Karamel Sutra Macarons (Chocolate Caramel Macarons)

Ice Cream MacaronsI love ice cream.  In high school, I used to eat an entire pint of ice cream in one sitting without blinking an eye.  It was a habit that quickly stopped once I started counting calories in college.  Yes the number of calories scared me, but I didn’t love it any less.
Ice Cream Macaron
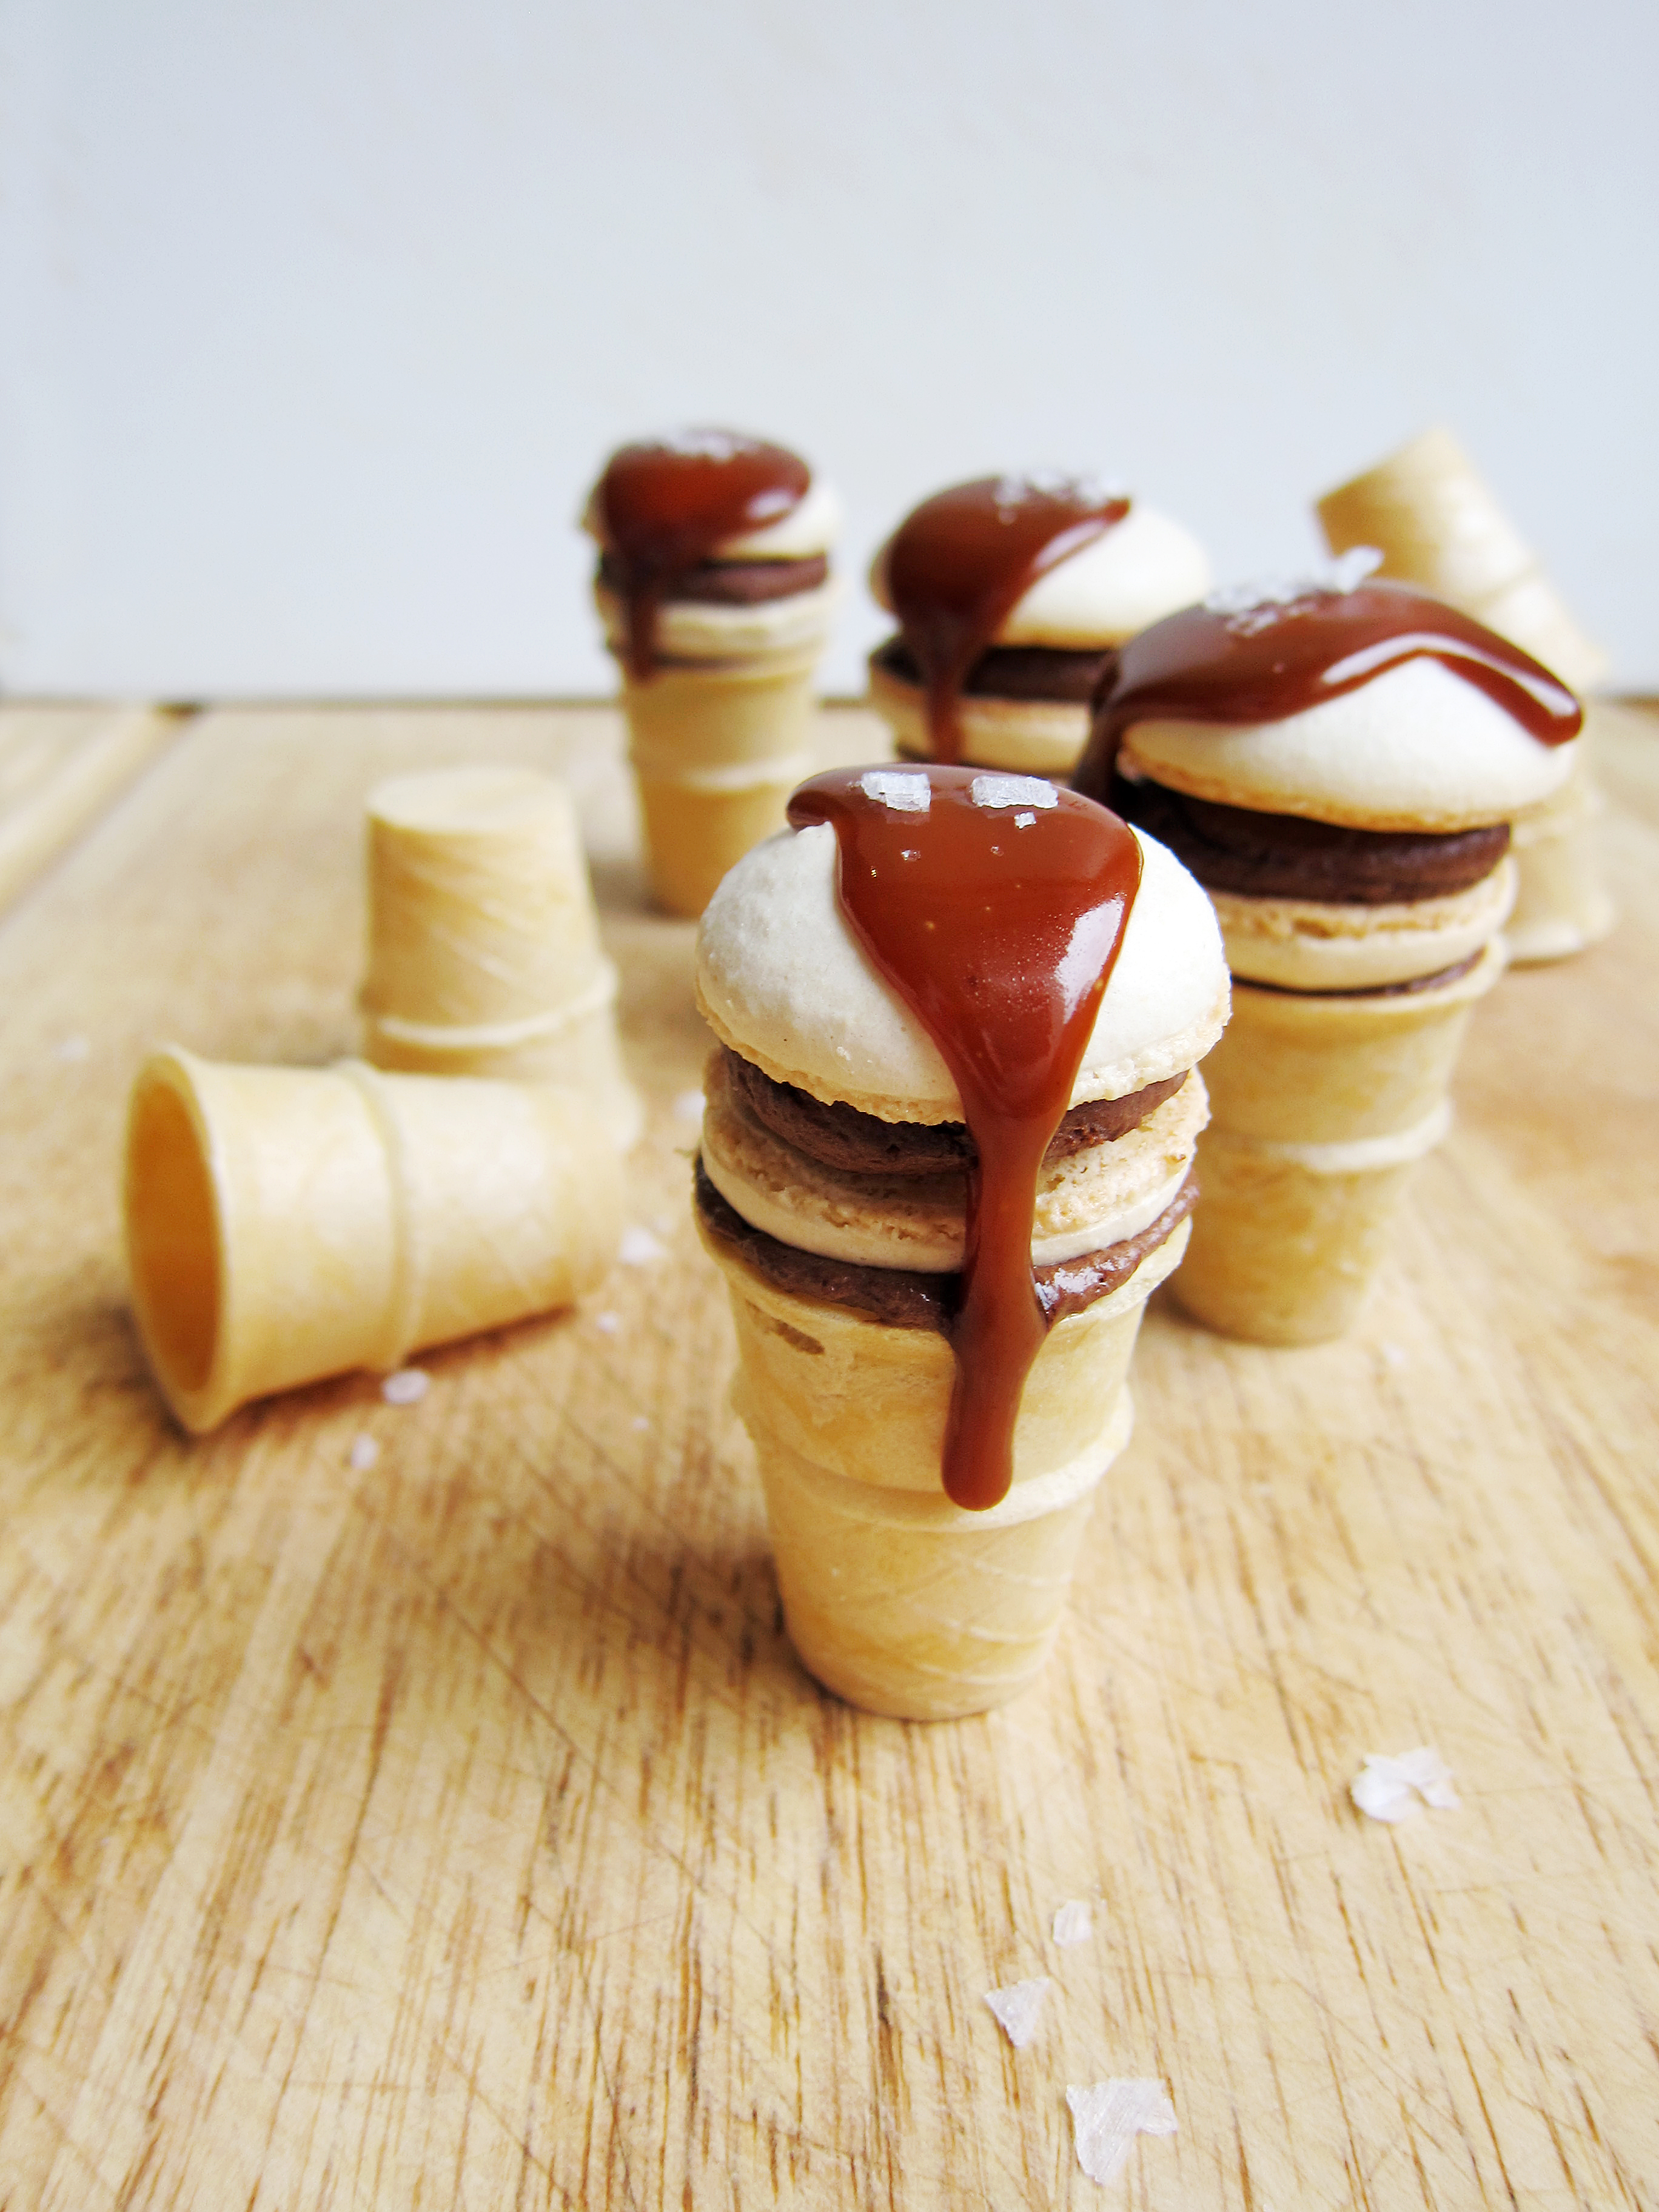
One of my favorite ice cream is Karamel Sutra from Ben and Jerry’s.  Featuring “a core of soft caramel encircled by chocolate & caramel ice creams & fudge chips”, it is a sinfully indulgent treat.  I’ve been haunted by the idea of putting macarons on mini ice cream cones for the longest time. So, I decided to take the plunge with one of my all-time favorites.
Ice Cream MacaronsIce Cream Macarons
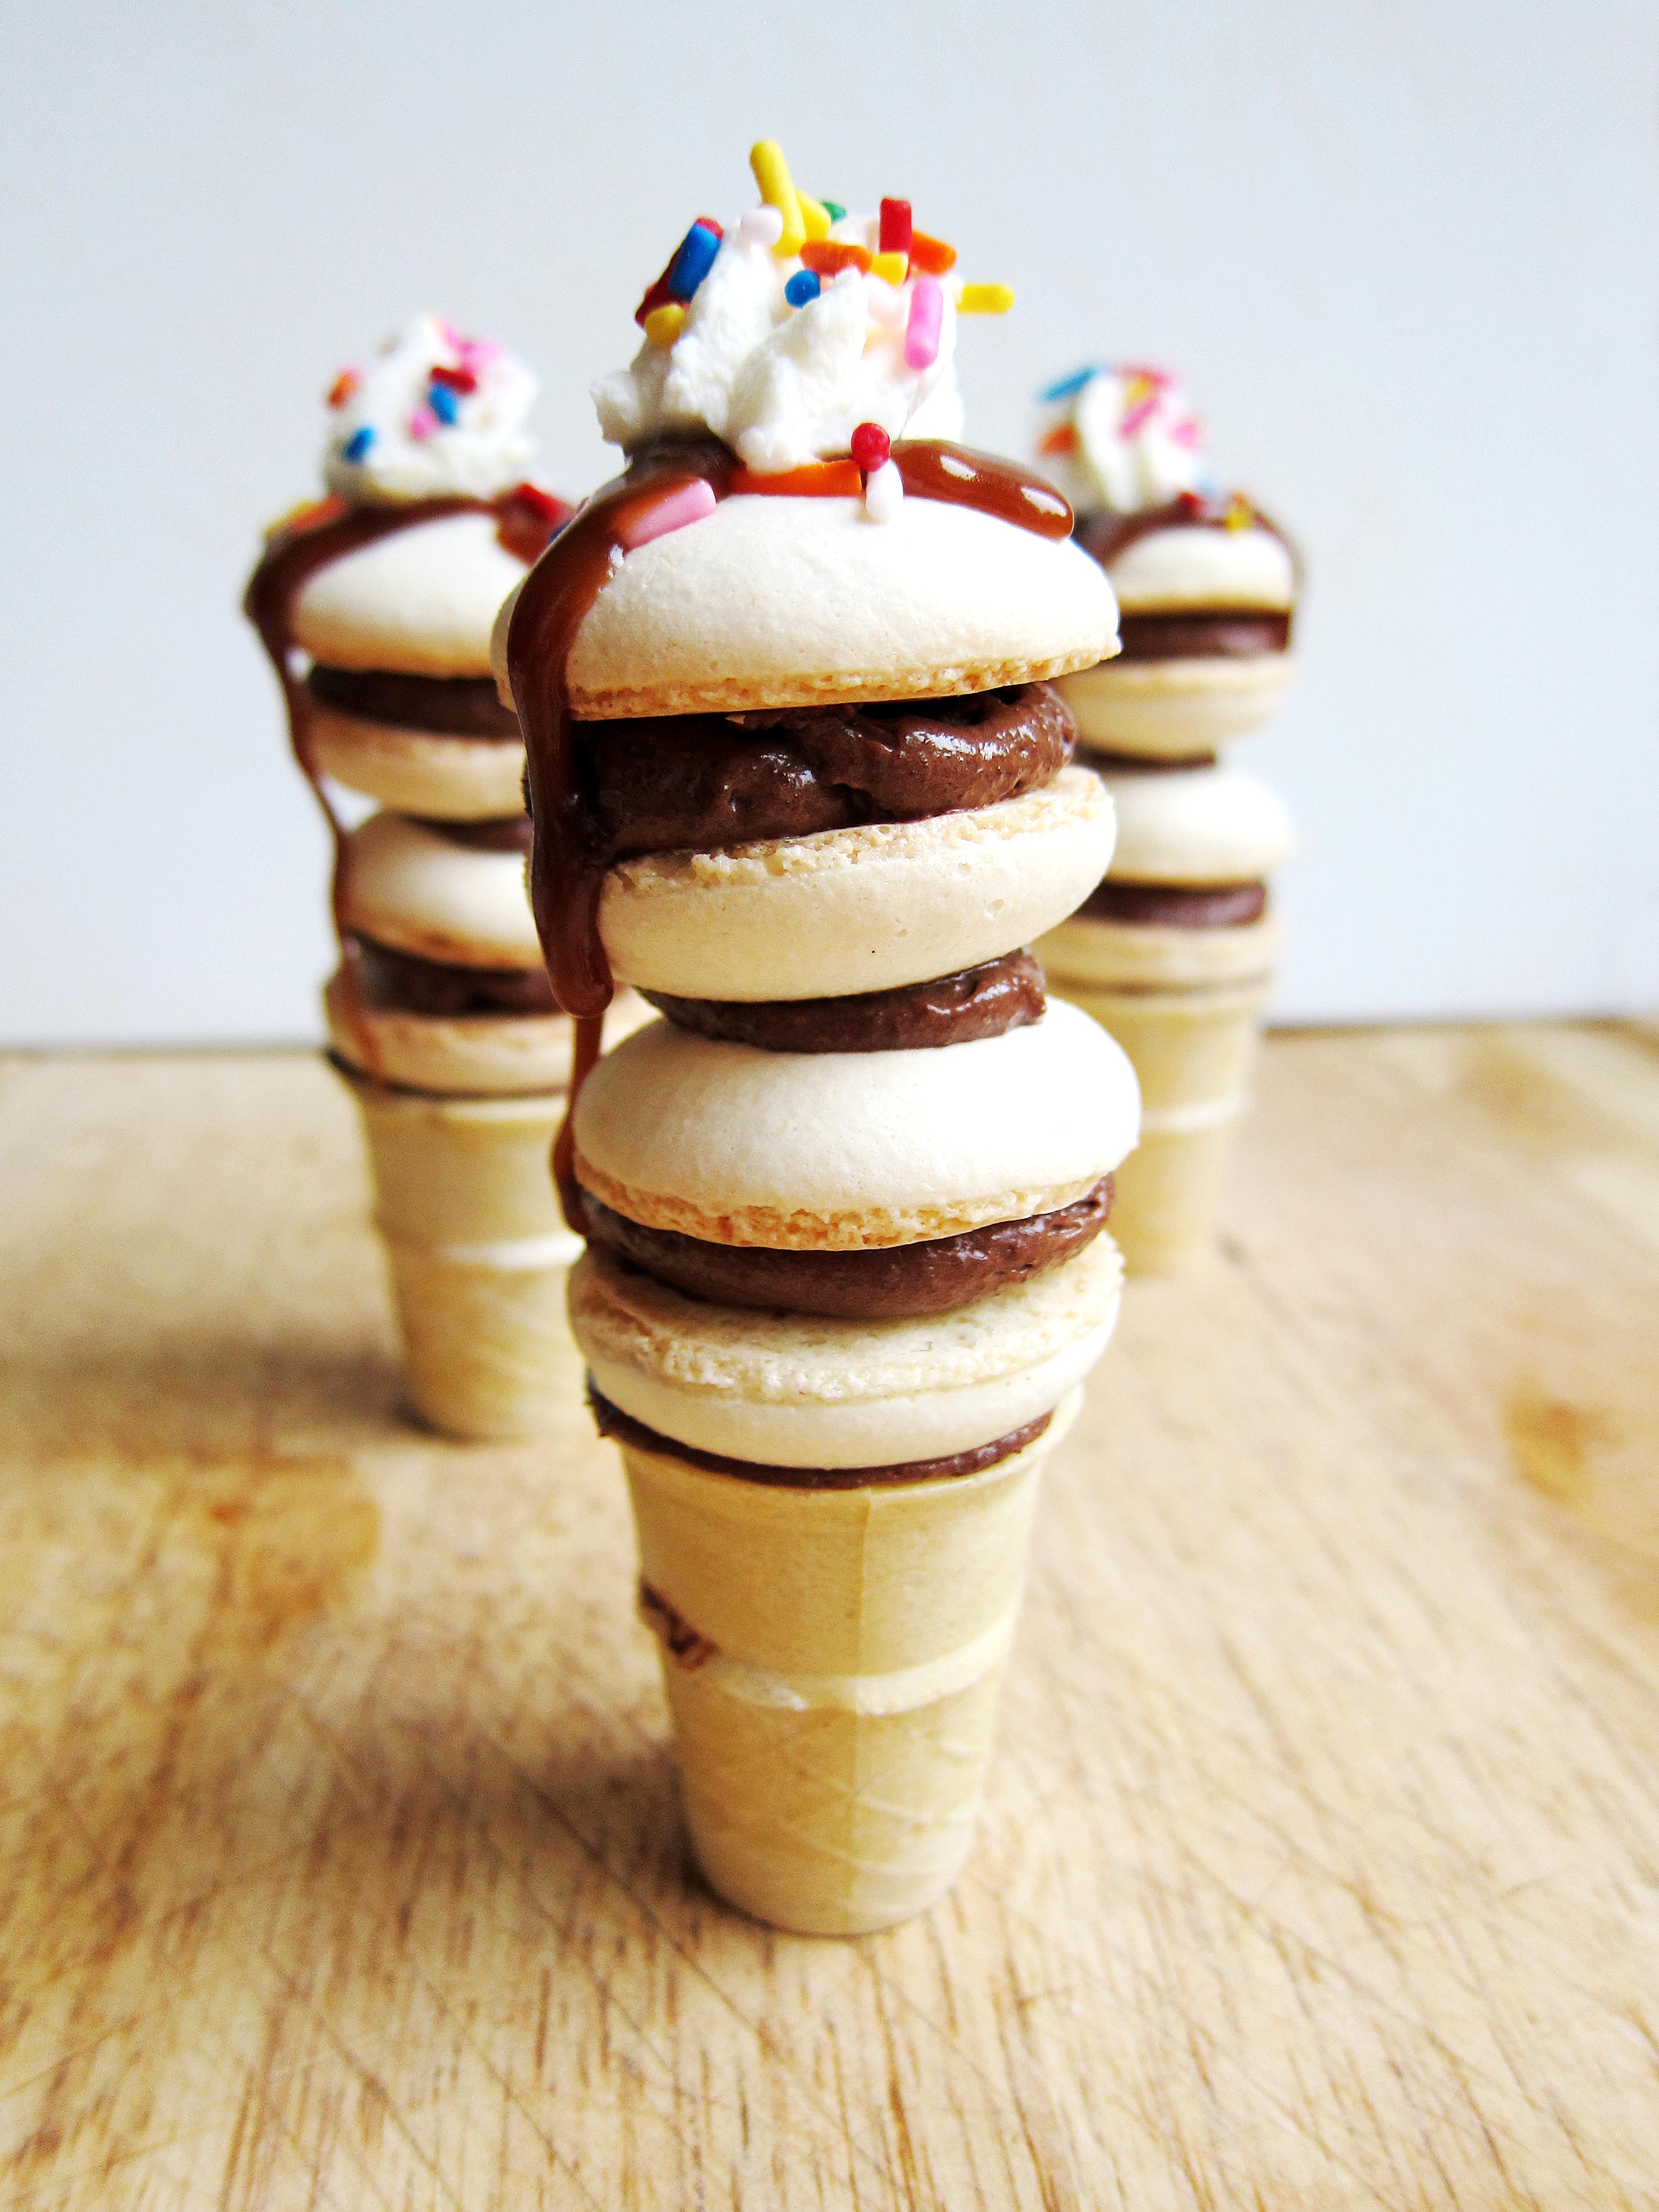
Sitting on top of a caramel filled cone and chocolate frosting, this macaron has a chewy caramel center that is encased by chocolate frosting.  It is delightfully charming and insanely delicious.  So delicious in fact, the entire batch disappeared within one night! (FYI This is pretty rare.)
Ice Cream Macarons

Karamel Sutra Macarons
(Chocolate Caramel Mini Ice Cream Macarons)

You will need:
Mini Ice Cream Cones
Macarons
Chocolate Frosting
Salted Caramel Filling
Whipped Cream (Optional)
Sprinkles (Optional)
Maldon Salt (Optional)

Basic French Macarons
Adapted from Bouchon Bakery by Thomas Keller, Sebastien Rouxel

Ingredients:
212 g. almond meal
212 g. powdered sugar
172 g. egg whites, divided to 82 g. and 90 g (aged, if possible)
236 g. sugar
158 g. water

Instructions:

  1. Line two baking sheets with parchment paper or silicone mats.
  2. In the bowl of a food processor, add the almond meal and powdered sugar and pulse until thoroughly combined.
  3. Sift the mixture over a large mixing bowl, throwing out the lumps as they appear.  Add 82 g. of the egg whites and stir until you get a thick mixture.
  4. In a small pot attached with a candy thermometer, combine the sugar and water over medium heat and boil until the syrup reaches 200˚F.
  5. Once the syrup reaches 200˚F, start whipping the remaining 90 g. in the bowl of your stand mixer with the whisk attachment on medium speed until soft peaks are reached.
  6. Once the syrup reaches 248 degrees, remove the pot off the burner and slowly pour the syrup down the side of the mixing bowl with the egg whites on medium speed.
  7. Once the egg whites are fully incorporated, increase the speed to medium high until egg whites form glossy, stiff peaks.  Add two drops of the pink gel food color and mix until batter turns a light shade of pink.
  8. Mix a ⅓ of the egg white mix to the almond mixture and stir together until the batter is slightly lighter and less pasty.  From then on, fold in ⅓ of the egg white mixture at a time until the mixture “flows like magma”.  The mixture should be smooth and run thick ribbons off the spatula.
  9. With a pastry bag fitted with a ½ in. plain tip, pipe 1¼ – 1½ in. rounds.
  10. The piped batter may have peaks but should smooth away in a minute or two.  Let the batter stand until the tops of the macaron batter are dry to the touch, about 30 mins to 1 hour.
  11. Preheat the oven to 275-325˚F.  If your oven tends to run hot go for 275˚, if not then 325˚.
  12. Bake 10-13 minutes, until the feet are formed and the tops are smooth.  The batter is done when you slightly wiggle it and it starts to come off of the parchment paper / silicone mat.
  13. Let cool and fill.

Salted Caramel Filling

Ingredients:
1 c. sugar
3 tbsp. light corn syrup
3 tbsp. water
¾ c. heavy cream
3 tbsp. unsalted butter, room temp
½ tsp. kosher salt
¼ tsp. vanilla extract

Instructions:

  1. In a small pot, mix and boil sugar, corn syrup and water until a golden amber color forms.
  2. While the sugar mixture is boiling, mix the heavy cream, unsalted butter, kosher salt, and vanilla in a separate bowl.
  3. When the sugar mixture turns amber, add the cream mixture.  Be careful!  It will bubble up and create a lot of steam.
  4. Attach a candy thermometer and cook sugar mixture until the mixture reaches 235 degrees.
  5. Promptly remove to a large glass spout cup and cool.
  6. Once cooled, transfer into a squeeze bottle.

Chocolate Frosting

Ingredients:
⅔ c. all-purpose flour
⅓ c. cocoa powder
1 c. milk
⅛ tsp. salt
8 oz. butter
⅔ c. sugar
8 oz. chocolate, melted and cooled
½ tsp. vanilla extract

Instructions:

  1. In a saucier pan, put milk, salt, cocoa powder and flour and whisk until combined on medium heat.
  2. Continuously whisk mixture until thickened to a pudding like consistency.
  3. Once thickened, strain through a mesh strainer into a bowl with a spatula to remove lumps.
  4. Place a piece of plastic wrap on top of the flour mixture and put into the refrigerator until fully cool.
  5. In a mixer bowl fitted with the whisk attachment, mix the sugar and butter on high speed until fluffy and pale about, 5-10 minutes.
  6. Add the chilled flour mixture and continue to whip on high speed until the sugar is completely dissolved and the mixture is no longer gritty, about 5-10 minutes.
  7. Add the vanilla extract and melted chocolate and mix until combined.
  8. Fill frosting in a piping bag fitted with a ¼ or ½ in. plain piping tip.

Assembly:

If the filling has cooled too much at any point of the assembly, rewarm in the microwave for 15-20 seconds until fluid once more.

  1. On one cooled macaron shell, frost a round dam around the edge of the cookie.
  2. Put into freezer to set frosting for 5 minutes.
  3. Fill the inside of the macaron with caramel filling. Top with another macaron shell.
  4. In a mini ice cream cone, fill about 1/3 of the way with caramel filling.  Pipe a round of chocolate frosting onto the lip of the ice cream cone.  It should look somewhat like a doughnut. (As shown in the above photo.)
  5. Put an assembled macaron on top of the chocolate frosting on the ice cream cone and set in the freezer for about 5 minutes.
  6. From here you can enjoy as is or go further with your decorations:
    1. Top your macaron with another macaron for a double scoop effect. (As shown in the above photo.)
    2. Top your macaron with reserved caramel filling and sprinkle with maldon sea salt (or any other flaky sea salt you have on hand). (As shown in the above photo.)
    3. Top your macaron with reserved caramel filling and top with whipped cream and sprinkes. (As shown in the above photo.)

Easter Bunny Surprise Cake

Easter bunny cake 1Here comes Peter Cottontail, Hoppin’ down the bunny trail… was the song that was running through my head when I thought of this cake.  Can you imagine the look of surprise people will give you when you cut into this?  Unfortunately for me, my family saw every step of the assembly and expected it when I cut into this cake.  Learn from my mistake, and keep it secret when you give it a try.
Easter bunny cake 2The great thing about this technique is that it is adaptable to many holidays and special occasions.  Off the top of my head, you could do tulips for Mother’s Day, a bat for Halloween, and even alternating red, white, and blue stars for Independence Day.  I think I may be giving away future blog posts so I’ll just stop here.
Easter bunny cake 3My only caveat to you is: 1) measure to make sure your cutouts will fit into the loaf pan (both horizontally and vertically) and 2) to keep your cutout design simple because you will lose the finer details when the cake bakes.  Other than that, I hope you have fun trying this cake!  Don’t worry, at this point I’m so tired of bunnies and Easter eggs, you will probably not see any more posts of them until next spring. 😀

Easter bunny cake 4

Easter Bunny Surprise Cake

You will need:
1 Batch of Pink Sheet Cake
1 Batch of Yellow Cake
1 Batch of Green Frosting
1 Batch of Chocolate Frosting
Bunny Cookie Cutter
Mini Chocolate Eggs
Grass Frosting Tip (Optional)

Pink Sheet Cake

Ingredients:
1 ½ c. all purpose flour
1 c. sugar
½ tbsp. baking powder
⅛ tsp. salt
¾ buttermilk, divided
4 oz. unsalted butter, room temperature
2 eggs,  room temperature
1 egg yolk
¼ tsp. vanilla extract
Pink gel food coloring

Instructions:

  1. Preheat the oven to 350˚F and line a sheet pan with parchment paper or a silicone mat.
  2. In a bowl of a standing mixer with the paddle attachment, add flour, sugar, baking powder, and salt. Mix until combined.
  3. On low speed, add ½ c. buttermilk and butter and mix until combined.
  4. In a separate bowl, whisk eggs, egg yolk, ¼ c. buttermilk, and vanilla extract until homogenous.
  5. On low speed, slowly add the egg mixture to the flour mixture.
  6. Increase speed to medium, and mix until combined.
  7. On low speed, add pink food coloring until desired color is reached.
  8. Spread batter onto the sheet pan until fully covered.
  9. Bake 10-12 minutes until cake is set.
  10. Let cool.
  11. Cut out bunny shapes. (as shown above)
  12. Chill in freezer.

Yellow Cake

Ingredients:
1 c. cake flour
1 c. all-purpose flour
1 ⅓  c. sugar
¾ tbsp. baking powder
⅛ tsp. salt
1 c. buttermilk, divided
6 oz. unsalted butter, room temperature
3 eggs, room temperature
1 egg yolk
½ tsp. vanilla extract

Instructions:

  1. Preheat the oven to 350˚F and line a loaf pan with parchment paper.
  2. In a bowl of a standing mixer with the paddle attachment, add flour, sugar, baking powder, and salt. Mix until combined.
  3. On low speed, add ¾ c. buttermilk and butter and mix until combined.
  4. In a separate bowl, whisk eggs, egg yolk, ¼ c. buttermilk, and vanilla extract until homogenous.
  5. On low speed, slowly add the egg mixture to the flour mixture.
  6. Increase speed to medium, and mix until combined.
  7. Spread batter until ¼-½ in. up the loaf pan.
  8. Stack the chilled cake cutouts side by side, horizontally, without any spaces in between.
  9. Place the stacked cake cutouts into the center of the cake pan, carefully making sure no gaps form in between.
  10. Spread rest of the batter into cake pan.
  11. Bake 30-45 minutes until cake is done or until a toothpick inserted into the center comes out clean.
  12. Let cool in pan for 10 minutes, and then flip onto a cooling rack until completely cool.

Chocolate Frosting

Ingredients:
⅔ c. all-purpose flour
⅓ c. cocoa powder
1 c. milk
⅛ tsp. salt
8 oz. butter
⅔ c. sugar
8 oz. chocolate, melted and cooled
½ tsp. vanilla extract

Instructions:

  1. In a saucier pan, put milk, salt, cocoa powder and flour and whisk until combined on medium heat.
  2. Continuously whisk mixture until thickened to a pudding like consistency.
  3. Once thickened, strain through a mesh strainer into a bowl with a spatula to remove lumps.
  4. Place a piece of plastic wrap on top of the flour mixture and put into the refrigerator until fully cool.
  5. In a mixer bowl fitted with the whisk attachment, mix the sugar and butter on high speed until fluffy and pale about, 5-10 minutes.
  6. Add the chilled flour mixture and continue to whip on high speed until the sugar is completely dissolved and the mixture is no longer gritty, about 5-10 minutes.
  7. Add the vanilla extract and melted chocolate and mix until combined.
  8. Smooth chocolate frosting over the loaf cake, and place in the freezer

Green Frosting:

Ingredients:
½ c. whole milk
¼ c. flour
⅛ tsp. salt
2 oz. unsalted butter, room temperature
½ c. sugar
¼ tsp. vanilla extract
green gel food coloring

Instructions:

  1. In a saucier pan, put milk, salt and flour and whisk until combined on medium heat.
  2. Continuously whisk mixture until thickened to a pudding like consistency.
  3. Once thickened, strain through a mesh strainer into a bowl with a spatula to remove lumps.
  4. Place a piece of plastic wrap on top of the flour mixture and put into the fridge until fully cool.
  5. In a mixer bowl fitted with the whisk attachment, mix the sugar and butter on high speed until fluffy and pale about, 5-10 minutes.
  6. Add the chilled flour mixture and continue to whip on high speed until the sugar is completely dissolved and the mixture is no longer gritty, about 5-10 minutes.
  7. Add the vanilla extract and mix until combined.
  8. Add green frosting until desire colored is reached.
  9. Add a thin layer of green frosting to top of cake.
  10. Chill cake in freezer for 3-5 minutes.
  11. Optional: Put the green frosting into a piping bag fitted with the grass frosting tip and pipe grass all over top of chilled cake.
  12.  Garnish top of cake with mini chocolate eggs.

Neapolitan Cupcakes

Neapolitan Cupcakes 1I believe that most of the world is split between two factions: chocolate and vanilla.  You love one more than the other. 
Neapolitan Cupcakes 2But then there is a small cluster of us who like them all: chocolate, vanilla and strawberry.  We stand in front of grocery freezers and ice cream parlors for minutes on end trying to choose.  “They all sound good!”  “I can go for all of them!”  We secretly like having to share with someone who is in the chocolate or vanilla faction just to avoid making a final decision.

Neapolitan Cupcakes 4This cupcake is for us.  You get the fruity tart strawberry with the sweet lightness of vanilla and dark richness of chocolate.  All rolled into one.  No more time wasted on your preference.  Think of the time you’ll save!

Neapolitan Cupcakes

Chocolate Cupcakes
Recipe Adapted from Ina Garten

Ingredients:
1 ¾ c. all-purpose flour
2 c. sugar
¼ c. natural unsweetened cocoa powder
½ c. Dutch-process unsweetened cocoa powder
2 tsp. baking soda
1 tsp. baking powder
1. tsp. kosher salt
½ c. vegetable oil
2 extra-large eggs, room temperature
1 tsp. vanilla extract
1 c. strong, hot coffee

Instructions:

  1. Preheat oven to 350 degrees and line 2 muffin pans with cupcake liners (24 cups in total).
  2. In a stand mixer fitted with the paddle attachment, mix flour, sugar, both cocoa powders, baking soda, baking powder and salt until fully combined.
  3. In a separate bowl, whisk vegetable oil, eggs, and vanilla extract until combined.
  4. With the mixer speed on low, add the egg mixture to the flour mixture until combined.
  5. Turn off the mixer.  With a spatula, scrape the sides of the bowl to fully incorporate the two mixtures.
  6. Turn the mixer on low and slowly add the hot coffee to the batter.  Once added, raise the speed to medium until completely homogenous.
  7. Fill cupcake liners with 2/3 full with batter and bake about 15-20 minutes. Checking at 13 minutes for doneness with a toothpick test.*
  8. Let stand for 5-10 minutes when done, then put onto a cooling rack to fully cool.

Strawberry Puree

Ingredients:
3 cups of strawberries, smashed
1 tsp. lemon juice

Instructions:

  1. In a small pot, cook strawberries and lemon juice on medium heat until mixture thickens and reduces 1/3-1/2 of the original volume, about 5-10 minutes.
  2. Once thickened, put in a bowl to cool and refrigerate.

Basic Vanilla Frosting

Ingredients:
2 c. whole milk
½ c. flour
¼ tsp. salt
1 1b. (4 sticks) unsalted butter, room temperature
2 c. sugar
1 tbsp. vanilla extract

Instructions:

  1. In a saucier pan, put milk, salt and flour and whisk until combined on medium heat.
  2. Continuously whisk mixture until thickened to a pudding like consistency.
  3. Once thickened, strain through a mesh strainer into a bowl with a spatula to remove lumps.
  4. Place a piece of plastic wrap on top of the flour mixture and put into the fridge until fully cool.
  5. In a mixer bowl fitted with the whisk attachment, mix the sugar and butter on high speed until fluffy and pale about, 5-10 minutes.
  6. Add the chilled flour mixture and continue to whip on high speed until the sugar is completely dissolved and the mixture is no longer gritty, about 5-10 minutes.
  7. Add the vanilla extract and mix until combined.

Strawberry Frosting

Ingredients:
1 batch of strawberry puree
⅔ batch of vanilla frosting

Instructions:

  1. Mix vanilla frosting with ½ of strawberry puree until the mixture turns strawberry pink and fluffy.
  2. Give mix a taste and if not flavored enough, add puree ¼ at a time until desired flavor is reached.

* The toothpick test: insert a toothpick into a cupcake and if the toothpick comes out clean or with a few crumbs clinging to it, it is done.

White Chocolate Tiramisu Eggs

Two years ago, I bought a Jello egg mold with grand hopes that it will mold and form beautiful rainbow-striped Jello eggs.   After mixing endless bowls of different flavored Jello, the project flopped terribly.  The eggs didn’t set properly and I ended up with shattered Jello eggs that wouldn’t hold their shape.  I called it a lost cause and put the mold away thinking I would never use it again.

Chocolate Tiramisu Egg 3

Fast forward two years and I unearthed the egg mold while digging through my cake pans.  Since Easter is around the corner, I called it fate and contemplated a way to use it.  It didn’t come easy, but in the end I finally thought of an original idea.  An idea that was original until this moment when I googled it and saw that 7 hours ago someone beat me to the punch!!  NOOOO!  Le sigh.

Chocolate Tiramisu Egg 2

Well original or not, these eggs look so much like the real thing at first glance it’s a little weird to eat them.  But you need to, because encased in the chocolate egg is the most heavenly bite of tiramisu.  It’s adorable and let’s be honest, it’s a little fun freaking out people.

Chocolate Tiramisu Egg 4

White Chocolate Tiramisu Eggs

You will need:

1 Batch of Lady Fingers (Recipe Below)
1 Batch of Mascarpone Cream (Recipe Below)
1 Cup of Strong Coffee
1/2 Package of White Chocolate Melts
1 Jello Egg Mold*
Approximately 10 Pieces of Yellow Chocolate Melts
Cocoa Powder (Optional)

Assembly:

  1. Place white chocolate in a microwave safe bowl/cup with a spout.
  2. Melt the white chocolate melts in the microwave in 15 second intervals until completely melted.
  3. Thoroughly spray the inside of your egg mold with a non-stick cooking spray.
  4. Use the spout of your bowl/cup to pour white chocolate into the egg about ¼ of the way.
  5. Start rotating your egg mold (left, right, and upside down) until it starts to set.** (When flipping the egg mold upside down, do so above your melted chocolate so the excess can drip back into the bowl.)
  6. Once set, repeat steps 4 and 5 two more times to ensure through covering and place in freezer to completely set. (4-5 minutes)
  7. While the eggs are setting,
    1. Punch out ½ -⅔ in circles of the prepared lady fingers.
    2. Place Mascarpone cream into a piping bag fitted with a ¼ in. plain piping tip.
  8. Take the eggs out of the freezer and carefully unmold the chocolate. It may stick a little. Just wiggle it around and it should come out in one piece.
  9. Run a serrated knife in hot tap water and wipe off excess water. While the knife is hot, cut the top ¼ -⅙ of the egg. (After every egg, make sure to reheat your knife for easier cutting.)
  10. Place the eggs back into the bottom half of the egg mold, and put about a teaspoon of the mascarpone cream inside.
  11. Layer one piece of the lady finger and with a small pastry brush, brush coffee onto the lady finger to soak it. Place a second piece of lady finger on top and brush coffee again.
  12. Layer another teaspoon of mascarpone cream, and repeat step 11.
  13. Layer the final teaspoon of mascarpone cream and let set in freezer.
  14. Melt the yellow chocolate melts and put into a squeeze bottle for easy use.***
  15. Take the chocolate out of the freezer and squeeze a dollop of yellow chocolate melts to imitate the yolk.
  16. Optional: Pinch a little cocoa powder between your fingers and (over the sink) flick specks of cocoa onto the white chocolate. Rotate the egg and repeat until completely speckled.  (This resembles the cocoa that is usually dusted on top of traditional tiramisu.)

Lady Fingers

Ingredients:
2 eggs, separated
6 tbsp. sugar, divided
⅓ c. flour, sifted
½ tsp. vanilla extract
pinch of salt

Instructions:

  1. Preheat oven to 350 degrees Fahrenheit and prepare a sheet pan lined with parchment paper or a silicone mat.
  2. In a stand mixer bowl fitted with the whisk attachment, whip egg whites until foamy.
  3. Slowly add in 2 tablespoons of sugar and continue whisking until stiff, glossy peaks form.
  4. Empty the egg whites in a separate bowl.
  5. Place 2 egg yolks and 4 tablespoons sugar into the mixer bowl and mix until pale and very thick.
  6. Add the vanilla extract and fold in sifted flour. (It will be very thick.)
  7. Mix in 1/3 of the reserved whipped egg whites to the flour mixture
  8. Fold in the remaining whipped egg whites 1/3 at a time.
  9. Spread the batter onto prepared sheet pan to about ¼ inch thick.
  10. Bake about 8 minutes, rotating the pan halfway until golden brown
  11. Let cool.

Mascarpone Cream

Ingredients:
1 c. heavy cream
¼ c. powdered sugar
4 oz. mascarpone cheese

Instructions:

  1. In a cold stand mixer bowl fitted with the whisk attachment, whip the heavy cream until soft peaks form.
  2. Sift in the powdered sugar and mix until just incorporated.
  3. Add the mascarpone cheese and mix until stiff peaks form.

* If you do not own a Jello egg mold, you can always take a shortcut and order pre-made hollow chocolate eggs from Amazon. If you do this, start from step 7.
** This process is messy. Don’t let that get you down!
*** If you do not have a squeeze bottle, you can always just spoon on the chocolate.