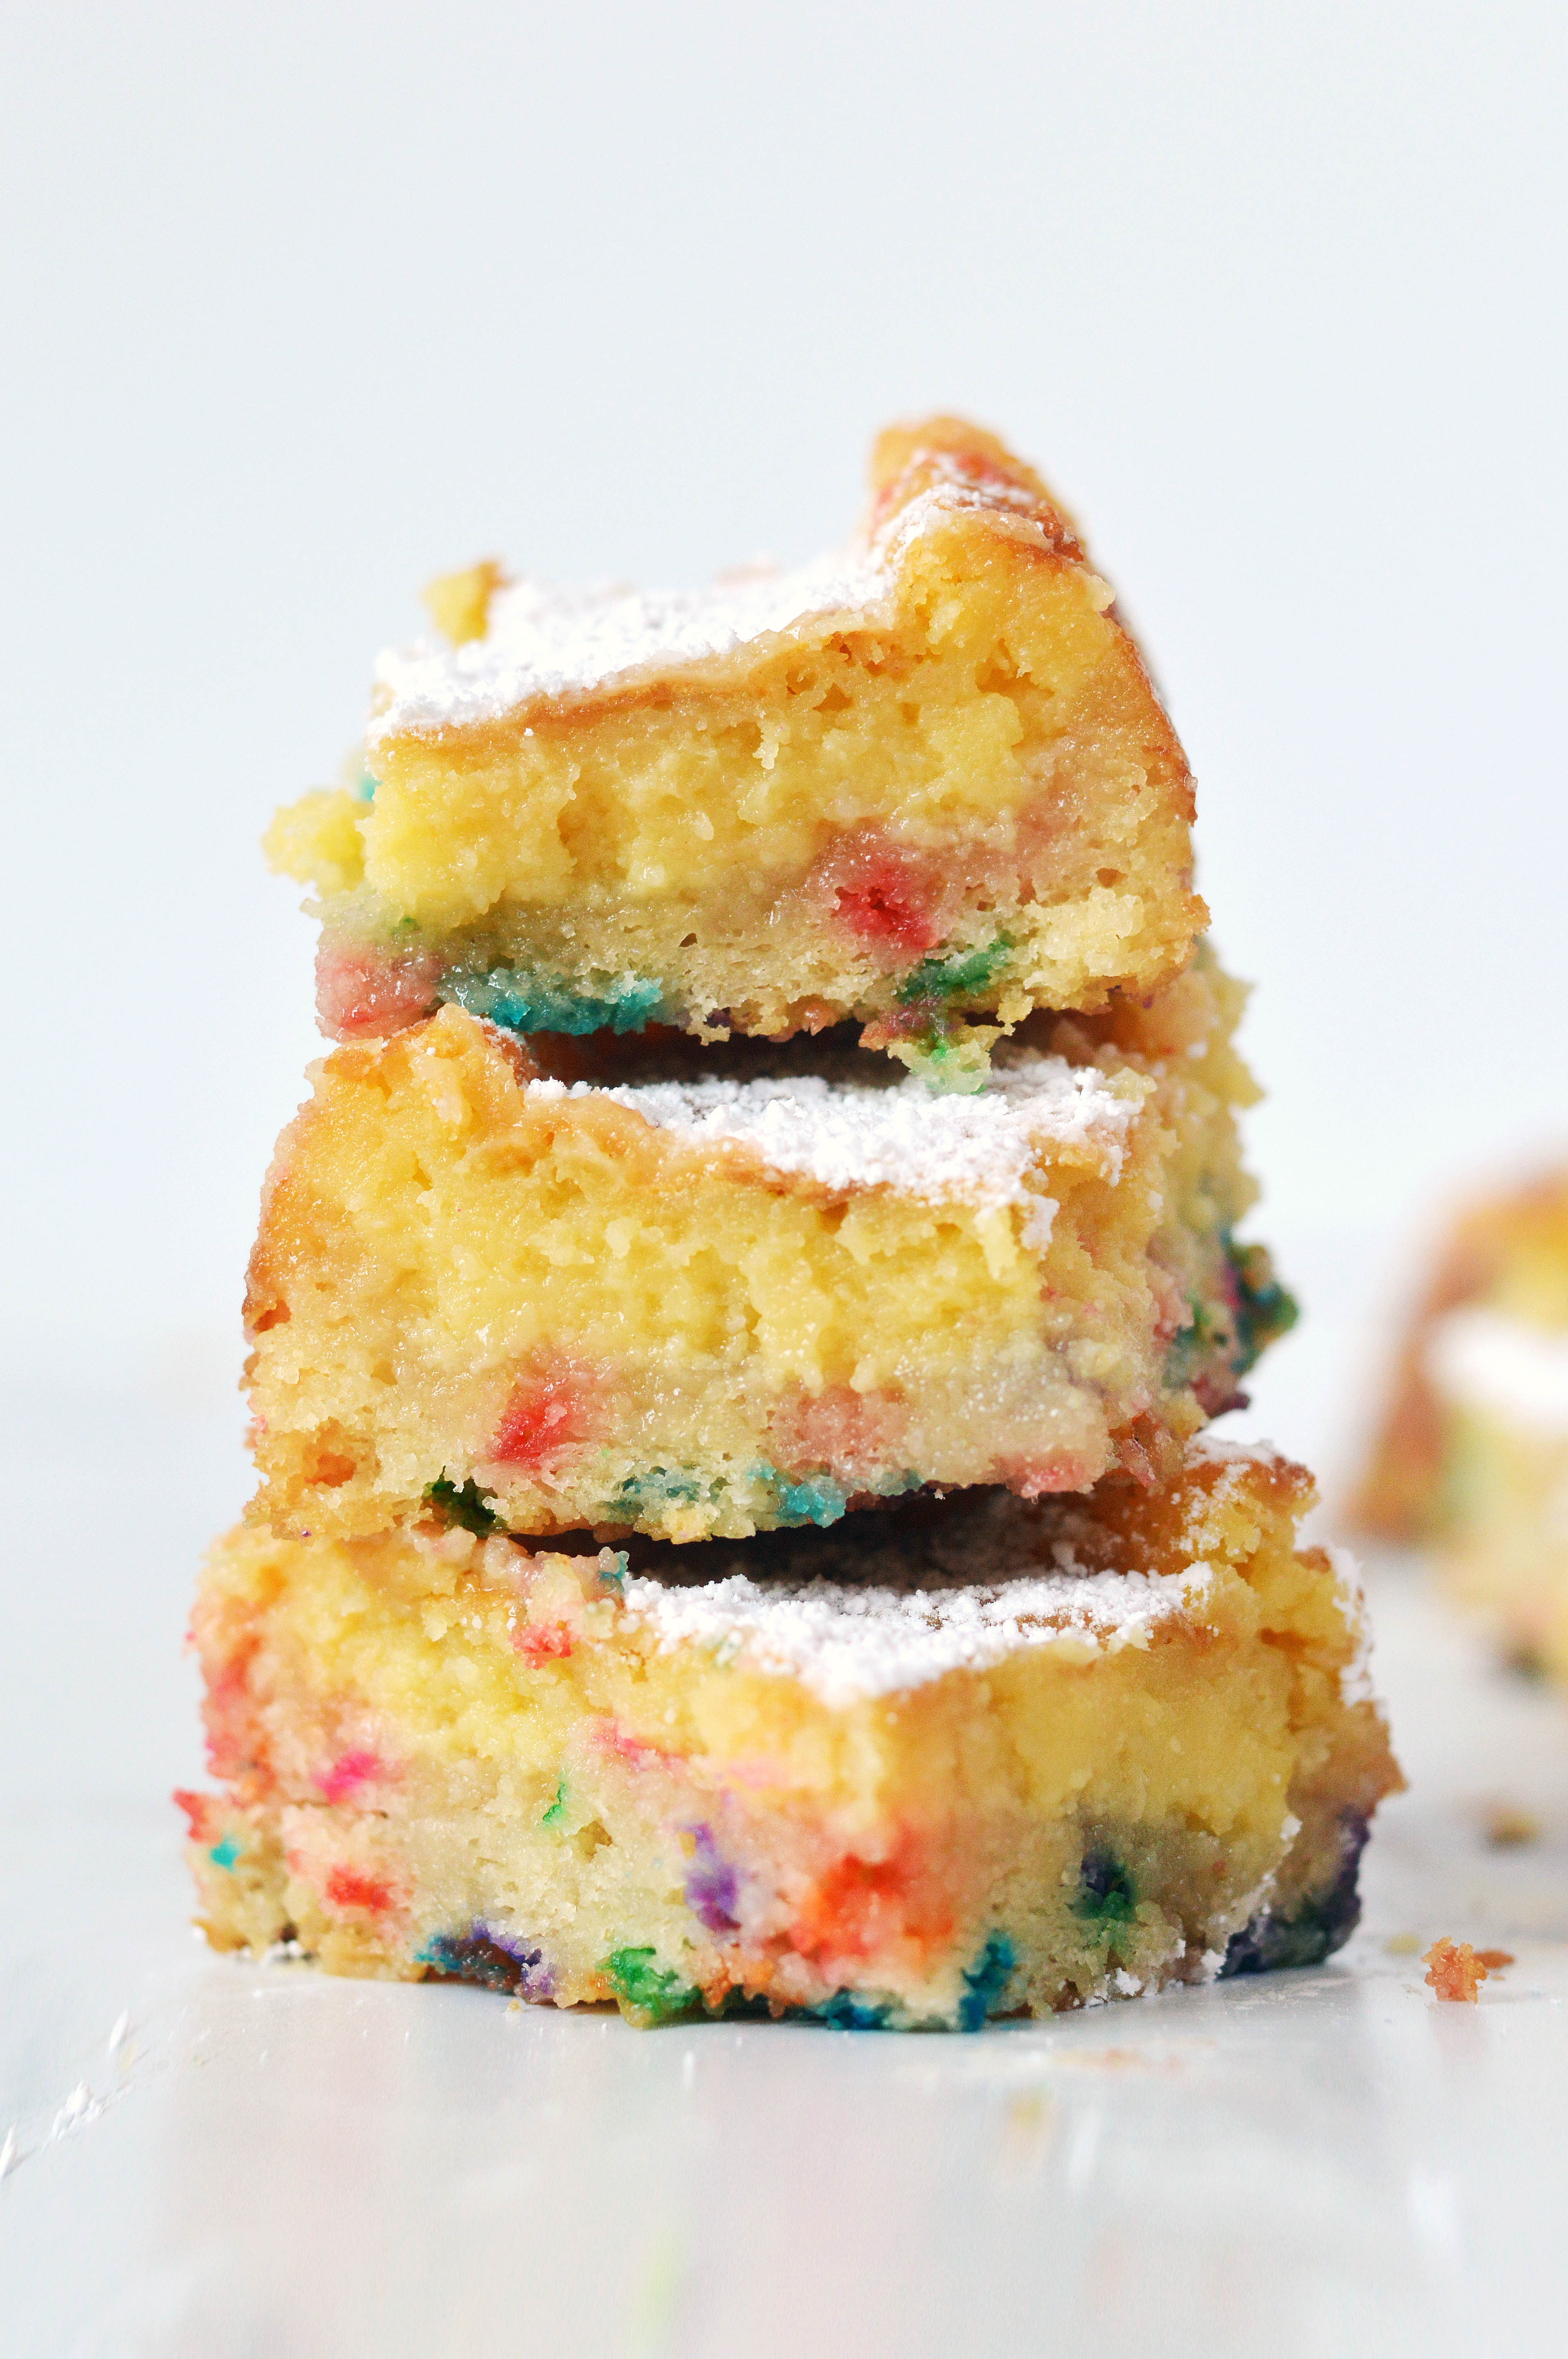
Sometimes the universe aligns to bring something new and that’s how this funfetti ooey gooey butter cake was born. I happened to see a recipe for a plush confetti cake and a gooey butter cake at the same time and I was sold. I needed to have both asap.
The confetti cake portion is vegan (!) and becomes borderline too moist (very similar to a tres leches cake) with the gooey butter topping. The almond-vanilla scented cake was a happy accident as the original recipe called for ⅛ th of a teaspoon of almond extract. My hand unexpectedly had a nervous tremor (probably from trying to measure out a tiny fraction) and I put a bit more, I’m guessing ½ – 1 teaspoon. The end result is an almond-vanilla scented cake that I think cuts the cloying sweetness of most gooey butter cakes.
It feeds a crowd and is a perfect cake to bake for celebrations. I baked to celebrate me (yay!) on my birthday. 🙂
Funfetti Ooey Gooey Butter Cake
Ingredients:
For the Funfetti Cake Layer:
1 ½ c. all-purpose flour ⅗ c. granulated sugar 1 ½ tsp. baking powder ½ tsp. kosher salt (I use diamond kosher) 1 c. unsweetened non-dairy milk ⅓ c. vegetable oil 2 tbsp. fresh lemon juice ½ tbsp. vanilla extract ½ – 1 tsp. almond extract ⅓ c. rainbow sprinkles
For the Ooey Gooey Layer:
8 oz. cream cheese, room temperature 4 oz. butter, room temperature 12 oz. powdered sugar, plus more for garnish ¼ tsp. kosher salt 2 large eggs 2 egg yolks 2 tablespoons vanilla extract
Instructions:
Preheat the oven to 350℉. Grease and line a 9×13-inch baking pan with parchment paper.
Prepare the ingredients for the funfetti cake. In a large mixing bowl, whisk together the flour, sugar, baking powder and salt. Set aside.
In a large measuring cup (I like that it has a spout) or a medium bowl, whisk together the non-dairy milk, oil, lemon juice, vanilla and almond extract. Set aside.*
Start the ooey gooey layer. In the bowl of a stand mixer fitted with a paddle attachment, combine the cream cheese, butter and salt. Mix on medium speed until combined.
Turn the speed to low and add the powdered sugar in slowly to minimize the sugar dust.
Once all of the powdered sugar is incorporated, turn up the speed to medium-high and mix until the mixture is fluffy, about 8-10 minutes.
In a small bowl, whisk together the eggs, egg yolks and vanilla extract.
Turn the speed of the stand mixer to low and add the egg mixture to the sugar mixture. Mix until combined. Set aside.
Assemble the funfetti cake. Pour the milk mixture over the flour mixture and mix until just combined.
Fold in the rainbow sprinkles.
Pour the funfetti cake batter over the prepared 9×13-inch baking pan. Spread evenly.
Use a spatula to evenly dollop the gooey layer over the cake batter. Smooth evenly.
Bake the cake about 35-45 minutes, until the top layer is toasted golden brown and the cake is cooked through.
Let the cake cool completely before dusting with powdered sugar and serving.*
I delay combining the funfetti cake ingredients to prevent the baking powder from reacting prematurely.
I prefer to serve the cake cold (it helps the cake keep its shape) with hot, unsweetened black coffee.
What are you doing this Valentine’s Day? I think Mr. Spatula and I are going to stay in and cook up something tasty. It’s a little different from our usual tradition which consists of going out to a good restaurant and eating delicious food while people-watching other couples. I’d like to think that while many restaurants are no-gos for many of us, that we are all enjoying a delicious meal with our loved ones. Because breaking bread together is always one of the best ways to share love.
This cheesecake bar really is a marriage of a lemon bar with the hint of lemon and the shortbread crust and a creme brûlée cheesecake. The sugar torched topping is not an option. It really gives it the perfect crisp shell for a dessert that is fitting for Valentine’s day. I used Meyer lemons because they’re in season and they’re less intense than lemons. But if you can’t get your hands on Meyer lemons, please feel free to use regular lemons. Just expect a more lemon-y punch. 🙂
Left: Before Torching | Right: After Torching
Meyer Lemon Creme Brûlée Cheesecake Makes about 12 servings, pending on how you large you make your squares
Ingredients:
For the crust: 8 tbsp. (1 stick) unsalted butter, room temp. ½ c. (100 g.) sugar 1 tbsp. Meyer lemon zest (be careful to not grate the pith of the lemon – the white part) ½ tsp. vanilla extract 1 c. (120 g.) all purpose-flour ¼ tsp. kosher salt
For the filling: 8 oz. (1 box) cream cheese, softened 14 oz. sweetened condensed milk 1 egg, large, room temp. 1 tbsp. Meyer lemon zest (be careful to not grate the pith of the lemon – the white part) ⅓ c. Meyer lemon juice a pinch of kosher salt
For the burnt sugar crust: Granulated sugar, as needed (if you have caster sugar, this is the time to use it)
Instructions:
Preheat the oven to 350°F. Grease and line an 8×8 inch baking pan with parchment paper. (This will make it much easier to remove the cheesecake.)
In the bowl of a standing mixer fitted with the paddle attachment, mix the butter, sugar, lemon zest and vanilla on medium speed until well combined.
Switch the mixer speed to low and in the flour and salt, mixing until just combined.
Press the dough into the prepared baking pan, trying to get it as even of a layer as possible.
Refrigerate the baking pan with the dough while you prepare the cheesecake layer.
In the bowl of a standing mixer fitted with the paddle attachment (or in another bowl using a handheld mixer), mix the cream cheese on medium speed until smooth. Scrape down the sides.
Add the sweetened condensed milk, mix on medium speed and scrape down the sides again.
Add the egg, lemon zest and juice and mix on medium-low speed, scrape down the sides and mix again until homogenous.
Remove the pan from the fridge, pour in the cheesecake filling and bake in the oven for about 20-25 minutes, or until the filling does not jiggle when you lightly shimmy the pan.
Remove cheesecake from the oven, and let cool completely.
Refrigerate cheesecake until firm.
Cut the cheesecake into the number of slices that you want.
Sprinkle sugar over the cheesecake evenly, and use your kitchen torch to heat the tops of the cheesecake until amber – a spotted dark brown. (If you don’t have a kitchen torch, you can apparently do this under a broiler. But I’ve never tried and would advise that you keep a close eye on the caramelizing sugar.)
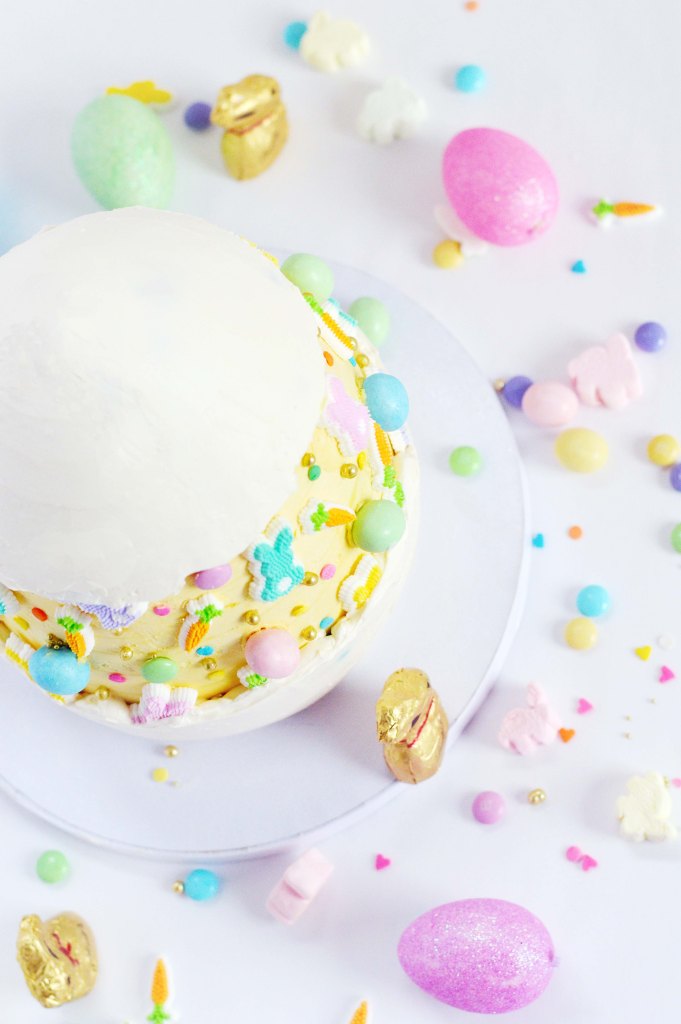
I can’t believe Easter is this Sunday! I don’t know about you, but personally, all the days seem to blend together these days. (I honestly thought today was Saturday and was panicking that I didn’t write this up fast enough for you guys.) Like most holidays, Easter was the most memorable to me as a kid. While I never got to participate in Easter egg hunts, I knew I would get some sort of treat at church. Whether it was opening up the contents of a hollow plastic egg, or getting a chocolate bunny, it was a day of celebration and joy. As an adult, Easter arrives with a depth of meaning but that undertone of childlike excitement still persists in my heart.
A year ago, faultline cakes became super popular. A cake that has a fracture in the center of a cake to display a fun interior was a novel design that took the Instagram world by storm. It was always an idea that I had pinned in the back of my mind but never got to try. So with Easter coming, it was natural to marry those ideas together. This faultline cake features super cute Easter sprinkles and pastel hued candy. The pastel candy against the yellow buttercream background cheers me up just by looking at it.
From Left to Right: Carrot Cake, Milk Crumbs, Graham Crust
The cake itself is inspired by Momofuku’s carrot cake. It features a graham cracker frosting, their signature milk crumb, a cheesecake filling and a sunken in carrot cake that serves as a pie crust like layer for the filling. Is it a lot of work? Yes. Is it worth it? A resounding YES. If you prepare for the cake in advance and make each component a few days ahead, it’ll save you time and sanity.
And yes, I had to shape the cake into an egg shape. The top of the cake is actually a molded cake ball out of all the cut scraps of the cake, so you don’t waste any of the delicious bits. Unlike a traditional cake that has more structure, this was not a clean cut project. You try your best to make it into an egg shape and stop cutting if you think you are shaving off too much. You can always add a bit more frosting to cover up your mistakes. But shaping the cake is an optional task. All of this is. If you want to just make the cake without decoration? That’s cool. If you want to decorate the cake without shaping it? That’s awesome. If you just want to bake the liquid cheesecake filling and eat it with a spoon? I caution you that it’s addictive and please, save me some. The point is, do what brings you the most joy and go with it. Happy Easter.
Easter Egg Faultline Cake (Milk Bar Carrot Cake)
You will need:
1 batch of carrot cake (recipe below) 1 batch of liquid cheesecake (recipe below) 1batch of milk crumbs (recipe below) 1 batch of graham frosting (recipe below) 1 batch of vanilla swiss meringue frosting, ¼ of the batch tinted yellow (recipe below) assortment of Easter candies 5 inch cake board thick straws
Assembly:
On a cake board, place one 6-inch cake with the concave side facing up.
Using an offset spatula spread a third of the liquid cheesecake in an even layer over the cake. The cake layer should now be a flat and even surface.
Sprinkle one-third of the milk crumbs evenly over the cheesecake. Use the back of your hand to anchor them in place.
Using an offset spatula spread an even layer of graham frosting taking care to smooth the edges of the cake.
Chill cake until firm in freezer. About 10-20 minutes.
Remove cake from freezer.
Top the cake with the 7-inch cake with the concave side facing up.
Fill with liquid cheesecake, and layer milk crumbs and graham frosting.
Chill cake until firm in freezer. About 10-20 minutes.
Remove cake from freezer.
Place a 5 inch cake board in the center of the cake and trace outline of the cake board. Remove cake board.
Mark halfway between the center of the cake and the center of the traced circle at the 12, 3, 6, and 9 o’clock position.
Insert a straw into the 12 o’clock mark on the cake and snip the straw where the straw sticks out of the cake. Continue for the 3, 6, and 9 o’clock position.
Place the 5 inch cake board back on the center of the cake. The cake is now stable and will not sink from the extra weight of the upper layers.
Place one 6-inch cake with the concave side facing up.
Fill with liquid cheesecake, and layer milk crumbs and graham frosting.
Chill cake until firm in freezer. About 10-20 minutes.
Remove cake from freezer.
Top the cake with the 5-inch cake with the concave side facing up.
Fill with liquid cheesecake, and layer milk crumbs and graham frosting.
Chill cake until firm in freezer. About 10-20 minutes.
Carve the cake to an egg like shape.
Take the cake scraps, liquid cheesecake, and milk crumbs and mix to make a large cake ball. Add some graham frosting if the cake ball won’t hold together.
Shape it to be the pointed part of the cake.
Chill cake.
Remove cake and crumb coat the entire cake with a thin layer of graham frosting.
Chill cake.
Remove cake and frost a thin, smooth layer of yellow buttercream in the center of the cake, and decorate the cake with sprinkles and candies.
Chill cake.
Remove cake and using a piping bag with a large, round decorating tip, pipe the upper and lower half of the cake as high as you desire.
Scrape off the extra frosting with a cake scraper for a smooth finish.
Enjoy.
For the Carrot Cake
Ingredients:
1 ½ c. vegetable oil 2 c. sugar 4 large eggs 2 c. all-purpose flour 2 tsp. baking powder 2 tsp. baking soda 1 tsp. salt 1 tsp. cinnamon ½ tsp. freshly ground nutmeg 3 cups finely grated, peeled carrots (about 1 pound)
Instructions:
Preheat oven to 325˚F and grease and line your baking pans with parchment paper. If you are planning on making the cake egg shaped, bake your cake in one 5-inch pan, two 6-inch pans, and one 7-inch pan. If you are making a standard cake, use four 6-inch pans.
In a medium bowl, whisk together flour, baking powder, baking soda, salt, cinnamon and nutmeg.
In the bowl of a standing mixer fitted with a paddle attachment, beat the sugar and oil together on medium speed until combined. Add eggs, one at a time, mixing well after each egg.
On low speed add the dry mixture and mix until just combined.
Take the bowl off of the standing mixer and fold in the grated carrots.
Divide the batter evenly into your prepared pans. (If you are using different sized pans, divide the batter so the batter comes up evenly amongst all the pans. So if it comes up ¼ way up the pan for 5-inch pan, it should also come up ¼ way up the side of your 6-inch pan). Bake about 20-25 minutes until the top is golden brown and until a toothpick poked in the middle comes out clean. Note: The cake will be sunken in the middle. This is done on purpose to have a pie crust-like cake for the filling.
Cool cakes on cooling rack until ready to assemble.
For the Liquid Cheesecake
Ingredients:
16 oz. cream cheese, room temp 1 ½ c. sugar 2 tbsps. cornstarch 1 tsp. kosher salt ¼ c. milk 2 large eggs
Instructions:
Heat the oven to 350° F.
In a medium bowl, whisk together the cornstarch and salt. Whisk in the milk in a slow, steady stream, then whisk in the egg until homogenous.
In the bowl of a stand mixer fitted with a paddle attachment, add the cream cheese and mix on low speed for 2 minutes. Scrape down the sides of the bowl with a spatula. Add the sugar and mix for 1 to 2 minutes, until the sugar has been completely incorporated.
Turn the mixer to medium-low speed, and stream in the egg slurry. Mix for 3 to 4 minutes, until the mixture is smooth.
Line the bottom and sides of an 8×8 inch baking pan with parchment paper. Pour the batter into the pan, put the pan in the oven, and bake for 20 minutes. Gently shake the pan. The cheesecake should be set on the outer edges of the baking pan but still wobble in the very center. If the cheesecake is not set at all, bake for 5 more minutes. Avoid browning the cheesecake at all. If it does brown, remove immediately.
Cool the cheesecake on a wire rack. Once completely cool, it is ready for use. If making ahead of time, the cheesecake can be wrapped and stored in an airtight container in the fridge for up to 1 week.
For the Milk Crumb
Ingredients:
½ c. milk powder ¼ c. flour 2 tbsp. cornstarch 2 tbsp. sugar ½ tsp. kosher salt 4 tbsp. (½ stick) butter, melted ¼ c. milk powder 3 oz. (90g) white chocolate, melted
Instructions:
Heat the oven to 250° F.
Combine the ½ c. milk powder, the flour, cornstarch, sugar, and salt in a medium bowl. Add the melted butter and mix using a spatula, until the mixture starts to come together and form small clusters.
Spread the clusters on a parchment- or Silpat-lined sheet pan and bake for 20 minutes. The crumbs should have sand like appearance. Cool the crumbs completely.
Crumble any milk crumb clusters that are larger than ½ inch in diameter and put the crumbs in a medium bowl. Add the ¼ c. milk powder and toss together until it is evenly distributed throughout the mixtures.
Pour the white chocolate over the crumbs and toss until your clusters are enrobed. Then continue tossing them every 5 minutes until the white chocolate hardens and the clusters are no longer sticky. The crumbs will keep in an airtight container in the fridge or freezer for up to 1 month.
For the Graham Frosting
Ingredients:
1 recipe Graham Crust ⅔ c. milk ¾ tsp. kosher salt 12 tbsp. butter, at room temperature 2 tbsp. light brown sugar, tightly packed 2 tbsp. confectioners’ sugar 1 tsp. ground cinnamon ¼ tsp. kosher salt
Instructions:
Combine the graham crust, milk, and ¾ tsp. salt in a blender, turn the speed on to medium-high, and puree until smooth and homogenous. It will take 1 to 3 minutes.
In the bowl of a stand mixer fitted with the paddle attachment, cream the butter, sugars, cinnamon, and ¼ tsp. on medium-high for 2 to 3 minutes, until fluffy and lighter in color. Scrape down the sides of the bowl with a spatula.
On low speed, add in the graham mixture from blender. Mix on medium speed until the color is a uniform tan and silky smooth.
Use the frosting immediately, or store it in an airtight container in the fridge for up to 1 week.
For the Graham Crust
Ingredients:
1½ c. graham cracker crumbs ¼ c. milk powder 2 tbsp. sugar ¾ tsp. kosher salt 4 tbsp. (½ stick) butter, melted, or as needed ¼ c. heavy cream
Instructions:
In a medium bowl, add and mix the graham crumbs, milk powder, sugar, and salt.
In a small bowl, whisk the butter and heavy cream together. Add to the dry ingredients and mix again to evenly distribute. The butter will act as a glue, adhering to the dry ingredients and turning the mixture into small clusters. The mixture should hold its shape if squeezed tightly in the palm of your hand. If it is not moist enough to do so, melt an additional 1 to 1½ tablespoons butter and mix it in.
Eat immediately, or use as directed in a recipe. Stored in an airtight container, graham crust will keep fresh for 1 week at room temperature or for 1 month in the fridge or freezer.
For the Swiss Meringue Frosting
Ingredients:
1 ¼ c. sugar 5 large egg whites 2 c. (4 sticks) unsalted butter 2 tsp. vanilla extract a pinch of kosher salt
Instructions:
Bring a small pot filled with about an inch of water to a simmer.
In a bowl of a standing mixer, whisk the egg whites, sugar, and salt together.
Place the bowl on top of the pot and whisk continuously until the mixture becomes slightly foamy and you cannot feel the grittiness of the sugar, about 5-8 minutes. The mixture will be hot. Be careful.
Move the bowl to the standing mixer fitted with the whisk attachment and whip the egg mixture until the bowl feels cool to the touch.
Add in the butter, and continue to whip until a smooth buttercream forms.
Add in the vanilla extract and continue to whip until incorporated.
I used to avoid toffee. It was just too crunchy and the bits of sugar would get stuck in my teeth and I’d have to try and fish it out with my tongue while trying to look like I wasn’t. No? Just me? I could never bring myself to fish it out with my fingers in public, although I’ve seen many people do it without batting an eye. Ick. I’ve always been partial to caramels and their chew until I made my own toffee. Unlike brittle or a not-so-great toffee, good toffee not only breaks into delightful shards in your mouth (as opposed to the jagged, sharp chips) but disintegrates into a caramel liquid that is pleasant on the tongue and doesn’t stick to your teeth. This cake is an ode to toffee and coffee. I call it a mocha cake because there are layers of chocolate cake in the center and chocolate + coffee = mocha. If I had it my way though, it would really be a toffee coffee chocolate cake. What a mouthful. The cake itself is well balanced with a salty sweet coffee toffee and its chocolate cake. But if you really don’t want to go through with this over-the-top cake, I’m pleading with you to at least try the toffee. That is one worth taking your time making.
Toffee Mocha Cake (For a step-by-step video of how I put it together, check out my stories on Instagram (@thebusyspatula)!)
On a cake board, place one layer of your chocolate cake.
Spread a thin, but even layer of the coffee buttercream.
Spread a layer of the coffee ganache.
Top with the coffee toffee.
Repeat two more times.
Crumb coat the cake with leftover buttercream and set in freezer for about 10-15 minutes or until the buttercream is firm.
Remove cake from freezer and frost entire cake smoothly.
Garnish the bottom of the cake with crushed coffee toffee.
Place cake in freezer until firm, about 20-30 minutes.
While cake is in the freezer, put the leftover ganache in a squeeze bottle and warm up ganache in a cup of hot water. You want the ganache to be runny enough that it will drip down the sides but not so hot that it will melt the buttercream.
Remove cake from the freezer and do a ganache drip down the side of the cake. Fill the top smoothly with coffee ganache.
Place cake in freezer to set.
In a pastry bag fitted with a star pastry tip (I used Wilton’s 1M), swirl buttercream all around the edge of the cake.
Dust the tops of the buttercream with crushed leftover toffee, and garnish each swirl with one espresso bean.
Chocolate Cake:
Ingredients:
1 ¾ c. flour
2 c. sugar
¾ c. cocoa powder
2 tsp. baking soda
1 tsp. baking powder
1 tsp. kosher salt
1 c. buttermilk, shaken
½ c. vegetable oil
2 eggs, at room temperature
1 tsp. pure vanilla extract
1 c. hot coffee
Instructions:
Preheat oven to 350˚ and grease and line the bottom of four 6” cake pans with parchment paper.
In a stand mixer fitted with the paddle attachment, mix flour, sugar, both cocoa powders, baking soda, baking powder and salt until fully combined.
In a separate bowl, whisk vegetable oil, eggs, and vanilla extract until combined.
With the mixer speed on low, add the egg mixture to the flour mixture until combined.
Turn off the mixer. With a spatula, scrape the sides of the bowl to fully incorporate the two mixtures.
Turn the mixer on low and slowly add the hot coffee to the batter. Once added, raise the speed to medium until completely homogenous.
Divide batter evenly amongst the four cake pans and bake for 18-20 minutes, rotating the cake pans halfway.
Let cake cool in pan for 10 minutes, then turn out of cake pan and move onto wire cooling rack to cool completely.
Salted Nut Coffee Toffee:
Ingredients:
1 c. butter
1 c. sugar
1 ½ tsp. espresso powder
1 ½ tsp. molasses
¼ tsp. kosher salt
nuts (I used walnuts and sunflower seeds)
flaky salt (I used maldon sea salt)
Instructions:
Prepare a sheet pan lined with either parchment paper or a silicone baking mat.
On medium-low heat in a small to medium HEAVY saucepan with a candy thermometer attached, mix butter, sugar, espresso powder, molasses and kosher salt together. (I’m emphasizing heavy because I’ve tried with a lighter pan and I ruined my first batch.)
Whisk mixture constantly until temperature reaches 285˚F.
Pour mixture onto the sheet pan and sprinkle your nuts and then the flaky salt.
Let cool and break into shards.
For the Coffee Ganache:
Ingredients:
120 ml. heavy cream
180 g. white chocolate
2 tsp. espresso powder
1 tsp. coffee emulsion
Instructions:
In a microwave safe bowl, heat heavy cream and white chocolate for one minute. Whisk mixture together until it becomes homogenous. If the white chocolate did not fully melt, microwave at intervals of 30 seconds until melted.
Add in espresso powder and coffee emulsion and whisk.
Pour onto the mocha cake layer and put cake in fridge to set the ganache. About 30 minutes to an hour.
Coffee Swiss Meringue Buttercream
Ingredients:
1 ¾ c. sugar
1 tbsp. espresso powder
7 large egg whites
a pinch of kosher salt
5 ½ sticks unsalted butter
2 tsp. vanilla extract
2 tsp. coffee emulsion
Instructions:
Simmer an inch of water in a medium pot.
In the bowl of a standing mixer, whisk egg whites, espresso powder, sugar and salt together.
Place the bowl over the pot of simmering water and whisk the egg white and sugar mixture continuously until the mixture becomes lighter and no longer grainy.
Remove the bowl from the pot and transfer the bowl into the mixer fitted with a whisk attachment.
Mix on high until mixture becomes white and fluffy, and cool (check for this by seeing if the outside of the bowl is cool to the touch).
Add in vanilla extract and butter one stick at a time until a silky smooth frosting forms.
Add 2 tsp. of the coffee emulsion and whip until light brown and homogenous.
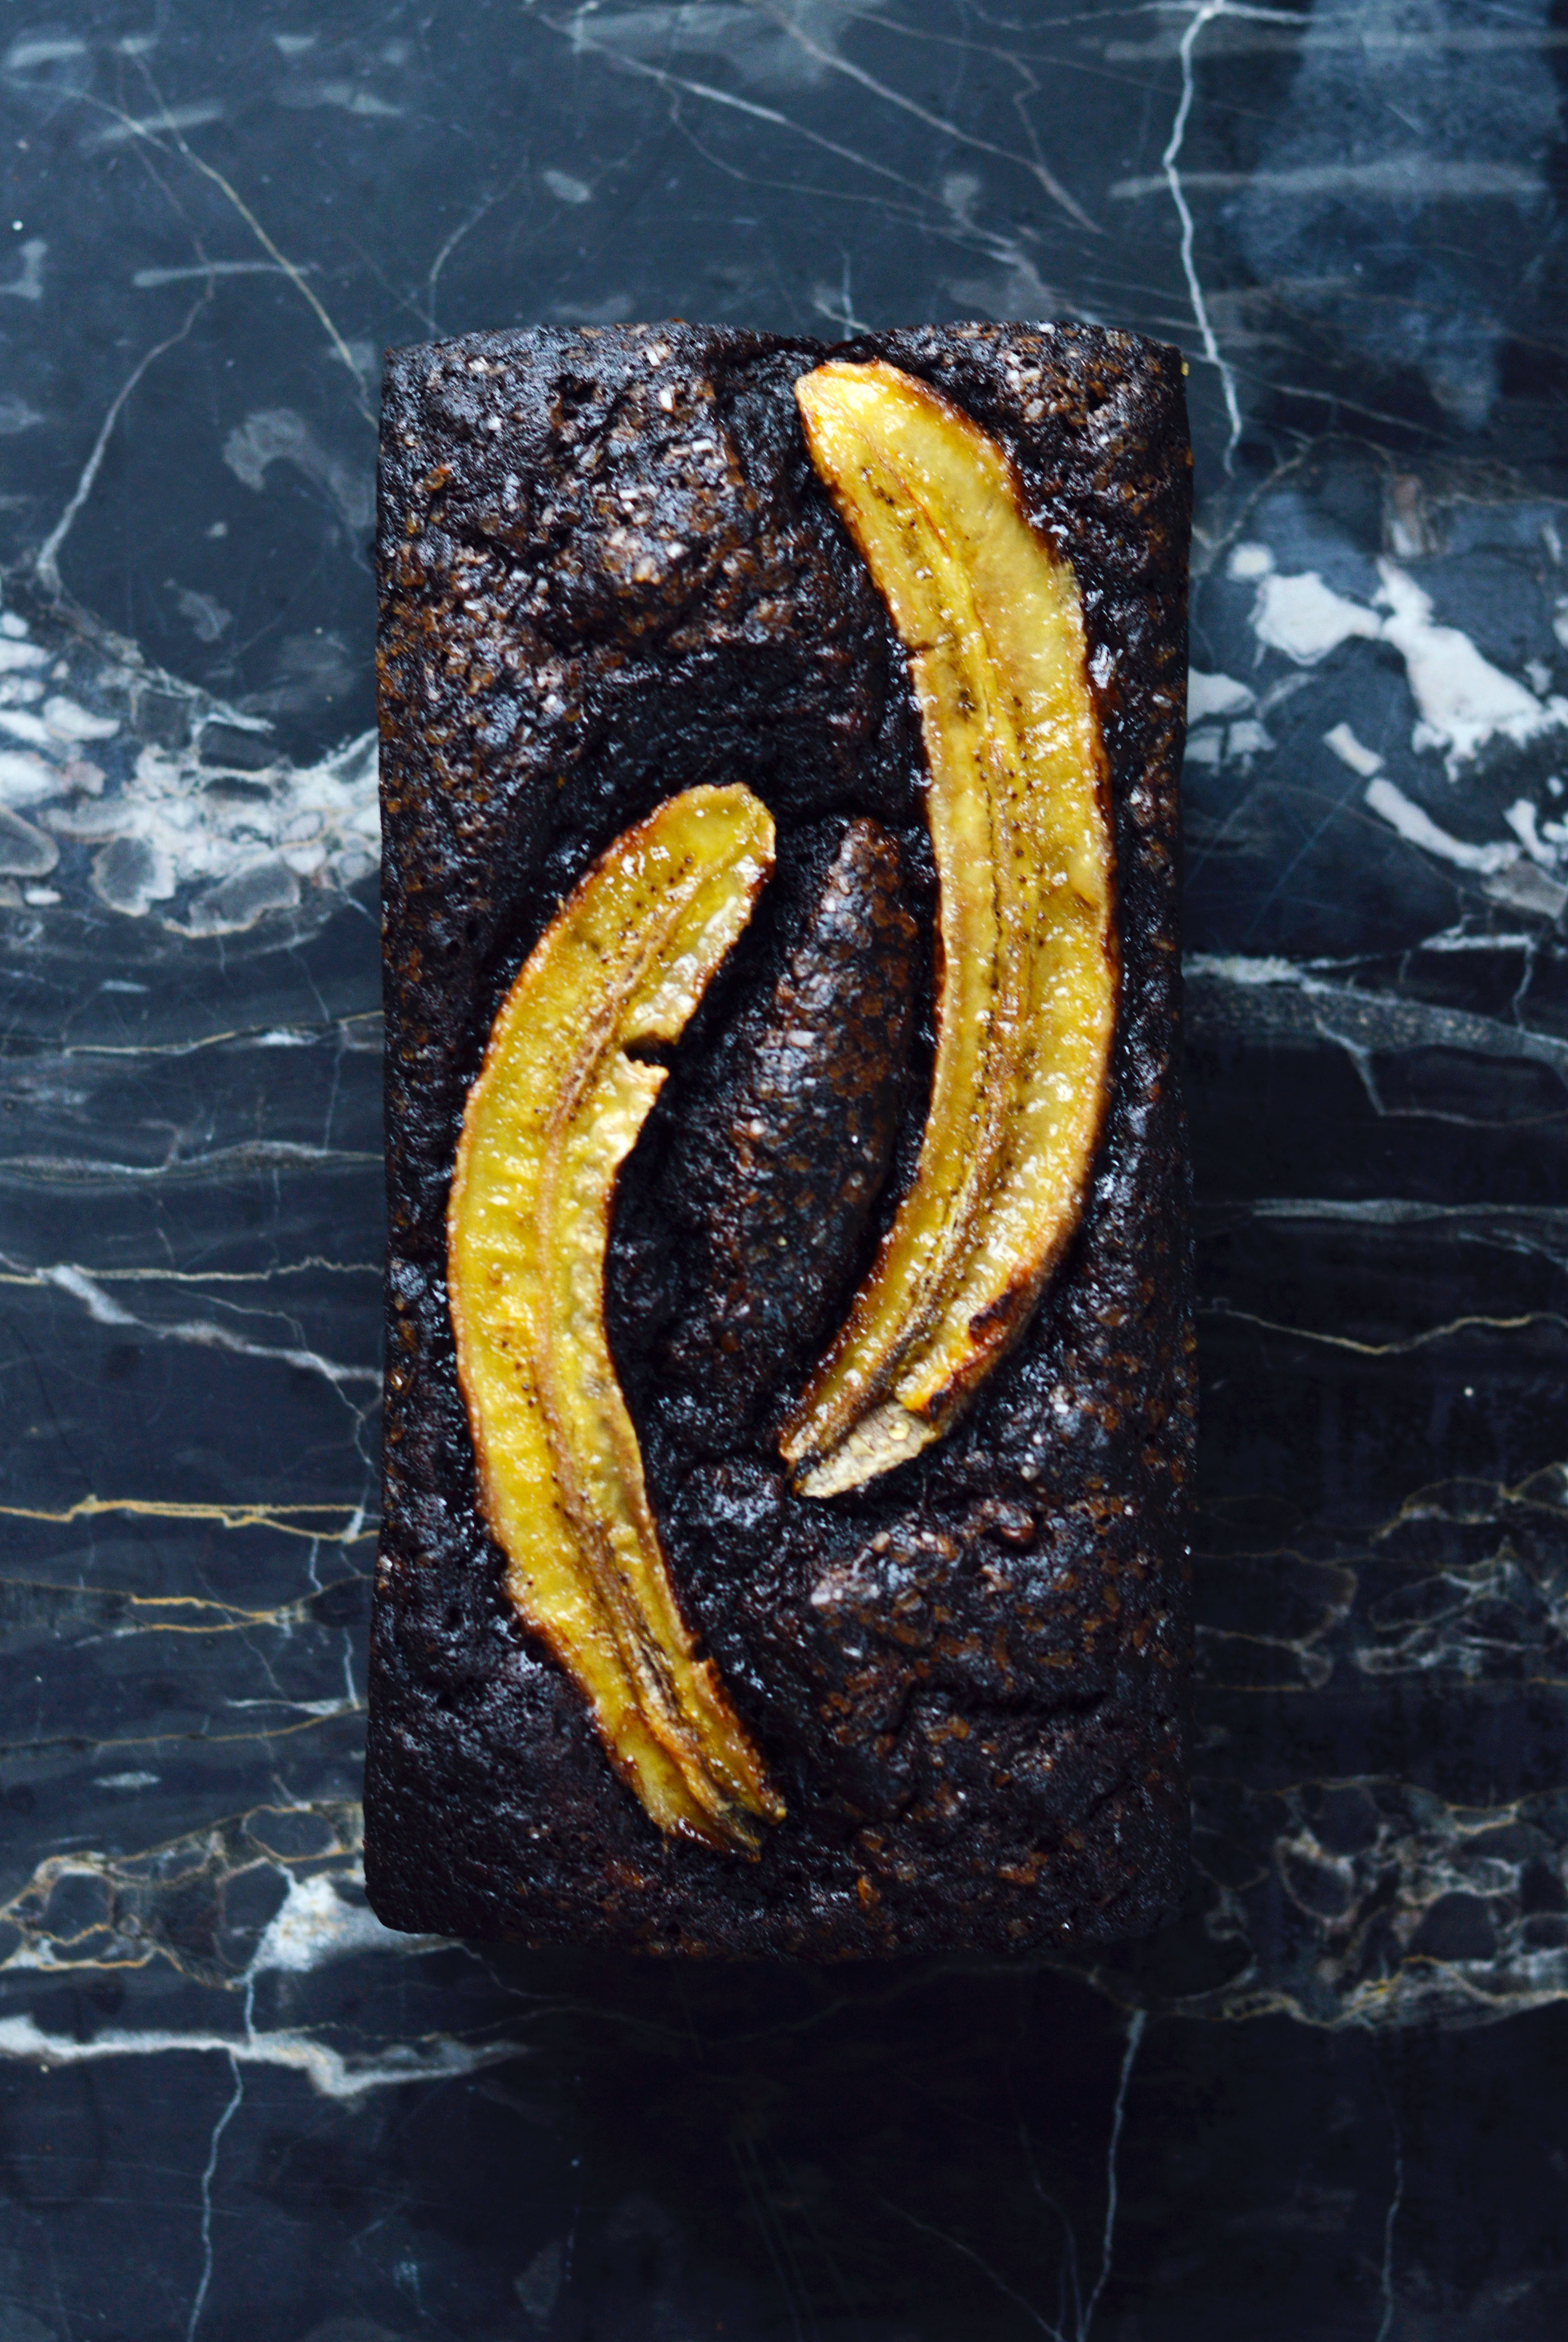
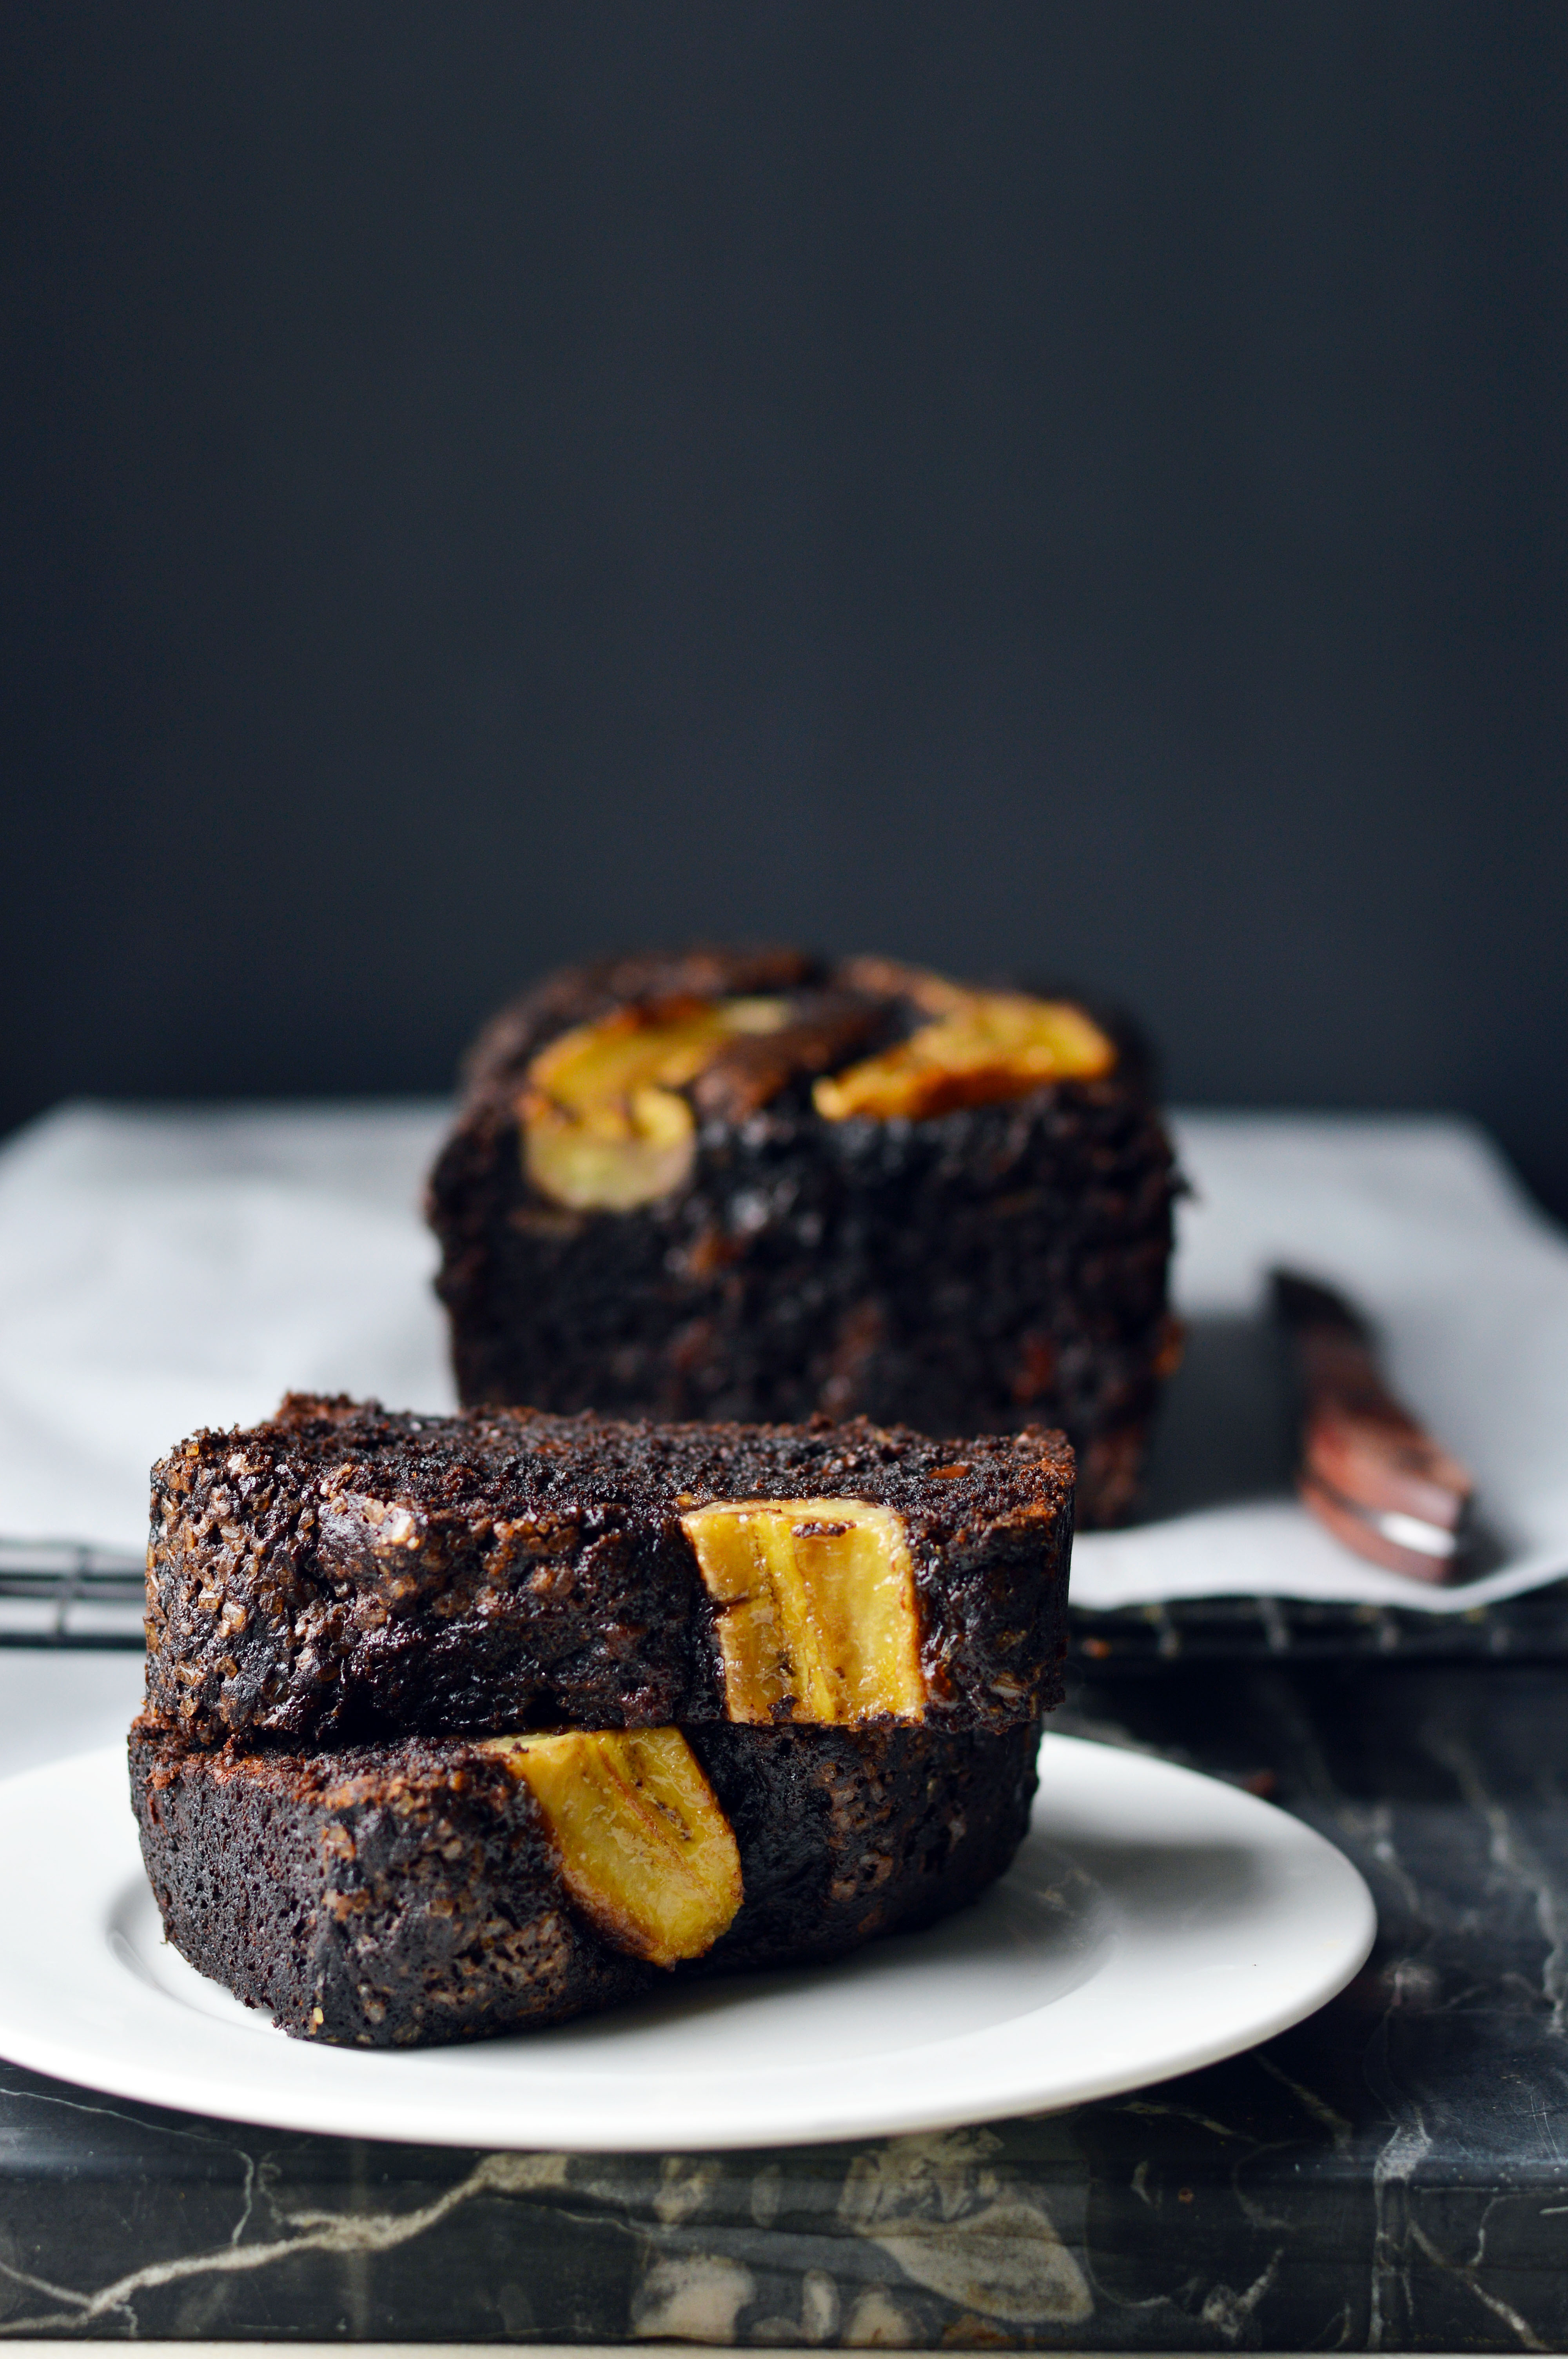
This bread is not healthy. I repeat, this bread is not healthy. It’s interesting how every time you have a fruit or a vegetable in the title of a recipe, it sounds like a healthier option. (Did you know that carrot cake at the Cheesecake Factory is one of their highest calorie count desserts? I’m telling you.. vegetables/fruits in a dessert is a lie!) Instead it’s an indulgent, rich chocolate bread which is full of chocolate chips and banana flavor. I think the role of the banana here is not so much to provide banana flavor (which it does) but to give it a rich, moist crumb that is not heavy.
I’ve seen a lot of banana breads on Instagram that have the floating bananas on top and always wondered how it is done. And the interesting thing is, no one writes how it is done! Even recipes with the floating bananas don’t mention the bananas on top of the loaf, they just mention putting the batter into the pan and bake. WHY?
Turns out, the bananas do not sink into the bread like I worried. But to keep it from turning color, a light brushing of fresh lemon juice will help it keep its pleasing yellow shade. Sprinkle the top with Sugar In The Raw (aka demerara sugar) and it will glisten with crunchy sugar crystals after it is baked. It really is one of my favorite banana bread recipes and I think I’ll have a hard time turning back to my older one. On second thought, I might on the days I want to be a little “healthier”… that one uses half whole wheat flour. 🙂
Chocolate Banana Bread
Ingredients:
1 c. all-purpose flour
½ c. Dutch processed cocoa
1 tsp. baking soda
½ tsp. kosher salt
3 large brown bananas (1 ½ c. mashed)
¼ c. (4 tablespoons) unsalted butter, melted
¼ c. vegetable oil
½ c. packed light brown sugar
1 extra large egg (or large if you don’t have extra large)
1 tsp. vanilla extract
¾ c. chocolate chips
1 banana, ripe but not browned
a squeeze of fresh lemon juice
demerara sugar (sugar in the raw) for sprinkling on top of loaf
Sift flour, cocoa powder, baking soda and kosher salt in a medium bowl and set it aside.
In the bowl of a standing mixer with the paddle attachment on medium speed, add the mashed bananas, melted butter, and oil and mix until combined.
Add in the brown sugar, egg and vanilla and mix until smooth.
Turn the mixer to the lowest setting and add in the flour mixture.
While there are traces of flour in the batter, add the chocolate chips and mix just until combined.
Pour batter into your prepared loaf pan.
Slice your banana lengthwise and brush with fresh lemon juice
Place it side by side on top of the batter.
Sprinkle the demerara sugar all over the top and place into the oven.
Bake banana bread for about 50-60 minutes, checking at 50 minutes to make sure you don’t overbake your loaf.
Stick a toothpick in the center of the loaf to check, making sure to check in a few places as skewering a chocolate chip would make you think the batter is undercooked.
Remove pan from the oven and place on a cooling rack for about 15 minutes before removing the bread from the pan.
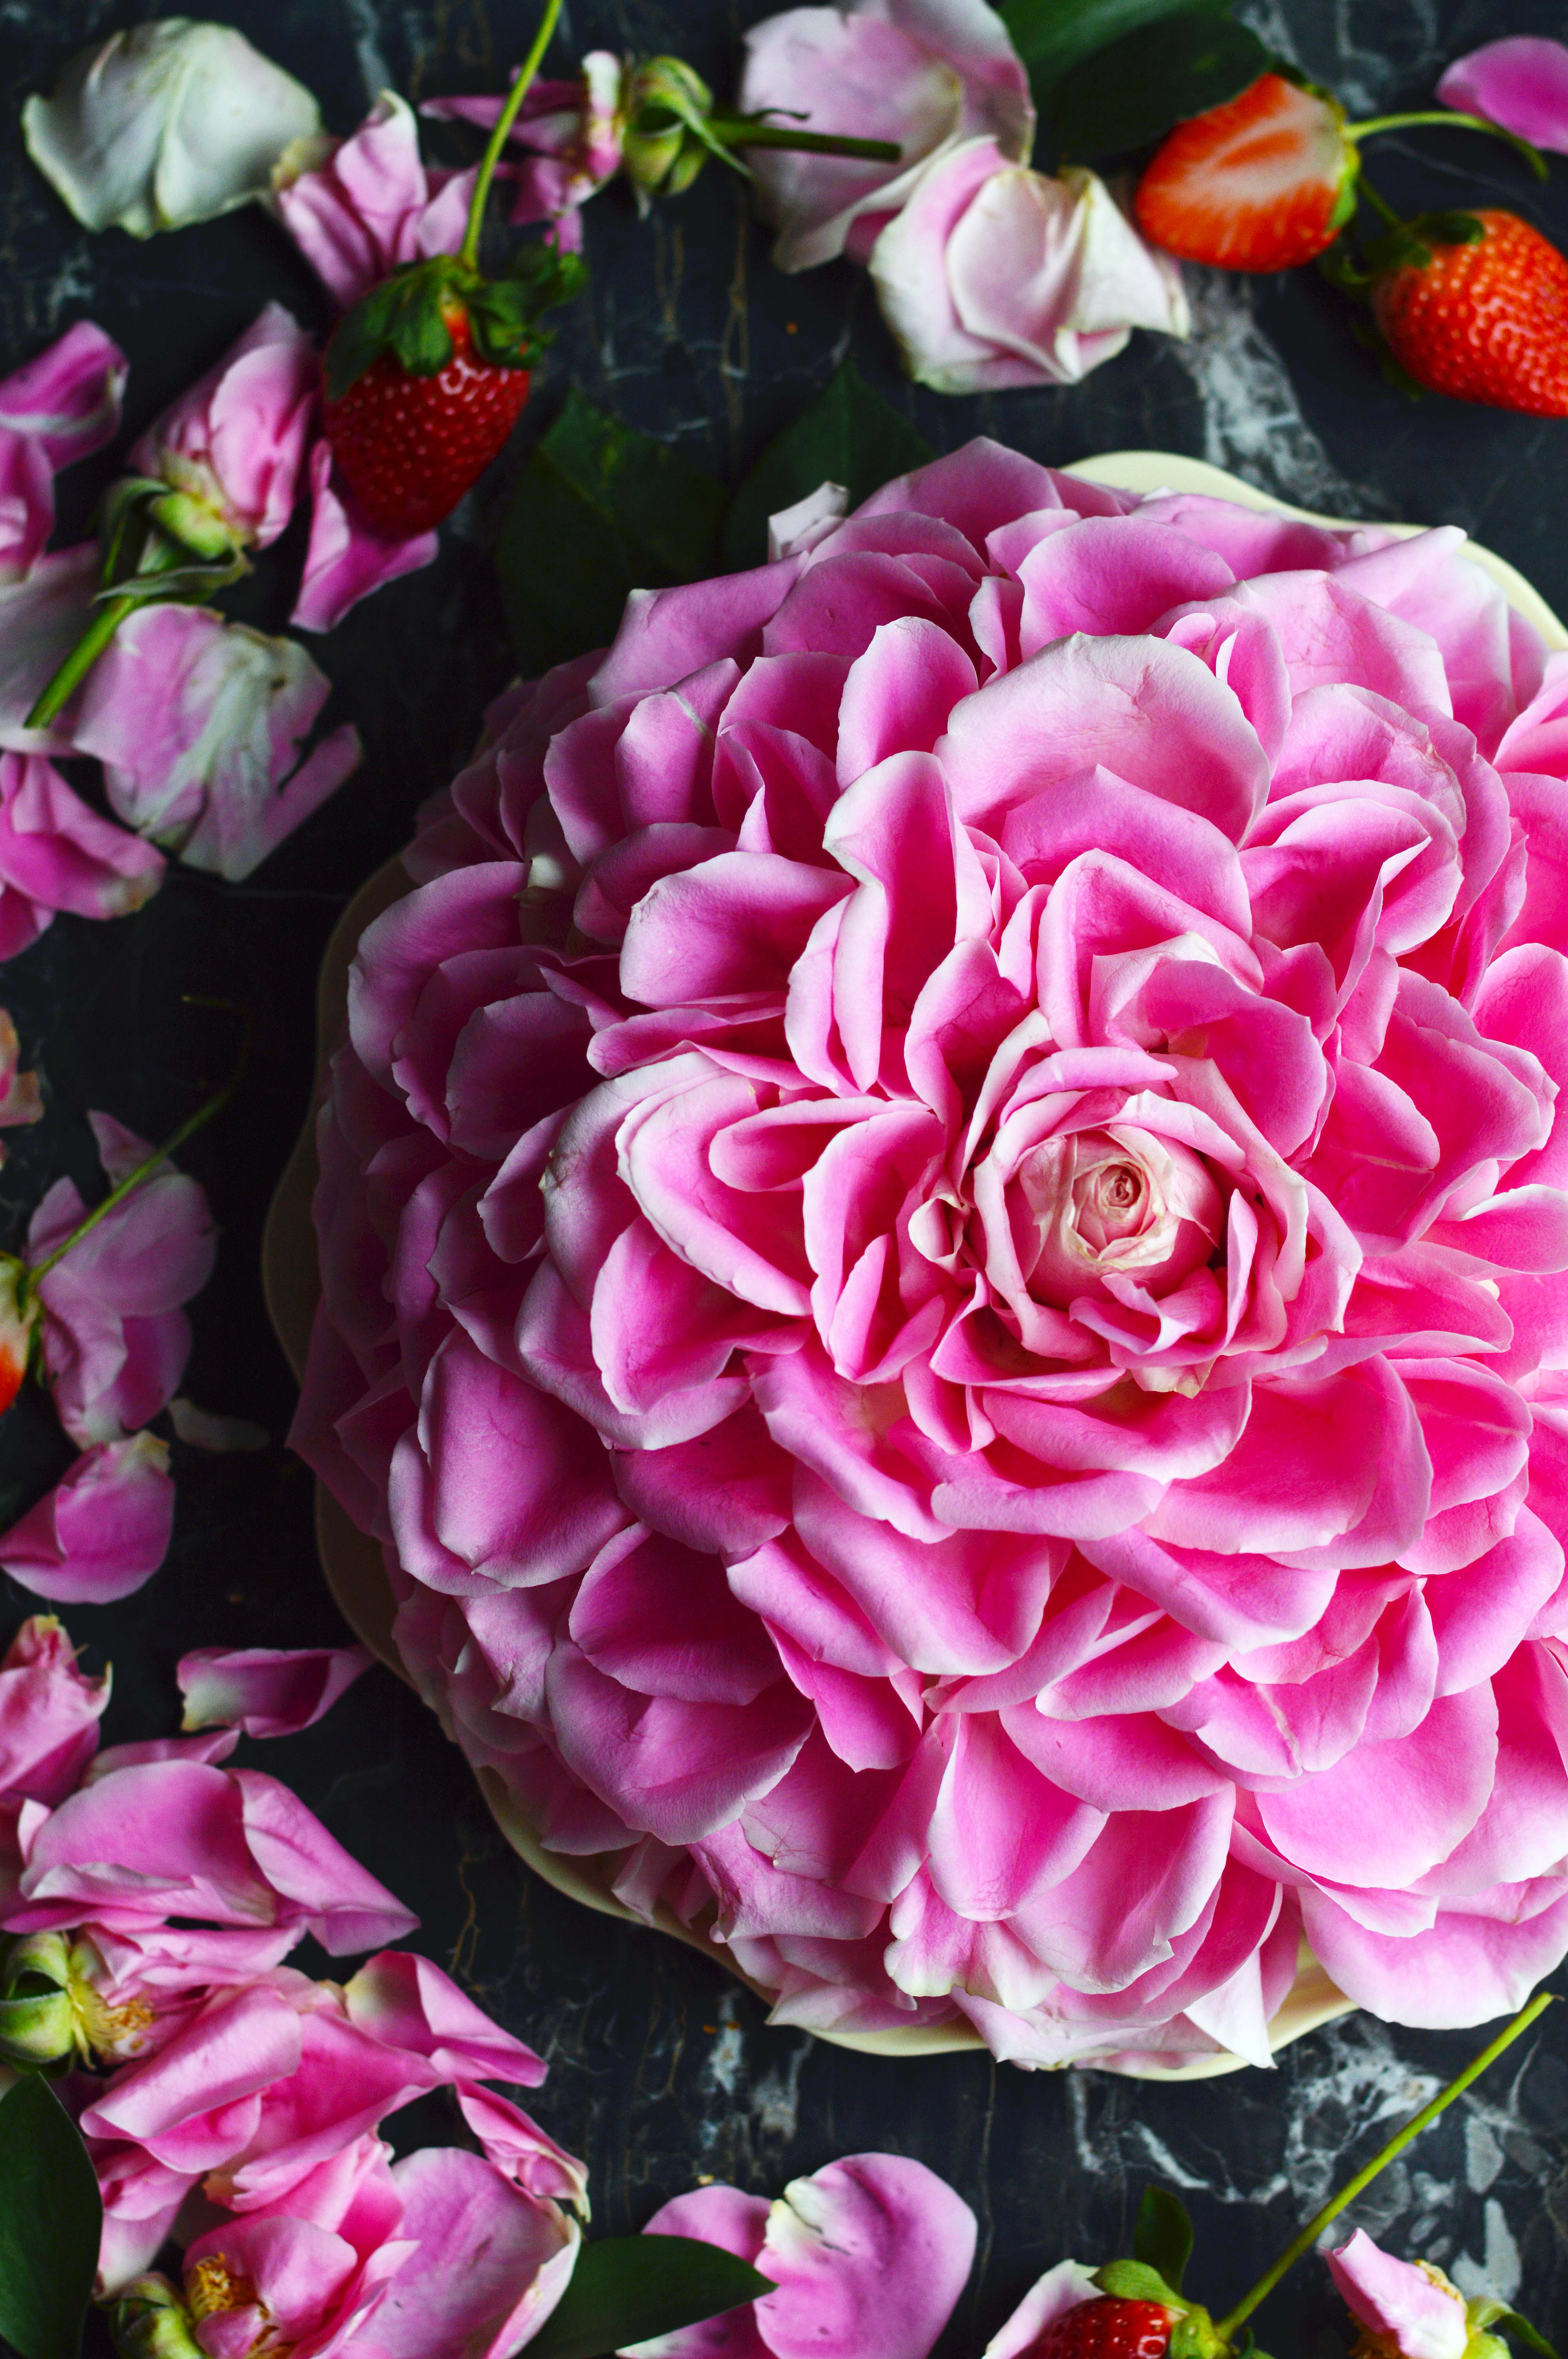
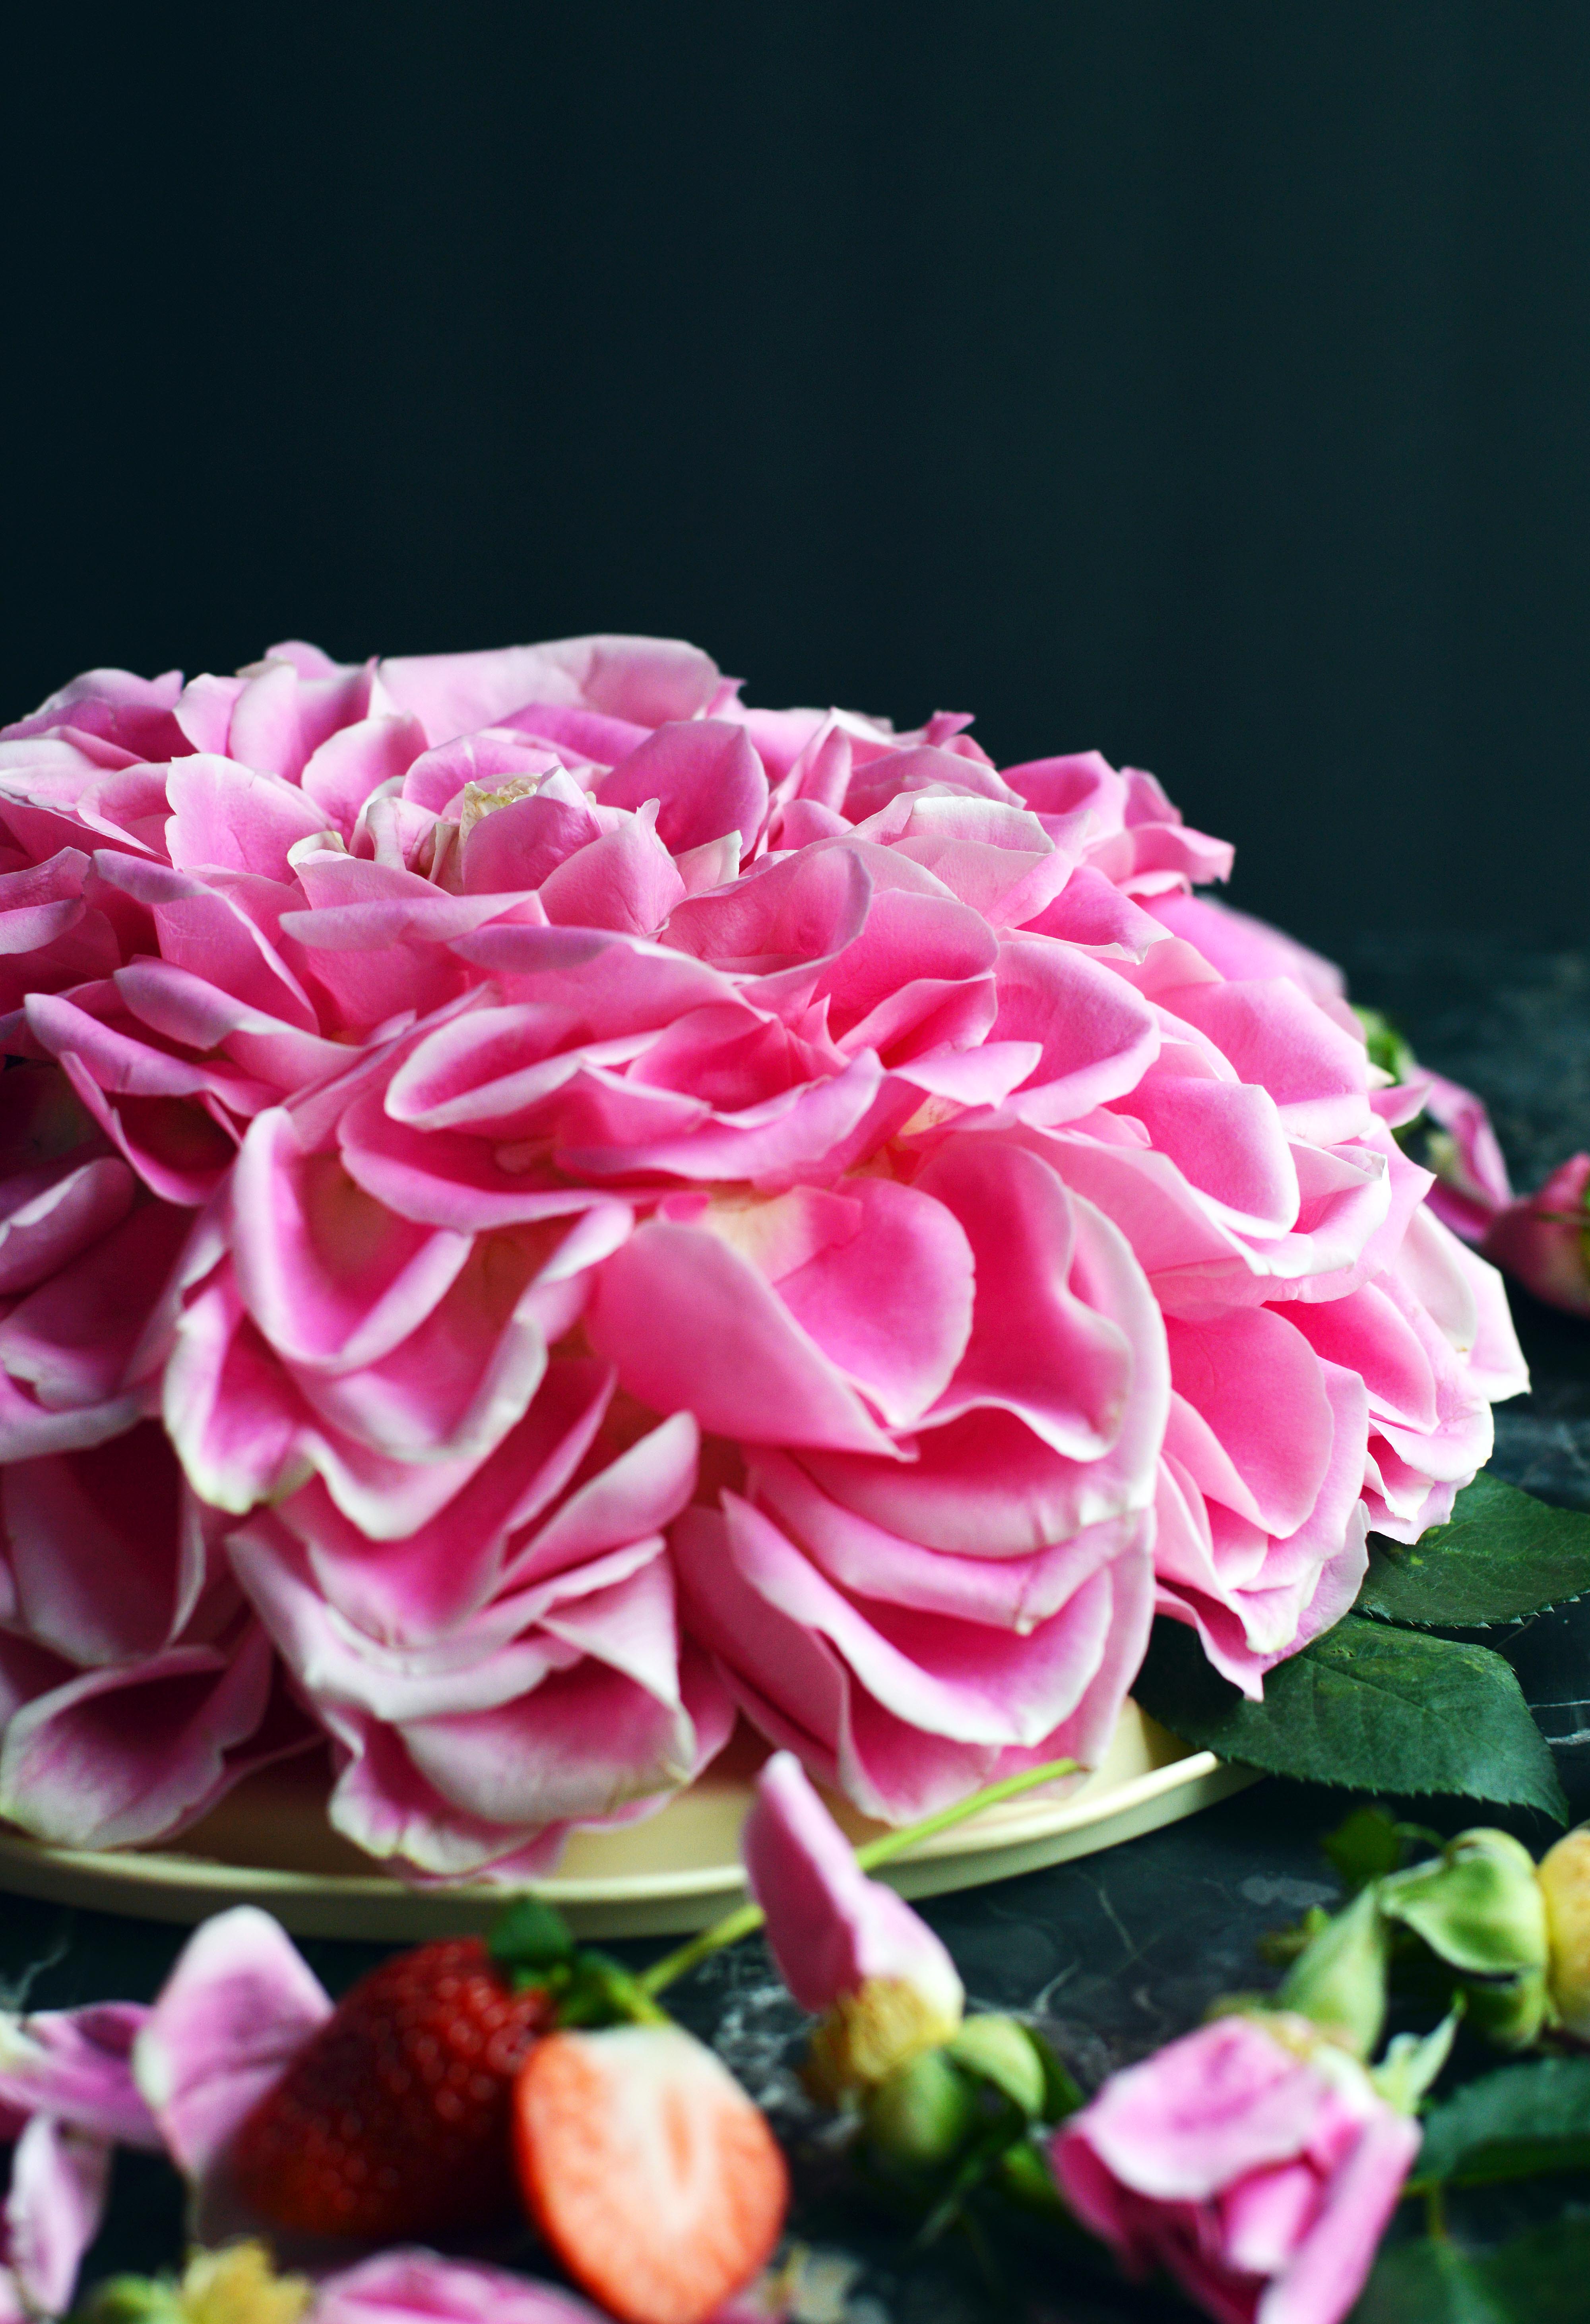
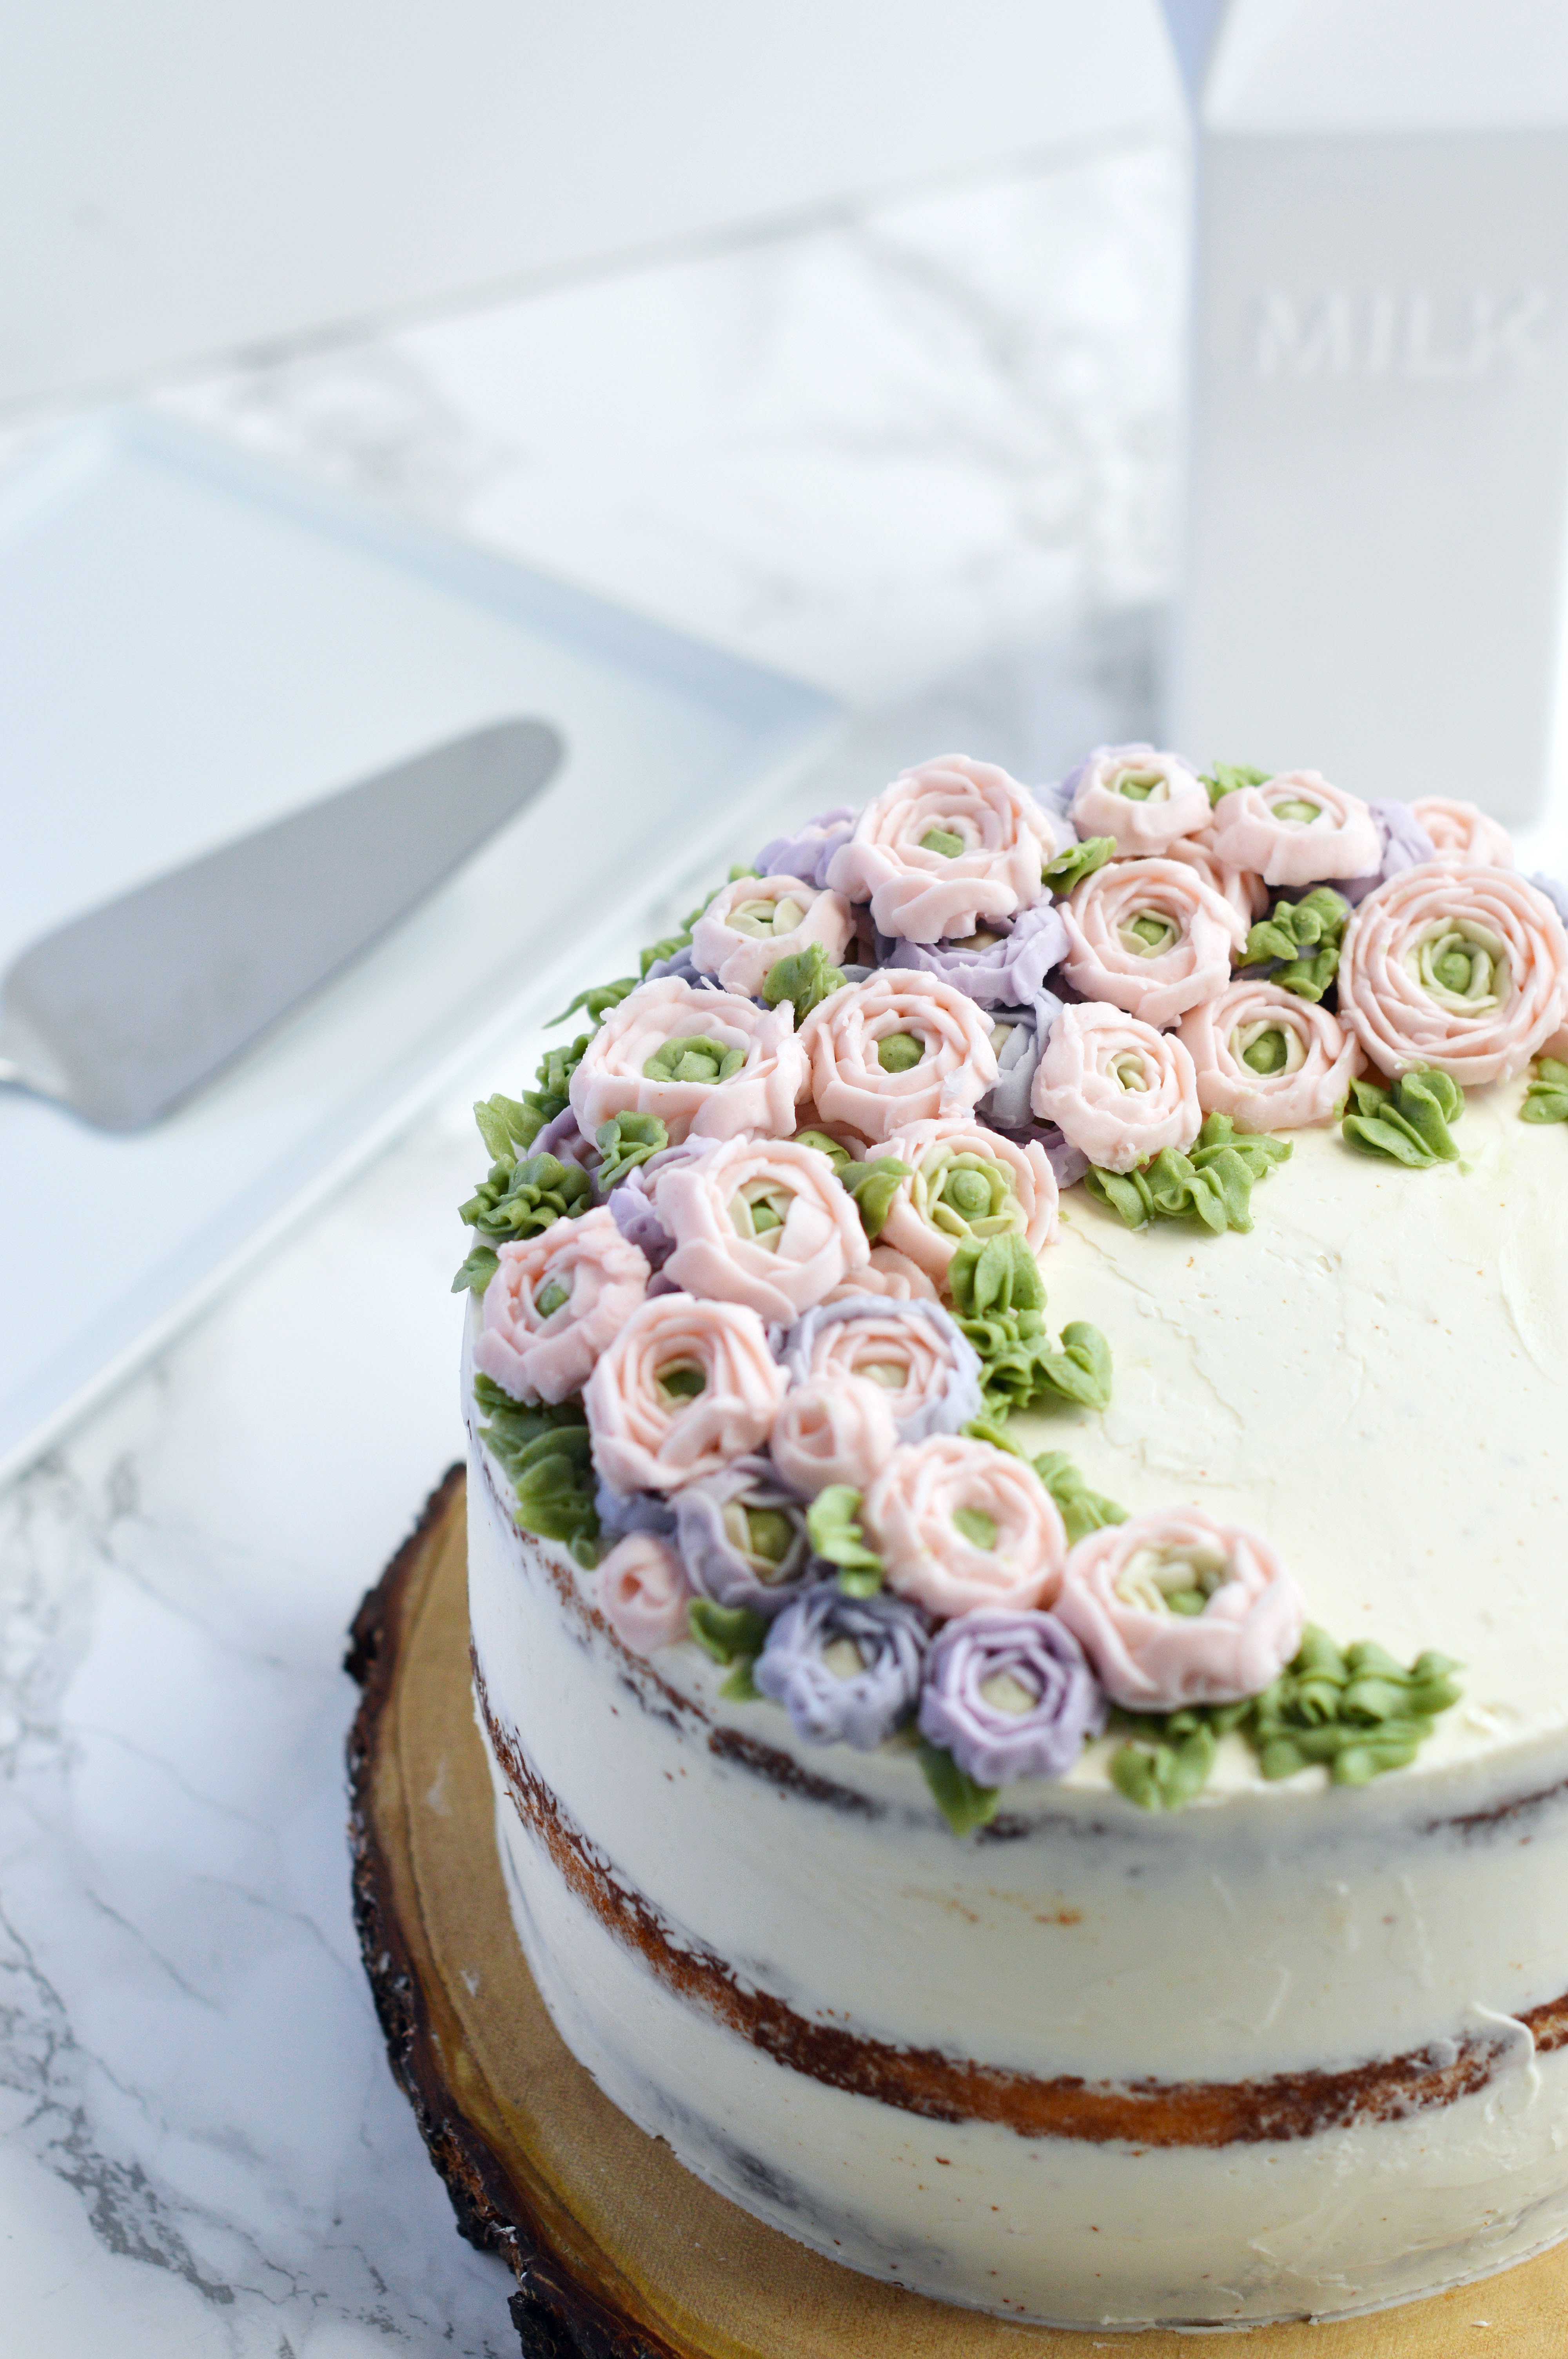
Happy Valentine’s Day! As someone who loves all things pink and feminine, Valentine’s Day décor is right up my alley. This cake was inspired by Ron Ben Israel’s rose cake which I’ve been obsessed with as soon as I laid my eyes on it. It was always on my “to-try” list but I never got the chance to take on the challenge. Recently, there was a blog post by NYC Cake Girl who used to work with Ron Ben Israel with a how-to on the very cake I loved. The amount of work and the detail work was perfection (as always), and I knew I simply didn’t have the time (and possibly even the skill) to recreate the cake. So I created this cake which looks similar and uses real rose petals. As for the cake itself, I used half of my giant doughnut cake pan instead of baking a round cake and carving it into a dome like the tutorial. A similar effect could be produced with a shallow bundt cake, but I think the smooth exterior of the doughnut pan really makes things easier. The cake flavor is red velvet (because it is THE cake of Valentine ’s Day), and is layered on the inside with fresh strawberries and vanilla frosting. I know I know, I almost felt like it was sacrilege not to use cream cheese frosting, but I didn’t have cream cheese in the fridge so, vanilla it is. Please feel free to use cream cheese frosting if you prefer it. I picked a bouquet of flowers that varied in shades of pink in hopes of making an ombre effect. However, once the petals were stripped from the flowers, they kind of ended up being the same color. I saved the lightest rose for the center though. Although in hindsight, I think I should’ve just picked the flower that had the least blemishes. You essentially layer the petals one by one in alternating layers around the cake to form a giant rose. It is a bit time consuming and is not completely symmetrical like the fondant petals from the original cake. But, I think it kind of gives it a homemade vibe that people can appreciate.I went a little heavy with the pictures because it was SO STUNNING. Like… the photos can’t do it justice. I loved even how the slices had petals on them fanning out the back, like a very fancy cape or headdress. I can almost guarantee that you will get “wows” and surprised looks when you bring this cake. It won’t disappoint. I hope all of you got some sort of recognition of love this Valentine’s Day. If not, I baked this cake for you. 😉
Red Velvet Strawberry Rose Cake
You will need:
1 batch red velvet cake, baked in a dome shape (recipe below)
1 batch vanilla frosting (recipe below)
About ½ pint strawberries, sliced horizontally (enough to cover the area of the cake twice)
1 dozen roses (pesticide-free)
Instructions:
Slice the red velvet cake in half (horizontally), and smooth a thin layer of vanilla frosting.
Layer it with fresh strawberry slices and repeat layer with vanilla frosting and fresh strawberries using frosting to fill in any gaps. (shown in picture #2)
Place the top half of the cake onto the frosting layer and crumb coat the entire cake with a thin layer of frosting. (shown in picture #3)
Put cake in freezer for about 10-15 minutes until the frosting is set and then remove from fridge and give it a full coating. (shown in picture #4)
Pick the flower you will be using as your center flower. Trim and place it in the center of the cake. (shown in picture #5)
Get a few petals and fill in the gaps around the hole. (shown in picture #6)
Now start layering the bottom part of the cake by pressing the petals into the frosting of the cake. Try to press the bottom edge of the petal only. (shown in picture #7)
Try to use the largest petals you have for the bottom layer and go all around the cake. (shown in picture #8)
Layer the next row of petals around the cake. (shown in picture #9)
Try to alternate the position of the petals. As in, try to place the petal of the next layer between two petals of the bottom layer. (shown in picture #10)
Repeat until you get to the center of the cake, try to use smaller petals as you get to the top of the cake. I had to replace some of the lighter petals because the lower petals turned out to be too pink to get a more seamless look. (shown in picture #11)
Get ready to stun the room. 😉
Red Velvet Cake
Ingredients
1 ½ cups all-purpose flour
1 ½ cups cake flour
3 tablespoons unsweetened cocoa powder
¾ tsp. salt
3 large eggs, at room temperature
¾ (1 ½ sticks) cup butter, at room temperature
2 ¼ cups granulated white sugar
2 tsp. vanilla extract
1 ounce bottle of red food coloring (2 Tablespoons)
1 ¼ cups buttermilk
1 ½ teaspoons baking soda
1 ½ teaspoons vinegar
Directions:
Preheat oven to 350°F, spray either your bundt pan or the top half of your giant doughnut cake pan with nonstick spray. (I highly suggest using either pam for baking or baker’s joy for extra insurance of “nonstickage”.)
In a medium bowl, whisk together flour, cocoa powder and salt. Set aside.
In the bowl of a standing mixer, beat butter on medium speed for 30 seconds.
Add sugar and vanilla, and beat until combined.
Add eggs one at a time on medium speed.
Lower speed to low and add in food coloring.
Add ⅓ of flour mixture to the egg mixture on low and add ½ of the buttermilk.
Repeat with ⅓ flour mix and the rest of the buttermilk.
Finish mixing with the rest of the flour mixture. Mix until just combined.
Stir together baking soda and vinegar in a small bowl. Add to cake batter and beat just until combined.
Fill cake pan until ⅔ full, bake 30-40 minutes or until a cake tester comes out clean.
Cool pan on rack for about 15-20 minutes. Try to use a small spatula around the edges to ensure a clean removal. Remove cake from pan.
Let cool completely.
Vanilla Frosting
Ingredients:
1 c. whole milk
¼ c. flour
¼ tsp. salt
8 oz. (2 sticks) unsalted butter, room temperature
1 c. sugar
2 tsp. vanilla extract
Instructions:
In a saucier pan, put milk, salt and flour and whisk until combined on medium heat.
Continuously whisk mixture until thickened to a pudding like consistency.
Once thickened, strain through a mesh strainer into a bowl with a spatula to remove lumps.
Place a piece of plastic wrap on top of the flour mixture and put into the fridge until fully cool.
In a mixer bowl fitted with the whisk attachment, mix the sugar and butter on high speed until fluffy and pale about, 5-10 minutes.
Add the chilled flour mixture and continue to whip on high speed until the sugar is completely dissolved and the mixture is no longer gritty, about 5-10 minutes.
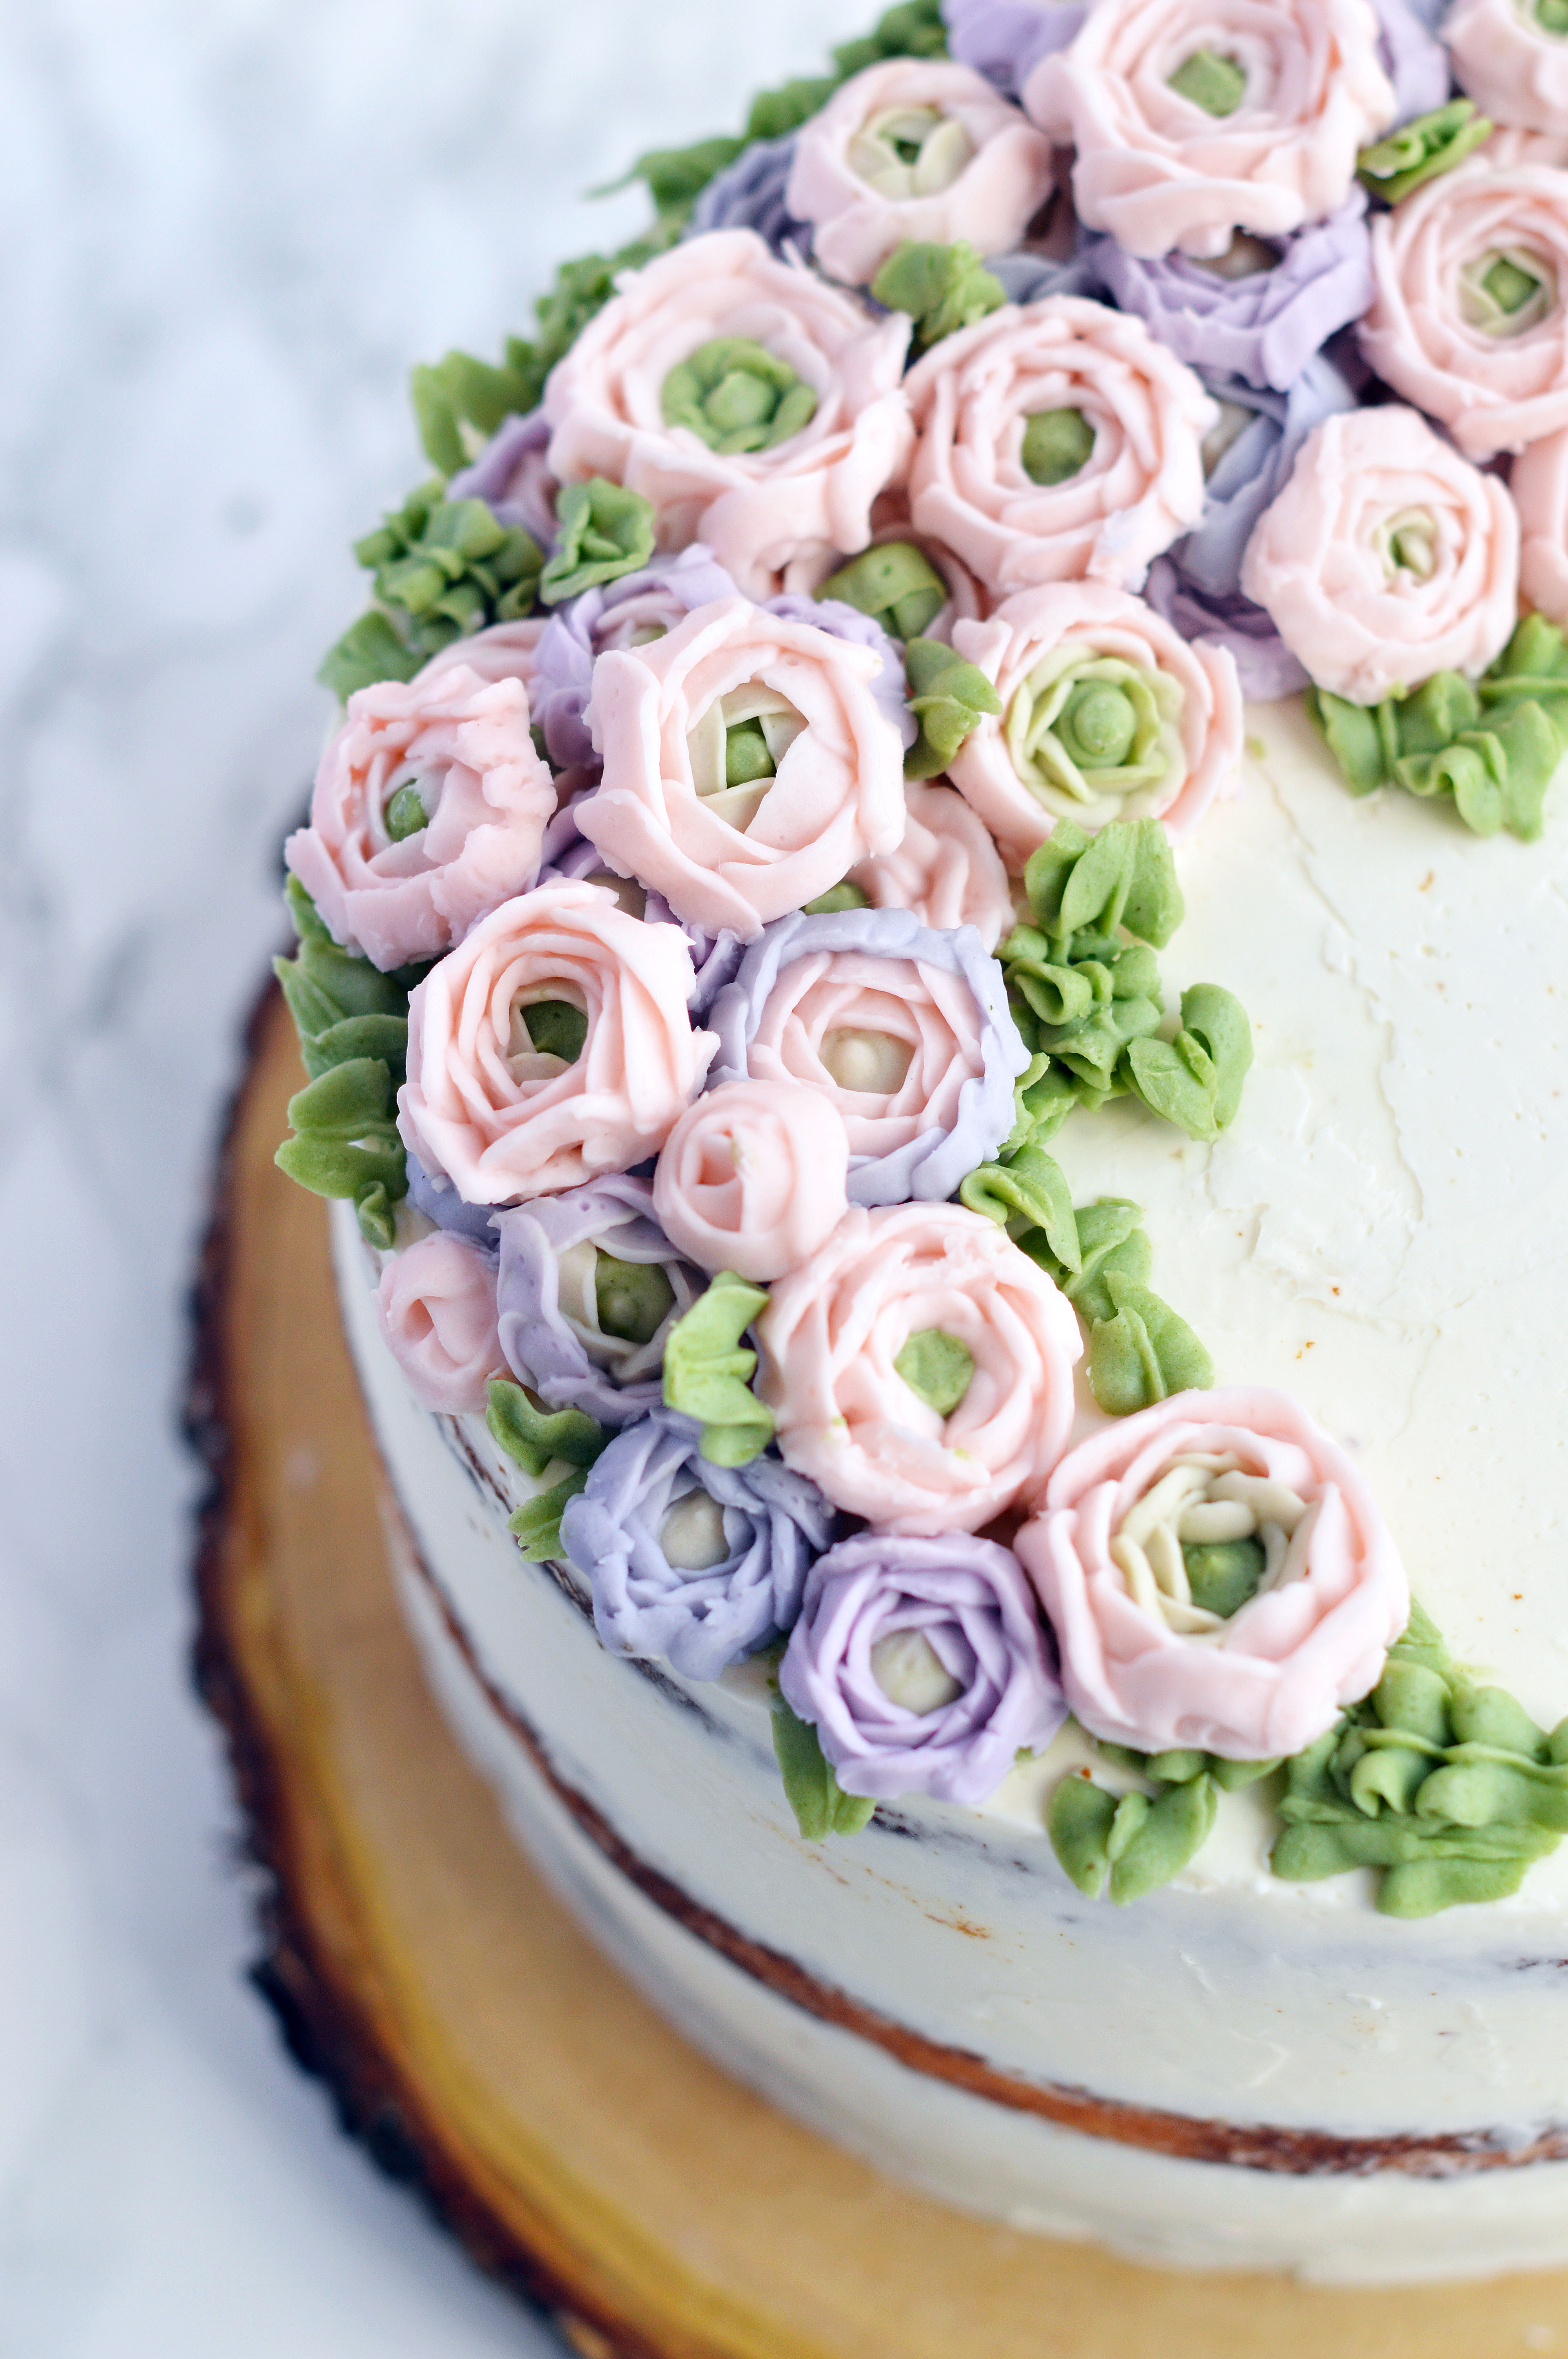
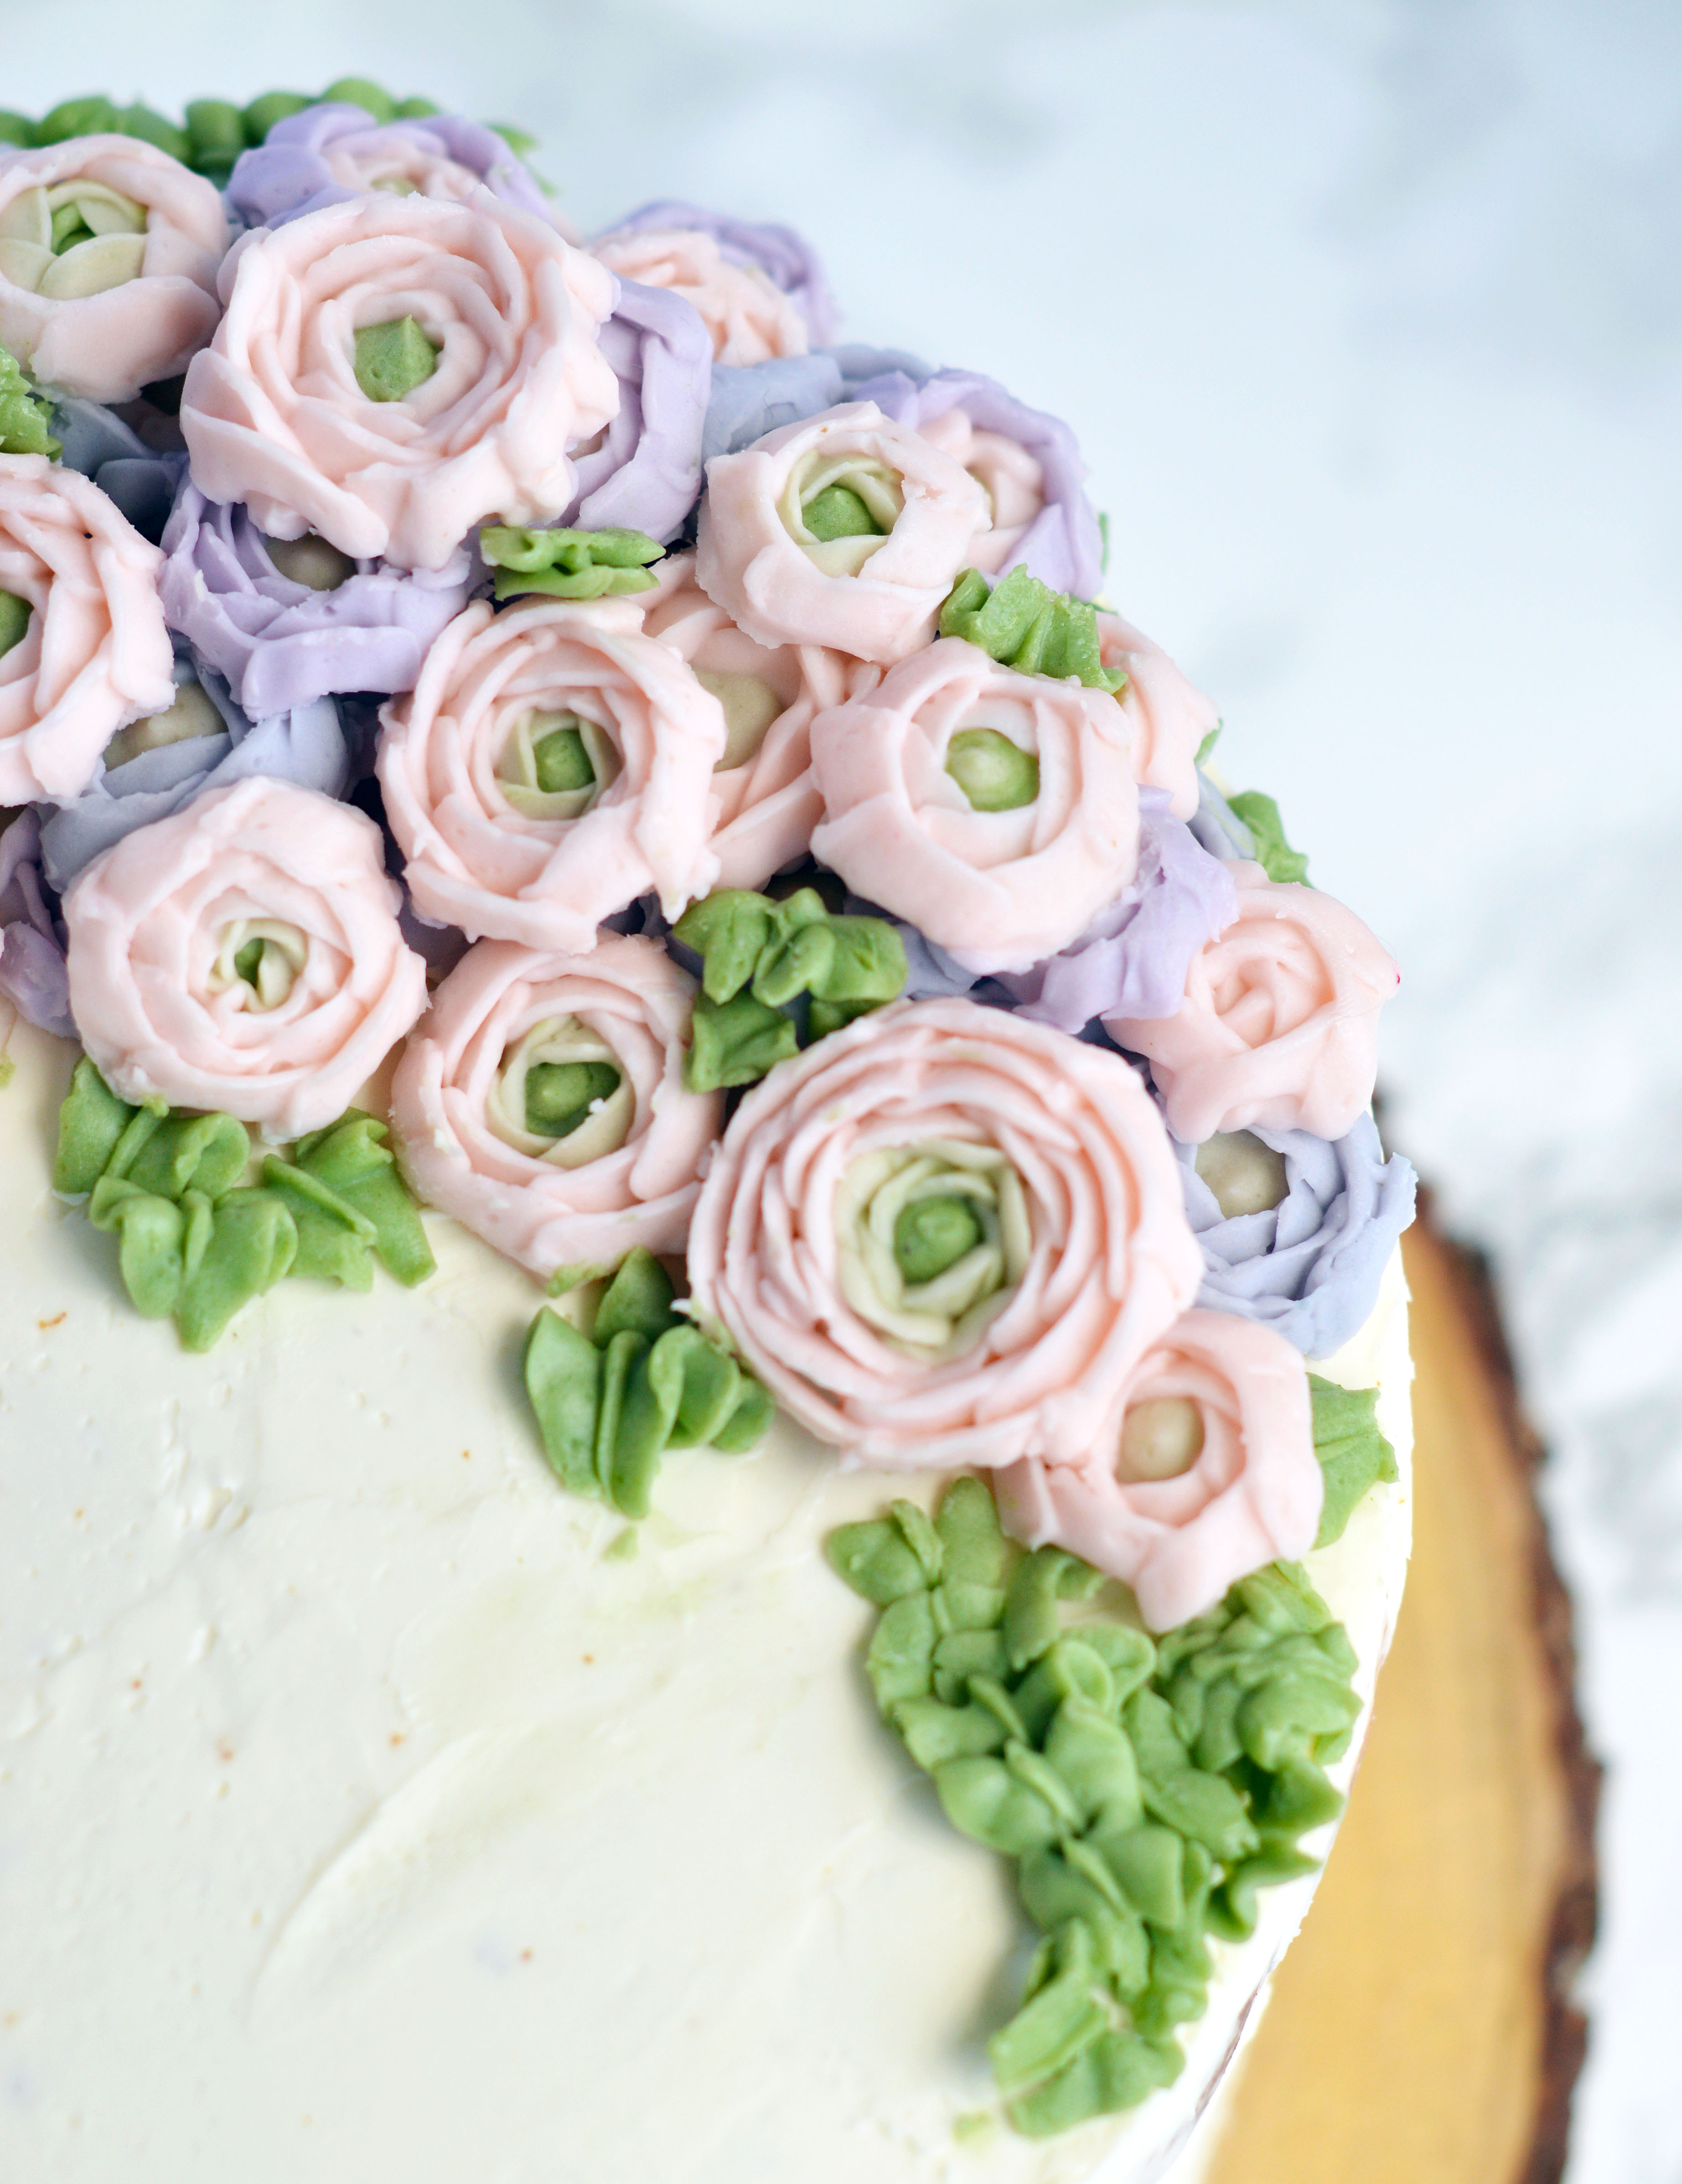
I’ve been kind of obsessed with flower everything on my cakes these days. Real or buttercream, I love them all. I actually made this cake back in May, and by the time I got to editing photos it was the peak of summer. And because the filling is sweet potato pastry cream, it just didn’t go with the season. But now that it is on the cusp of fall, I feel like it’s appropriate to post this. (Although, personally, this is my favorite pastry cream of all time and I love it any time of the year.) The star of this cake is the sweet potato, but not the orange fleshed kind but the purple skinned, yellow fleshed kind. This type of sweet potato is popular in Korean desserts and tastes similar to a roasted chestnut. In the past, I’ve also featured this type of sweet potato in this post: Mini Green Tea Cake. If you’ve never made pastry cream before, my advice for you is to go slow with pouring the hot milk into the egg mixture, as in a slow drizzle, not a pour. You want to avoid curdling at all costs. But if you do it right, man oh man is it worth it. Gone are the days of powdered mixes. You will never look back. Fill it between your favorite vanilla cake and watch the compliments roll. As for the decoration, I’ve always loved ranunculus and decided to try to pipe it. It is easier than It looks but is quite time consuming to pipe each flower, especially since they have so many petals. Here are the steps to pipe the flower:
Cut out many squares of parchment or wax paper. You will use one square per flower. (I usually cut mine around 3×3 inches.)
With a flower nail in your hand, pipe a small amount of frosting onto the center of it. (As shown in Photo 2.)
Place a piece of parchment paper on top of the frosting. (As shown in Photo 3.)
Using a small round tip (wilton #2 or #3), pipe a small amount of green frosting in the center of the flower nail in a round, circular shape. (As shown in Photo 4.)
In a piping bag filled with light green frosting and fitted with a petal tip with the wider side facing the flower nail (wilton #102, or larger pending on the size of the flower you want to pipe), pipe a square around the circle, overlapping each other on the ends. (As shown in Photo 5.)
In a piping bag filled with light pink frosting and fitted with a petal tip with the wider side facing the flower nail (wilton #104, or larger pending on the size of the flower you want to pipe), pipe 5 dashes around the light green square overlapping the ends. (As shown in Photo 6.)
Using the same piping bag, pipe 6 dashes around the pink circle. You want to show a little bit of the circle beforehand to create an illusion of overlapping petals. (As shown in Photo 7.)
Continue piping dashes along the outer edge of the flower, increasing the number of dashes by 1 until you reach the size of the flower you desire. (As shown in Photo 8.)
I hope you try it soon! I know it’s been a while I’ve missed you!
Sweet Potato Pastry Cream
Ingredients:
3 medium sized Korean sweet potatoes, roasted and peeled.
2 c. whole milk
½ c. sugar, divided
2 egg yolks
1 egg, large
¼ c. cornstarch
a pinch of kosher salt
2 tbsp. unsalted butter
1 tsp. vanilla extract
Instructions:
In a food processor, mix the sweet potatoes until a smooth puree forms. Set aside.
In a medium saucepan, whisk the milk and ¼ c. of sugar and heat until the milk boils.
While the milk heats, grab a medium bowl and whisk together the egg yolks, egg, ¼ c. sugar, cornstarch and the salt until smooth.
Once the milk is heated, slowly drizzle in the milk mixture into the egg mixture with one hand while whisking the egg mixture with the other. Once the milk is completely incorporated into the egg mix, return the entire mixture into the saucepan.
Heat the saucepan while whisking until the mixture becomes thickened like pudding.
Take it off the heat and stir in the butter and vanilla extract.
Mix the sweet potato with the pastry cream until homogenous.
Place a piece of plastic wrap directly onto the pastry cream and refrigerate until cool and set. (about 4 hours, or overnight)
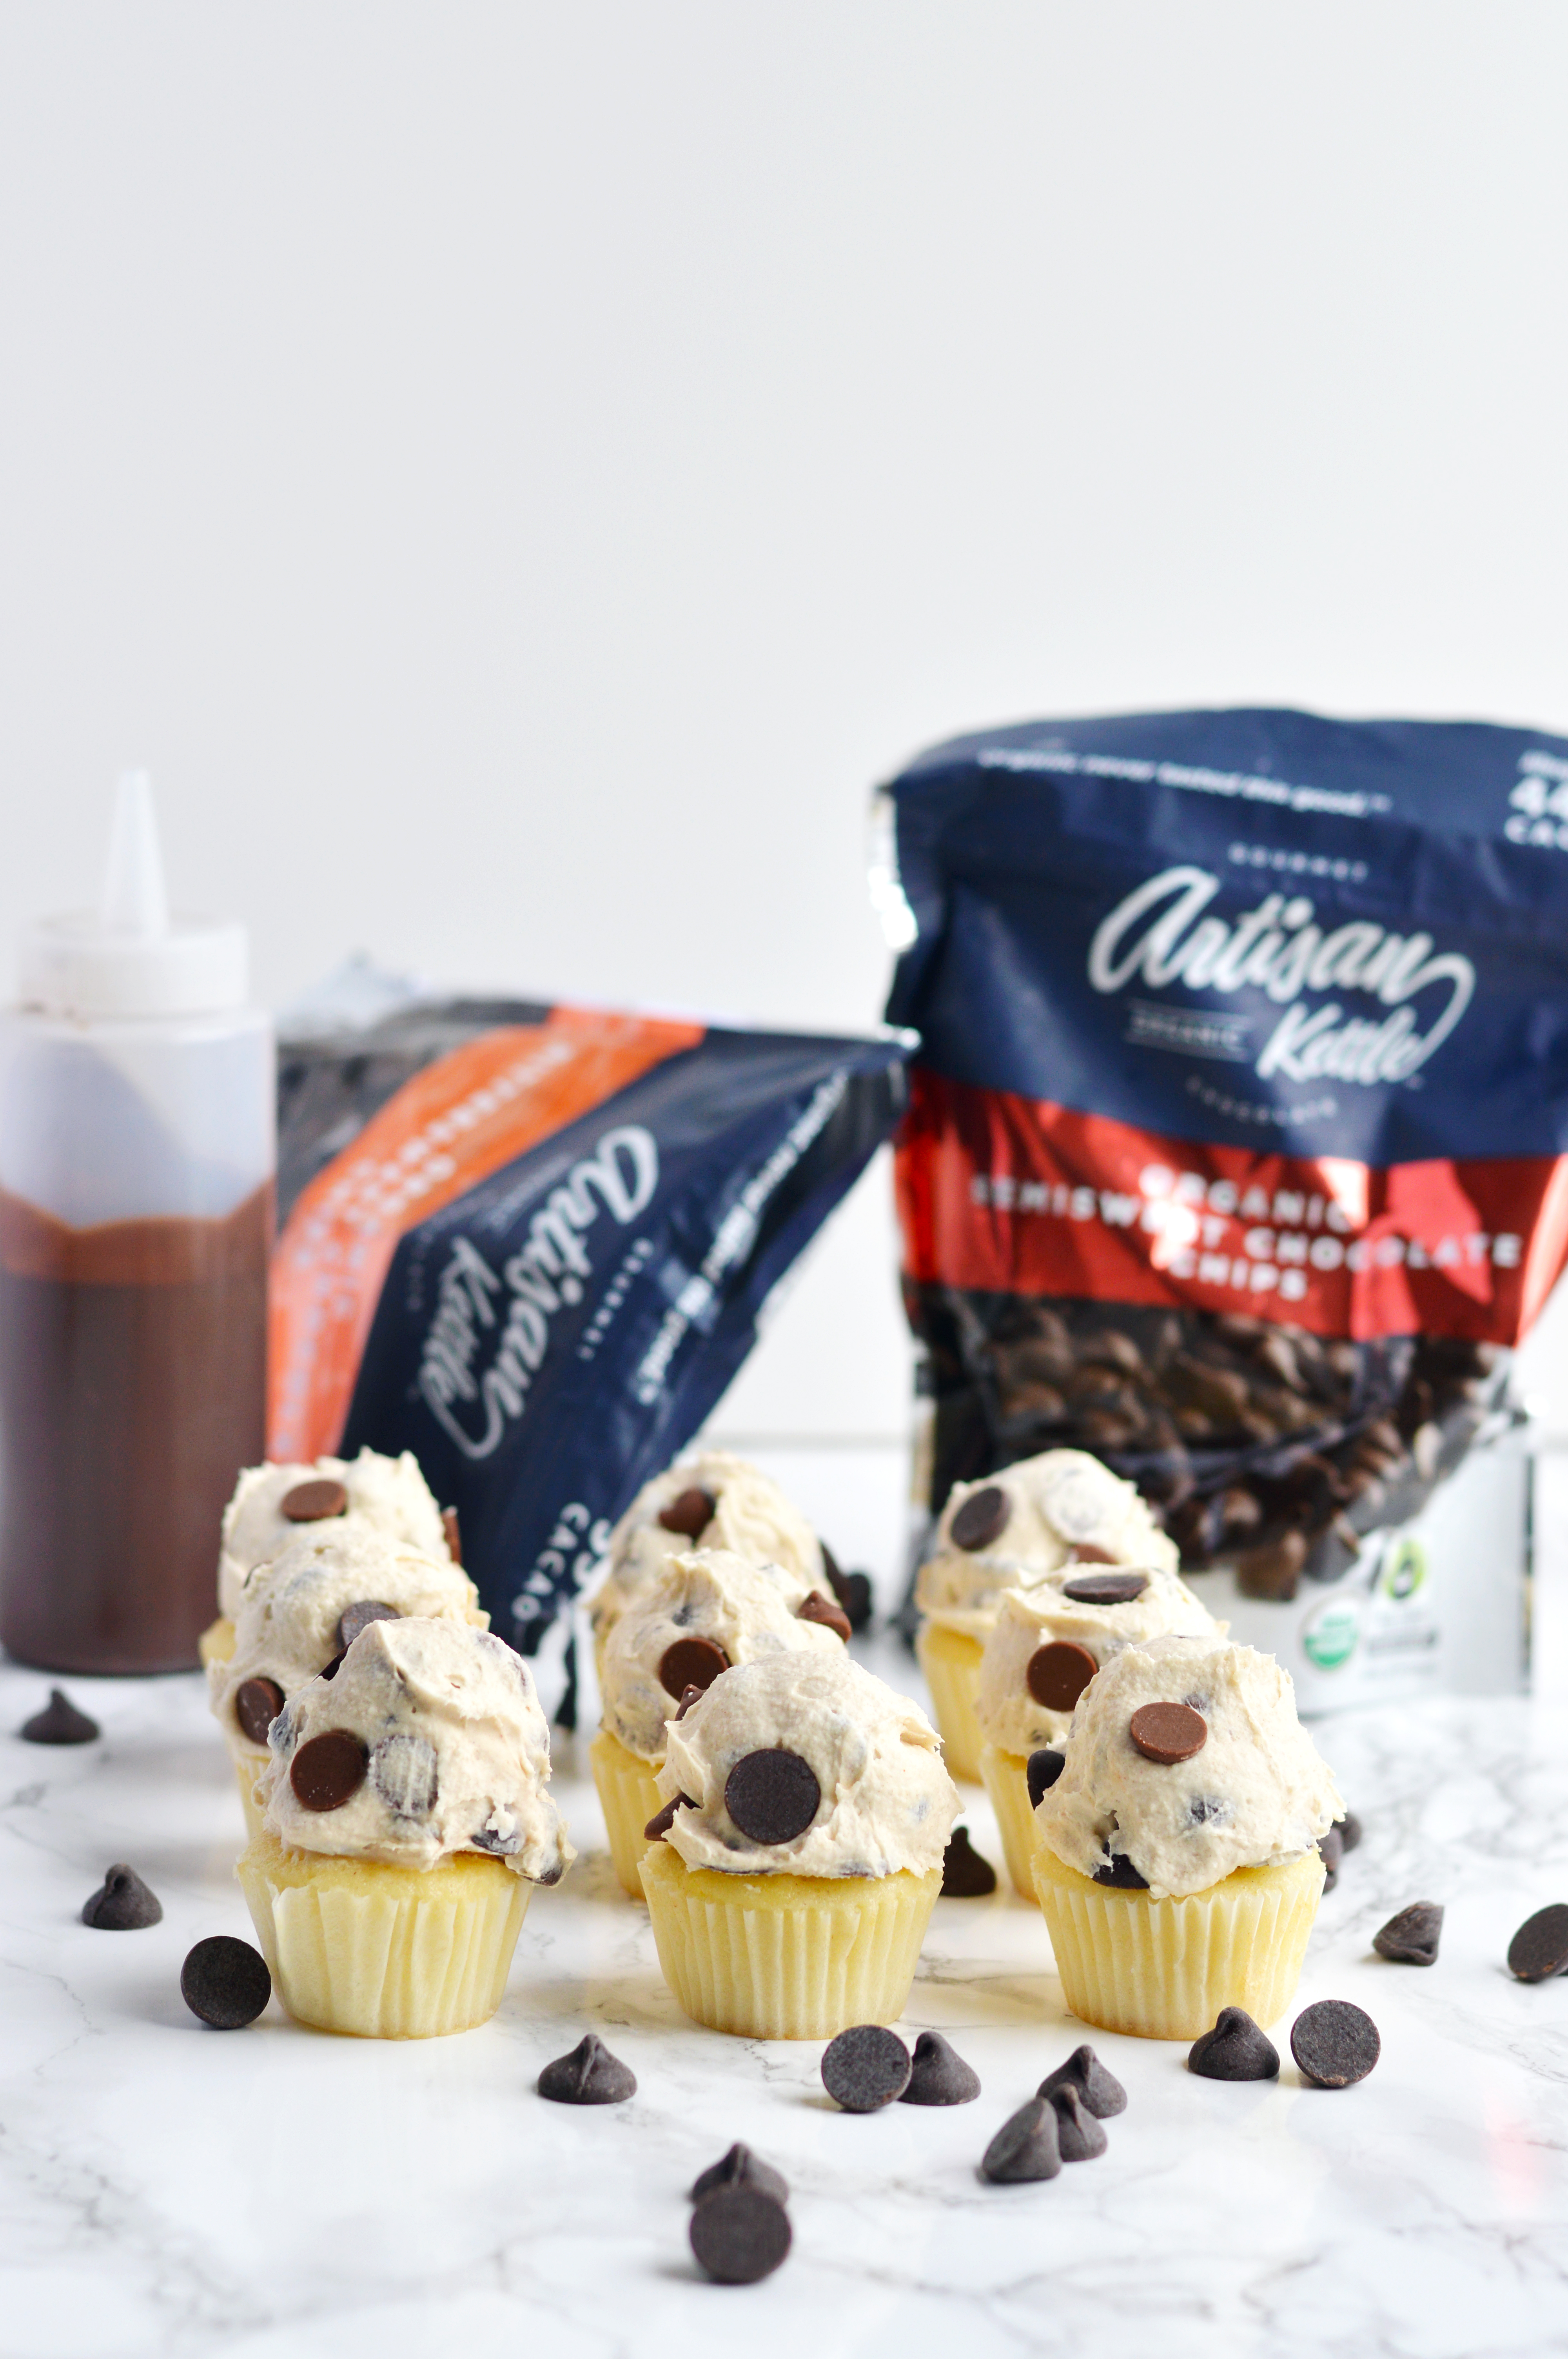
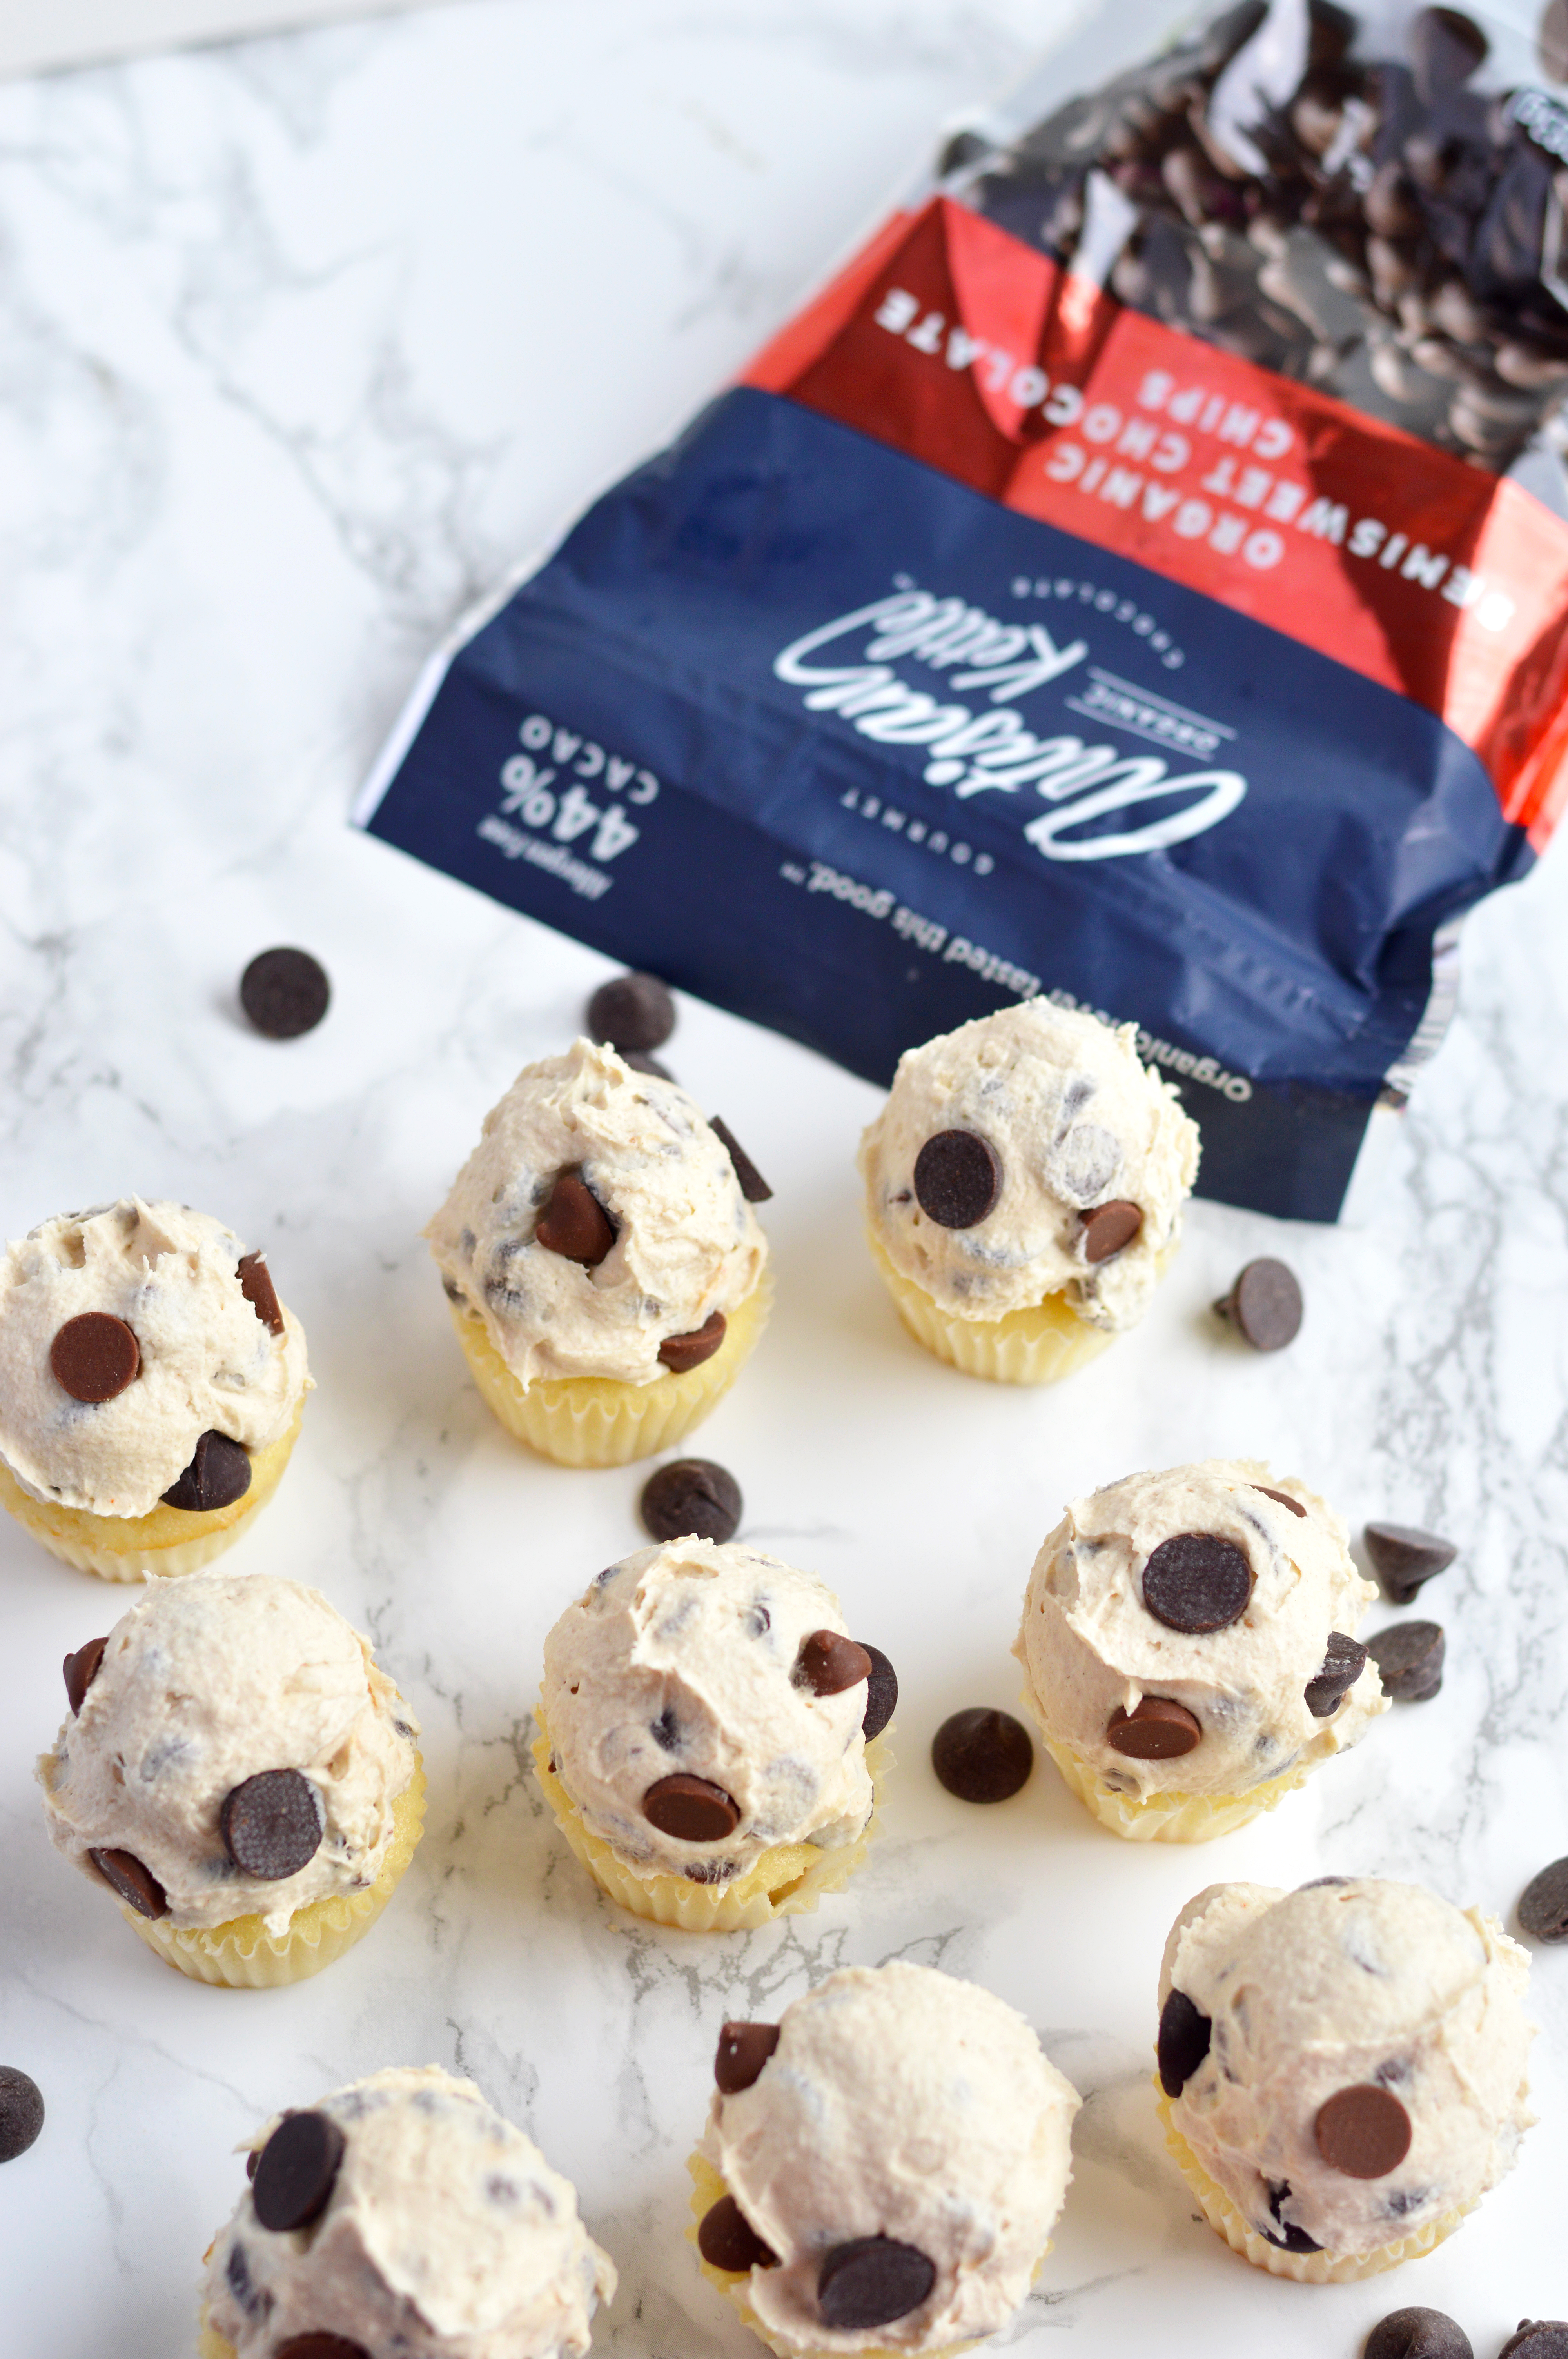
I’ve been in a motivational slump lately. Creative juices are at their all-time low, and laziness has taken over my life. It’s not like I don’t have content to share with you, but parking myself in front of the computer and writing a post seemed so pointless and boring I just didn’t have the heart to write. Anyway, I’m working on moving past the slump and onto a more productive track. These mini cupcakes are vanilla cupcakes that I made from leftover wedding cake batter (a post on that soon) and are topped with a scoop of (what I think) is the best cookie dough, homemade magic shell and flaky salt. While all the parts of the cupcake are delicious, the star of this particular recipe is the cookie dough. What I think makes this cookie dough better others is a key step: toasting the flour. Did you know that ingesting raw flour can cause foodborne illnesses such as E.coli and Salmonella? I know. I was surprised too. Toasting the flour not only makes it safe to consume, but it also gives the cookie dough a delicious nutty flavor that cuts down the sweetness of the cookie dough too. Other than toasting the flour, you would need some great quality chocolate chips. Artisan Kettle happened to send me some bags to work with, and they were delicious. I’ve really tried about every brand of chocolate out there, and for the price point, they’re hard to beat. Bonus, they’re organic, fair-trade and gluten free. It’s simple to make and so so easy. I happened to make the cupcakes because I had them on hand, but you can always just make a jar of cookie dough and store it in the fridge for a cold scoop able treat.
¾ c. all-purpose flour
½ c. butter, softened
⅓ c. sugar
2 tbsp. heavy cream
½ tsp. kosher salt
½ c. semi-sweet chocolate chips
½ c. milk chocolate chips
Instructions:
Preheat oven to 325˚F. Line a small sheet pan with aluminum foil.
Spread flour evenly on the sheet pan and toast in oven for about 10 minutes, or until the flour is lightly browned and smells nutty.
5 minutes into baking, stir the flour to toast it evenly.
Remove and cool flour before use, about 10 minutes.
In a medium bowl with an electric mixer, cream butter and sugar until light and fluffy, about 3-4 minutes.
Add the sugar, cream and salt and mix until combined.
Add flour and mix until combined.
Fold in chocolate chips. Either scoop on top of mini cupcakes or store in fridge for easy snacking.
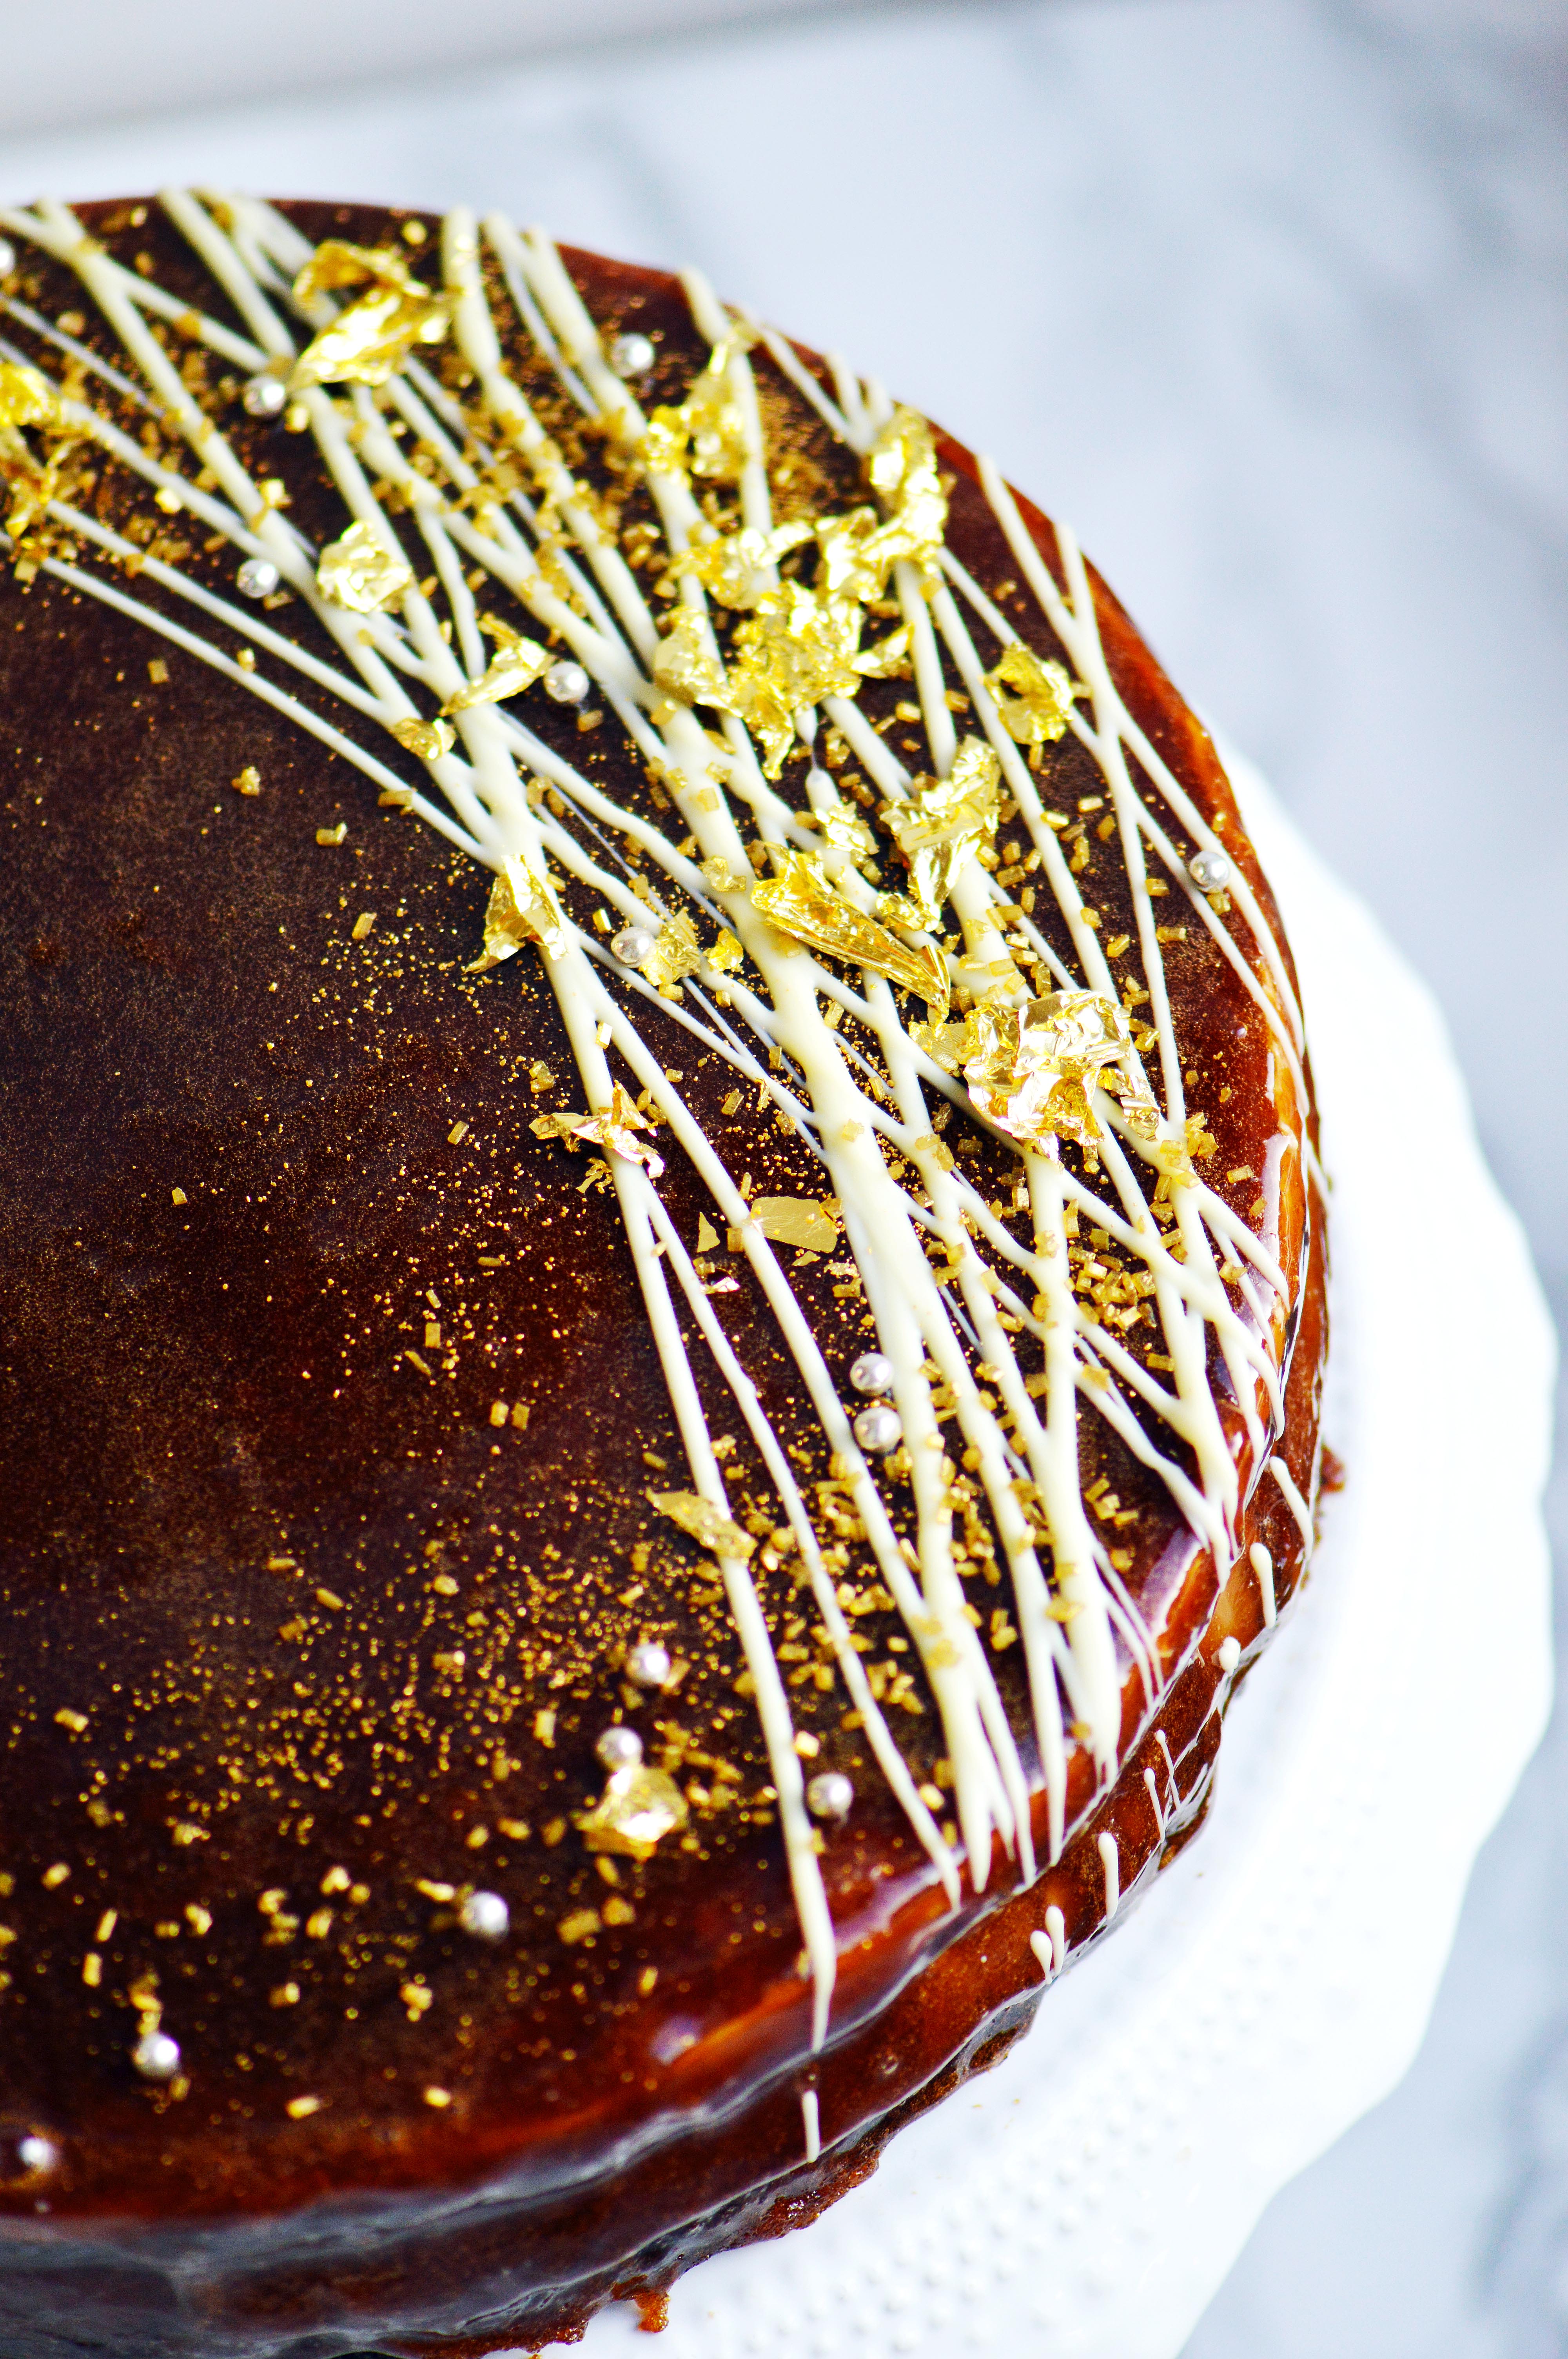
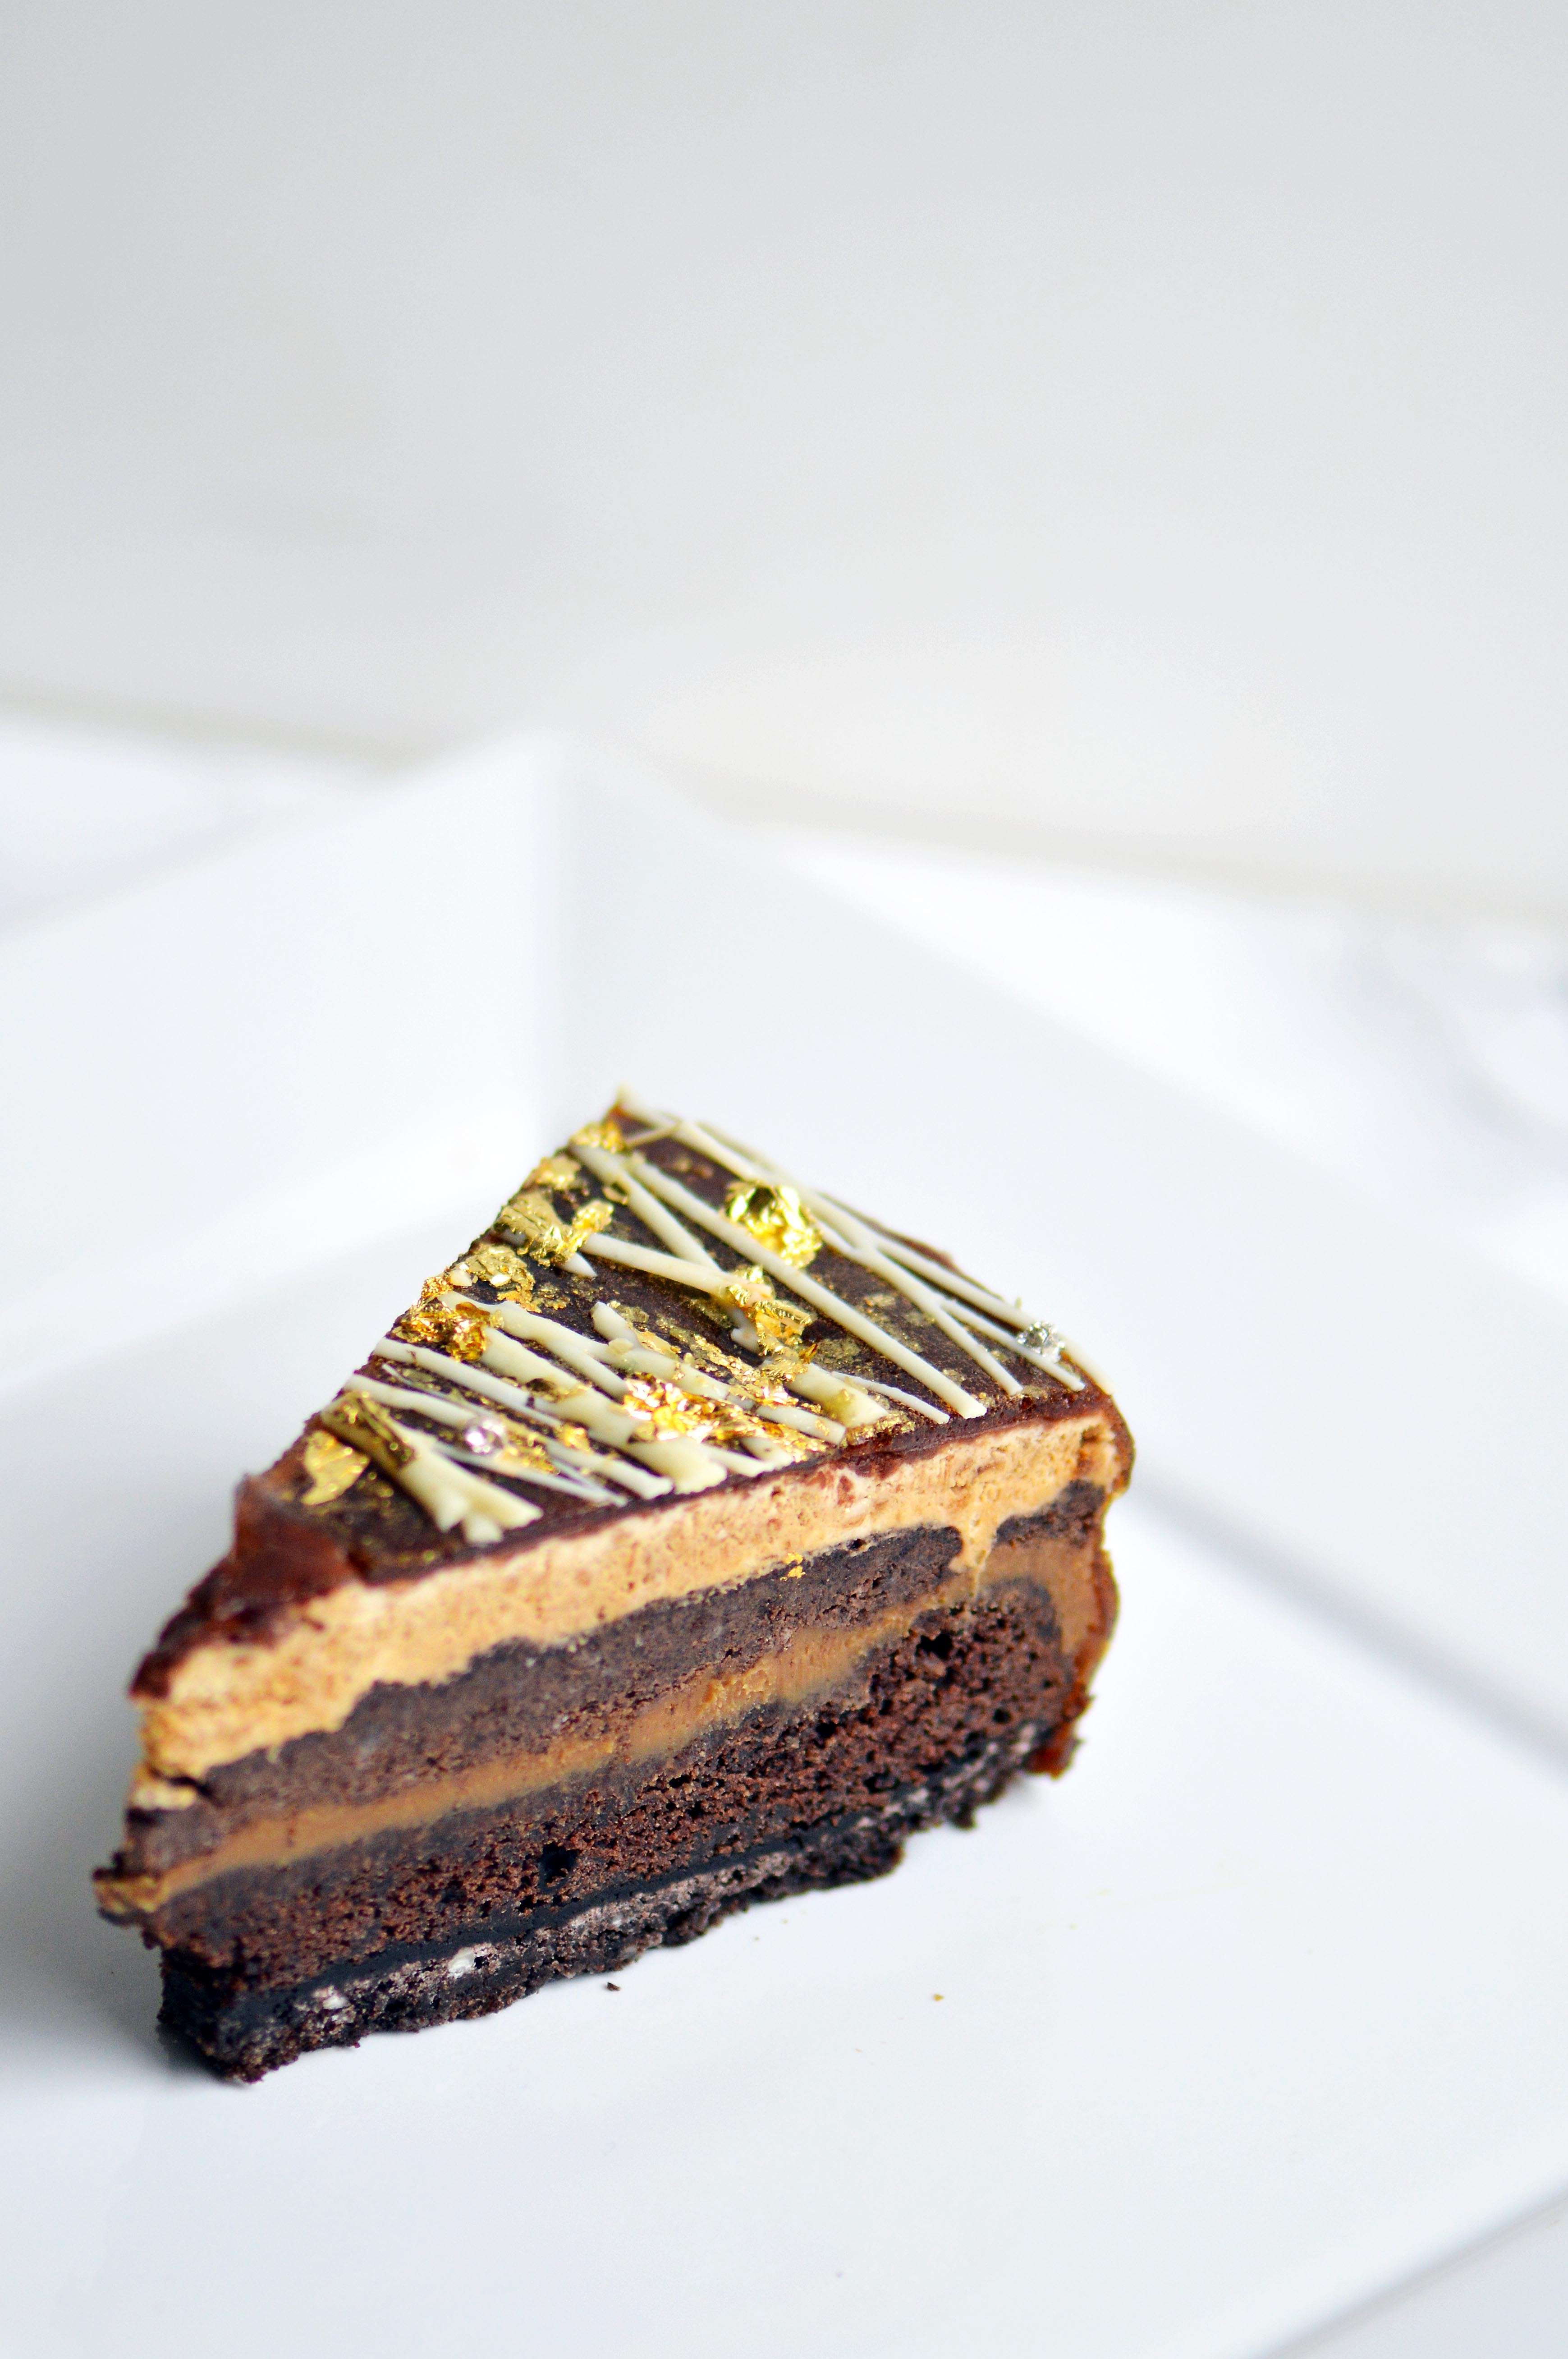
I rarely ever call anything the “best” because I know there is something out there that’s better. But I’m telling you, this cake is very, very good. Most of the cakes on this website are cakes that I’ve made for my family’s birthday celebrations, and they’ve tasted every single one of them. The good and bad thing about family members is that they are your biggest critics. They’re not too polite to say everything is good when it’s not, and aren’t afraid to tell you that your previous work was better. So when my brother said that it’s one of the best cakes I’ve ever made and requested the same one for this next birthday, I knew it was a winner. This isn’t your average layer cake where you glue rounds of the same flavored cake with some frosting and call it a day. It’s complex and flavorful. With 5 different layers and a jelly glaze, it’s definitely a labor of love. I’m telling you, even I was worn out after putting this cake together, but oh man was it worth it. It’s rich, soft, buttery, light, crunchy and silky at the same time. You can’t mistake the coffee or the chocolate and one doesn’t overpower the other. They’re perfectly balanced. First, you have a chocolate cookie crust, then a mocha cake: followed by a coffee ganache and then chocolate crunchies with a coffee mousse on top. The whole thing is covered in a coffee mirror glaze that’s very glossy and jelly-like. I’ve never made a mirror glaze before, but I have to say I’m not impressed by the flavor. Please, feel free to peel it off before consuming your cake. You want to make sure to use the very best white chocolate for the coffee ganache. I feel if you use the waxy cheap white chocolate, the balance of the cake will be off. This is the time to pull out the valrhona or the guittard and savor every bite of it. The Best Mocha Cake Makes one 9-inch cake
*Because there are so many components to this cake, I’ll put the ingredients and the instructions for each layer. I don’t want you to have to keep scrolling up for each ingredient. Note that each layer is layered in the same 9-inch springform pan.
Spray a 9-inch springform pan with nonstick spray and line the bottom with parchment paper.
Stir the cookie crumbs and melted butter in a bowl.
Press the evenly crumbs into the bottom of the springform pan.
Bake the crust for 8 minutes and cool completely before moving onto the next layer.
For the Mocha Cake:
Ingredients:
½ c. strong coffee, room temp
1 ½ tsp. espresso powder
½ c. whole milk
1 tsp. vanilla extract
1 ⅓ c. all-purpose flour
⅓ c. unsweetened cocoa powder
1 tsp. baking powder
½ tsp. baking soda
¼ tsp. salt
½ c. unsalted butter, room temp
½ c. granulated sugar
⅓ c. light brown sugar
Instructions:
Preheat oven to 350˚F.
In a measuring cup, whisk coffee, espresso powder, milk and vanilla extract together. Set aside.
In a medium bowl, whisk flour, cocoa powder, baking powder, baking soda and salt together. Set aside.
In the bowl of a standing mixer fitted with a paddle, beat the butter and the granulated and light brown sugar together until light and fluffy.
Turn the mixer on low and add in a third of the flour mixture followed by half of the coffee mixture. Repeat with another third of the flour followed by the remaining coffee mixture. End with the last third of the coffee mixture.
Pour about ¾ of the cake batter onto the cookie crust and bake for about 20-25 minutes until the cake is set. Let cool.
*You can bake a few cupcakes with the remaining cake batter to taste test.
For the Coffee Ganache:
Ingredients:
120 ml. heavy cream
180 g. white chocolate
2 tsp. espresso powder
1 tsp. coffee emulsion
Instructions:
In a microwave safe bowl, heat heavy cream and white chocolate for one minute. Whisk mixture together until it becomes homogenous. If the white chocolate did not fully melt, microwave at intervals of 30 seconds until melted.
Add in espresso powder and coffee emulsion and whisk.
Pour onto the mocha cake layer and put cake in fridge to set the ganache. About 30 minutes to an hour.
For the Espresso Chocolate Crunchies:
Ingredients:
10 Oreo cookies
¾ bottle of magic shell
2 tsp. espresso powder
Instructions:
Pulse the oreo cookies in a processor until fine crumbs form.
In a medium bowl, mix ¾ of a bottle of magic shell with the oreo crumbs until thoroughly combined.
Smooth on a layer of crunchies over the chilled coffee ganache.
Evenly sprinkle the 2 tsp of espresso powder over the crunchies.
Chill until the crunchies set, about 15-20 minutes in the freezer or an hour in the refrigerator.
For the Espresso Mousse:
Ingredients:
1 tsp. unflavored gelatin
1 tbsp. water
1 c. heavy cream
2 tbsp. powdered sugar
2 tsp. espresso powder
1 tsp. coffee emulsion
Instructions:
In a small bowl, mix gelatin with water and set aside to hydrate.
Beat the heavy cream until soft peaks form.
Heat the gelatin mixture in the microwave in 10 second increments until melted.
Add in the powdered sugar to the heavy cream and once it is mixed in, add in the gelatin slowly.
Whip until semi-stiff peaks form. Add in the espresso powder and the coffee emulsion.
Whip until stiff peaks form.
Lay a smooth layer of the espresso cream on top of the crunchies using an offset spatula.
If desired, you may use the remaining ¼ of the magic shell from the above recipe and smooth it over on top of the mousse to create a smoother top for the cake.
Chill in the refrigerator until firm, about an hour.
In a medium bowl, mix ¼ c. water with 3 tsp. gelatin and set aside for 5 minutes.
Add 1 cup of hot water to the gelatin mixture and whisk until gelatin has dissolved.
Add in sugar, espresso powder and coffee emulsion and whisk until smooth.
Once mixture is thickened and cooled, about 20-25 minutes (it should be viscous, I didn’t wait long enough and it wasn’t as thick as I would’ve liked), remove the cake from the refrigerator and unmold from the springpan.
Place cake on top of wire rack with a sheet pan on the bottom.
Pour the gelatin mixture evenly over the cake and let it set. This is a messy move, you will have leftover gelatin all over the bottom of the sheet pan. There is no saving it, just let it go.
While the cake sets, melt about ¼ c. white chocolate in piping bag with a tiny hole cut at the end. Drizzle over one side of the cake in straight lines.
Sprinkle the gold sanding sugar and silver dragees over the same side.
I’m not sorry to see 2016 go. I kind of felt like it could be salvaged until Carrie Fisher died. That kind of gave it the nail in the coffin. It was as if 2016 was saying, “Sayonara, sucker!” while waving a rude gesture. I’m not quite looking forward to 2017 either, the exception being that I am looking forward to creating more projects for you and sharing this and that about my life (hopefully good news, and not bad). By the way, I did finish the holiday cake I was raving about in my last post. Unfortunately, I came down with a severe case of sinusitis and I couldn’t work on the actual post. I think I will save it for 2017. (Side note: I hope unicorns are still relevant by this point next year.)