I rarely ever call anything the “best” because I know there is something out there that’s better. But I’m telling you, this cake is very, very good. Most of the cakes on this website are cakes that I’ve made for my family’s birthday celebrations, and they’ve tasted every single one of them. The good and bad thing about family members is that they are your biggest critics. They’re not too polite to say everything is good when it’s not, and aren’t afraid to tell you that your previous work was better. So when my brother said that it’s one of the best cakes I’ve ever made and requested the same one for this next birthday, I knew it was a winner.
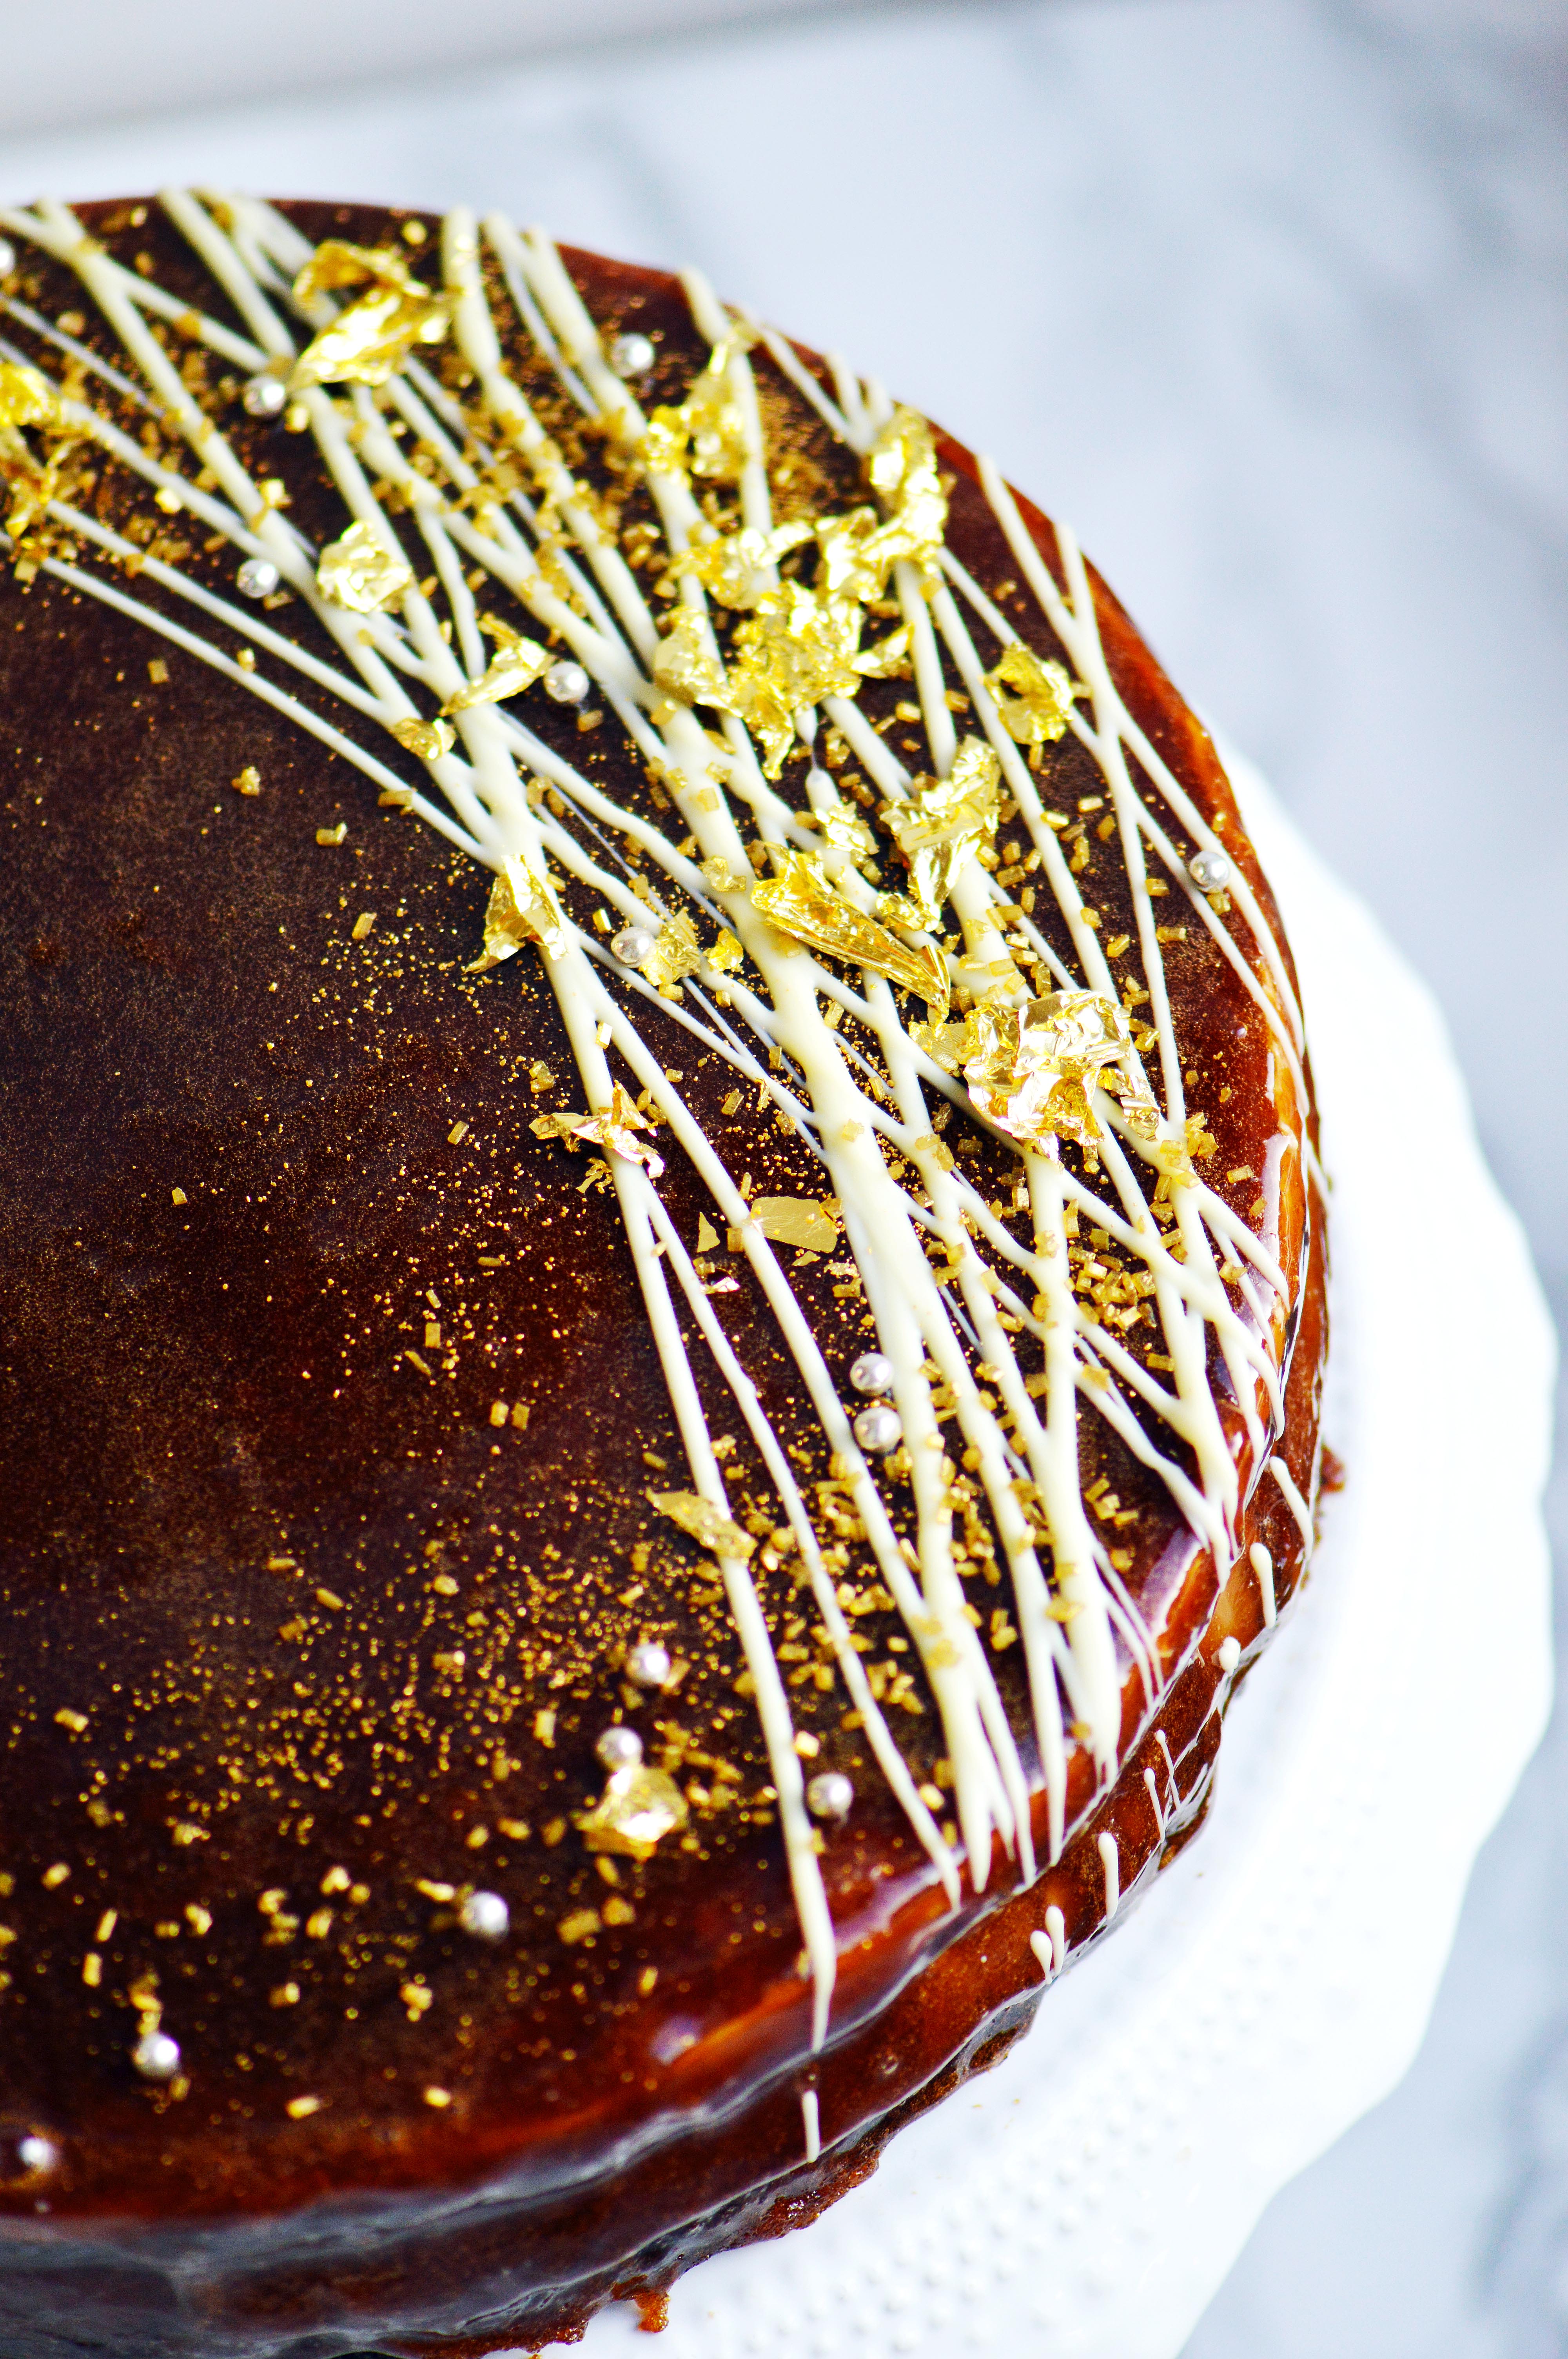
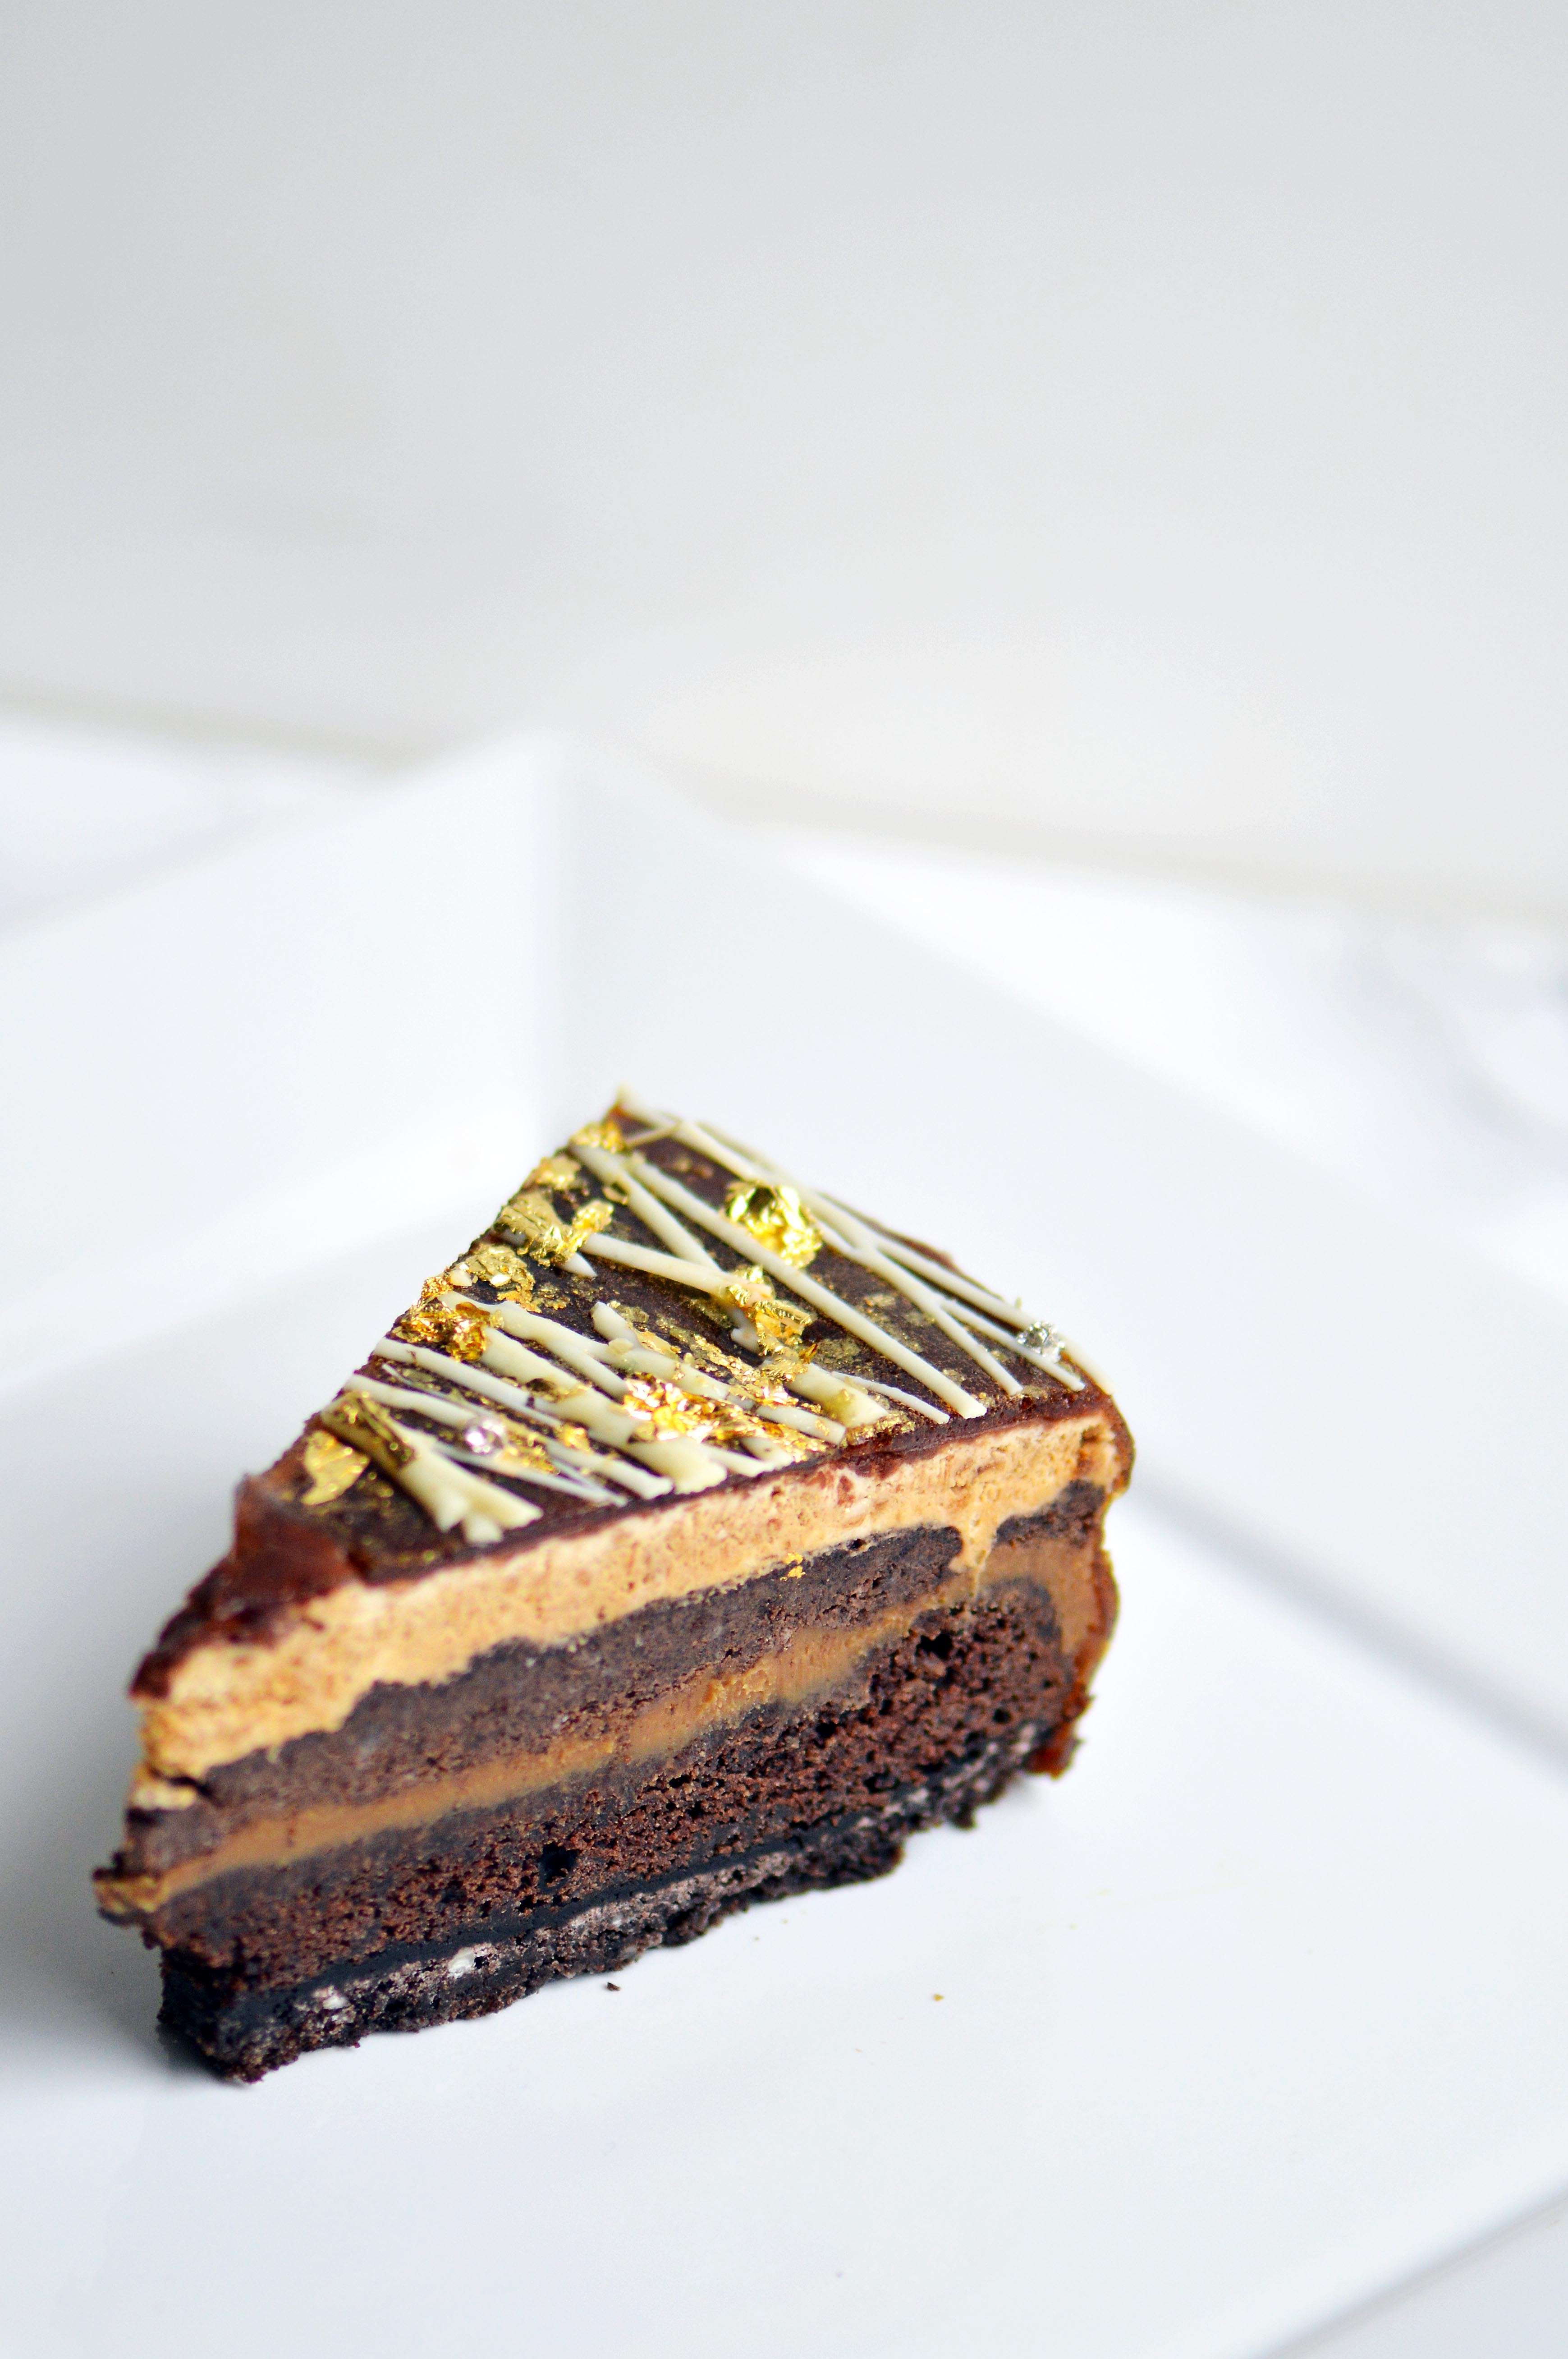
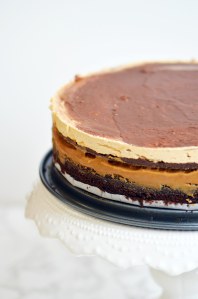 This isn’t your average layer cake where you glue rounds of the same flavored cake with some frosting and call it a day. It’s complex and flavorful. With 5 different layers and a jelly glaze, it’s definitely a labor of love. I’m telling you, even I was worn out after putting this cake together, but oh man was it worth it. It’s rich, soft, buttery, light, crunchy and silky at the same time. You can’t mistake the coffee or the chocolate and one doesn’t overpower the other. They’re perfectly balanced.
 First, you have a chocolate cookie crust, then a mocha cake: followed by a coffee ganache and then chocolate crunchies with a coffee mousse on top. The whole thing is covered in a coffee mirror glaze that’s very glossy and jelly-like. I’ve never made a mirror glaze before, but I have to say I’m not impressed by the flavor. Please, feel free to peel it off before consuming your cake.
 You want to make sure to use the very best white chocolate for the coffee ganache. I feel if you use the waxy cheap white chocolate, the balance of the cake will be off. This is the time to pull out the valrhona or the guittard and savor every bite of it.
 The Best Mocha Cake
Makes one 9-inch cake
*Because there are so many components to this cake, I’ll put the ingredients and the instructions for each layer. I don’t want you to have to keep scrolling up for each ingredient. Note that each layer is layered in the same 9-inch springform pan.
For the Oreo Crust:
Ingredients:
25 Oreo cookies, crushed
5 tbsp. unsalted butter, melted
Instructions:
- Preheat the oven to 350˚F.
- Spray a 9-inch springform pan with nonstick spray and line the bottom with parchment paper.
- Stir the cookie crumbs and melted butter in a bowl.
- Press the evenly crumbs into the bottom of the springform pan.
- Bake the crust for 8 minutes and cool completely before moving onto the next layer.
For the Mocha Cake:
Ingredients:
½ c. strong coffee, room temp
1 ½ tsp. espresso powder
½ c. whole milk
1 tsp. vanilla extract
1 ⅓ c. all-purpose flour
⅓ c. unsweetened cocoa powder
1 tsp. baking powder
½ tsp. baking soda
¼ tsp. salt
½ c. unsalted butter, room temp
½ c. granulated sugar
⅓ c. light brown sugar
Instructions:
- Preheat oven to 350˚F.
- In a measuring cup, whisk coffee, espresso powder, milk and vanilla extract together. Set aside.
- In a medium bowl, whisk flour, cocoa powder, baking powder, baking soda and salt together. Set aside.
- In the bowl of a standing mixer fitted with a paddle, beat the butter and the granulated and light brown sugar together until light and fluffy.
- Turn the mixer on low and add in a third of the flour mixture followed by half of the coffee mixture. Repeat with another third of the flour followed by the remaining coffee mixture. End with the last third of the coffee mixture.
- Pour about ¾ of the cake batter onto the cookie crust and bake for about 20-25 minutes until the cake is set. Let cool.
- *You can bake a few cupcakes with the remaining cake batter to taste test.
For the Coffee Ganache:
Ingredients:
120 ml. heavy cream
180 g. white chocolate
2 tsp. espresso powder
1 tsp. coffee emulsion
Instructions:
- In a microwave safe bowl, heat heavy cream and white chocolate for one minute. Whisk mixture together until it becomes homogenous. If the white chocolate did not fully melt, microwave at intervals of 30 seconds until melted.
- Add in espresso powder and coffee emulsion and whisk.
- Pour onto the mocha cake layer and put cake in fridge to set the ganache. About 30 minutes to an hour.
For the Espresso Chocolate Crunchies:
Ingredients:
10 Oreo cookies
¾ bottle of magic shell
2 tsp. espresso powder
Instructions:
- Pulse the oreo cookies in a processor until fine crumbs form.
- In a medium bowl, mix ¾ of a bottle of magic shell with the oreo crumbs until thoroughly combined.
- Smooth on a layer of crunchies over the chilled coffee ganache.
- Evenly sprinkle the 2 tsp of espresso powder over the crunchies.
- Chill until the crunchies set, about 15-20 minutes in the freezer or an hour in the refrigerator.
For the Espresso Mousse:
Ingredients:
1 tsp. unflavored gelatin
1 tbsp. water
1 c. heavy cream
2 tbsp. powdered sugar
2 tsp. espresso powder
1 tsp. coffee emulsion
Instructions:
- In a small bowl, mix gelatin with water and set aside to hydrate.
- Beat the heavy cream until soft peaks form.
- Heat the gelatin mixture in the microwave in 10 second increments until melted.
- Add in the powdered sugar to the heavy cream and once it is mixed in, add in the gelatin slowly.
- Whip until semi-stiff peaks form. Add in the espresso powder and the coffee emulsion.
- Whip until stiff peaks form.
- Lay a smooth layer of the espresso cream on top of the crunchies using an offset spatula.
- If desired, you may use the remaining ¼ of the magic shell from the above recipe and smooth it over on top of the mousse to create a smoother top for the cake.
- Chill in the refrigerator until firm, about an hour.
For the Espresso Mirror Glaze:
Ingredients:
1 ¼ c. water, divided
3 tsp. unflavored gelatin
1 ¾ c. granulated sugar
1 tbsp. espresso powder
1 tsp. coffee emulsion
white chocolate (for decoration)
gold leaf/ gold flakes (for decoration)
gold sanding sugar (for decoration)
silver dragees (for decoration)
Instructions:
- In a medium bowl, mix ¼ c. water with 3 tsp. gelatin and set aside for 5 minutes.
- Add 1 cup of hot water to the gelatin mixture and whisk until gelatin has dissolved.
- Add in sugar, espresso powder and coffee emulsion and whisk until smooth.
- Once mixture is thickened and cooled, about 20-25 minutes (it should be viscous, I didn’t wait long enough and it wasn’t as thick as I would’ve liked), remove the cake from the refrigerator and unmold from the springpan.
- Place cake on top of wire rack with a sheet pan on the bottom.
- Pour the gelatin mixture evenly over the cake and let it set. This is a messy move, you will have leftover gelatin all over the bottom of the sheet pan. There is no saving it, just let it go.
- While the cake sets, melt about ¼ c. white chocolate in piping bag with a tiny hole cut at the end. Drizzle over one side of the cake in straight lines.
- Sprinkle the gold sanding sugar and silver dragees over the same side.
- Add the gold leaf.
- Chill in fridge until ready to serve.
Oreo crust recipe adapted from Crazy For Crust.
Mocha cake recipe adapted from Brown Eyed Baker.

 I remember holding a Gameboy Color in my hands for the first time. My brother had bought it with months of saving up for it and I couldn’t believe the handheld color display. Along with the Gameboy he purchased Pokémon Red, which was just starting to get its hype. I loved that game and spent hours leveling up Pokémon and discovering glitches like the MissingNo.. This glitch let you duplicate rare candies infinitely which you then used to up your team to level 99. Honestly, leveling up your team so high is useless because you can beat the whole game with much less, but bragging rights seem to never go out of fashion. And while Pokémon Red has a special place in my heart, Pokemon Silver has to be the best one out there. (Don’t @ me, please.)
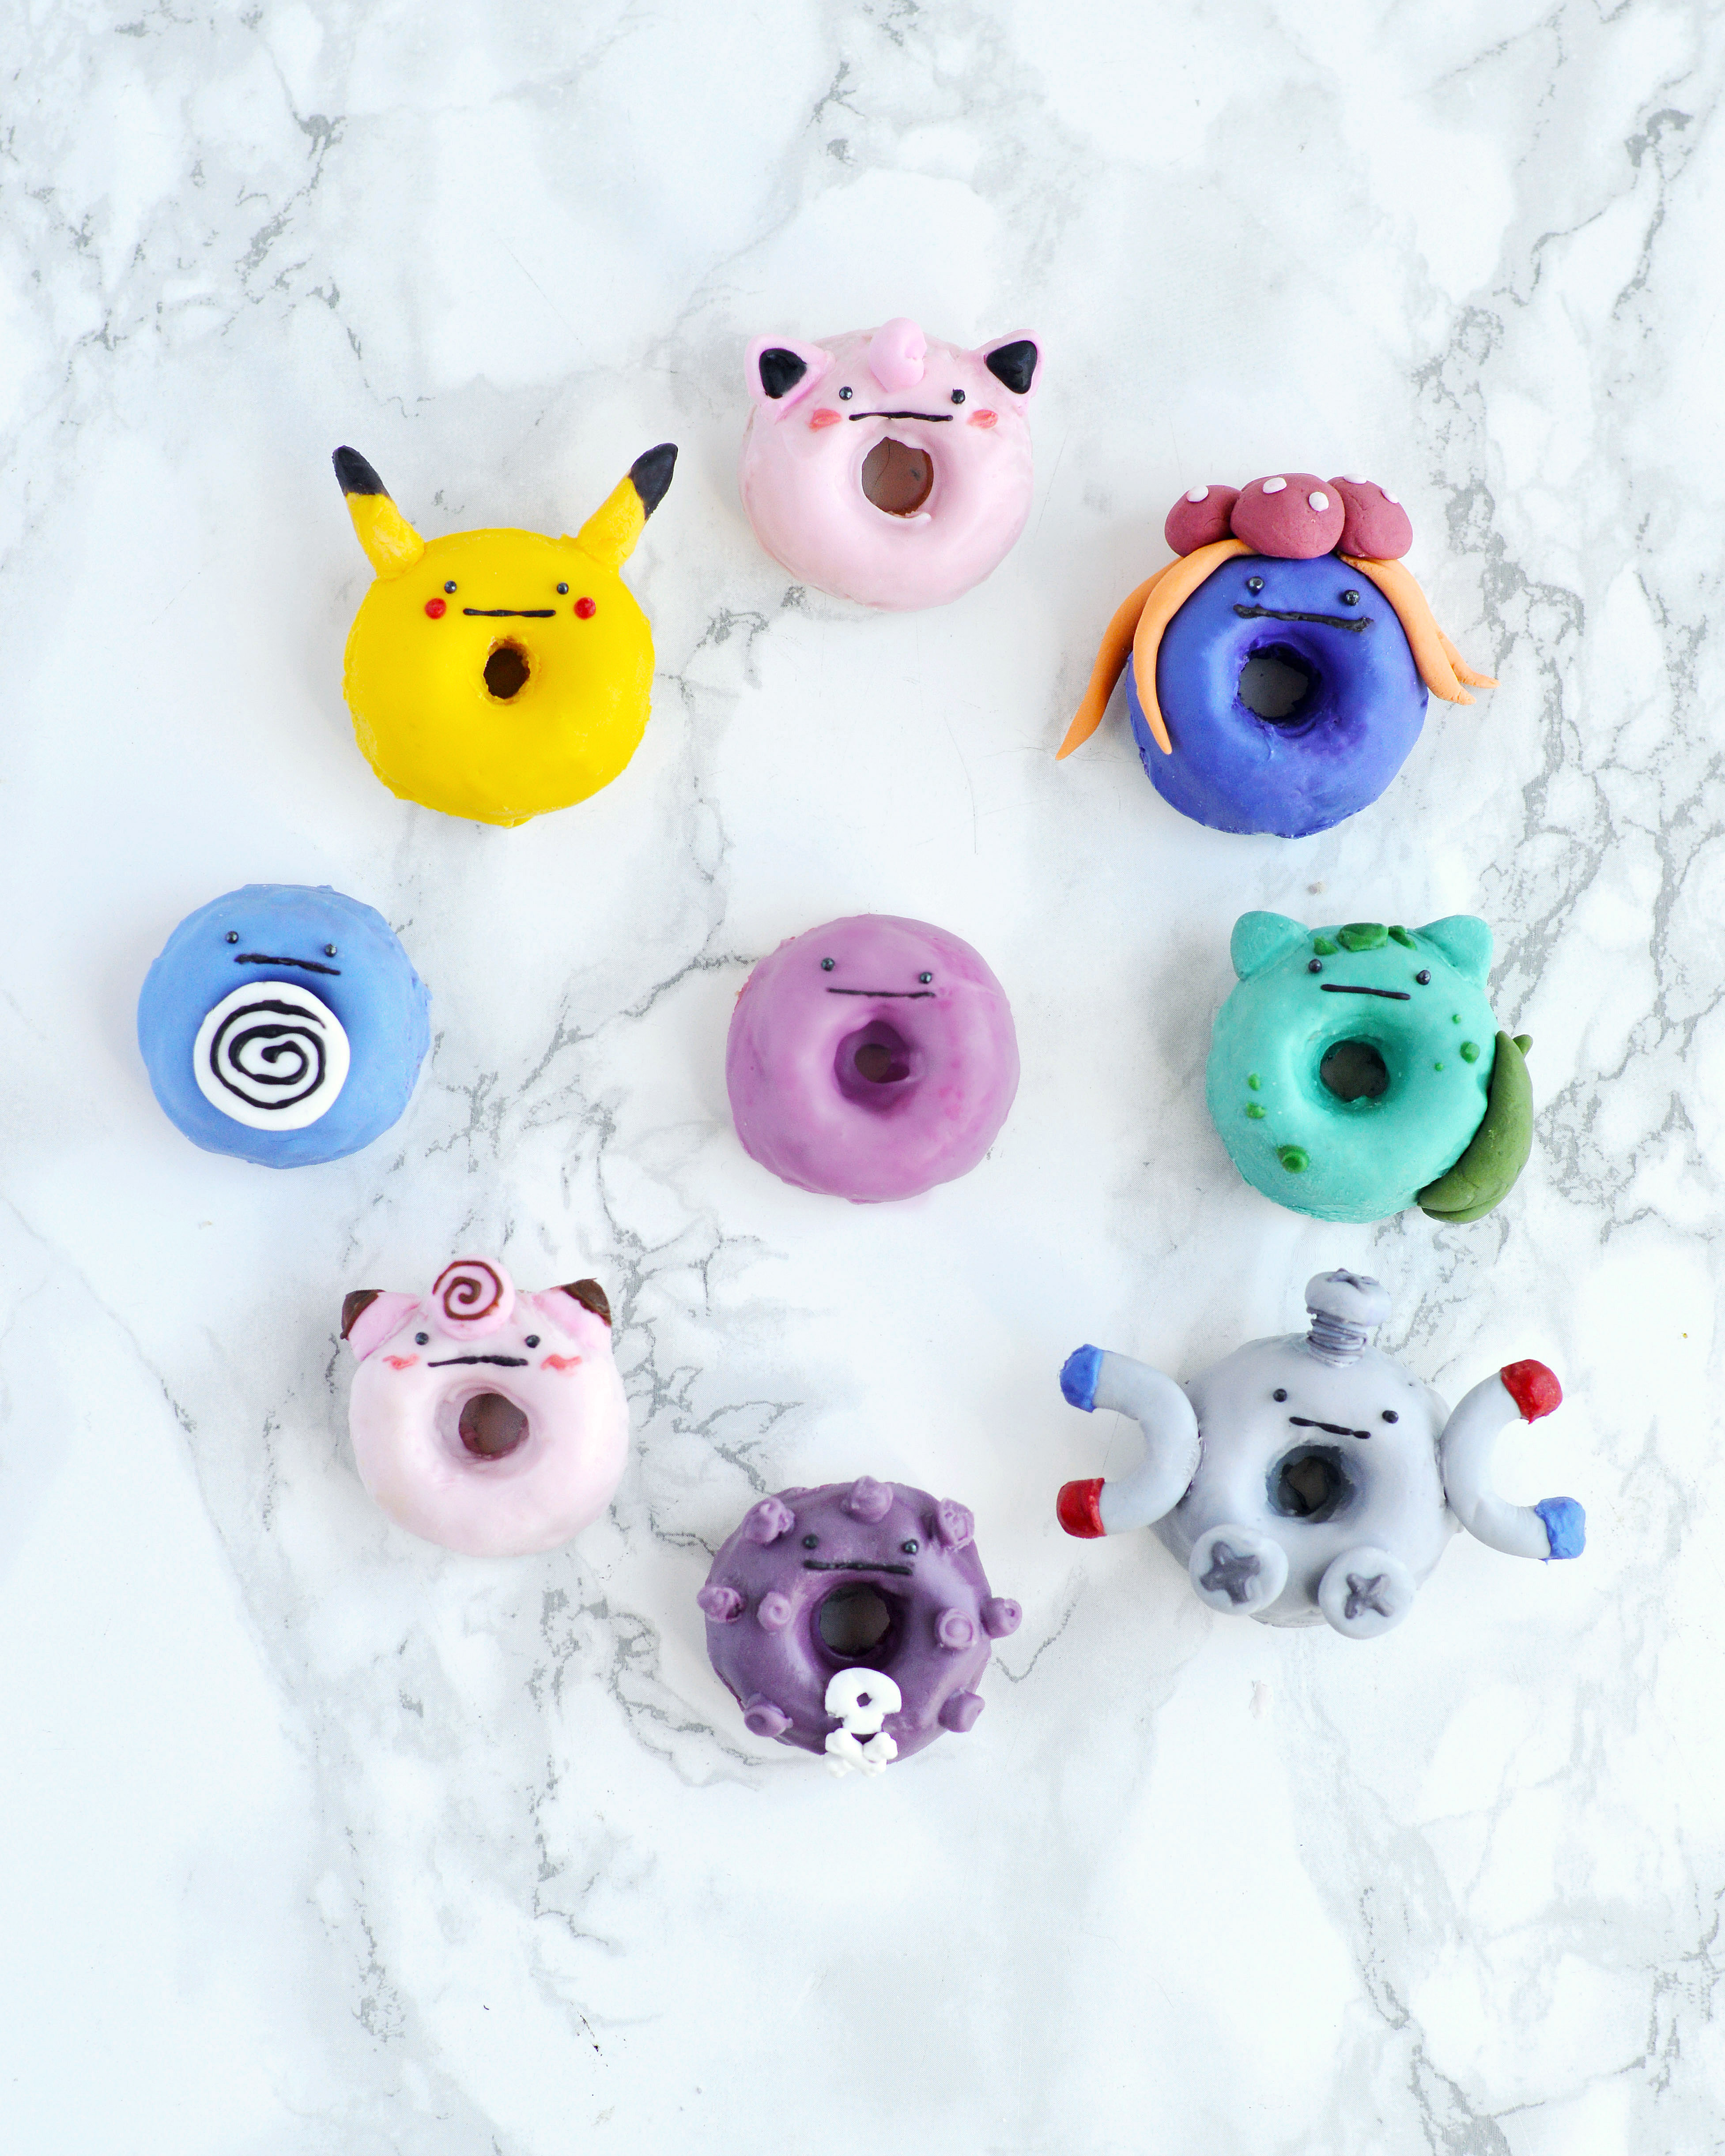
 I’ve made Star Wars doughnuts in the past, so I thought it’d be fun to do a Pokémon version. Only this time I decided to make them into Ditto versions. If you didn’t know, Ditto is a Pokémon that copies the abilities and appearances of other Pokémon except for their face. I guess this was a way of keeping the same simple face while making fun appendages. But honestly, I think they’re very cute in their own right. Just look at all the plushies that are made of them!
 If you follow me on Instagram, you can see the process of making some of these. Click below to be taken to the page: