Christmas Wreath Macarons

Christmas Wreath Macarons 1Am I the only person that thinks that Christmas snuck upon us this year? I feel like I was waiting forever for Thanksgiving and then BAM! Christmas is right around the corner. (Did anyone else think of this Friends’ scene when they read BAM?) I’ve been dreaming of these macarons since December started and I finally had a chance to bake them earlier this week.
Christmas Wreath Macarons 2
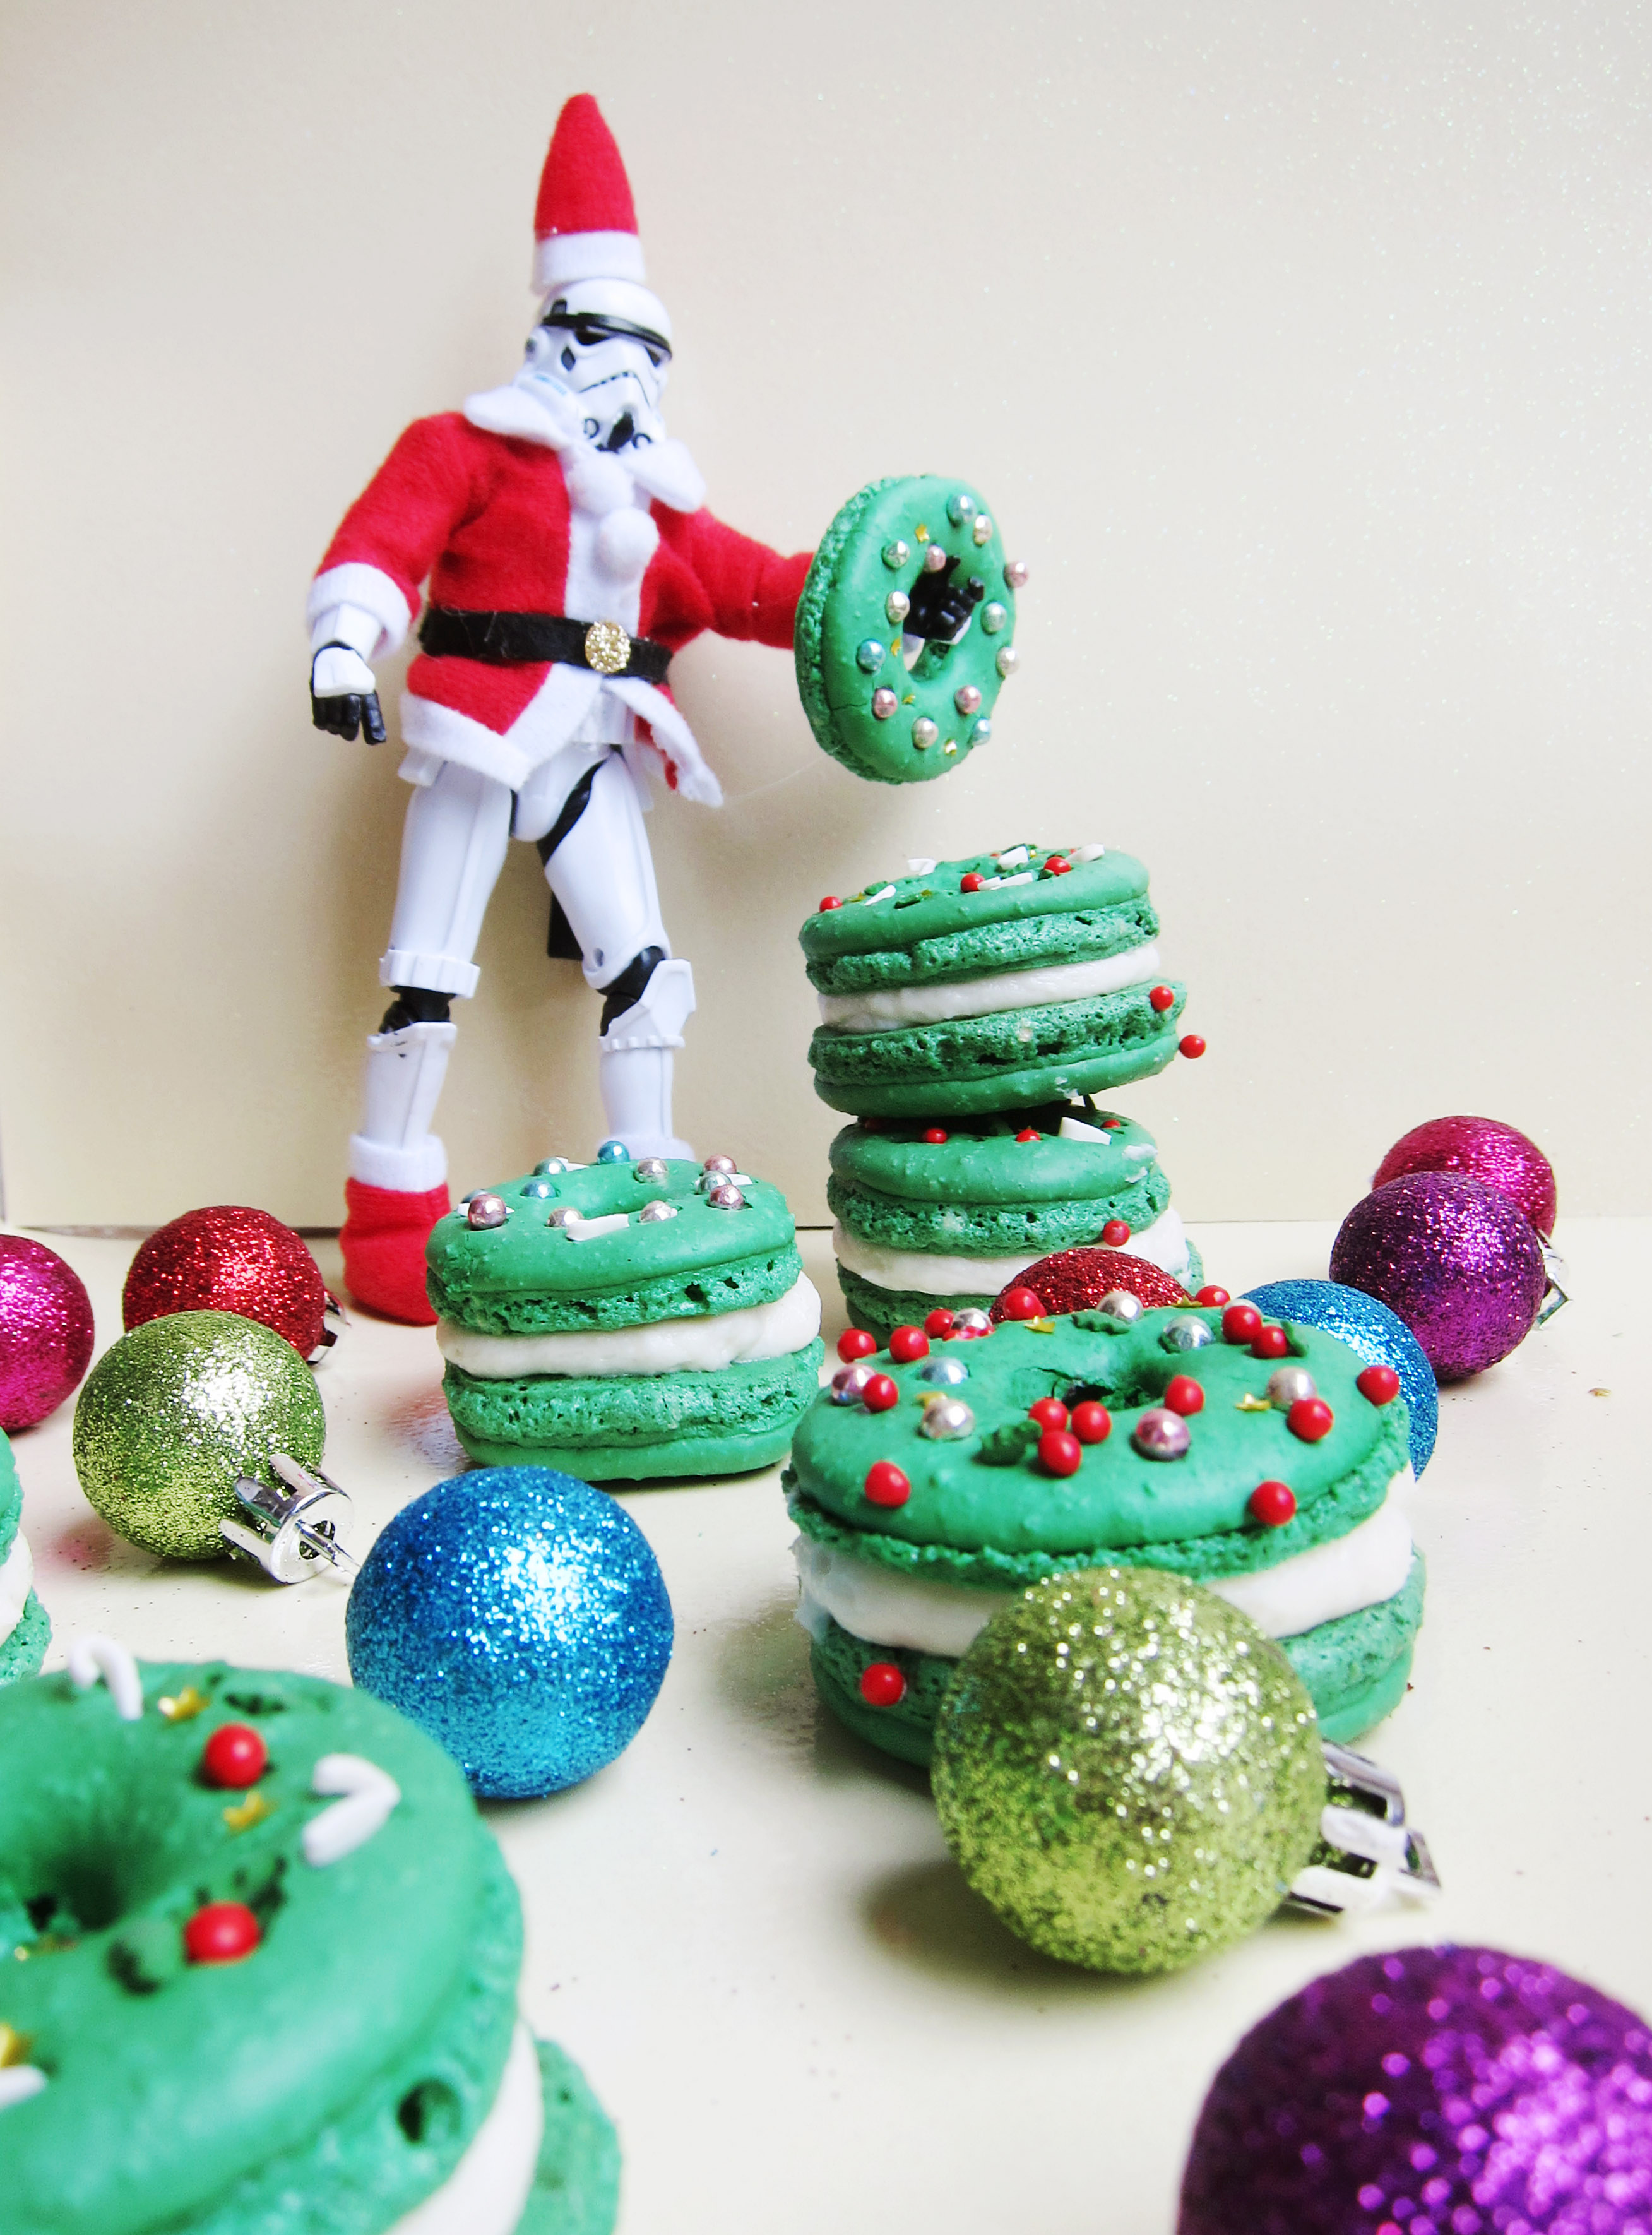
Is it cold where you live? It’s been freezing in NJ and I am not used to working in a cooler kitchen. The weather must’ve been super dry because my macaron shells set before I was able to place my sprinkles, hence the little cracks in the shell where I tried to force each sprinkle in with a pair of tweezers (kitchen-use-only-tweezers). I have to admit I was getting quite frustrated with making them and then this happened:
Christmas Wreath Macarons 4Here are my attempts at his mug shots.
Christmas Wreath Macarons 5The thing is, Bear, my cat loves to watch me bake and prep food on the kitchen table. He demands to sit on his own chair and Petey (my other cat) was occupying Bear’s usual space. Fed up with watching from the floor, he decided to get up close and onto the table where the trays of macarons were drying. If you don’t know already, macaron batter is sticky and it took forever to get the green goo out of his tiny paws. Not to mention the trail of green batter on the floor he left when he ran away from me.
Christmas Wreath Macarons 3Despite my frustrations making this particular recipe, I think the macarons would make a cute addition to any cookie platter and add a bit of holiday flair. You can also change up the look of the macaron with different sprinkles. Just make sure you put them on before the shells dry out. If you don’t, they’ll just bounce off like hail on cement pavement.

Christmas Wreath Macarons

Ingredients:

212 g. almond meal
212 g. powdered sugar
172 g. egg whites, divided to 82 g. and 90 g (aged, if possible)
236 g. sugar
158 g. water
green gel food color
various sprinkles

Instructions:

  1. Line two baking sheets with parchment paper or silicone mats.
  2. In the bowl of a food processor, add the almond meal and powdered sugar and pulse until thoroughly combined.
  3. Sift the mixture over a large mixing bowl, throwing out the lumps as they appear. Add 82 g. of the egg whites and stir until you get a thick mixture.
  4. In a small pot attached with a candy thermometer, combine the sugar and water over medium heat and boil until the syrup reaches 200˚F.
  5. Once the syrup reaches 200˚F, start whipping the remaining 90 g. in the bowl of your stand mixer with the whisk attachment on medium speed until soft peaks are reached.
  6. Once the syrup reaches 248 degrees, remove the pot off the burner and slowly pour the syrup down the side of the mixing bowl with the egg whites on medium speed.
  7. Once the egg whites are fully incorporated, increase the speed to medium high until egg whites form glossy, stiff peaks. Add two drops of the green gel food color and mix until batter turns a bright shade of green.
  8. Mix a ⅓ of the egg white mix to the almond mixture and stir together until the batter is slightly lighter and less pasty. From then on, fold in ⅓ of the egg white mixture at a time until the mixture “flows like magma”.  The mixture should be smooth and run thick ribbons off the spatula.
  9. With a pastry bag fitted with a ¼ in. plain tip, pipe a ring of macaron batter leaving the hole in the center as wide as possible. (If you do not, it will close up when the macaron bakes.)
  10. Before the batter dries, place your sprinkles in the desired area.
  11. The piped batter may have peaks but should smooth away in a minute or two. Let the batter stand until the tops of the macaron batter are dry to the touch, about 30 mins to 1 hour.
  12. Preheat the oven to 275-325˚F. If your oven tends to run hot go for 275˚, if not then 325˚.
  13. Bake 10-13 minutes, until the feet are formed and the tops are smooth. The batter is done when you slightly wiggle it and it starts to come off of the parchment paper / silicone mat.
  14. Let cool and fill.

Basic Vanilla Frosting

Ingredients:
2 c. whole milk
½ c. flour
¼ tsp. salt
1 1b. (4 sticks) unsalted butter, room temperature
2 c. sugar
1 tbsp. vanilla extract

Instructions:

  1. In a saucier pan, put milk, salt and flour and whisk until combined on medium heat.
  2. Continuously whisk mixture until thickened to a pudding like consistency.
  3. Once thickened, strain through a mesh strainer into a bowl with a spatula to remove lumps.
  4. Place a piece of plastic wrap on top of the flour mixture and put into the fridge until fully cool.
  5. In a mixer bowl fitted with the whisk attachment, mix the sugar and butter on high speed until fluffy and pale about, 5-10 minutes.
  6. Add the chilled flour mixture and continue to whip on high speed until the sugar is completely dissolved and the mixture is no longer gritty, about 5-10 minutes.
  7. Add the vanilla extract and mix until combined.

*Basic macarons adapted from Bouchon Bakery by Thomas Keller, Sebastien Rouxel.

Star Wars Rebels Party

Star Wars Rebels PartyIt’s been a while. With Thanksgiving and prepping for Step 3’s, life has been hectic! I feel a mix of regret and sorrow that I missed out on all things fall for the blog. But, it has fast forwarded to December which means that the holidays are here and that translates to holiday goodies. But before we get started on all things Christmas, let’s get to the Rebels Party.

As someone who has watched the Star Wars movies exclusively, I was skeptical when the hype for Star Wars Rebels rose out of midair. But after watching one episode (which led to another and another…), I have to say that I’ve fallen in love with the characters and the story line. There is just the right mix of darkness and humor for all ages to enjoy.

So when Mr. L approached me about doing another Star Wars party, I couldn’t say no. (This is the second Star Wars themed party to be featured on the blog. The first one is linked here.)

We drew inspiration from Lothal, the planet where the rebels operate.  Lothal is apparently the name of a real city in India and one of the characters, Ezra, really reminds me of Aladdin. Coincidence?? I think not. Anyways, a bit of yellow turf, clay mountains and a modified Lego Space Needle, made a cute tablescape that was reminiscent of the real thing.

Star Wars Rebels Party LothalAs always, there was food with punny names.

Star Wars Rebels Party 2 Star Wars Rebels Party 1Inquisitortilla Chips with Dual Dip (Inquisitor Tortilla Chips with Dual Dip)
Star Wars Rebels Party 4 Star Wars Rebels Party 3Sa-Bean Burritos (Sabine Burritos)
Star Wars Rebels Party 522 Pickup-Cakes (22 Pickup Cupcakes)
Star Wars Rebels Party 8 Star Wars Rebels Party 6Chopper Salad
Star Wars Rebels Party 9“Zeb” Orrelios Oreos
Star Wars Rebels Party 11 Star Wars Rebels Party  10TIE Lettuce Wraps
Star Wars Rebels Party 13 Star Wars Rebels Party 12Kanan Lightsaber Kebabs
Star Wars Rebels Party 15 Star Wars Rebels Party 16Jogan Fruit Juice
Star Wars Rebels Party 17Hoth2O (A nod to the original series)
Star Wars Rebels Party 18The Entire Spread

It was really fun hanging out with friends, eating good food and watching the special broadcast of “Spark of Rebellion” with the extended scene. Everyone went home with a goodie bag filled with Star Wars themed candy and a figure. Of course I got the one figure I didn’t want, the imperial commander. Boo.

Groot Cupcakes (Mont Blanc Cupcakes)

guardians of the galaxy cupcake 2Remember how I gushed about Guardians of the Galaxy a couple of posts back?* Apparently, I wasn’t done with it. (Wait, have you watched it yet?  Can you please? It’s totally awesome. Thanks.) The latest Marvel movie had me racking my brain for a dessert idea and naturally I started with my favorite character of the group, Groot. To be honest, I thought that the idea of Groot was silly. Really, a talking tree that only says, “I am Groot” exclusively in that order? But as the movie went on, the simplest character became the most interesting and loveable of them all.
guardians of the galaxy cupcake 3A Mont Blanc is a chestnut flavored dessert. The chestnut cream is traditionally piled high and topped with powdered sugar which resembles a snow capped mountain. Hence the name, Mont Blanc, just like the mountain that borders France and Italy. The tan color of the chestnut cream is similar to the color of tree bark so instead of piling up the cream in a circle, I decided to turn it into Groot’s face.  
Groot Cupcakes (Mont Blanc Cupcakes) 2This particular Groot cupcake starts with a syrup soaked genoise cake. It is then filled with chestnut cream and dipped in a perfectly shiny chocolate ganache. (Seriously, so shiny.  I couldn’t keep my eyes off of them.) It is then topped with more chestnut cream, only this time it is piped with a multi-hole pastry tip in the shape of Groot’s face.
Groot Cupcakes (Mont Blanc Cupcakes) 1A few fondant additions later, you have your very own mini swarm of Groots.** Super cute and perfect for a Marvel, Guardians of the Galaxy or Superhero themed party, I hope you give it a try for your next gathering.
guardians of the galaxy cupcake 1Groot Cupcakes (Mont Blanc Cupcakes)

Genoise Cake

Ingredients:
5 large eggs, room temperature
⅔ c. sugar
½ tbsp. corn syrup
1 ⅓ c. cake flour
1 tsp. vanilla extract
2 tbsp. butter, melted
2 tbsp. milk
2 tbsp. vegetable oil

Instructions

  1. Preheat the oven to 325˚F and line muffin tin with cupcake liners.
  2. In a bowl of a standing mixer fitted with the whisk attachment, beat the eggs until homogenous.
  3. Add the sugar and corn syrup to the eggs and mix on high speed until thickened, lightened and a ribbon forms when whisk is lifted.
  4. Sift the cake flour into the egg mixture and fold until no traces of the flour remain.
  5. In a separate bowl mix vanilla extract, butter, milk and vegetable oil and mix into the flour mixture.
  6. Fill the cupcake liners with batter and bake 12-15 minutes until golden brown and a toothpick comes out clean.
  7. Cool on a cooling rack.

Simple Syrup

Ingredients
¼ c. sugar
¼ c. water

Instructions

  1. In a small pot, heat sugar and water until sugar is completely dissolved. Set aside and let cool.

Chestnut Pastry Cream

Ingredients
2 c. milk
¼ c. sugar
2 egg yolks
1 egg
¼ c. cornstarch
¼ c. sugar
2 tbsp. unsalted butter
1 tsp. vanilla extract
320 g. chestnuts, roasted and peeled
¼ c. heavy whipping cream

Instructions

  1. In a medium saucepan, bring milk and ¼ c. sugar to a boil.
  2. In another medium bowl, mix egg yolks, egg, cornstarch and ¼ c. sugar until a paste forms.
  3. Using a ladle, drizzle a ladleful of milk while continuously whisking the egg mixture. Continue to drizzle in hot milk a little at a time until you mix in ¾ of the milk.
  4. Take the egg milk mixture and pour it into the saucepan with the remaining milk.
  5. Cook the mixture while stirring constantly over medium heat until mixture is thickened and pudding like.
  6. Remove saucepan from heat and mix in butter and vanilla extract. Set aside.
  7. In a food processor, puree chestnuts until very fine.
  8. Add the pastry cream and process until a smooth paste forms.
  9. Add the heavy whipping cream and process until completely mixed in.

Chocolate Ganache

Ingredients:
8 oz. good quality dark chocolate, chopped into small pieces
¾ c. heavy whipping cream
2 tbsp. sugar
2 tbsp. unsalted butter
1 pinch kosher salt

Instructions

  1. Bring whipping cream and sugar to a boil in either a saucepan or microwave.***
  2. In a medium bowl, pour hot cream mixture over the chopped chocolate.
  3. Let it rest for 5 minutes, then whisk mixture until smooth.
  4. Add the butter and salt and mix until fully incorporated.

Fondant Pieces

You will need:
green fondant
black fondant
white fondant

Instructions

For the leaves:

  1. Pinch off tiny pieces of green fondant and form shapes of leaves by molding one end narrower than the other side.

For the eyes:

  1. Roll out black fondant ⅛ in. thick. Cut out circles that are ¾ in. in diameter.  (I used the end of a fat bubble tea straw.)
  2. Pinch off tiny pieces of white fondant and make tiny circles to press flat onto the black fondant. Remember to place the pieces off center to avoid deadpan eyes. (I placed mine to in the north east quadrant of the eyes.)

Assembly

  1. With a pastry brush, brush the tops of cooled cupcakes with the simple syrup.
  2. Let it rest 5 minutes and go over it once more with the simple syrup.
  3. Fill a pastry bag fitted with a narrow plain pastry tip with half of the chestnut pastry cream; fill each cupcake with about a tablespoon of pastry cream.
  4. Dip the tops of the cupcake with the chocolate ganache, and let set in the freezer for about 5 minutes.
  5. Fill a pastry bag fitted with a multi-hole pastry tip, with more chestnut pastry cream.
  6. Using a stead pressure, draw Groot’s face using an up and down motion. Make sure you go over the each area several times to give it a 3D effect.
  7. Carefully place the fondant eyes in the center of the face and arrange the fondant leaves at the top of the head. Remember the fondant WILL melt in time, do not place the fondant pieces until you are ready to serve or as close to the serving time as possible.

*If you don’t know by now, I’m into the geek/nerd culture.  I wouldn’t say I’m fully immersed it in, but maybe waist deep.
** Warning about the fondant addition.  Because the fondant is resting on top of a pile of pastry cream, the fondant will melt with time.  I would give you a solid hour before it starts to melt.  Tread lightly and be aware. 🙂
*** If using the microwave, be careful not to overheat it.  It will bubble over, leaving you a large mess to clean… not that this happened to me.  No, it totally did.  Don’t be like me.

Chocolate ganache recipe adapted from recipe girl.

Rose Cake

rose cake 2This weekend was crazy busy for the Park family.  We had a graduation, Mother’s Day and my dad’s birthday lined up 3 days in a row.  We ended up celebrating Mother’s day and my dad’s birthday in one go, and I tried to think of a birthday cake that would serve both occasions.  I suppose the mauve color of the cake was a little too feminine for a man’s birthday, but my mom didn’t get any flowers for Mother’s day so I hope this made up for it a bit.
Rose cake 1Like many celebration cakes, this cake takes a long time to decorate but isn’t necessarily challenging.  What takes the most time is rolling out the petals and chilling the petals in between steps.  I wanted to use 100% modeling chocolate for the cake, but something went wrong during the process and I had to add about 30% fondant to make it useable.  Do not fight the weather, as soon as your modeling chocolate/fondant starts to lose its shape, stop and chill it in the freezer.  This will save you a lot of frustration and heartache down the line.
rose cake 3It does have a certain eye opening charm and it’s very flexible in terms of the variation of celebrations and colors.  An all-around crowd pleaser.
rose cake 4Rose Cake
You Will Need:
14 oz of modeling chocolate or a mixture of fondant and modeling chocolate
1 batch of vanilla buttercream
1 8” cake, layered and filled
a set of round cookie cutters 
round ended fondant tool

Instructions:

  1. Frost your cake with vanilla frosting into a dome shape.*  (Pic 1)
  2. Mold a 1½ in. cone with modeling chocolate and place in center of the cake. (Pic 2)
  3. From this point on, the modeling chocolate will be rolled out to 1/8-1/16 in. thickness.
  4. With your 1.75 in. round cutter, cut out 2 pieces of modeling chocolate and mold it to a petal shape using a round ended fondant tool.
  5. Wrap the cone with the 2 petals with some buttercream, overlapping each other to form a bud. (Pic 3 and 4)
  6. With your 1.75 in. round cutter, cut out 3 pieces of modeling chocolate and mold it to a petal shape using a round ended fondant tool.
  7. Wrap the bud with the 3 petals with some buttercream, overlapping each other at the edges. (Pic 5 and 6)
  8. With your 2.25 in. round cutter, cut out 5 pieces of modeling chocolate and mold it to a petal shape using a round ended fondant tool.
  9. Wrap the bud with the 5 petals with some buttercream, overlapping each other at the edges. (Pic 7 and 8)
  10. With your 2.5 in. round cutter, cut out 5 pieces of modeling chocolate and mold it to a petal shape using a round ended fondant tool.
  11. Wrap the bud with the 5 petals with some buttercream, overlapping each other at the edges. (Pic 9 and 10)
  12. With your 2.75 in. round cutter, cut out 5 pieces of modeling chocolate and mold it to a petal shape using a round ended fondant tool.
  13. Wrap the bud with the 5 petals with some buttercream, overlapping each other at the edges. (Pic 11 and 12)
  14. With your 3 in. round cutter, cut out 5 pieces of modeling chocolate and mold it to a petal shape using a round ended fondant tool.
  15. Wrap the bud with the 5 petals with some buttercream, overlapping each other at the edges. (Pic 13)
  16. With your 3.25 in. round cutter, cut out 7 pieces of modeling chocolate and mold it to a petal shape using a round ended fondant tool.
  17. Wrap the bud with the 7 petals with some buttercream, overlapping each other at the edges. (Pic 15)
  18. Cut 2-3 in. wide strips of molding chocolate and curl the edges with a straw, about 8-13 pieces.
  19. Chill in the freezer to set, about 1-3 minutes.
  20. Use some frosting to wrap the cake with the strips, overlapping at the edges and curled edge pointing up.  (Pic 16)

* This is what I did.  In hindsight, you could do the regular sharp corners, it shouldn’t make a difference.

Sofia the First Doll Cake

sofia the first doll cake 1There are many things that make birthdays special: friends, family, presents, food… the list goes on.  My favorite part of a birthday is the cake.  I’m not sure what the exact reason is.  It may be because it’s the centerpiece of a celebration or because it foreshadows the inevitable sweet ending of a party or simply because I love cake.
sofia the first doll cake 3I did not have many birthday parties when I was little, but I do remember seeing many beautiful cakes at American bakeries wishing I would have one for my birthday.  I always ended up getting a Korean cake.  By Korean cake, I mean a simple sponge cake filled with whipped cream and fruit and a simple decoration on top.  (I have to say, Korean bakeries have stepped up their decorating game since I was a little kid.) Many a day did I wish for the sugary sweet American buttercream counterpart but it just didn’t happen.  So that’s why when it’s someone’s birthday I try to make it special the only way I know how, with cake.
sofia the first doll cake 4Andy’s niece LOVES Sofia the First, along with Minnie Mouse and Max & Ruby.  I’ve always wanted to try my hand at doll cakes so the present was twofold: the cake and the doll in one.

steps 2If you’ve never made doll cakes before, I’ll tell you that it’s definitely more time consuming than a layer cake but the reaction you get makes it worth the trouble.  When we walked in the door, the first thing she screamed was “Sofia!!” and asked to hold it thinking it was a real doll.  We were successful keeping her hands off until the end when the urge was too great and she made a grab for it. 🙂
sofia the first doll cake 5

Sophia the First Doll Cake

You will need:
Purple Fondant
White Fondant
White Buttercream
White Sugar Pearls
4 layers of 6” round cake
Purple Food Marker
Isomalt (optional)
Small Gem Mold (optional)

Instructions:

  1. Cut out holes in the cake layers so that it would fit your doll.  I used this doll.
  2. Prep your doll by tying its hair up, taking off the dress, and wrapping the doll with plastic wrap.
  3. Roll out a piece of purple fondant and drape around the doll adhering it with either a very thin layer of buttercream or water. (As shown above.)
  4. Frost and layer the cake layers and place your doll inside.
  5. Mold the cake into a dress shape by cutting it along the top in a rounded shape.
  6. Frost the cake smoothly up to below the waist of the doll.  (As shown above.)
  7. Roll out a piece of white fondant and cut out a 2-3 in. strip.  Drape it around the bottom of the dress to form the underskirt of the dress. (As shown above.)
  8. Roll out a piece of purple fondant and cut out a ¼ in. strip.  Adhere the purple strip over the white fondant with either buttercream or water to form the stripe around the underskirt. (As shown above.)
  9. Roll out a large piece of purple fondant (about 10 in. in height) and cut out scalloped shapes along the bottom.  Drape right below the waist of the doll connecting the two ends together in the back. (As shown above.)
  10. Roll out two more pieces of fondant in a semi-circle shape and drape around each side of the doll to create the top layer of her dress. (As shown above.)
  11.  Roll and cut a thin ribbon of fondant and wrap around the waist to meld the top and bottom together.
  12. With the purple marker, draw two lines and a loop design on the front of her dress. (As shown above.)
  13. Adhere pearls along the neckline and the purple stripes. (As shown above.)
  14. Adhere pearls along the top layer of the dress. (As shown above.)
  15. Optional: If you have time, you can continue the pearl all across the back of the dress.  I did not so I opted to continue it with a white ribbon made of white fondant.
  16. Adhere pearls all along the top and bottom skirt of the dress
  17. For the circular pattern along the bottom of the dress you can either:
    1. Cut out the pattern with the fondant and adhere it.
    2. Make white teardrop jewels with a small gem mold with either sugar or isomalt. This gives it an interesting 3D effect to the dress.  You can cut out the triangular shapes with fondant and adhere it.
  18. If you have time, you can fancy the dress up in the back with more pearls and sugar jewels. (As shown above.)
  19. Optional: You can also paint the crown with silver paint and bling it out with little purple gems like I did above.  It makes the cake look a little more expensive and detailed. (As shown above.)

Star Wars Day 2014

Star Wars Day 2014 1This is the third year I’ve hosted a Star Wars Day party.  It involves good food with punny names, watching SW movies and SW themed board games.  The first SW party I threw was just a small surprise for a special someone but through the years it’s evolved into a bigger celebration.  I can’t say that I’m a huge fan of Star Wars, but I can say that I love throwing themed parties.  So in a way, I do love Star Wars Day.
Star Wars Day 2014 2Star Wars Day 2014 4
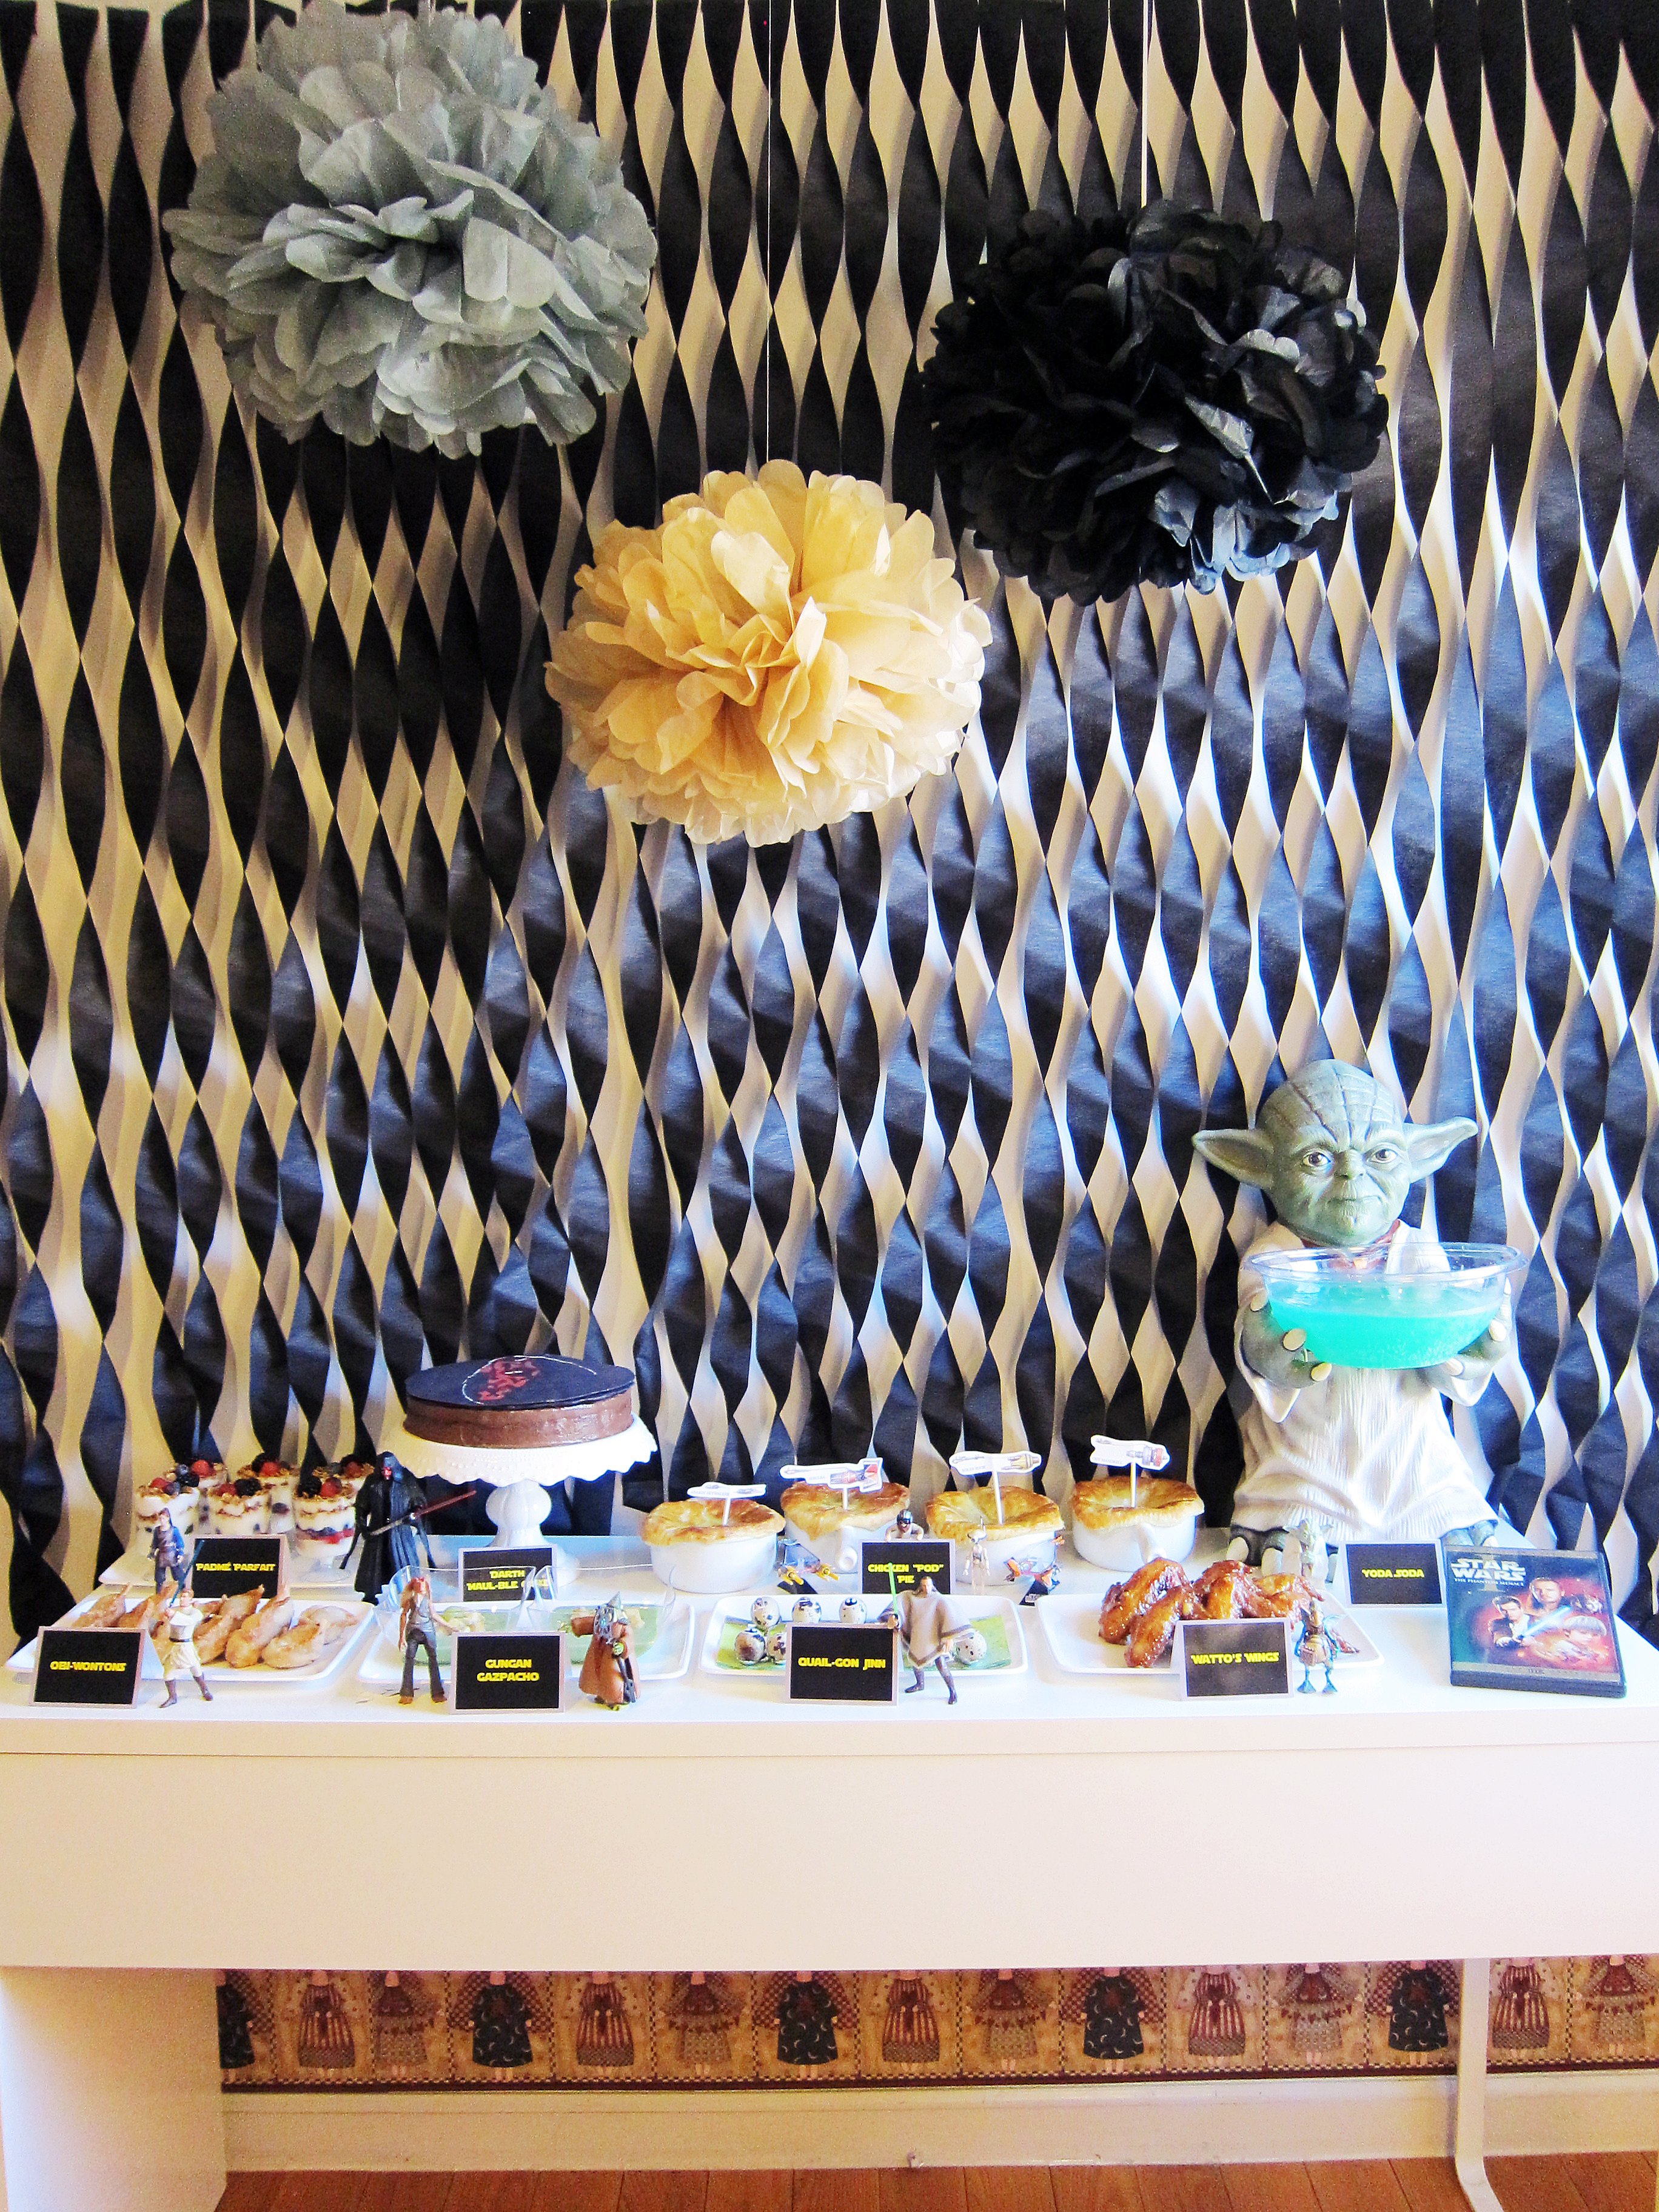
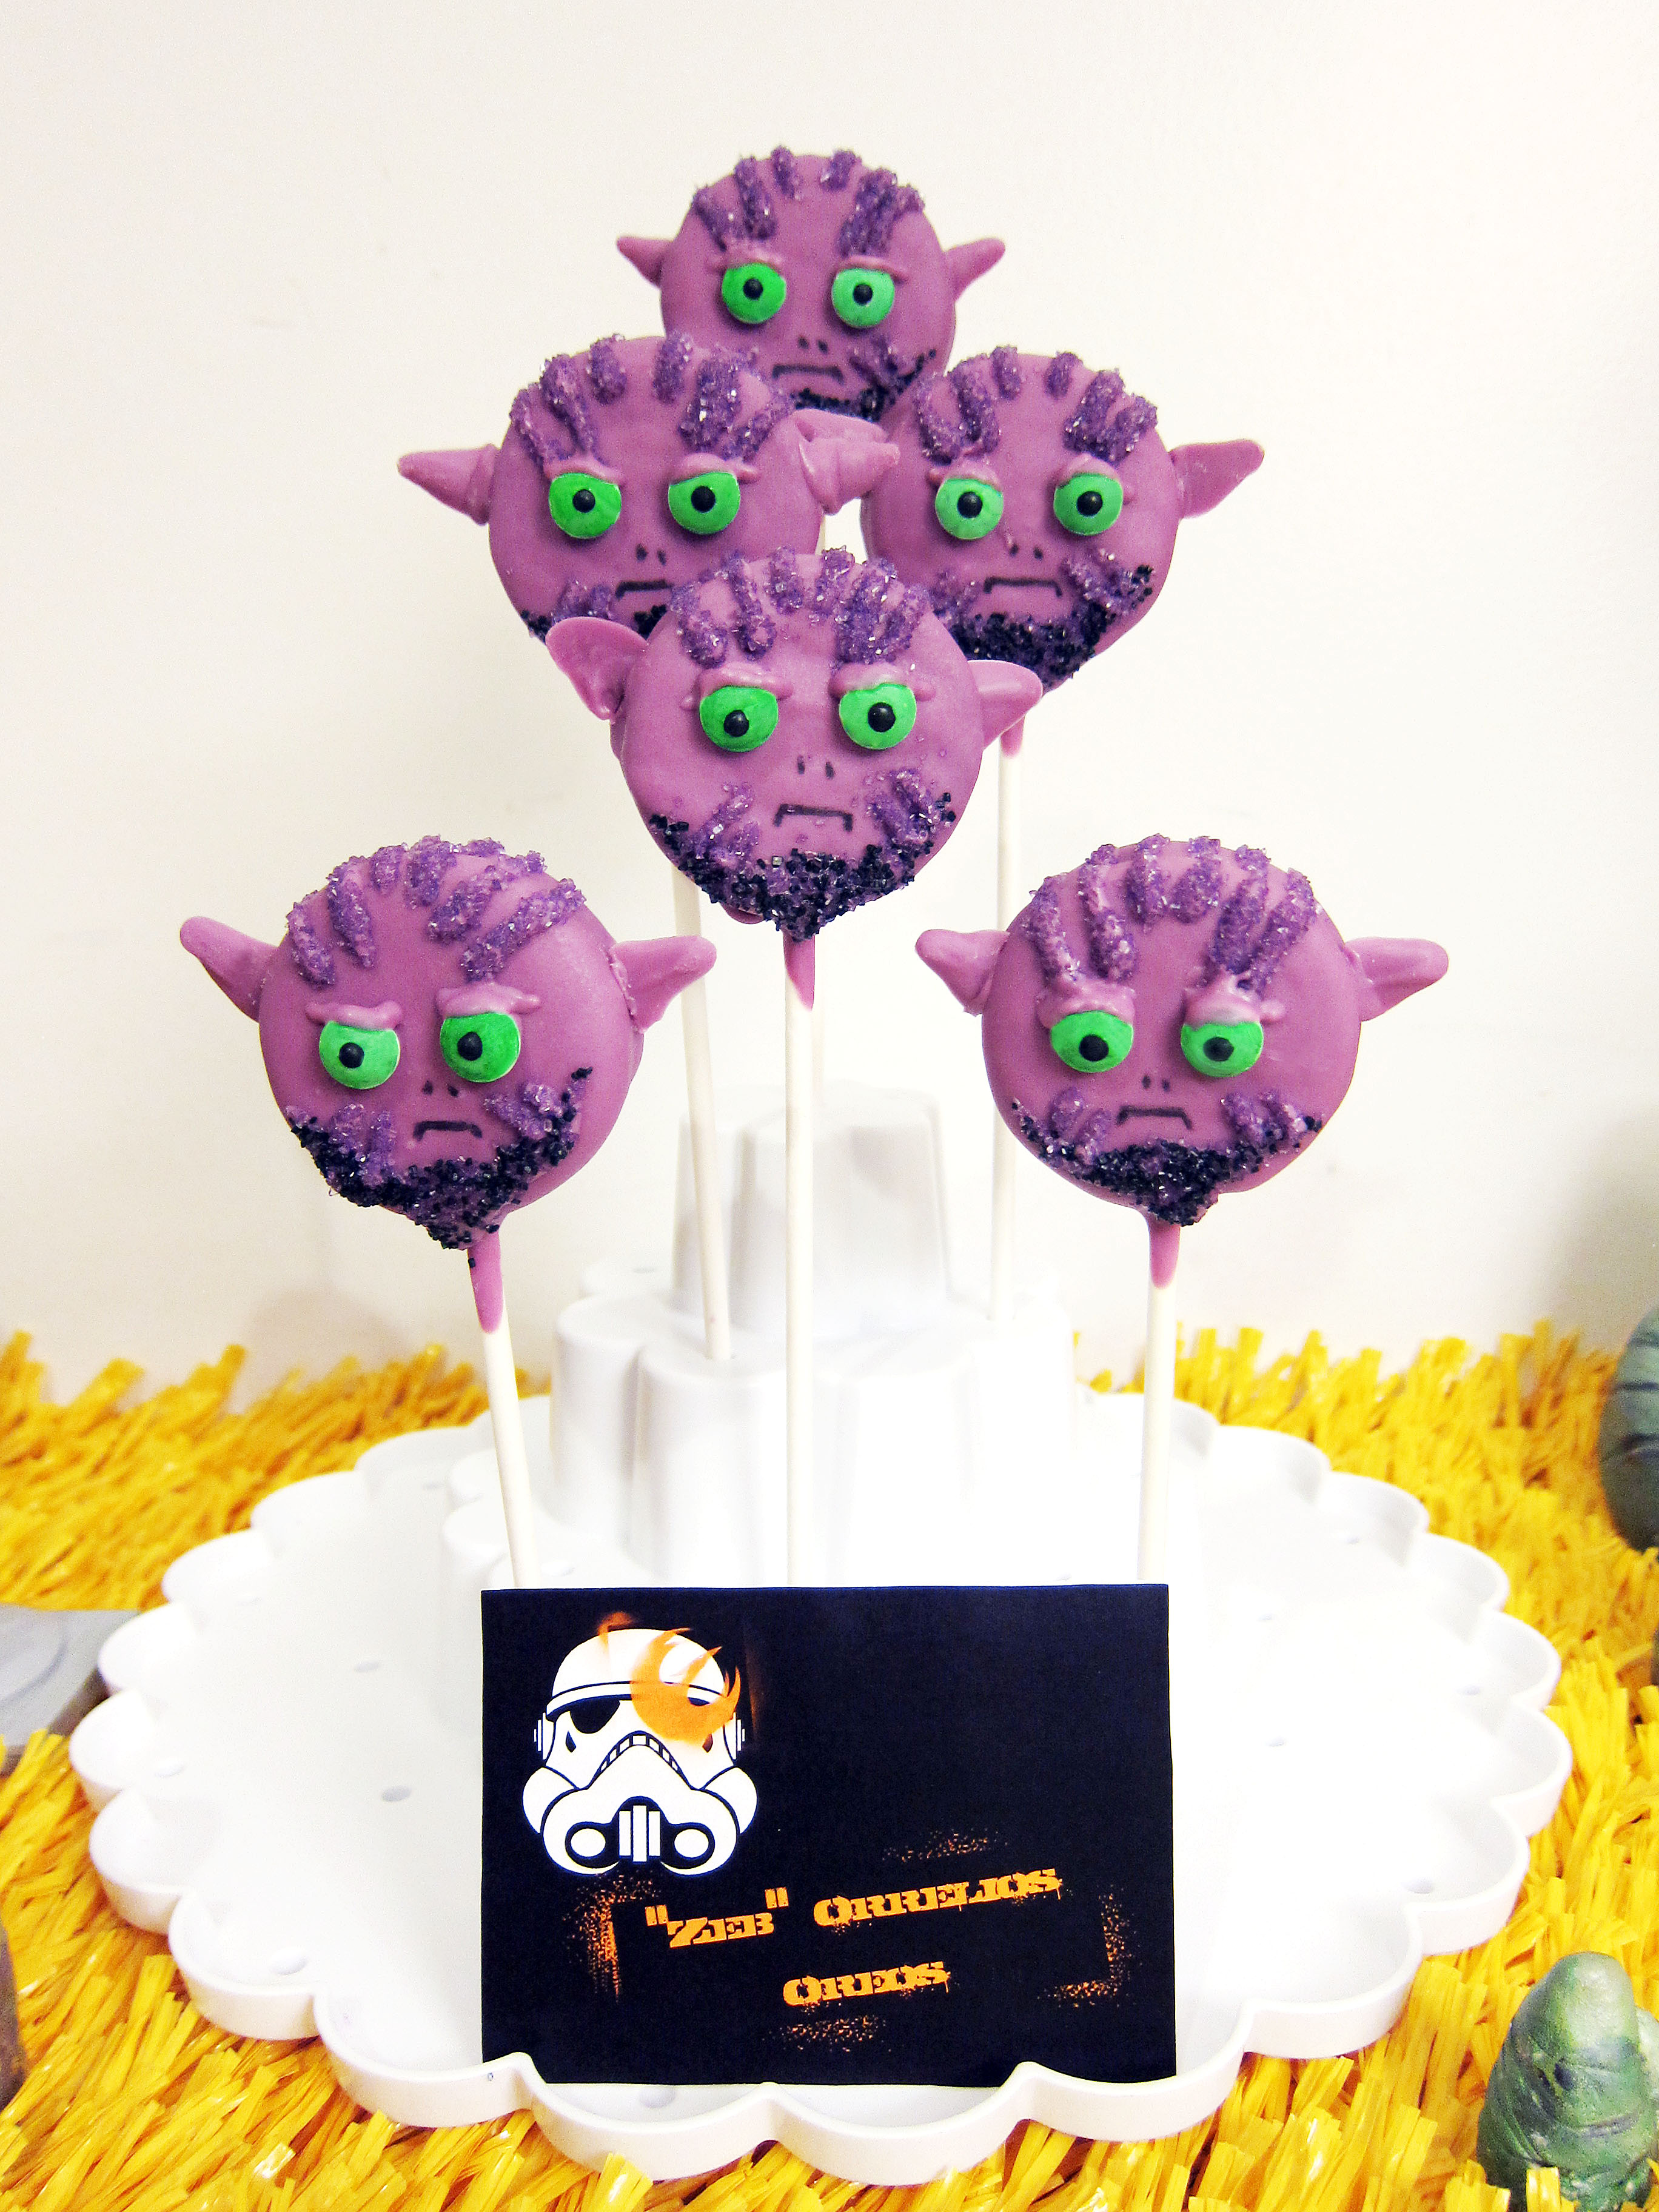
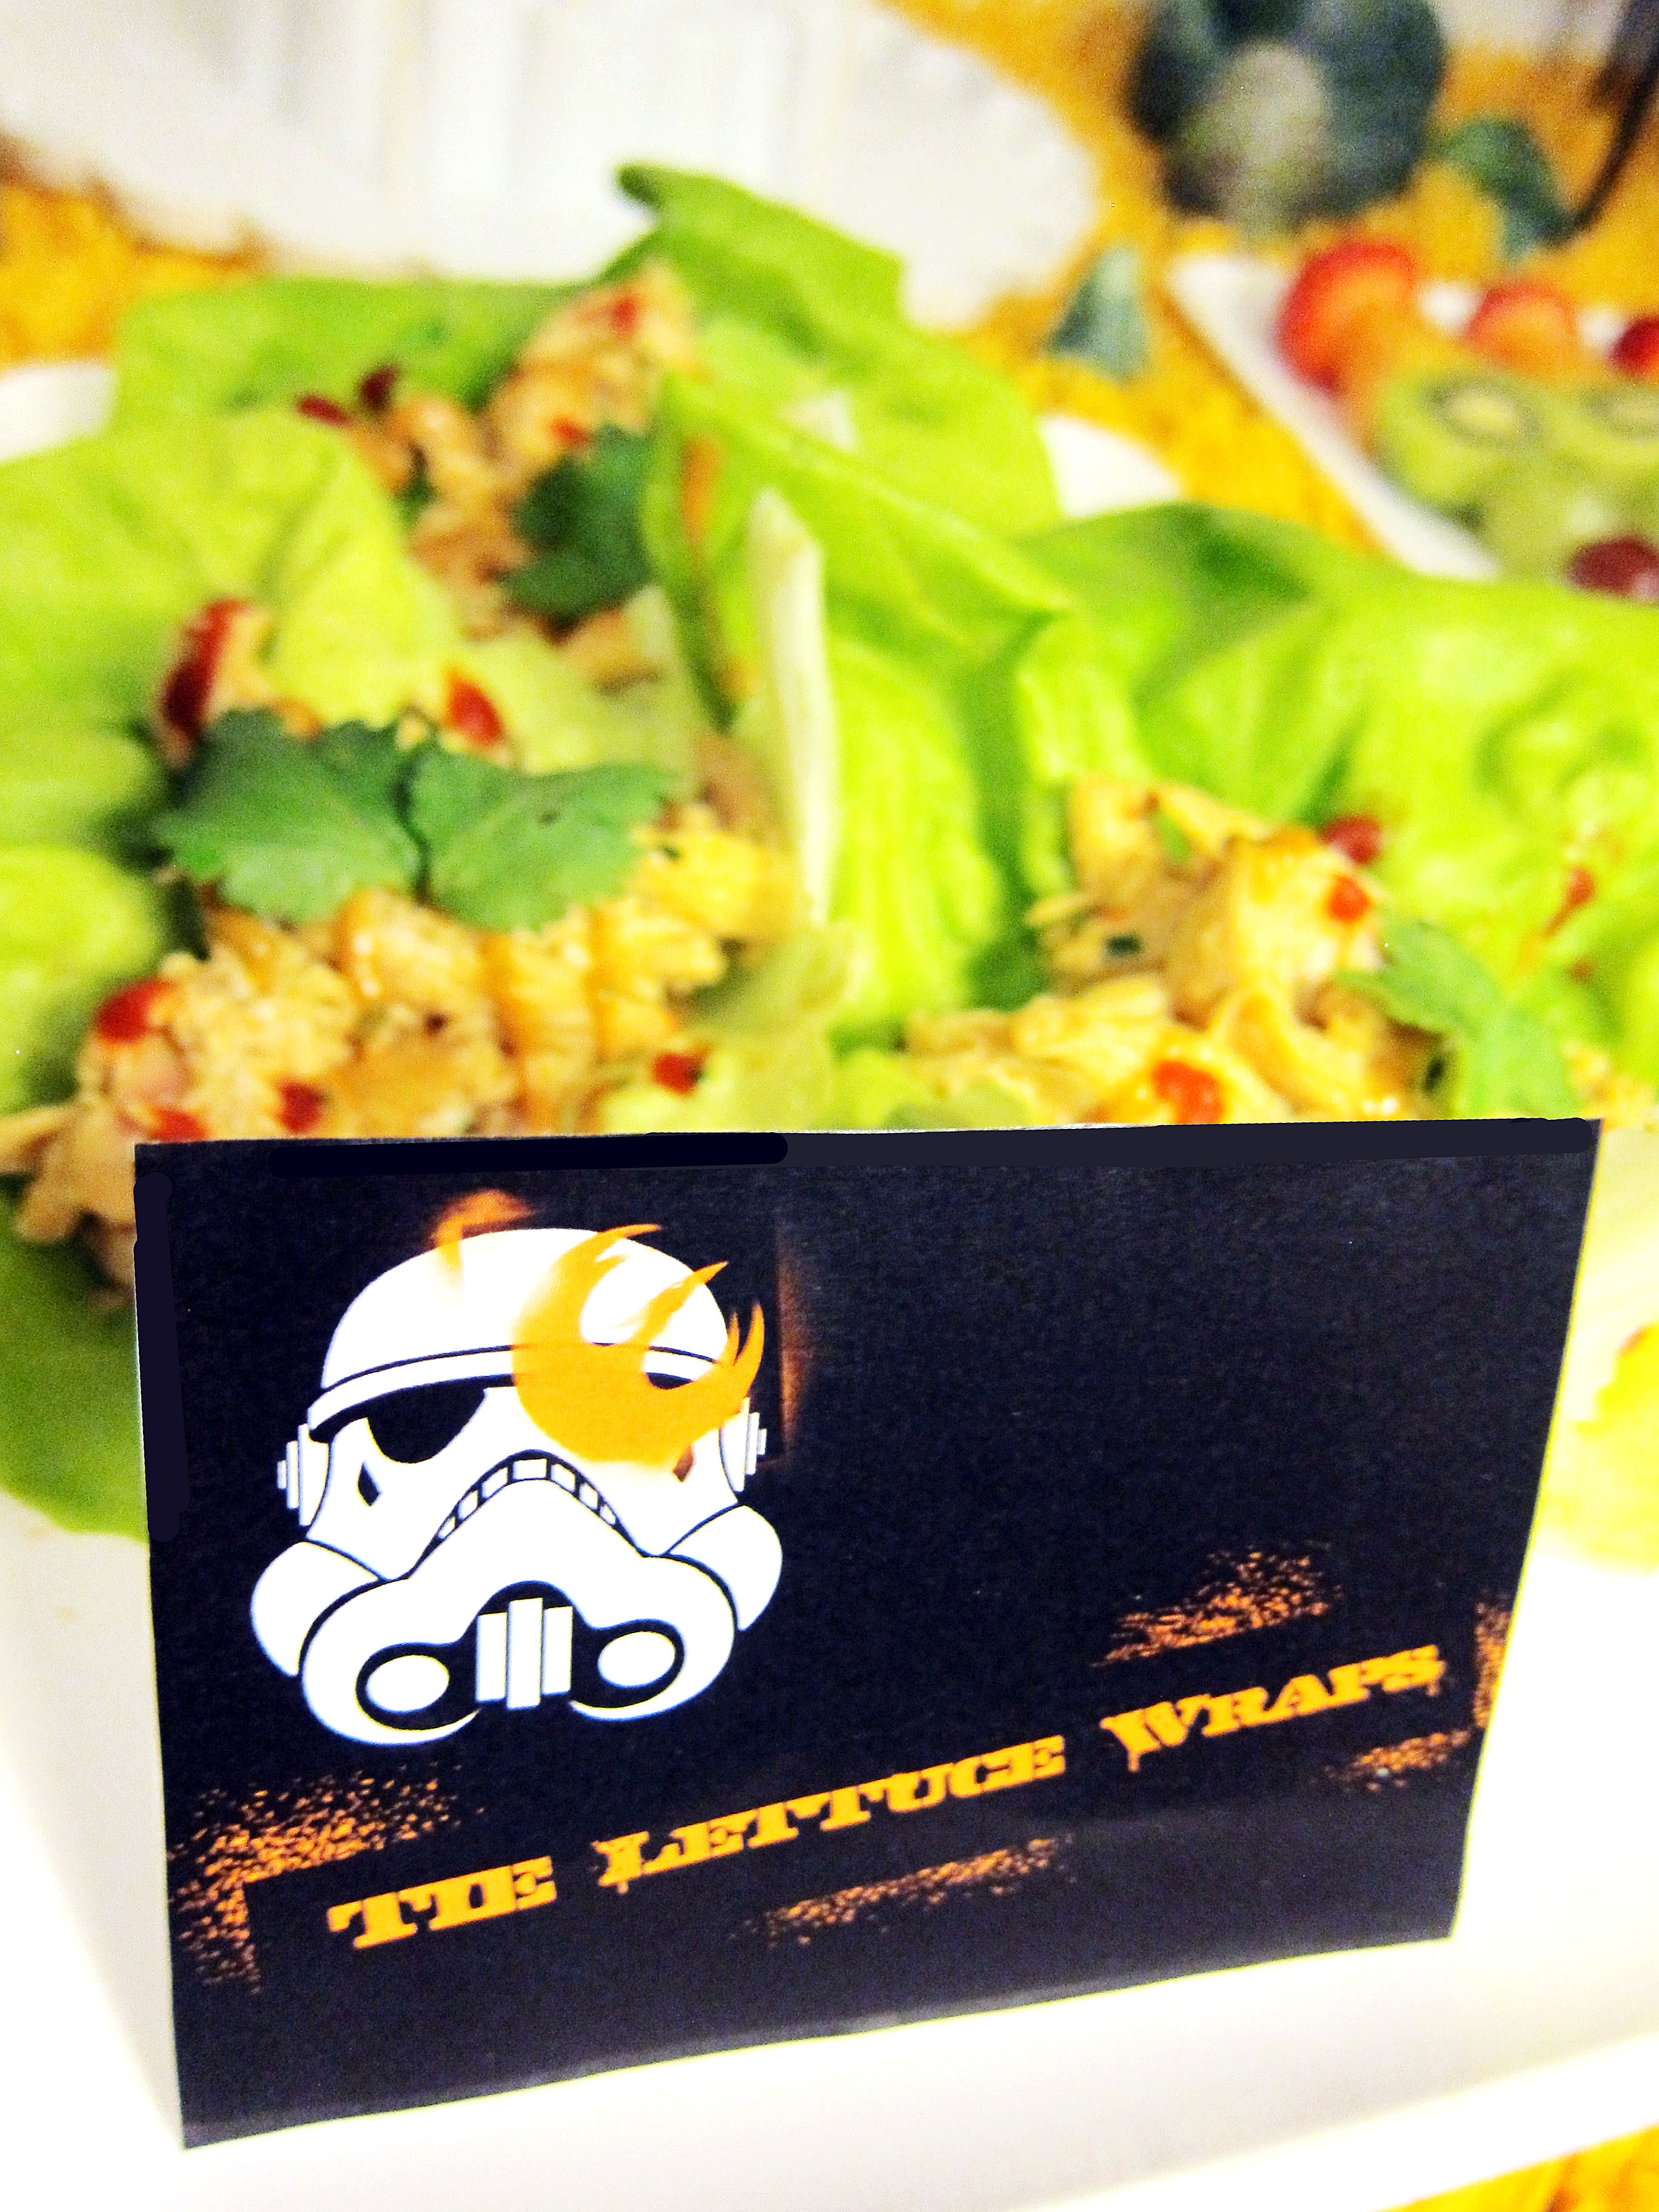
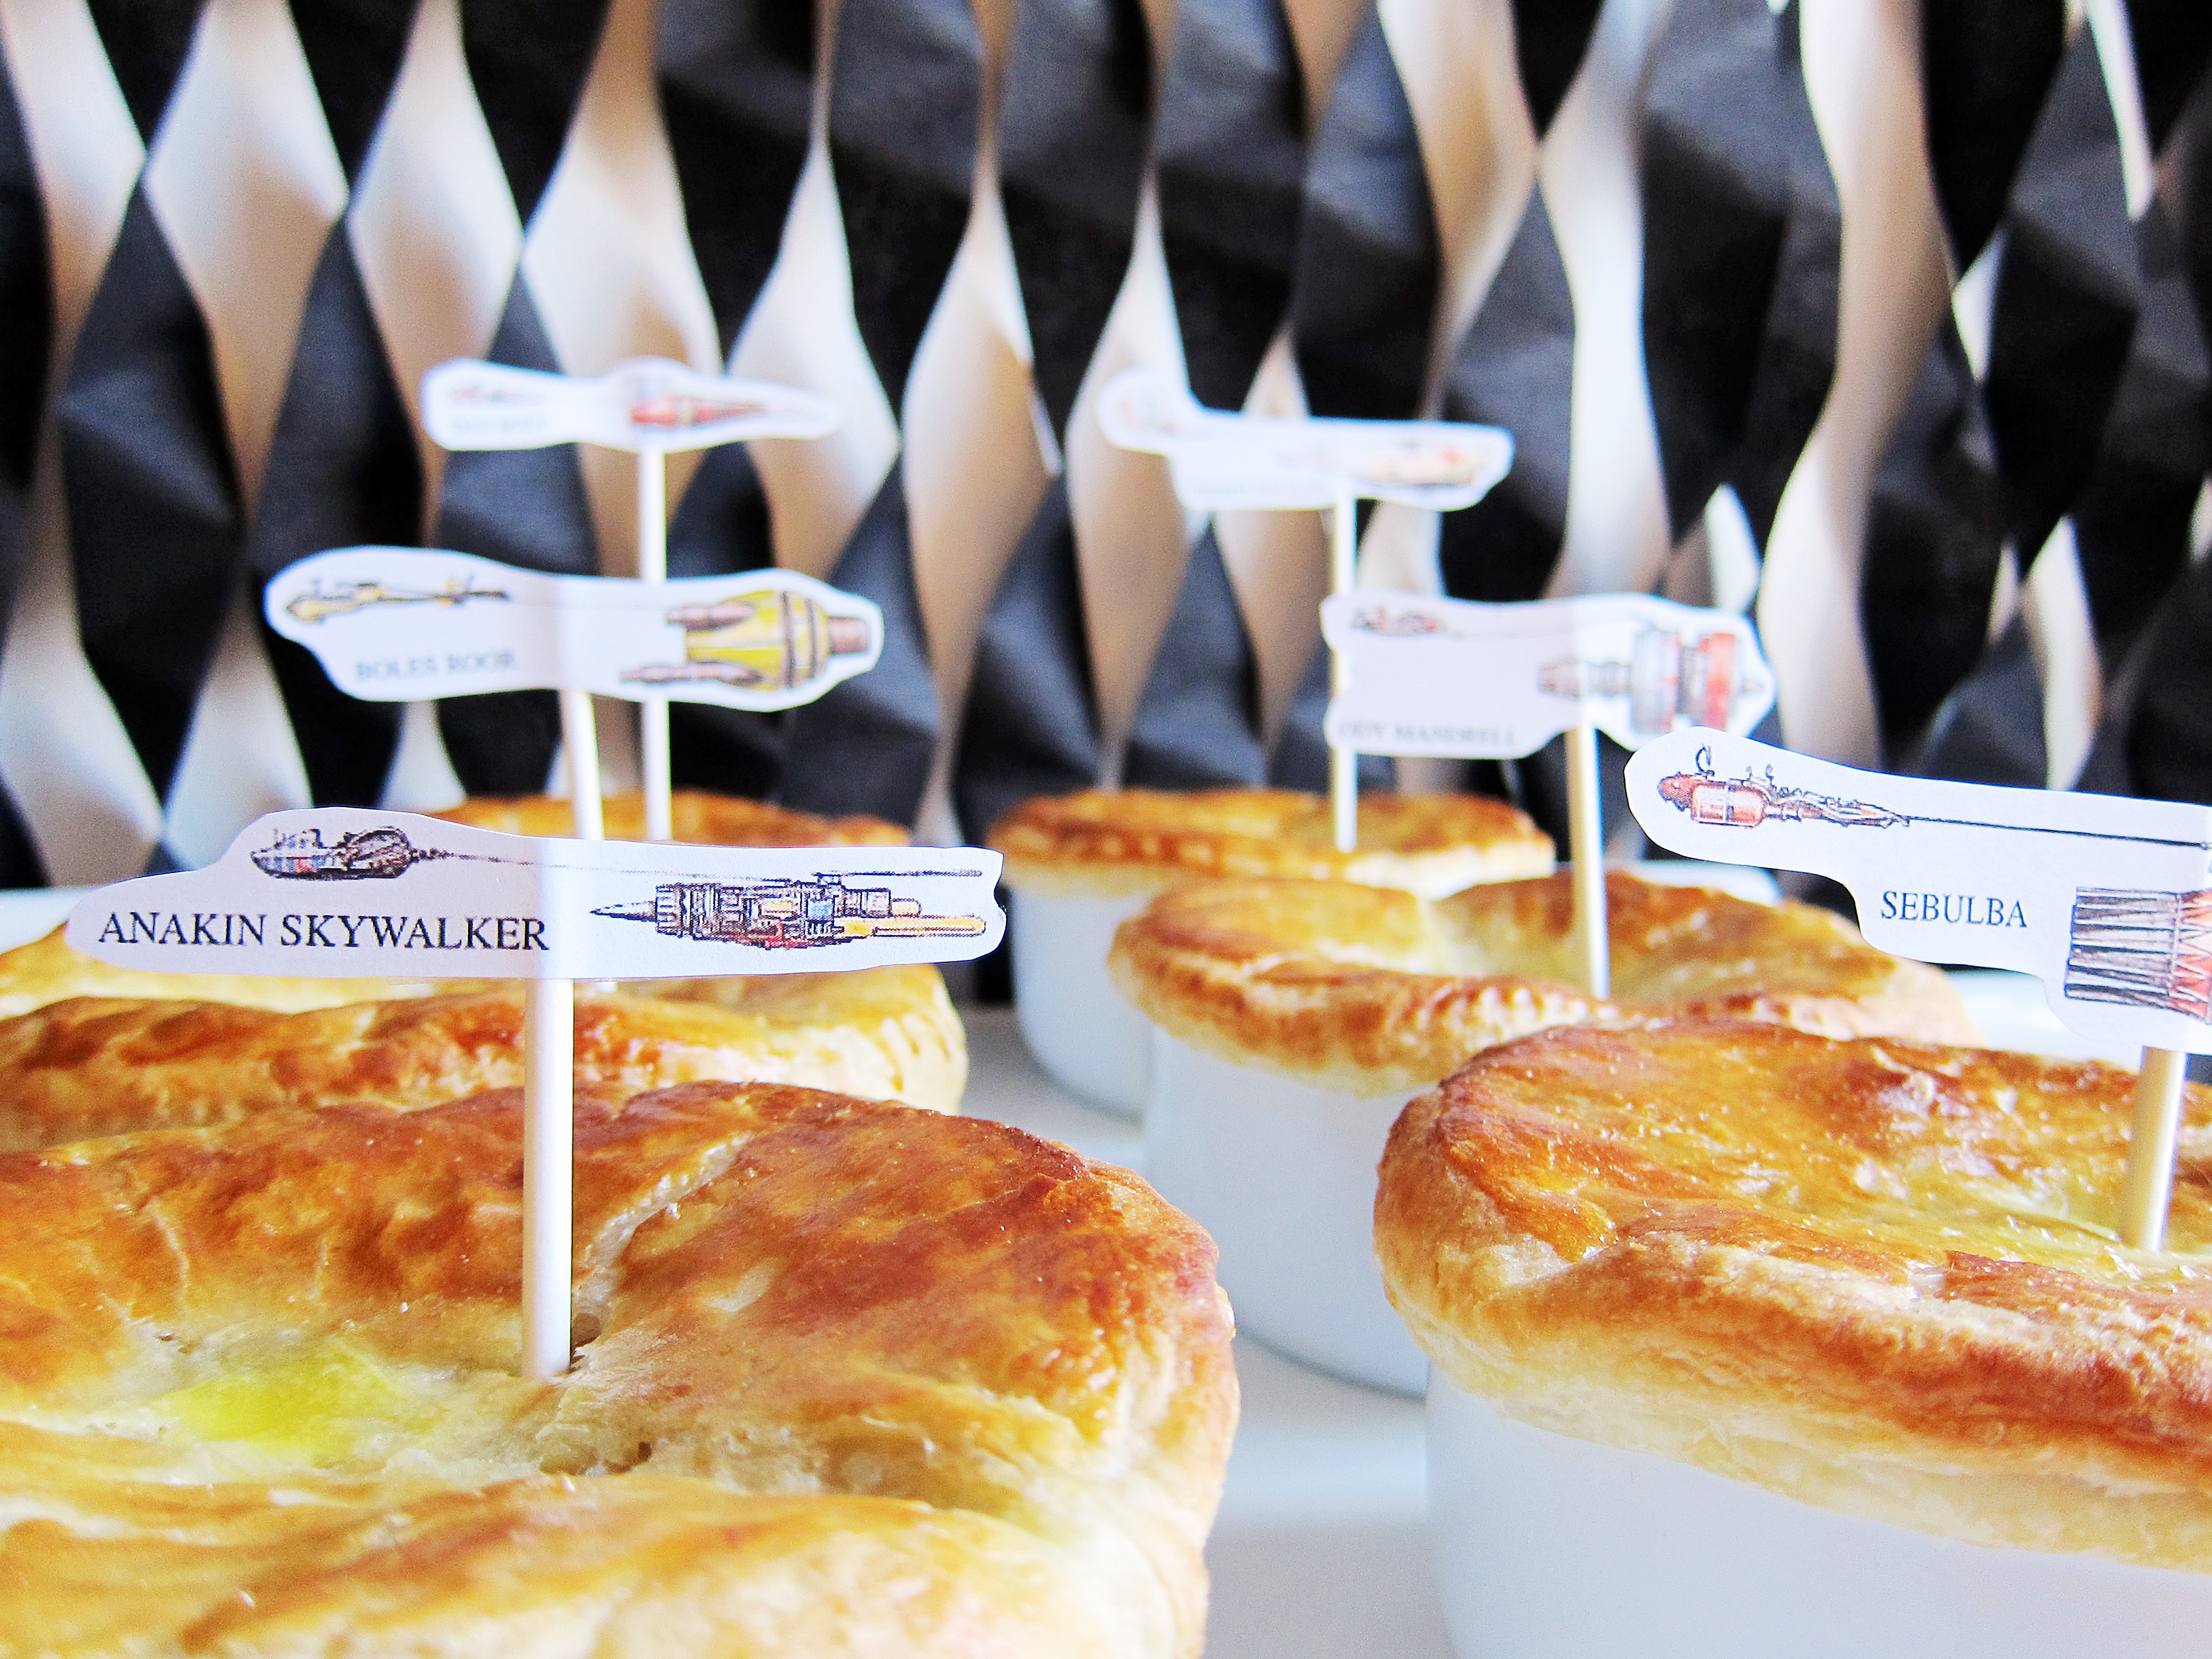
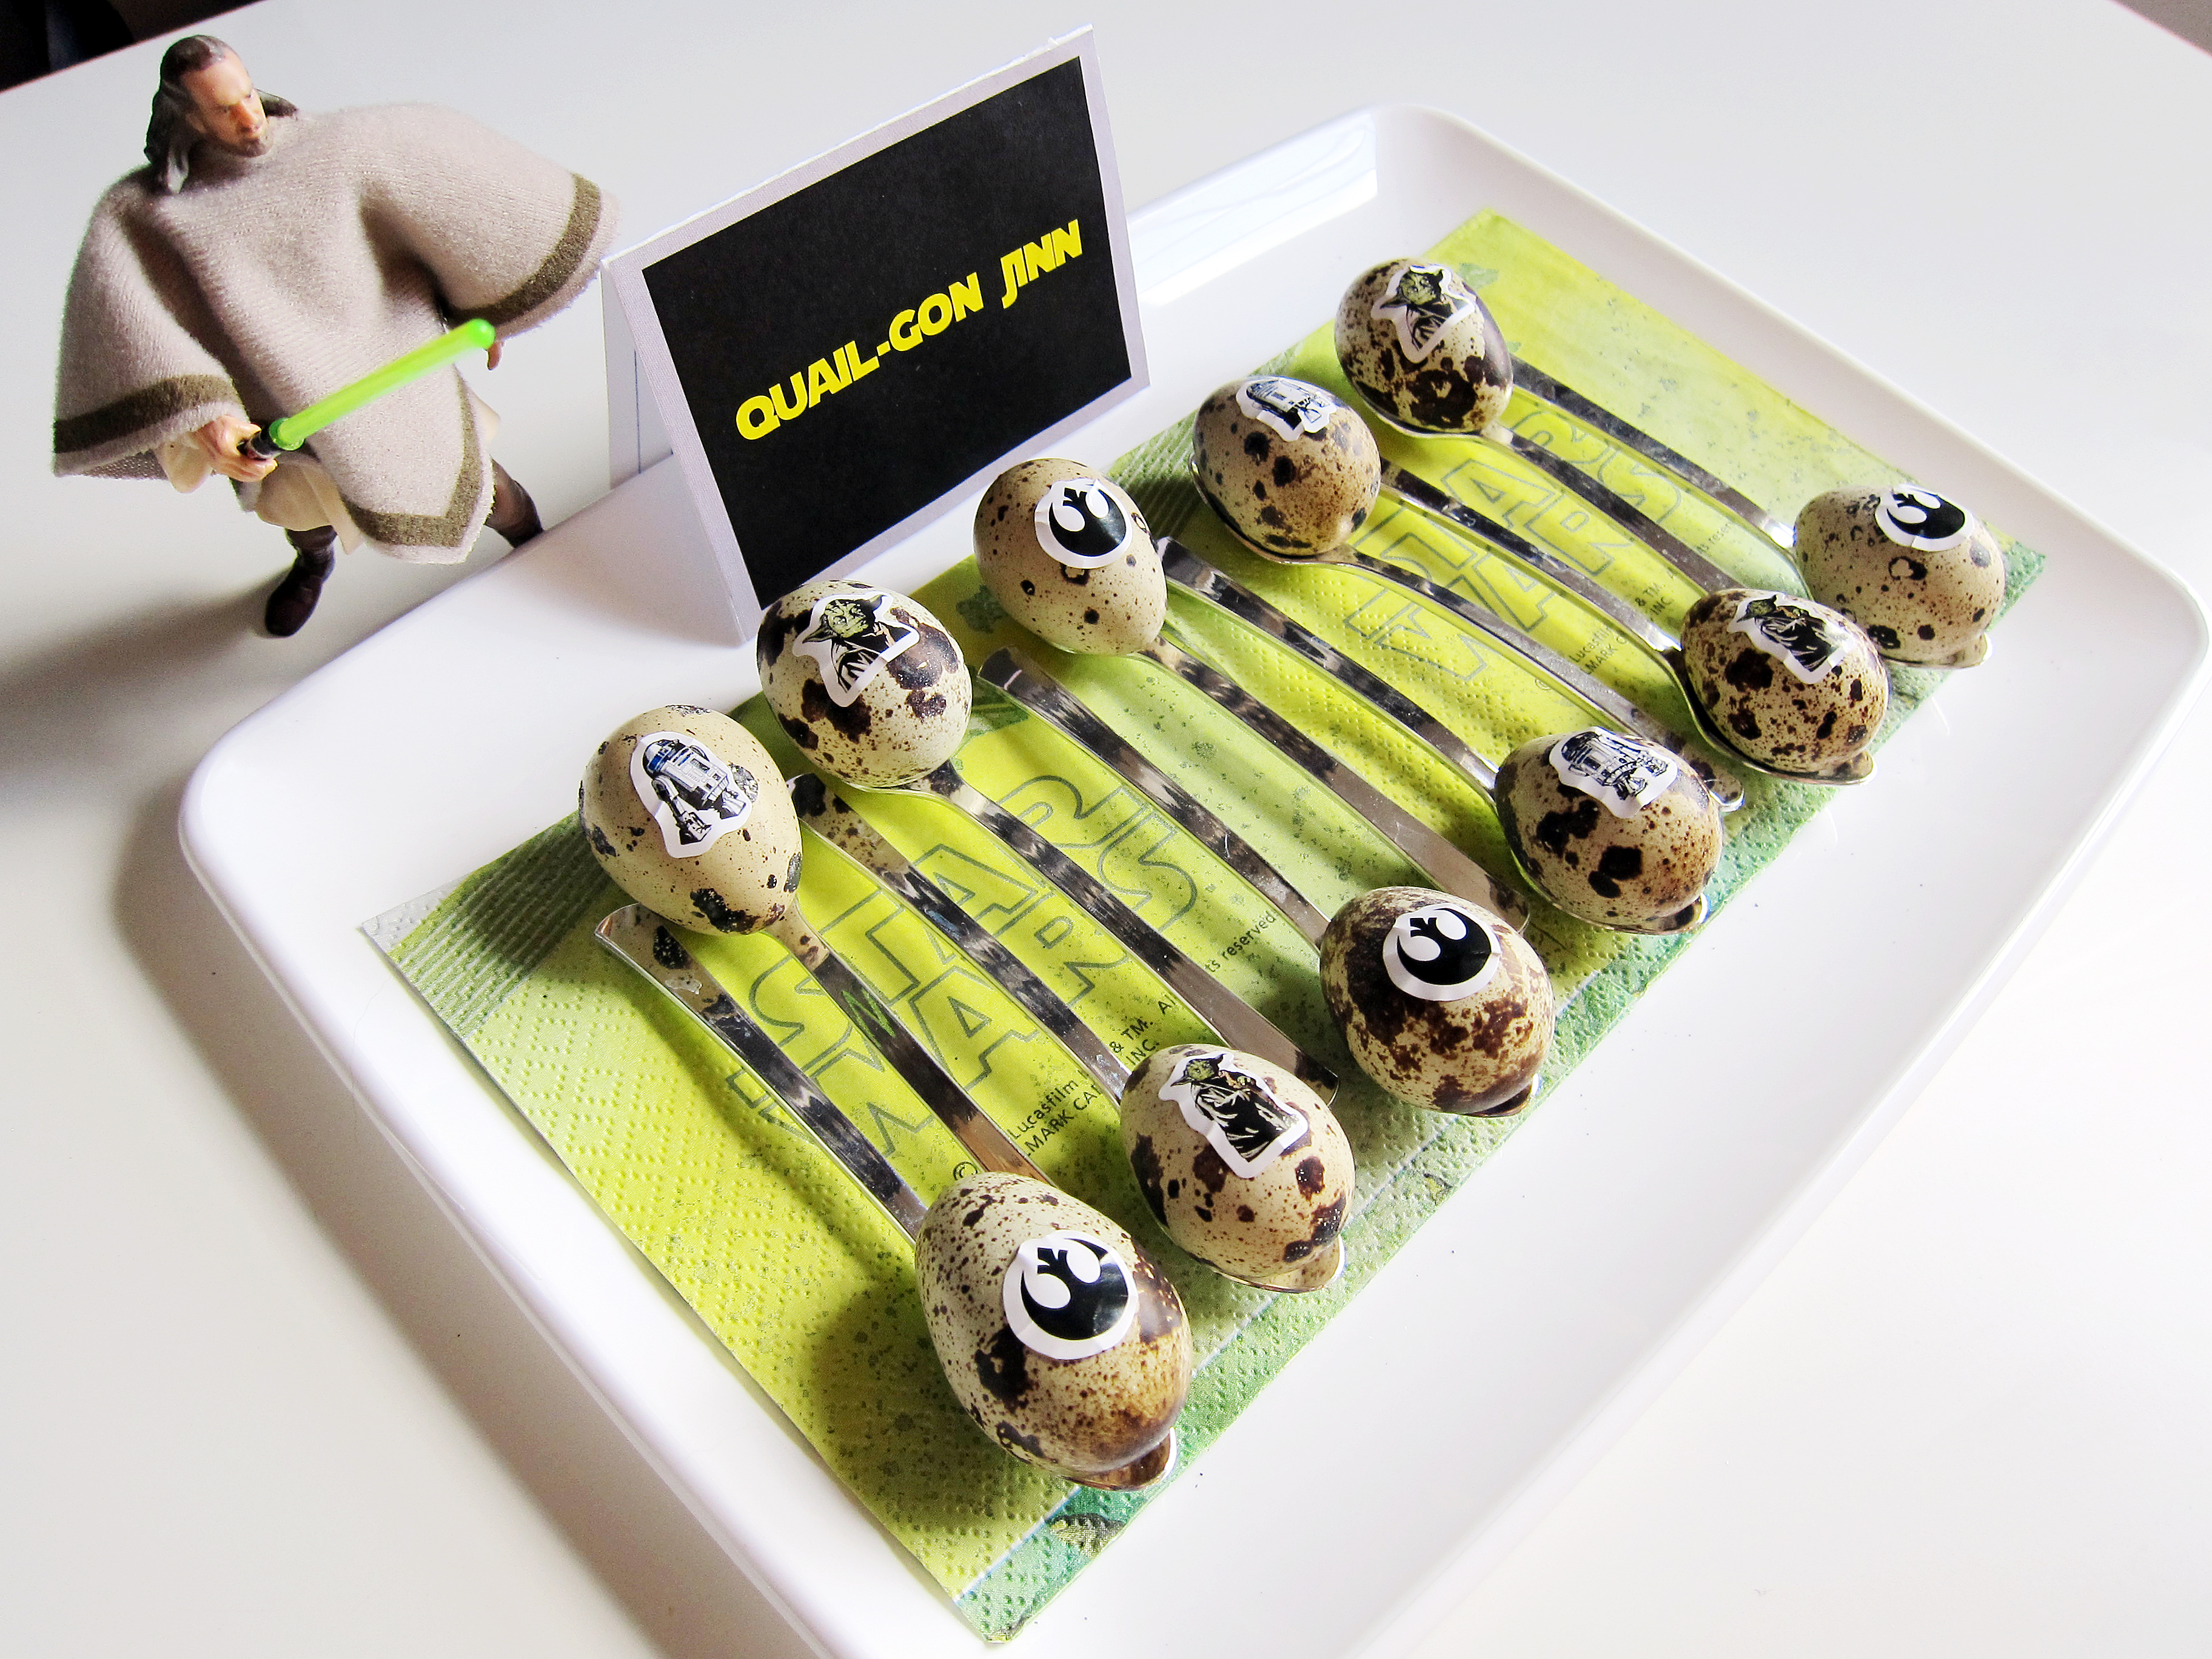
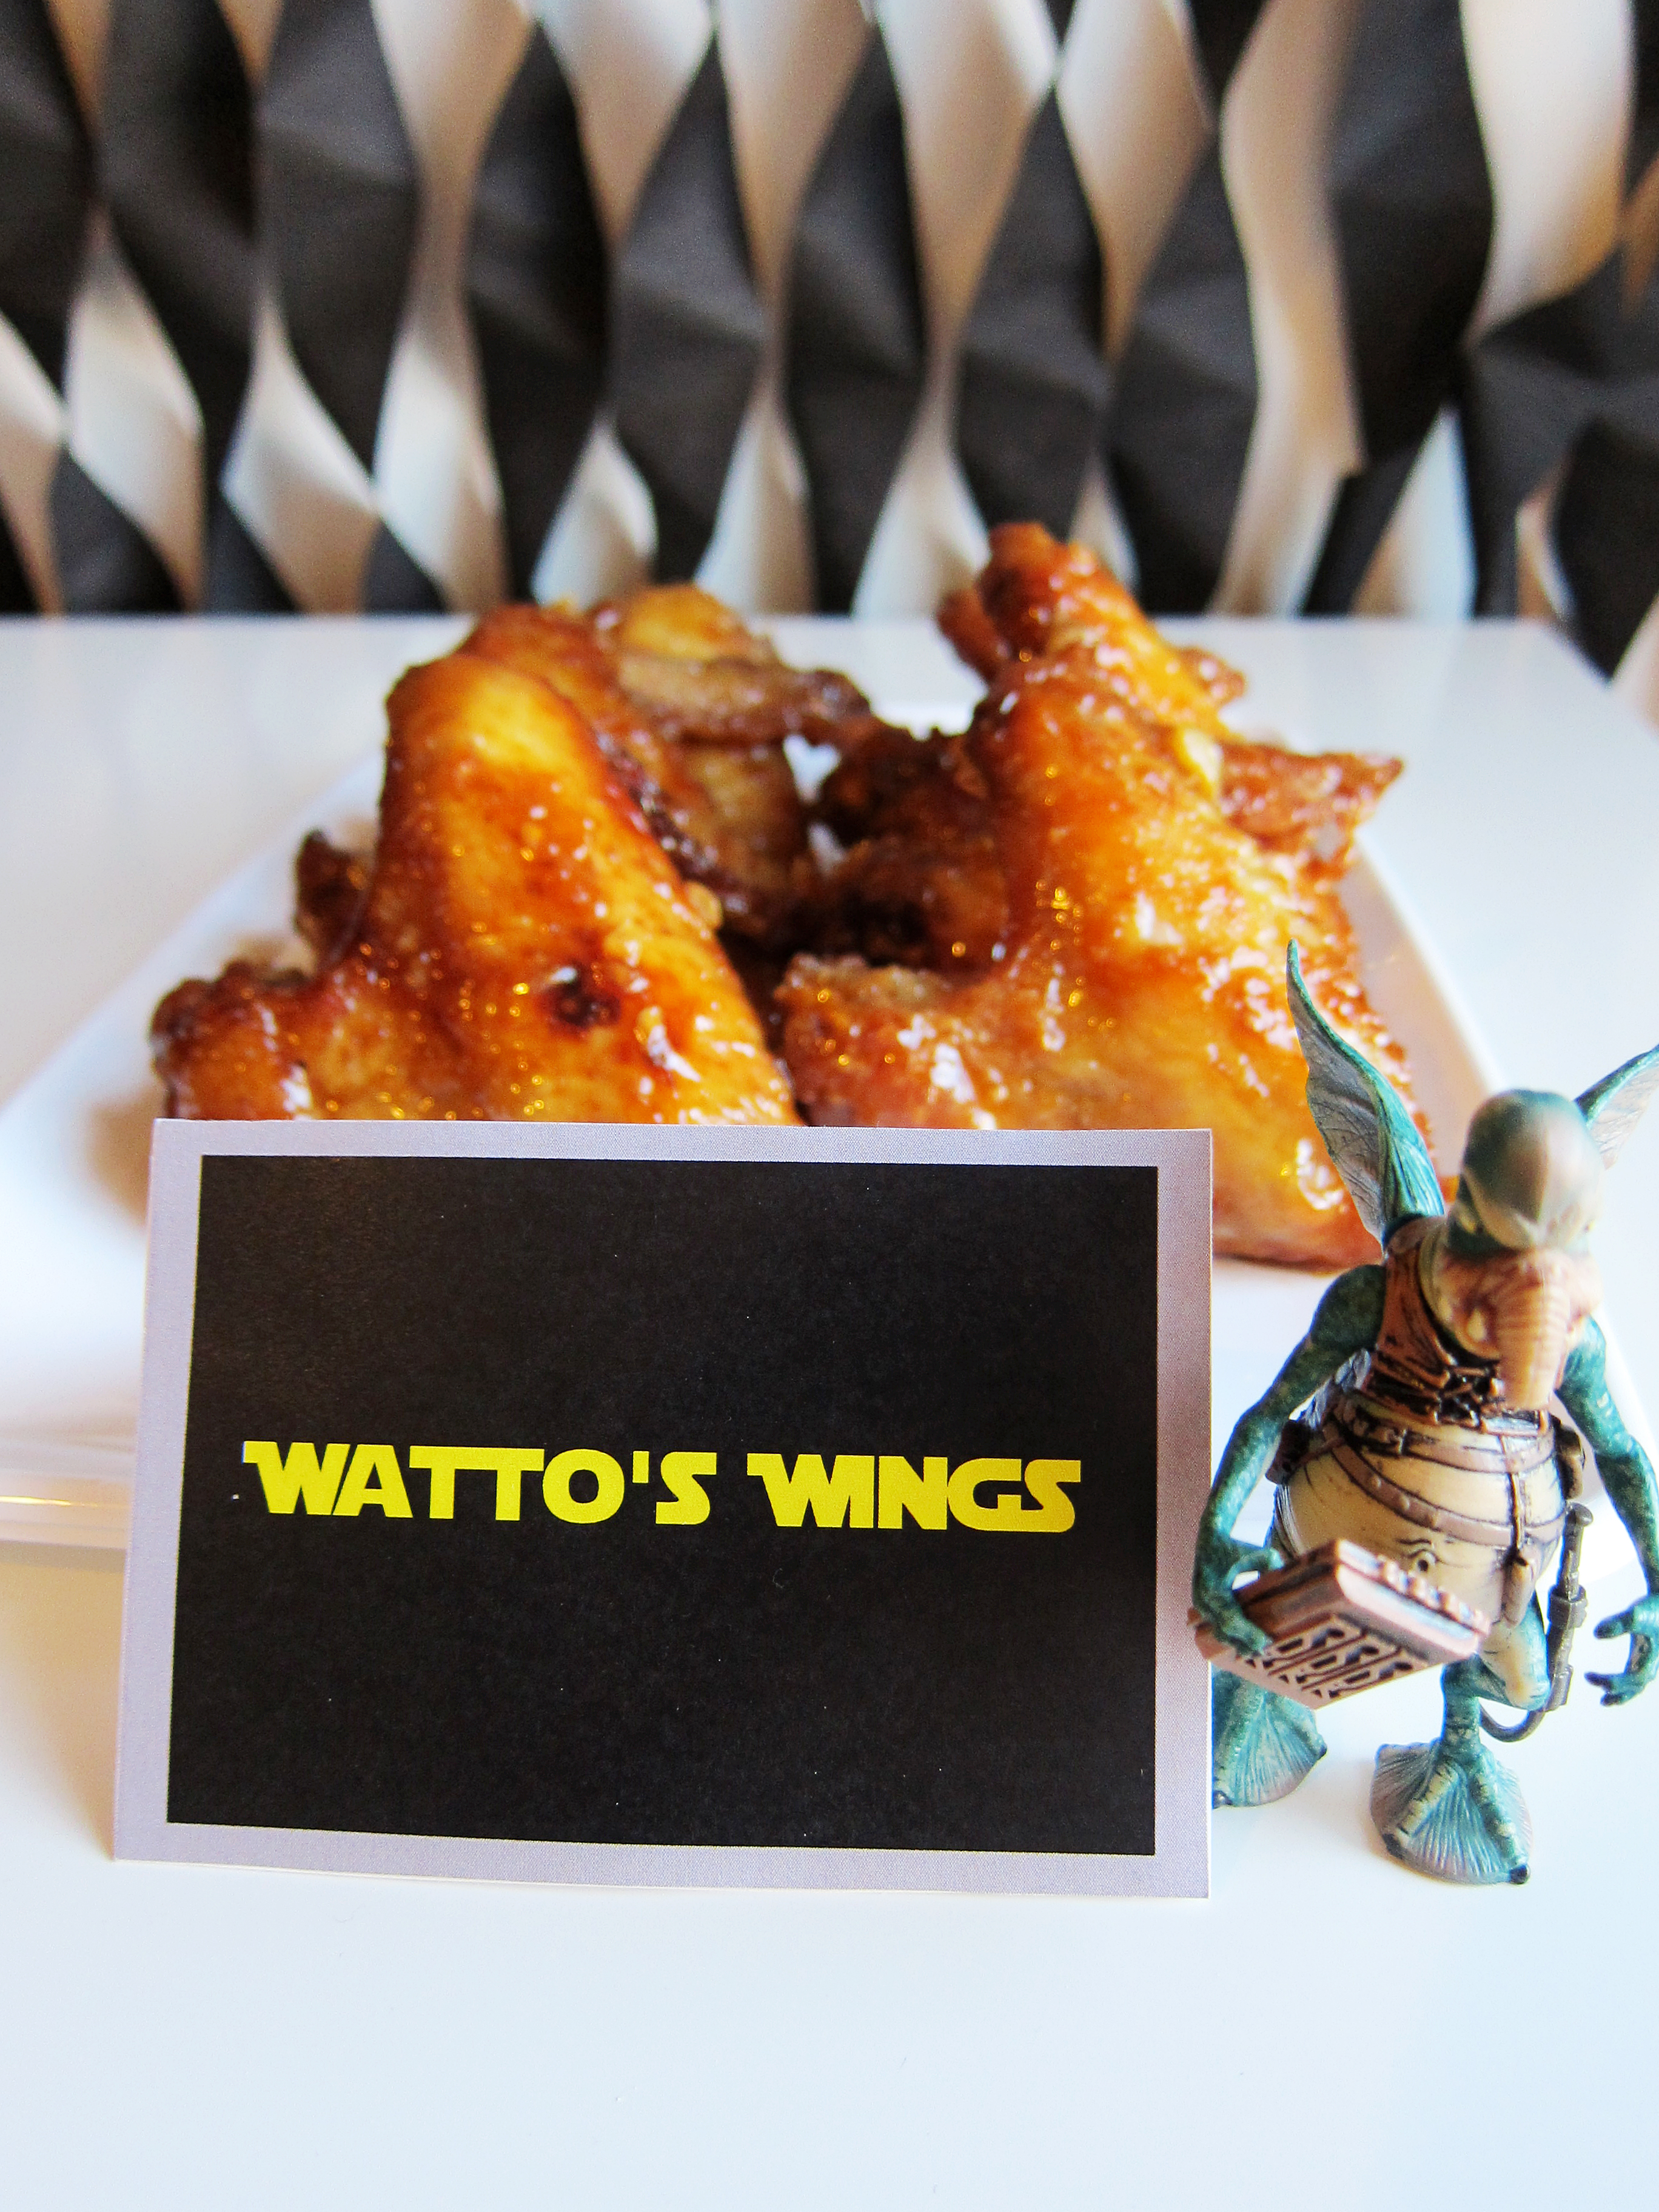
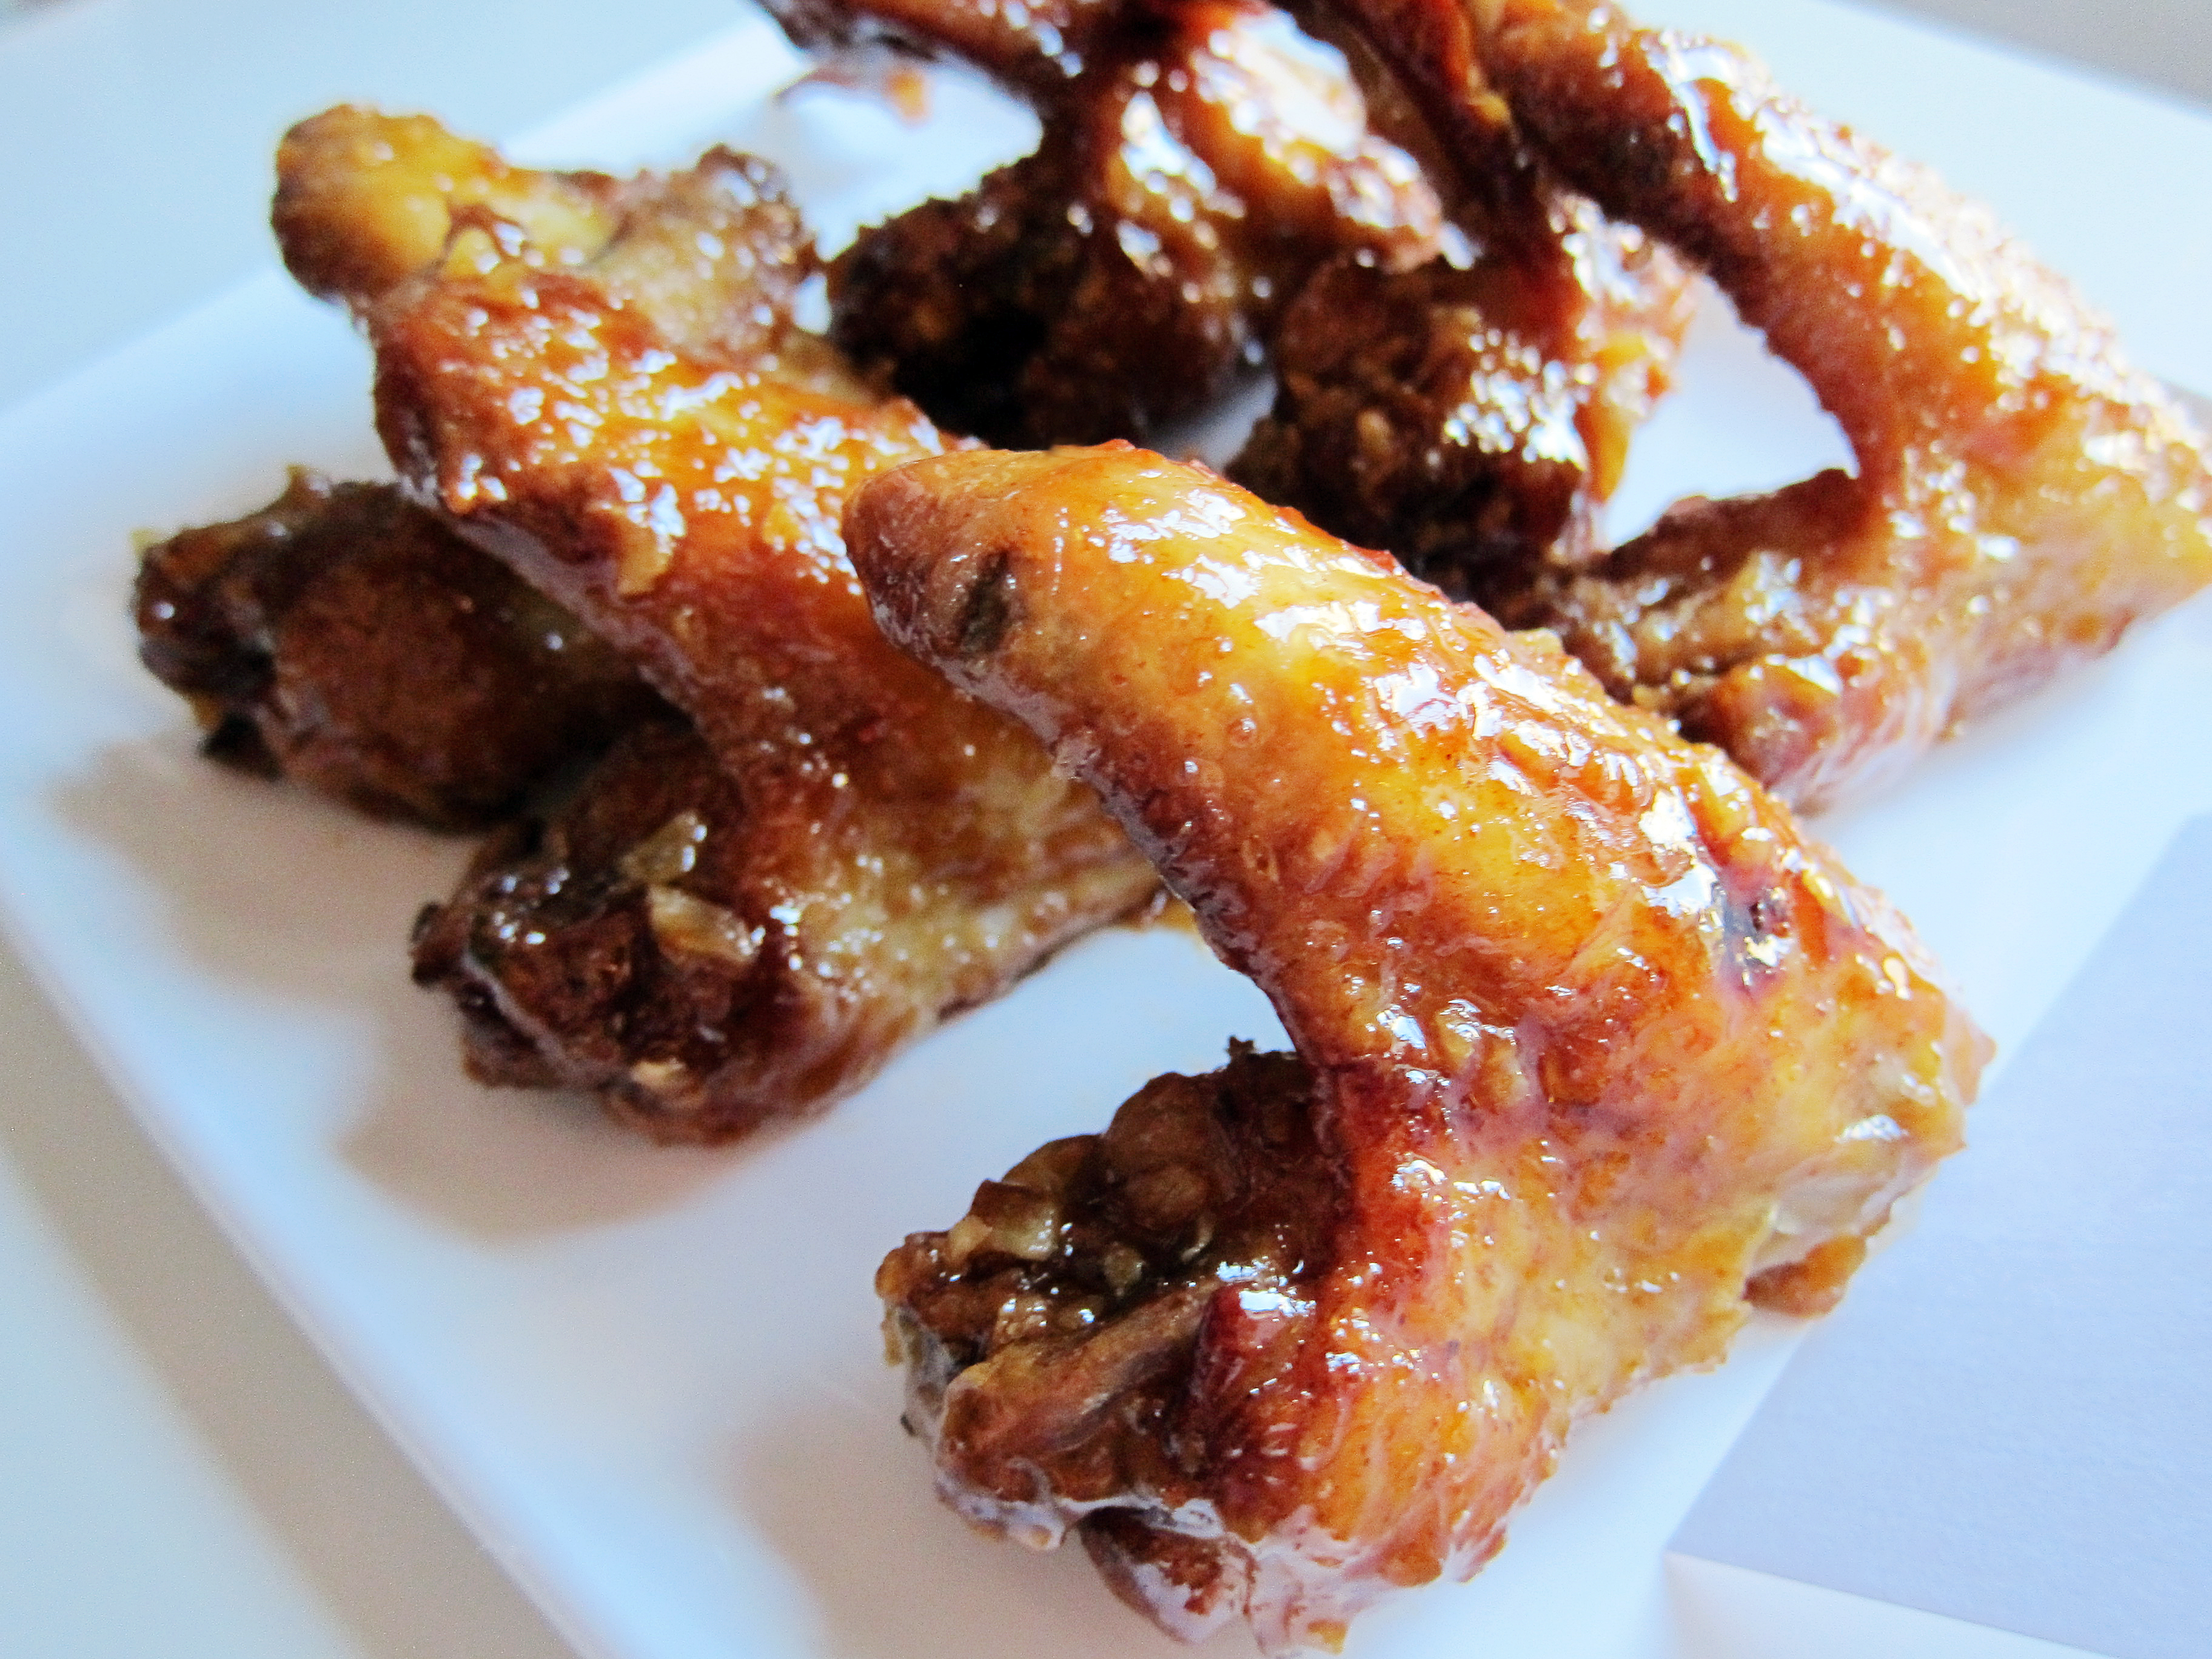
This year‘s party theme was Episode 1: The Phantom Menace, so all of the food and activities were centered on Episode 1 characters and settings.  Here are the things we made for SW Day*:
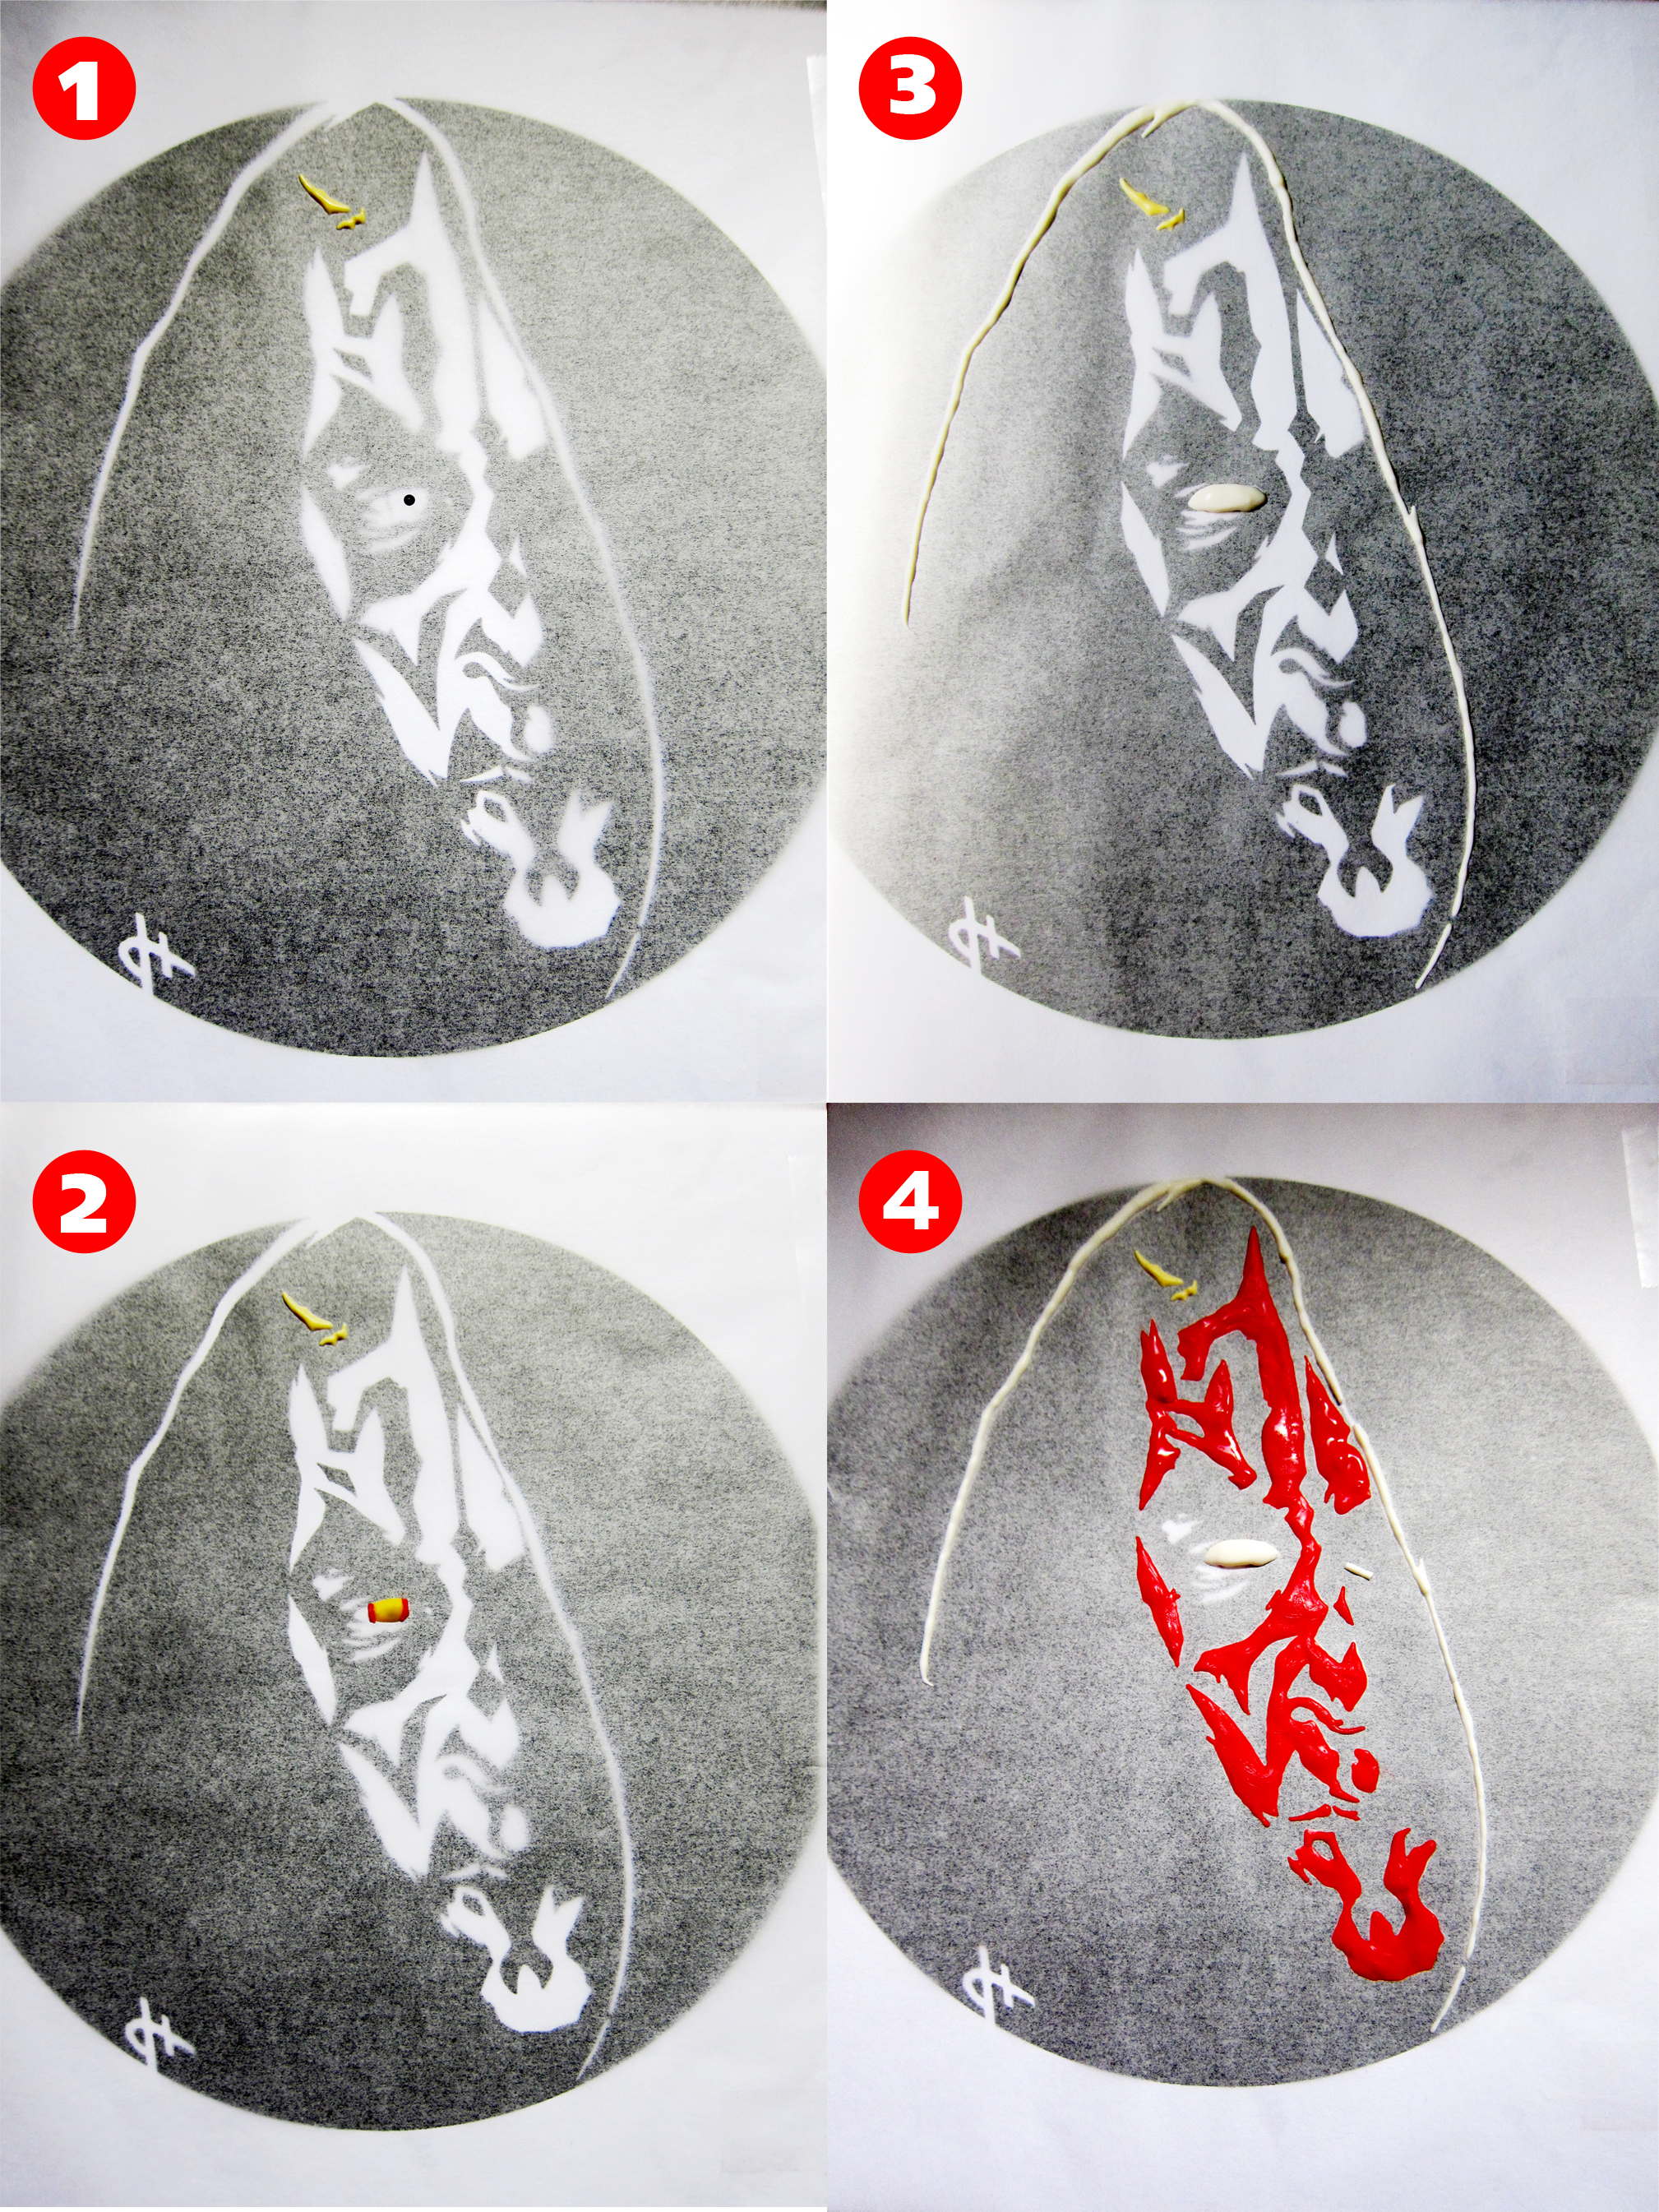
chicken pod piechicken pod pie 2Star Wars Day 2014 7 Star Wars Day 2014 8obi wontons obi wontons 2padme parfaitpadme parfait 2quail gon jinn 1 quail gon jinn 2watto's wings 1 watto's wings 2The centerpiece of the table was my Darth Maul-ble Cake, a marble cake with chocolate frosting and a chocolate transfer of Darth Maul.   There was a small chorus of “wows” when I revealed it.  Chocolate transfers can take a bit of time, but it is straight forward and simple to do.  I used the same technique for this piece and it turned out fabulous.
steps darth maulI think Darth Maul is quite scary.  To be completely honest, I got a wee bit frightened trying to find the right photo for the transfer.  Filling in the chocolate parts was no walk in the park either, he was just as scary.  I know it sounds silly, but if your imagination runs as wild as mine does I’m sure you understand. Revenge of the Six-th indeed. 🙂
Star Wars Day 2014 19Darth Maul-ble Cake

You will need:

1 Chocolate Marble Cake – Recipe Below
1 Batch of Chocolate Frosting – Can be found here
Black Candy Melts
Red Candy Melts
Yellow Candy Melts
White Candy Melts
A mirrored image of this printout in a black circle

Instructions:

  1. Tape the printout onto a baking sheet or any desired flat surface.
  2. Tape a piece of parchment paper over the printout making sure it covers the entire image.
  3. Melt a small amount of black, red, yellow and white candy melts (do not meld the colors together).
  4. Remember, chocolate transfers are all about layering.  Each time you fill out the next step, you will be going over the previously filled portion.
  5. Using either a toothpick or a piping bag fitted with either a #1 or #2 round tip, fill in the pupil of the eye with the black candy melt. (As shown in the above photo.)
  6. Mix the yellow and white candy melt to get a light ivory hue for the horns. Fill in. (As shown in the above photo.)
  7. Once the pupil is set, fill in the iris with the yellow candy melt.  Let set. (As shown in the above photo.)
  8. The outer edge of the iris has a red outline.  Carefully, trace a red border around the yellow candy melt. Let set. (As shown in the above photo.)
  9. Fill in the sclera with the white candy melt.  (As shown in the above photo.)
  10. Fill in the white edge of the hood while the sclera sets. (As shown in the above photo.)
  11. Using the red candy melt, start filling in the mask like patterns on the face.  Try not to lose the detailed edges because that’s what makes the image pop. (As shown in the above photo.)
  12. Once the red candy melt is set, melt some black candy melts.  Make sure it is not piping hot because you will lose some detail if it is.
  13. Smooth over the entire circumference with the black candy melts.  Let completely set.
  14. Place on top of frosted cake and you’re done!

Chocolate Marble Cake

Ingredients:
1⅔ c. all-purpose flour
½ tsp. baking powder
¼ tsp. baking soda
¼ tsp. kosher salt
4 oz. unsalted butter, melted
1 c. sugar
1 egg, room temp
¼ c. Greek yogurt
¾ c. + 1 tbsp. milk, divided
1 tsp. vanilla extract
¼ c. unsweetened cocoa powder

Instructions:

  1. Preheat the oven to 350˚F and prep a 9” cake pan by coating it with nonstick spray and lining the bottom with parchment paper.
  2. Mix melted butter and sugar in a mixing bowl.  Set aside.
  3. In a separate bowl, mix flour, baking powder, baking soda and salt until combined.
  4. Add the egg, Greek yogurt, ¾ c. milk and 1 tsp. vanilla extract to the butter mixture and mix until homogenous.
  5. Add the flour mixture to the butter mixture and fold until smooth.
  6. Transfer ½ of the mixture to another bowl, mix in 1 tbsp. milk and cocoa powder until a thick chocolate batter forms.
  7. Put half of the vanilla batter into the prepared cake pan and spread out.
  8. Pour all of the chocolate batter on top of the vanilla mixture.
  9. Pour the rest of the vanilla batter over the chocolate batter.
  10. Using a toothpick or a butter knife, make swirls all over the cake. Be careful not to over swirl, or you will lose the marbling.
  11. Bake 18-25 minutes until golden brown or a toothpick inserted in the center of the cake comes out clean.

Cake recipe adapted from sally’s baking addiction.


* If you would like detailed info on any of the food I’ve prepared, don’t be afraid to leave a comment or shoot me an email!