Spring is here! …And with it, all the pollen. It might be the new neighborhood that we moved to, but the allergies are out of control. Tissue boxes are everywhere and I had my first dose of non-drowsy allergy medicine that made me foggy headed all day. So I’m soldiering on, no pills, just eye drops and nasal spray to keep the itching away.
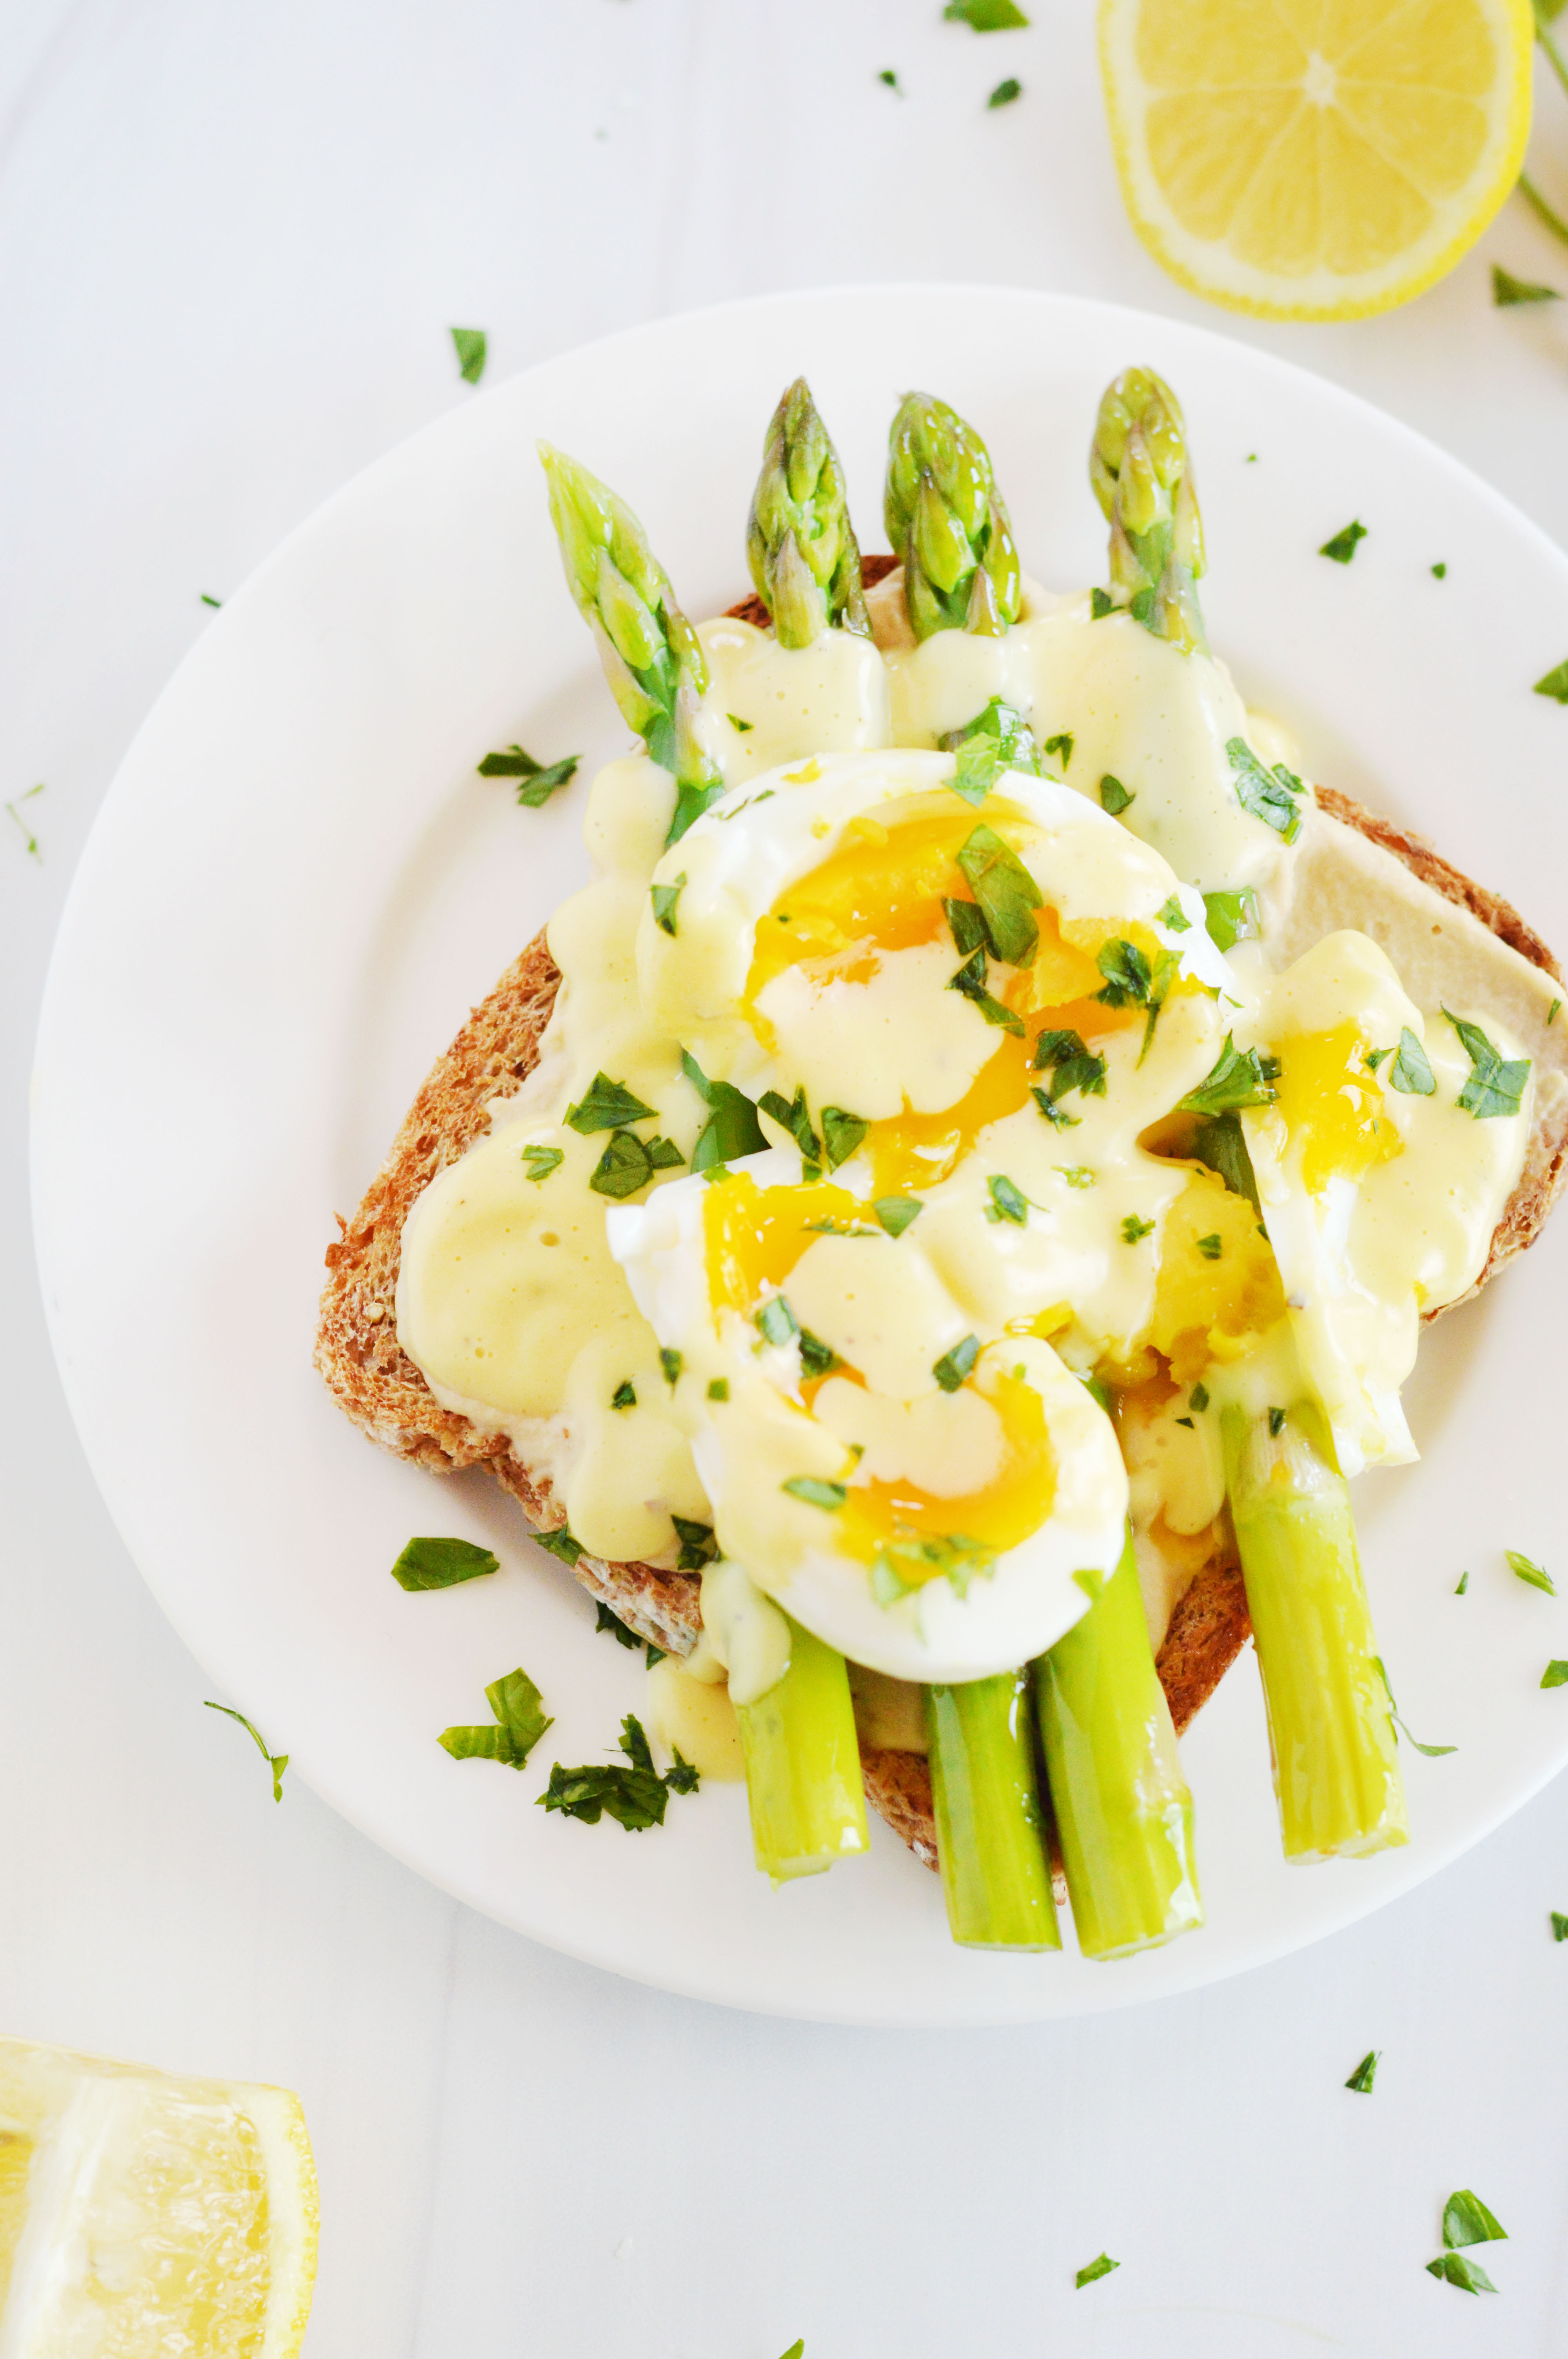
As much as I am suffering, springtime also brings fresher produce and we can finally move on from the comforting and hearty roasts and stews that kept our bodies and bellies warm over this winter. Asparagus is a welcome change and it stays crisp and fresh if you blanch it! (Blanch = quick cook in boiling water). It’s also super cheap this time of the year, and as I am a sucker for deals, I tend to over buy good looking, affordable produce. So what to do with all the asparagus? Make asparagus toast!
We happened to have some roasted garlic hummus in the fridge from our attempt to have healthier snacks, (dieting is going terribly btw) and it made the perfect canvas for the asparagus and the soft boiled egg. Then it’s topped with Hollandaise sauce which is made in the microwave (I know, I didn’t know it could be done either), and is the perfect velvety, rich and tangy touch to the healthy toast. Spring is served.
Asparagus Smashed Egg Toast Makes 2 toasts
Ingredients: 2 slices of bread, toasted (I used Ezekiel Bread) garlic hummus (whichever brand or hummus you like) 8-10 stalks of asparagus, pending on thickness extra virgin olive oil 2 large eggs quick microwave hollandaise sauce (recipe below) parsley, for garnish salt and pepper, to taste
Instructions:
Fill a medium bowl with ice water and set it aside.
Trim your asparagus about 1-2 inches from the bottom, removing the tough ends.
Boil a pot of water and bring it to a simmer, add your asparagus for about 1-2 minutes until crisp-tender.
Remove asparagus and place into the ice water until cool.
Rub extra virgin olive oil and a sprinkle of salt on the asparagus and set aside.
Bring the same pot of water to boil and once it does, lower the heat to a bare simmer and submerge your eggs carefully into the water with a spoon.
Cook the eggs for 7 minutes and move into an ice bath.
Once cool enough to handle, crack and peel eggs.
On your toasted bread, spread garlic hummus. Remember to spread it to the edges.
Neatly arrange your cooked asparagus in a diagonal, giving it a push to secure it to the hummus.
Place an egg on each toast, and smash it with a fork.
Drizzle on the hollandaise sauce.
Sprinkle on salt and pepper, if desired and garnish with parsley
Quick Microwave Hollandaise
Ingredients
½ cup (1 stick) butter, melted 2 egg yolks (from a large egg) 1-2 tbsp lemon juice 1 tbsp. milk Salt and pepper to taste
Instructions
Whisk egg yolks, lemon juice (start with 1 tablespoon and add more later if needed), milk and a pinch of salt and pepper together in a microwave safe bowl.
Drizzle in the melted butter while whisking the egg yolk mixture until smooth.
Microwave the sauce in 15 second intervals for one minute, whisking in between every interval until the sauce is hot and thick.
I can’t believe Easter is this Sunday! I don’t know about you, but personally, all the days seem to blend together these days. (I honestly thought today was Saturday and was panicking that I didn’t write this up fast enough for you guys.) Like most holidays, Easter was the most memorable to me as a kid. While I never got to participate in Easter egg hunts, I knew I would get some sort of treat at church. Whether it was opening up the contents of a hollow plastic egg, or getting a chocolate bunny, it was a day of celebration and joy. As an adult, Easter arrives with a depth of meaning but that undertone of childlike excitement still persists in my heart.
A year ago, faultline cakes became super popular. A cake that has a fracture in the center of a cake to display a fun interior was a novel design that took the Instagram world by storm. It was always an idea that I had pinned in the back of my mind but never got to try. So with Easter coming, it was natural to marry those ideas together. This faultline cake features super cute Easter sprinkles and pastel hued candy. The pastel candy against the yellow buttercream background cheers me up just by looking at it.
From Left to Right: Carrot Cake, Milk Crumbs, Graham Crust
The cake itself is inspired by Momofuku’s carrot cake. It features a graham cracker frosting, their signature milk crumb, a cheesecake filling and a sunken in carrot cake that serves as a pie crust like layer for the filling. Is it a lot of work? Yes. Is it worth it? A resounding YES. If you prepare for the cake in advance and make each component a few days ahead, it’ll save you time and sanity.
And yes, I had to shape the cake into an egg shape. The top of the cake is actually a molded cake ball out of all the cut scraps of the cake, so you don’t waste any of the delicious bits. Unlike a traditional cake that has more structure, this was not a clean cut project. You try your best to make it into an egg shape and stop cutting if you think you are shaving off too much. You can always add a bit more frosting to cover up your mistakes. But shaping the cake is an optional task. All of this is. If you want to just make the cake without decoration? That’s cool. If you want to decorate the cake without shaping it? That’s awesome. If you just want to bake the liquid cheesecake filling and eat it with a spoon? I caution you that it’s addictive and please, save me some. The point is, do what brings you the most joy and go with it. Happy Easter.
Easter Egg Faultline Cake (Milk Bar Carrot Cake)
You will need:
1 batch of carrot cake (recipe below) 1 batch of liquid cheesecake (recipe below) 1batch of milk crumbs (recipe below) 1 batch of graham frosting (recipe below) 1 batch of vanilla swiss meringue frosting, ¼ of the batch tinted yellow (recipe below) assortment of Easter candies 5 inch cake board thick straws
Assembly:
On a cake board, place one 6-inch cake with the concave side facing up.
Using an offset spatula spread a third of the liquid cheesecake in an even layer over the cake. The cake layer should now be a flat and even surface.
Sprinkle one-third of the milk crumbs evenly over the cheesecake. Use the back of your hand to anchor them in place.
Using an offset spatula spread an even layer of graham frosting taking care to smooth the edges of the cake.
Chill cake until firm in freezer. About 10-20 minutes.
Remove cake from freezer.
Top the cake with the 7-inch cake with the concave side facing up.
Fill with liquid cheesecake, and layer milk crumbs and graham frosting.
Chill cake until firm in freezer. About 10-20 minutes.
Remove cake from freezer.
Place a 5 inch cake board in the center of the cake and trace outline of the cake board. Remove cake board.
Mark halfway between the center of the cake and the center of the traced circle at the 12, 3, 6, and 9 o’clock position.
Insert a straw into the 12 o’clock mark on the cake and snip the straw where the straw sticks out of the cake. Continue for the 3, 6, and 9 o’clock position.
Place the 5 inch cake board back on the center of the cake. The cake is now stable and will not sink from the extra weight of the upper layers.
Place one 6-inch cake with the concave side facing up.
Fill with liquid cheesecake, and layer milk crumbs and graham frosting.
Chill cake until firm in freezer. About 10-20 minutes.
Remove cake from freezer.
Top the cake with the 5-inch cake with the concave side facing up.
Fill with liquid cheesecake, and layer milk crumbs and graham frosting.
Chill cake until firm in freezer. About 10-20 minutes.
Carve the cake to an egg like shape.
Take the cake scraps, liquid cheesecake, and milk crumbs and mix to make a large cake ball. Add some graham frosting if the cake ball won’t hold together.
Shape it to be the pointed part of the cake.
Chill cake.
Remove cake and crumb coat the entire cake with a thin layer of graham frosting.
Chill cake.
Remove cake and frost a thin, smooth layer of yellow buttercream in the center of the cake, and decorate the cake with sprinkles and candies.
Chill cake.
Remove cake and using a piping bag with a large, round decorating tip, pipe the upper and lower half of the cake as high as you desire.
Scrape off the extra frosting with a cake scraper for a smooth finish.
Enjoy.
For the Carrot Cake
Ingredients:
1 ½ c. vegetable oil 2 c. sugar 4 large eggs 2 c. all-purpose flour 2 tsp. baking powder 2 tsp. baking soda 1 tsp. salt 1 tsp. cinnamon ½ tsp. freshly ground nutmeg 3 cups finely grated, peeled carrots (about 1 pound)
Instructions:
Preheat oven to 325˚F and grease and line your baking pans with parchment paper. If you are planning on making the cake egg shaped, bake your cake in one 5-inch pan, two 6-inch pans, and one 7-inch pan. If you are making a standard cake, use four 6-inch pans.
In a medium bowl, whisk together flour, baking powder, baking soda, salt, cinnamon and nutmeg.
In the bowl of a standing mixer fitted with a paddle attachment, beat the sugar and oil together on medium speed until combined. Add eggs, one at a time, mixing well after each egg.
On low speed add the dry mixture and mix until just combined.
Take the bowl off of the standing mixer and fold in the grated carrots.
Divide the batter evenly into your prepared pans. (If you are using different sized pans, divide the batter so the batter comes up evenly amongst all the pans. So if it comes up ¼ way up the pan for 5-inch pan, it should also come up ¼ way up the side of your 6-inch pan). Bake about 20-25 minutes until the top is golden brown and until a toothpick poked in the middle comes out clean. Note: The cake will be sunken in the middle. This is done on purpose to have a pie crust-like cake for the filling.
Cool cakes on cooling rack until ready to assemble.
For the Liquid Cheesecake
Ingredients:
16 oz. cream cheese, room temp 1 ½ c. sugar 2 tbsps. cornstarch 1 tsp. kosher salt ¼ c. milk 2 large eggs
Instructions:
Heat the oven to 350° F.
In a medium bowl, whisk together the cornstarch and salt. Whisk in the milk in a slow, steady stream, then whisk in the egg until homogenous.
In the bowl of a stand mixer fitted with a paddle attachment, add the cream cheese and mix on low speed for 2 minutes. Scrape down the sides of the bowl with a spatula. Add the sugar and mix for 1 to 2 minutes, until the sugar has been completely incorporated.
Turn the mixer to medium-low speed, and stream in the egg slurry. Mix for 3 to 4 minutes, until the mixture is smooth.
Line the bottom and sides of an 8×8 inch baking pan with parchment paper. Pour the batter into the pan, put the pan in the oven, and bake for 20 minutes. Gently shake the pan. The cheesecake should be set on the outer edges of the baking pan but still wobble in the very center. If the cheesecake is not set at all, bake for 5 more minutes. Avoid browning the cheesecake at all. If it does brown, remove immediately.
Cool the cheesecake on a wire rack. Once completely cool, it is ready for use. If making ahead of time, the cheesecake can be wrapped and stored in an airtight container in the fridge for up to 1 week.
For the Milk Crumb
Ingredients:
½ c. milk powder ¼ c. flour 2 tbsp. cornstarch 2 tbsp. sugar ½ tsp. kosher salt 4 tbsp. (½ stick) butter, melted ¼ c. milk powder 3 oz. (90g) white chocolate, melted
Instructions:
Heat the oven to 250° F.
Combine the ½ c. milk powder, the flour, cornstarch, sugar, and salt in a medium bowl. Add the melted butter and mix using a spatula, until the mixture starts to come together and form small clusters.
Spread the clusters on a parchment- or Silpat-lined sheet pan and bake for 20 minutes. The crumbs should have sand like appearance. Cool the crumbs completely.
Crumble any milk crumb clusters that are larger than ½ inch in diameter and put the crumbs in a medium bowl. Add the ¼ c. milk powder and toss together until it is evenly distributed throughout the mixtures.
Pour the white chocolate over the crumbs and toss until your clusters are enrobed. Then continue tossing them every 5 minutes until the white chocolate hardens and the clusters are no longer sticky. The crumbs will keep in an airtight container in the fridge or freezer for up to 1 month.
For the Graham Frosting
Ingredients:
1 recipe Graham Crust ⅔ c. milk ¾ tsp. kosher salt 12 tbsp. butter, at room temperature 2 tbsp. light brown sugar, tightly packed 2 tbsp. confectioners’ sugar 1 tsp. ground cinnamon ¼ tsp. kosher salt
Instructions:
Combine the graham crust, milk, and ¾ tsp. salt in a blender, turn the speed on to medium-high, and puree until smooth and homogenous. It will take 1 to 3 minutes.
In the bowl of a stand mixer fitted with the paddle attachment, cream the butter, sugars, cinnamon, and ¼ tsp. on medium-high for 2 to 3 minutes, until fluffy and lighter in color. Scrape down the sides of the bowl with a spatula.
On low speed, add in the graham mixture from blender. Mix on medium speed until the color is a uniform tan and silky smooth.
Use the frosting immediately, or store it in an airtight container in the fridge for up to 1 week.
For the Graham Crust
Ingredients:
1½ c. graham cracker crumbs ¼ c. milk powder 2 tbsp. sugar ¾ tsp. kosher salt 4 tbsp. (½ stick) butter, melted, or as needed ¼ c. heavy cream
Instructions:
In a medium bowl, add and mix the graham crumbs, milk powder, sugar, and salt.
In a small bowl, whisk the butter and heavy cream together. Add to the dry ingredients and mix again to evenly distribute. The butter will act as a glue, adhering to the dry ingredients and turning the mixture into small clusters. The mixture should hold its shape if squeezed tightly in the palm of your hand. If it is not moist enough to do so, melt an additional 1 to 1½ tablespoons butter and mix it in.
Eat immediately, or use as directed in a recipe. Stored in an airtight container, graham crust will keep fresh for 1 week at room temperature or for 1 month in the fridge or freezer.
For the Swiss Meringue Frosting
Ingredients:
1 ¼ c. sugar 5 large egg whites 2 c. (4 sticks) unsalted butter 2 tsp. vanilla extract a pinch of kosher salt
Instructions:
Bring a small pot filled with about an inch of water to a simmer.
In a bowl of a standing mixer, whisk the egg whites, sugar, and salt together.
Place the bowl on top of the pot and whisk continuously until the mixture becomes slightly foamy and you cannot feel the grittiness of the sugar, about 5-8 minutes. The mixture will be hot. Be careful.
Move the bowl to the standing mixer fitted with the whisk attachment and whip the egg mixture until the bowl feels cool to the touch.
Add in the butter, and continue to whip until a smooth buttercream forms.
Add in the vanilla extract and continue to whip until incorporated.
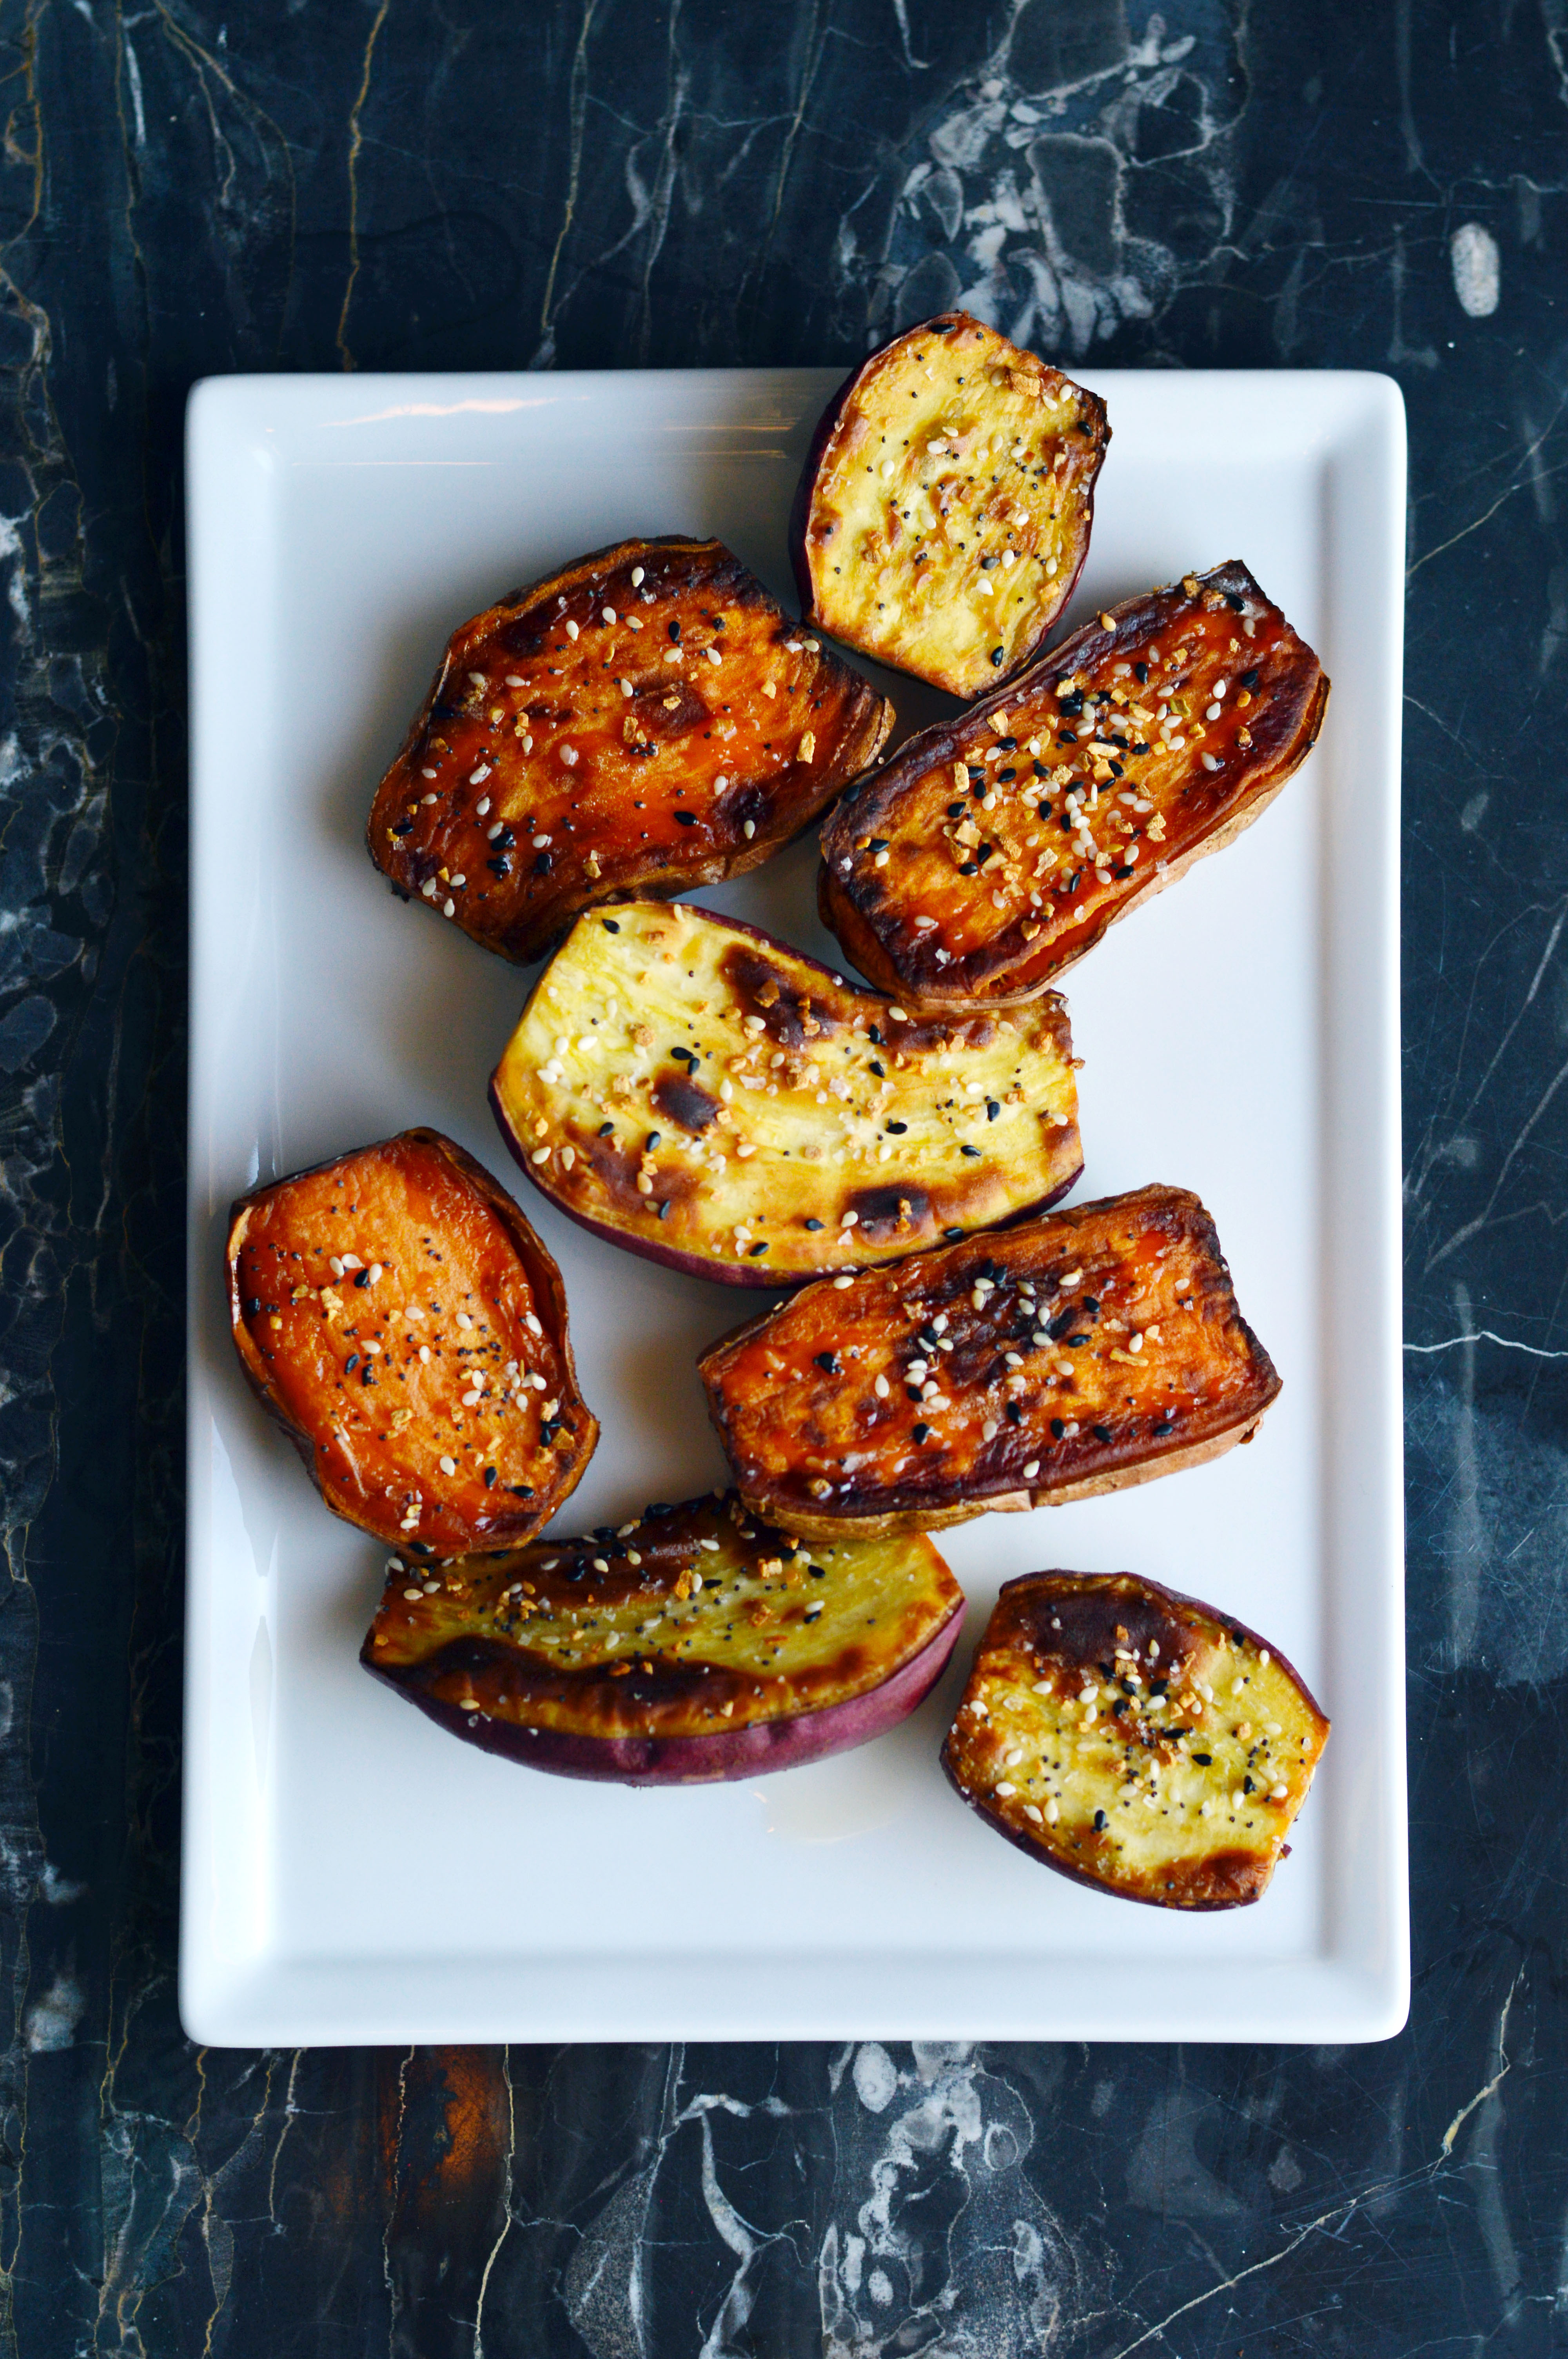
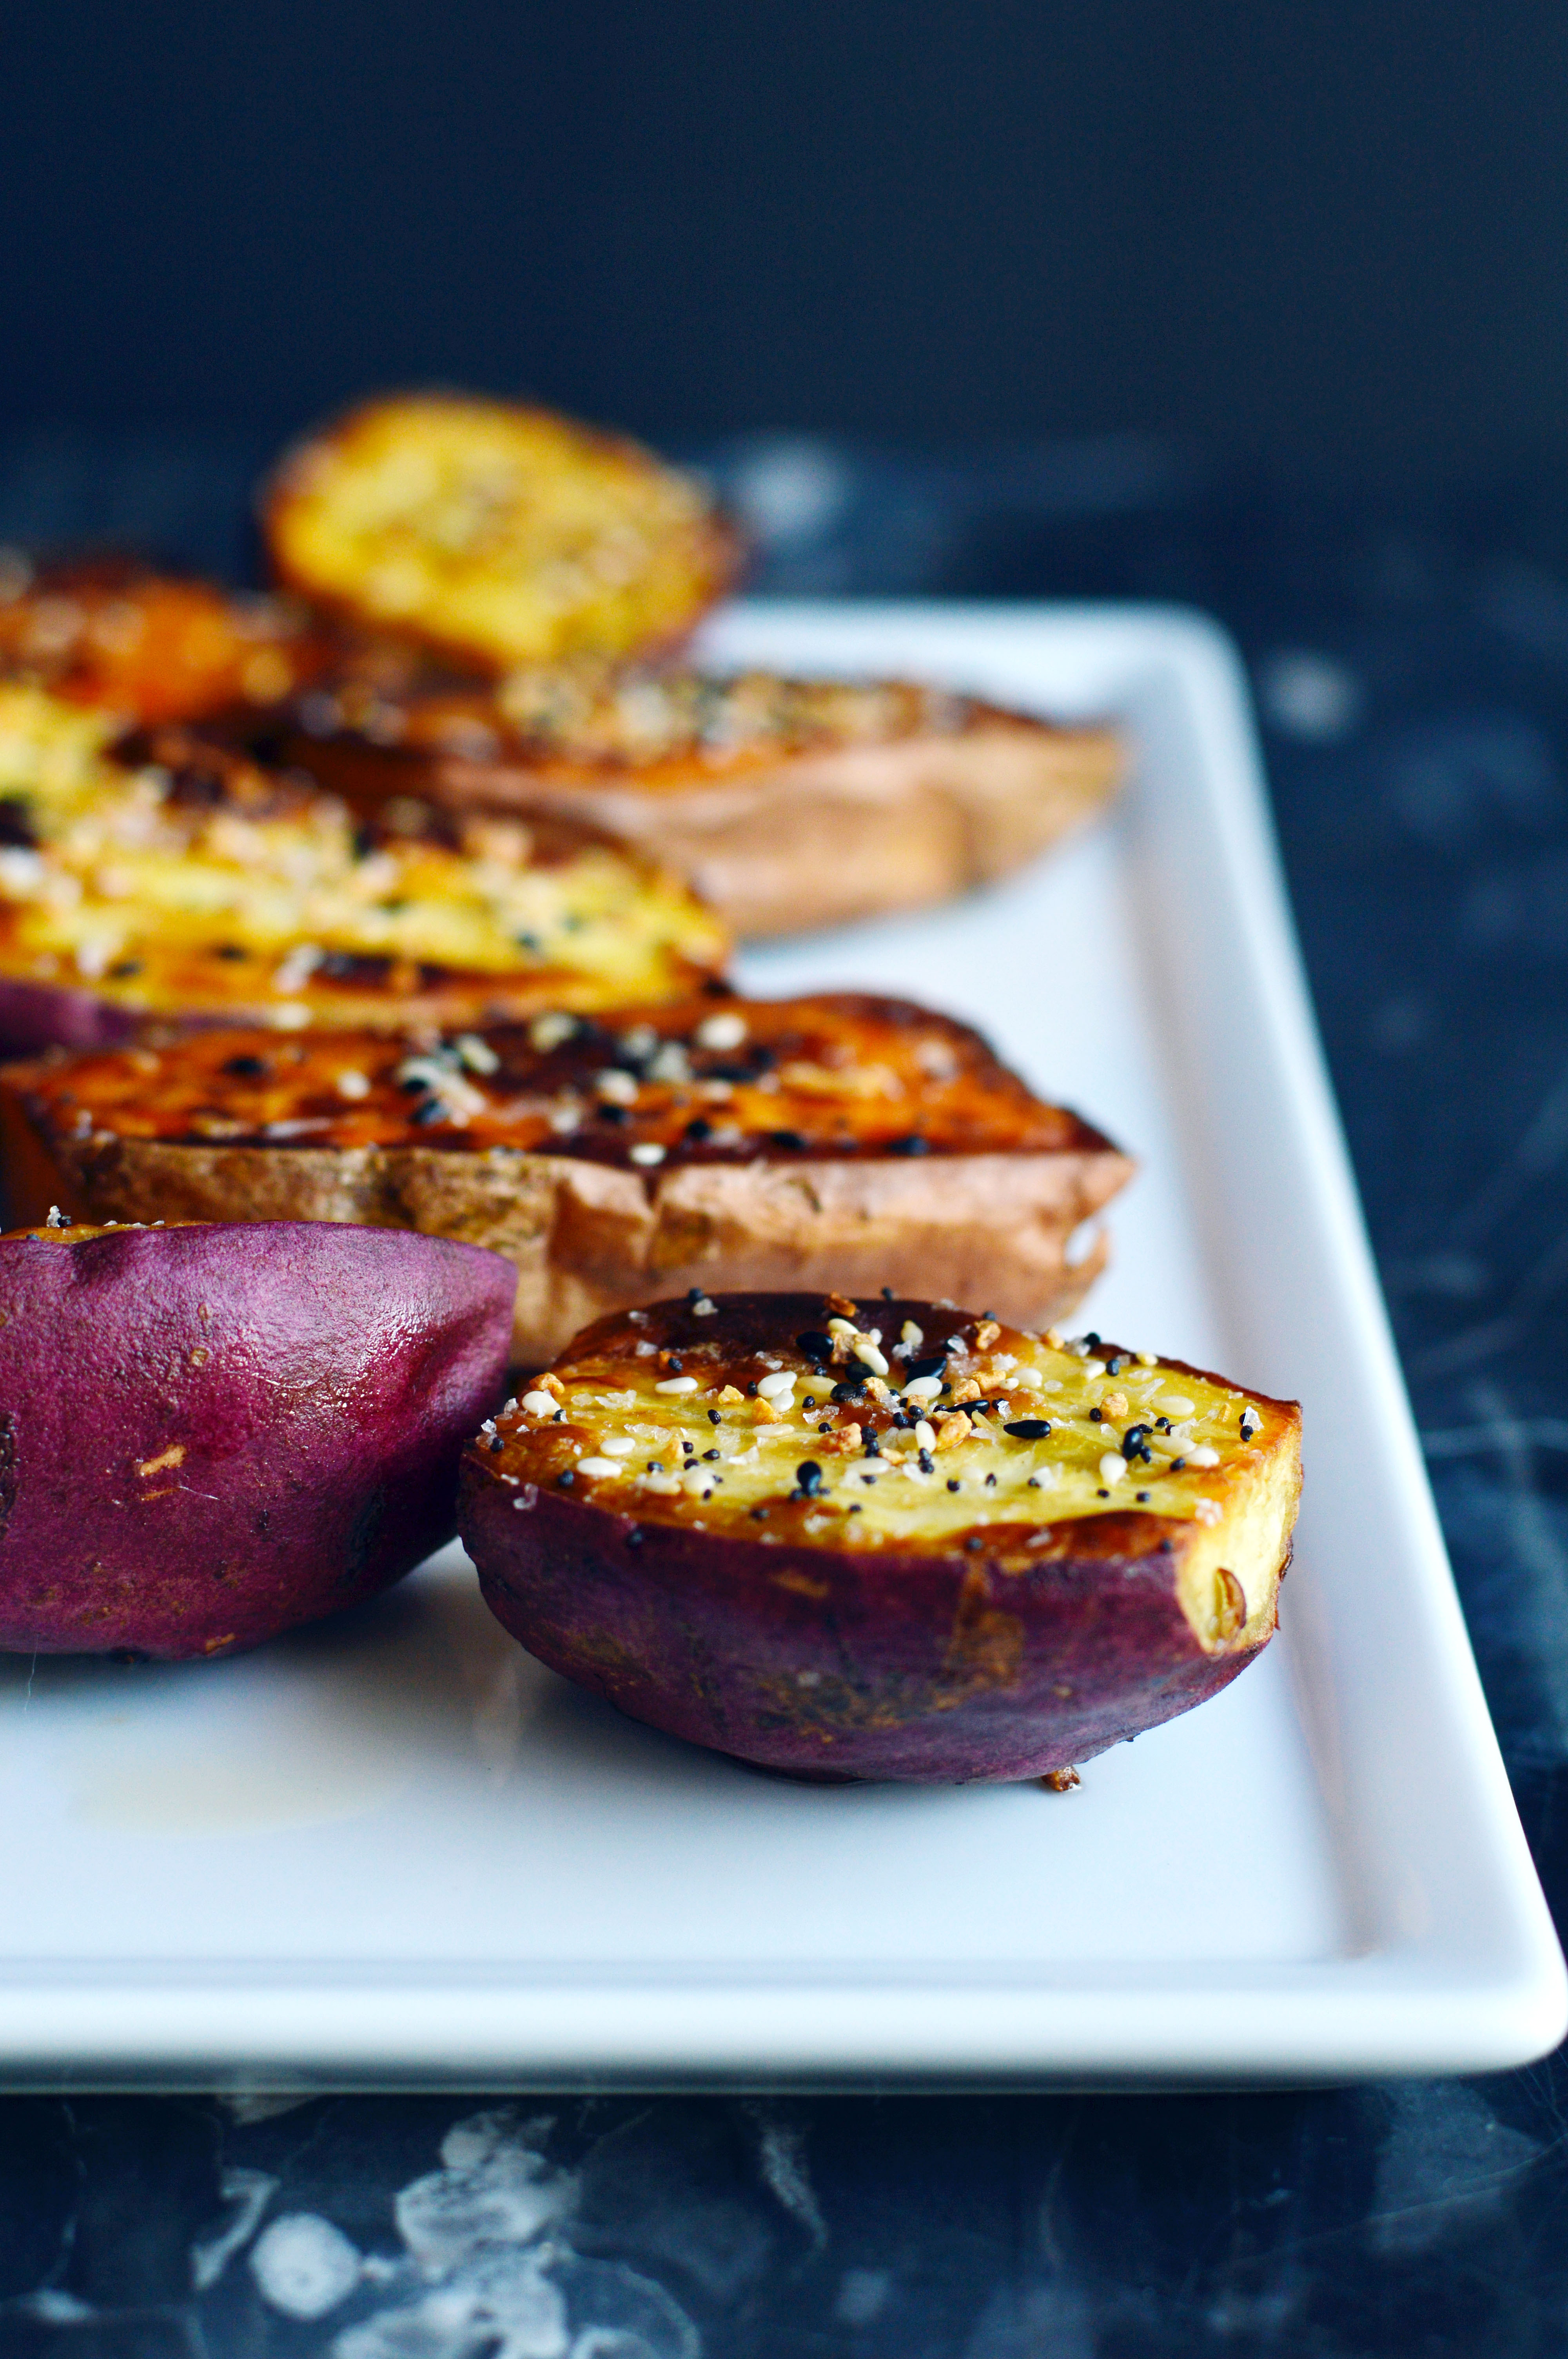
If you’ve been reading my blog for a while now, you would know how much I love sweet potatoes. (As evidenced here, here and here.) I love the soft texture it takes on when it is roasted well and the flavor, to me, is as comforting as chicken noodle soup. So when one of my favorite bloggers posted a video about “perfect sweet potatoes”, I had to give it a try. Well, it was quite delicious and nearly perfect! I just tweaked it a little by adding salt and omitting the freshly chopped garlic. (If you love garlic, or are in a garlicky mood, mince a few cloves of garlic and add it to the seasoning stage.) Aimee’s way of roasting the sweet potatoes gives it a crisp exterior and a smooth and buttery interior, and the addition of the “everything but the bagel” seasoning gives a savory edge to the sweetness of the sweet potato. We’ve been making these a lot in our house lately because it is Whole 30 friendly. My sister has been on the whole 30 diet and turns out no sugar, alcohol, grains, legumes, soy, and dairy really cuts down the things that you are allowed to eat. But this has been the sweet-savory snack that has been helping her stay on track. You can watch the video of Aimee making it here.
Everything Bagel Sweet Potatoes
Ingredients:
3-4 medium sized sweet potatoes (use organic potatoes if you are eating the skin)
avocado oil (or any high smoke point oil)
everything but the bagel seasoning (I got mine at trader joe’s but you can technically make your own)
kosher salt
3-4 cloves of garlic, minced (optional)
Instructions:
Preheat oven to 400˚F and line a baking sheet with aluminum foil (shiny side down).
Thoroughly wash your sweet potatoes. Trim both ends and cut lengthwise.
Coat the sweet potatoes with avocado oil, and place on baking sheet cut-side down.
Roast sweet potatoes 15-20 minutes or until golden brown.
Remove sweet potatoes from oven; flip sweet potatoes so they are cut-side up.
Sprinkle with kosher salt, bagel seasoning, and garlic (if using).
Move baking sheet back into the oven and roast 10-15 minutes more.
Turn off oven and let sweet potatoes sit in oven for an additional 10-15 minutes.
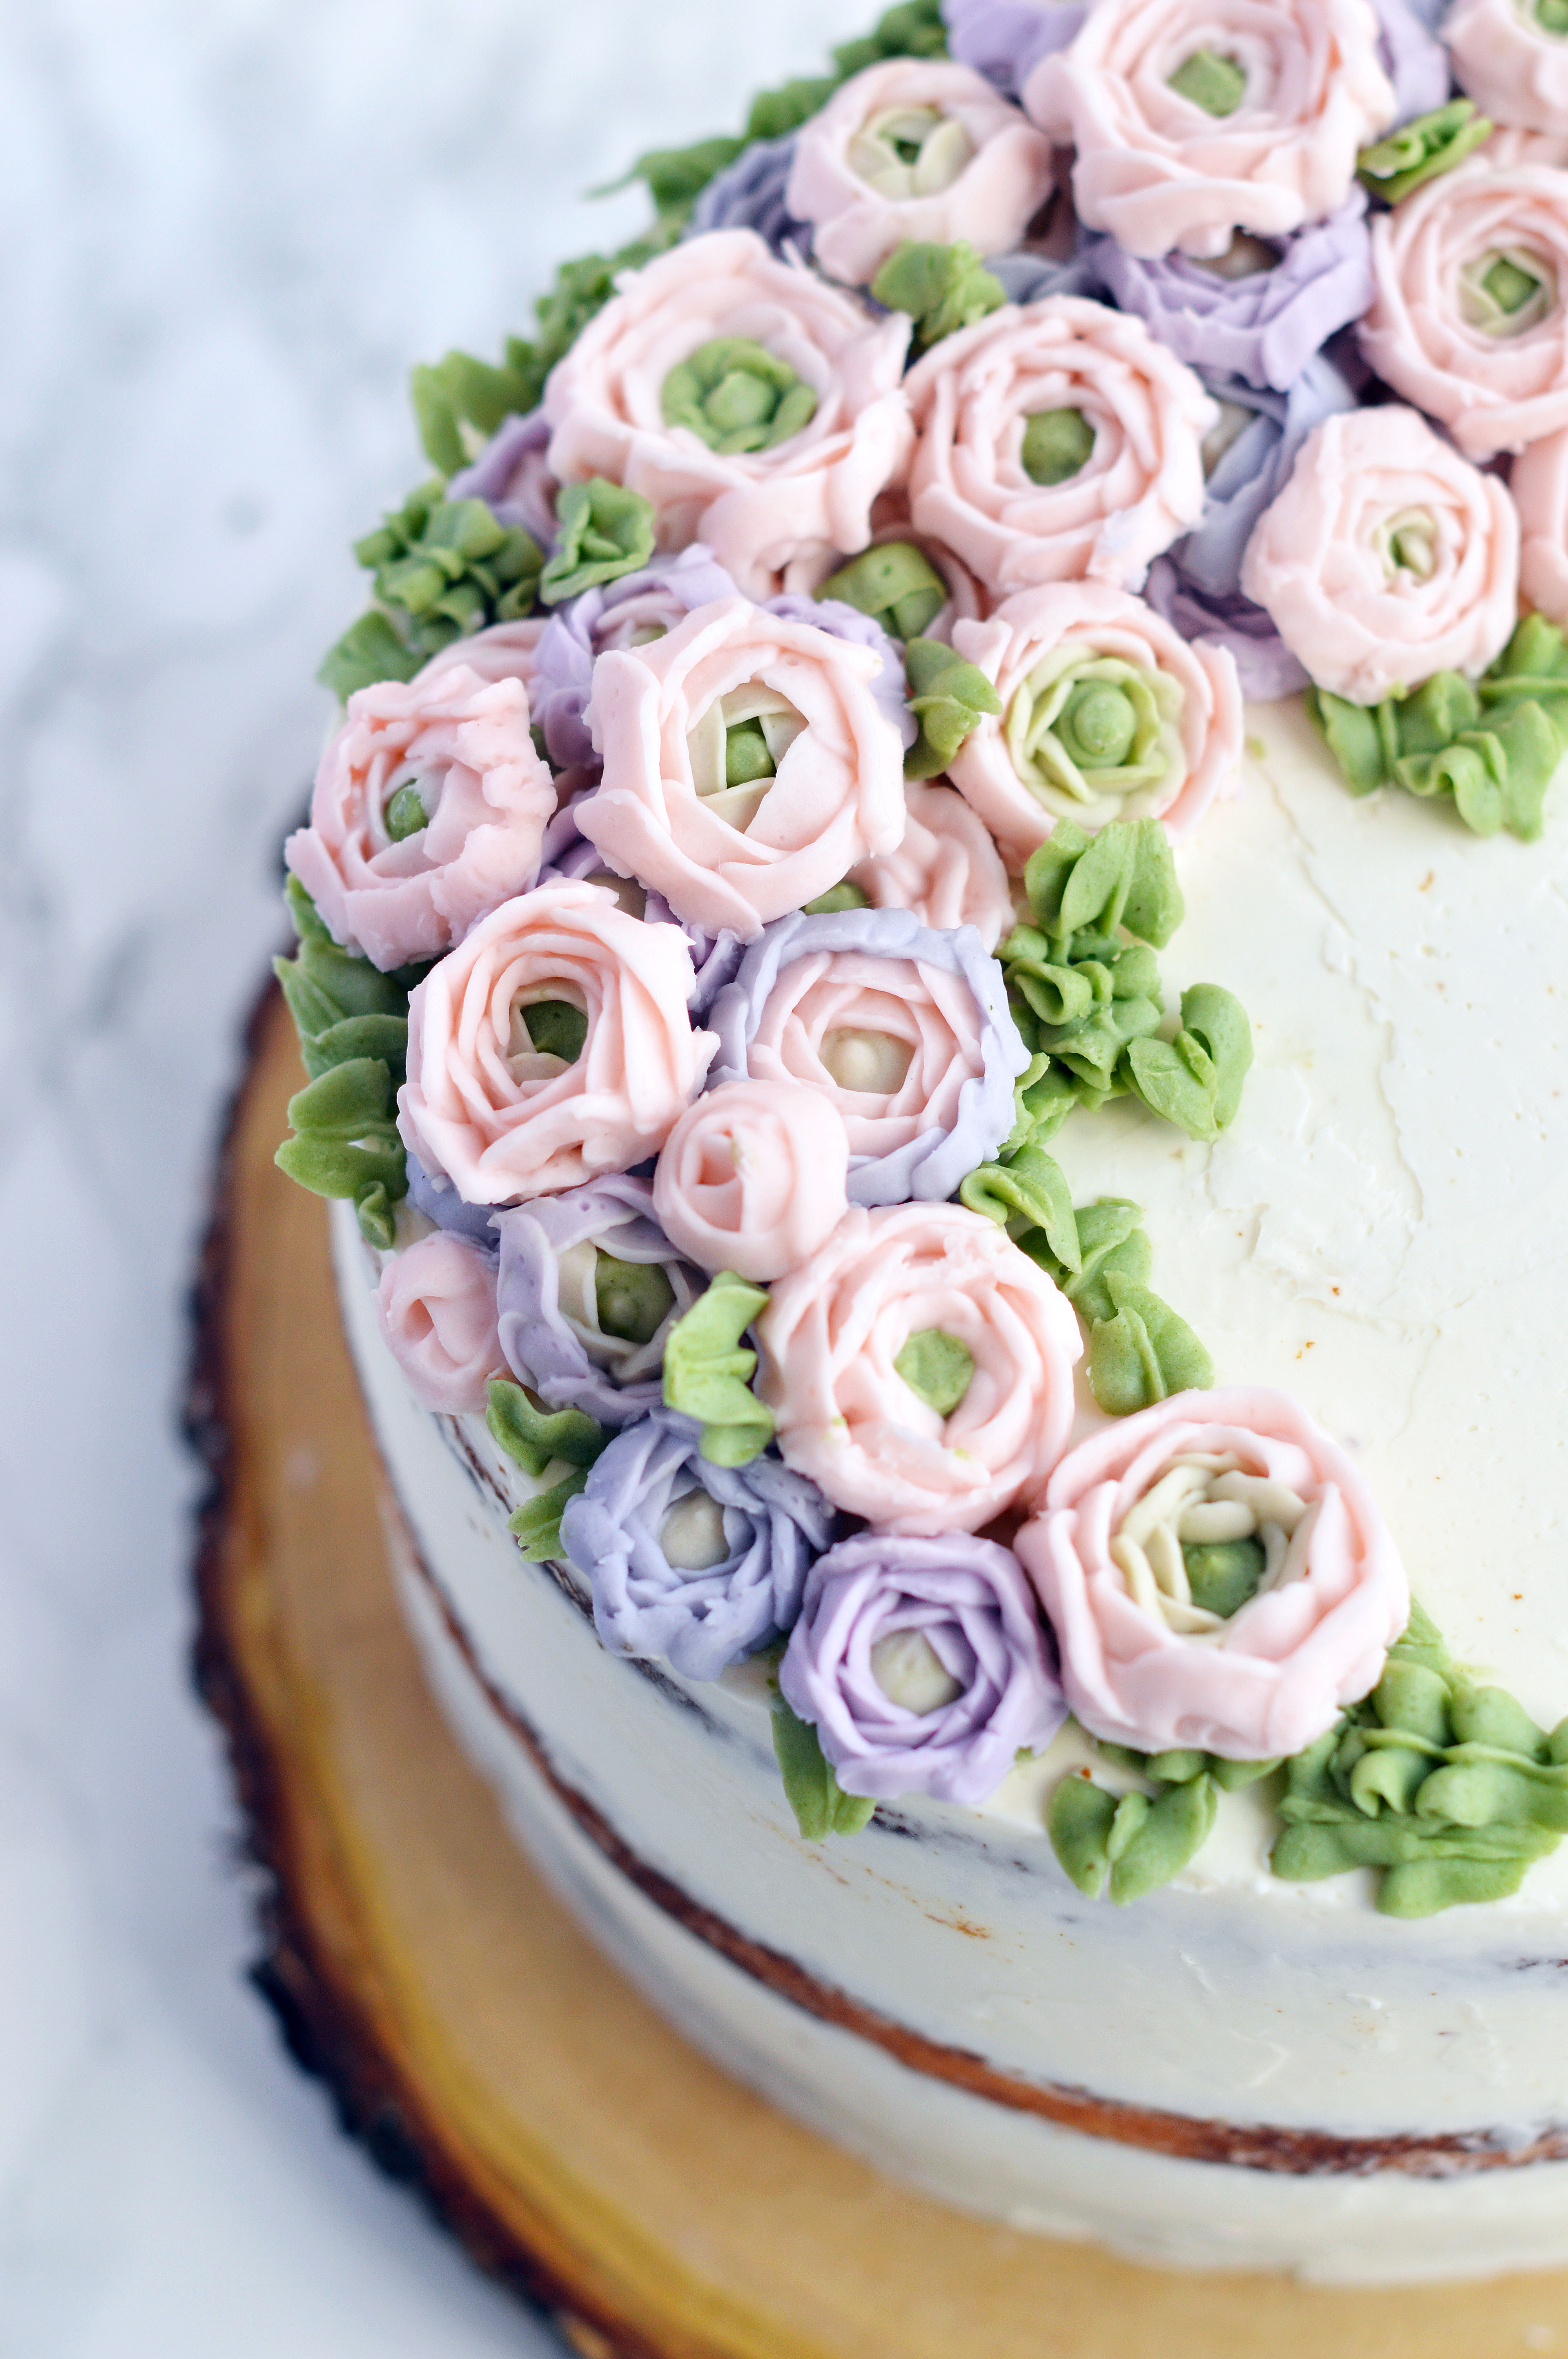
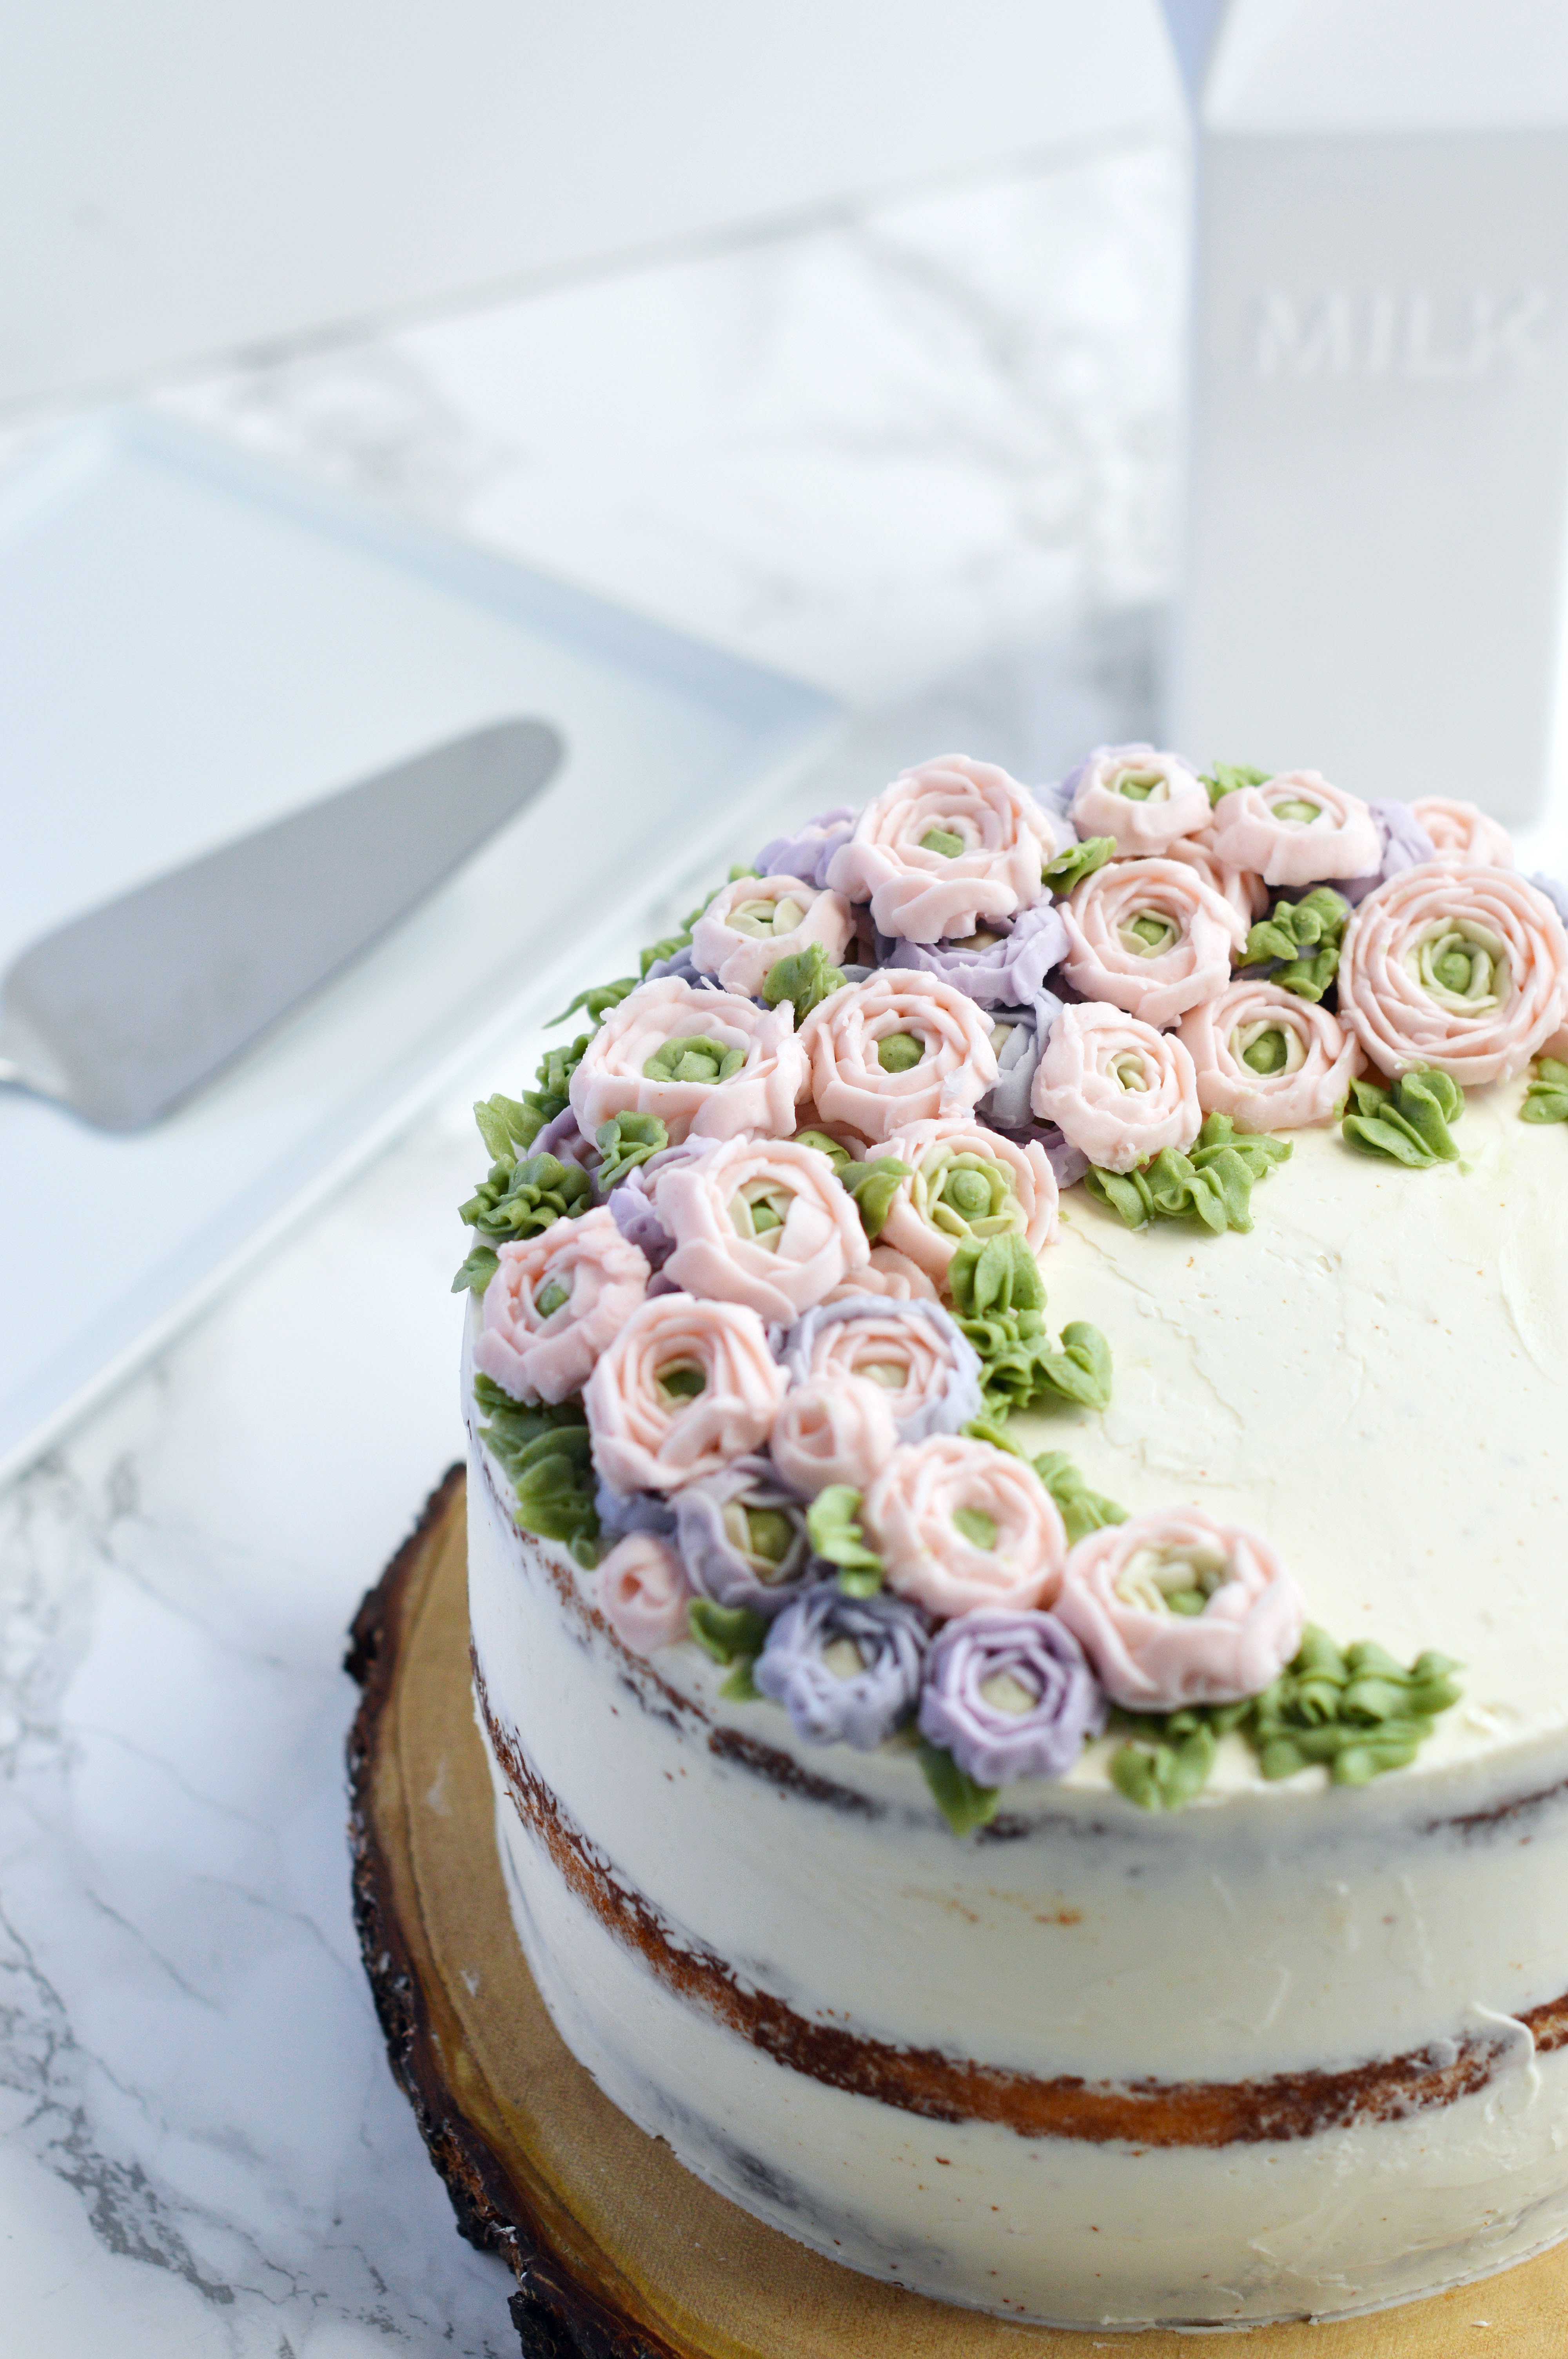
I’ve been kind of obsessed with flower everything on my cakes these days. Real or buttercream, I love them all. I actually made this cake back in May, and by the time I got to editing photos it was the peak of summer. And because the filling is sweet potato pastry cream, it just didn’t go with the season. But now that it is on the cusp of fall, I feel like it’s appropriate to post this. (Although, personally, this is my favorite pastry cream of all time and I love it any time of the year.) The star of this cake is the sweet potato, but not the orange fleshed kind but the purple skinned, yellow fleshed kind. This type of sweet potato is popular in Korean desserts and tastes similar to a roasted chestnut. In the past, I’ve also featured this type of sweet potato in this post: Mini Green Tea Cake. If you’ve never made pastry cream before, my advice for you is to go slow with pouring the hot milk into the egg mixture, as in a slow drizzle, not a pour. You want to avoid curdling at all costs. But if you do it right, man oh man is it worth it. Gone are the days of powdered mixes. You will never look back. Fill it between your favorite vanilla cake and watch the compliments roll. As for the decoration, I’ve always loved ranunculus and decided to try to pipe it. It is easier than It looks but is quite time consuming to pipe each flower, especially since they have so many petals. Here are the steps to pipe the flower:
Cut out many squares of parchment or wax paper. You will use one square per flower. (I usually cut mine around 3×3 inches.)
With a flower nail in your hand, pipe a small amount of frosting onto the center of it. (As shown in Photo 2.)
Place a piece of parchment paper on top of the frosting. (As shown in Photo 3.)
Using a small round tip (wilton #2 or #3), pipe a small amount of green frosting in the center of the flower nail in a round, circular shape. (As shown in Photo 4.)
In a piping bag filled with light green frosting and fitted with a petal tip with the wider side facing the flower nail (wilton #102, or larger pending on the size of the flower you want to pipe), pipe a square around the circle, overlapping each other on the ends. (As shown in Photo 5.)
In a piping bag filled with light pink frosting and fitted with a petal tip with the wider side facing the flower nail (wilton #104, or larger pending on the size of the flower you want to pipe), pipe 5 dashes around the light green square overlapping the ends. (As shown in Photo 6.)
Using the same piping bag, pipe 6 dashes around the pink circle. You want to show a little bit of the circle beforehand to create an illusion of overlapping petals. (As shown in Photo 7.)
Continue piping dashes along the outer edge of the flower, increasing the number of dashes by 1 until you reach the size of the flower you desire. (As shown in Photo 8.)
I hope you try it soon! I know it’s been a while I’ve missed you!
Sweet Potato Pastry Cream
Ingredients:
3 medium sized Korean sweet potatoes, roasted and peeled.
2 c. whole milk
½ c. sugar, divided
2 egg yolks
1 egg, large
¼ c. cornstarch
a pinch of kosher salt
2 tbsp. unsalted butter
1 tsp. vanilla extract
Instructions:
In a food processor, mix the sweet potatoes until a smooth puree forms. Set aside.
In a medium saucepan, whisk the milk and ¼ c. of sugar and heat until the milk boils.
While the milk heats, grab a medium bowl and whisk together the egg yolks, egg, ¼ c. sugar, cornstarch and the salt until smooth.
Once the milk is heated, slowly drizzle in the milk mixture into the egg mixture with one hand while whisking the egg mixture with the other. Once the milk is completely incorporated into the egg mix, return the entire mixture into the saucepan.
Heat the saucepan while whisking until the mixture becomes thickened like pudding.
Take it off the heat and stir in the butter and vanilla extract.
Mix the sweet potato with the pastry cream until homogenous.
Place a piece of plastic wrap directly onto the pastry cream and refrigerate until cool and set. (about 4 hours, or overnight)
There isn’t much that I remember about living in Seoul, South Korea as a little girl. But one memory that lingers after all these years is how the streets were perfumed with the scent of roasted sweet potatoes in the winter. I don’t know how it is now, but back then the streets were filled with carts that sold perfectly roasted sweet potatoes. Roasted Korean sweet potatoes are very different from their American counterpart. They are insanely sweet and the flavor is chestnut-like. And unlike American sweet potatoes, they don’t get watery. Instead, they are more fibrous and hold their shape when peeled. For many years, I’ve tried to recapture that memory by roasting Korean sweet potatoes in my oven. The smell was spot on, but I couldn’t get that same roasted taste that I remembered. There is a Korean market that I stop by for snacks when I’m at my local Laundromat. If you stop by in the colder months, there is a small machine that churns out roasted sweet potatoes and the whole store smells has that warm roasty toasty smell. Anyways, after having one that was properly roasted, I became obsessed with trying to recreate it at home and scoured the internet on how to do it. I finally came upon a blog that featured this pot and after finding it in a Korean supermarket (It’s so much cheaper. I got it for less than $20 because it was on sale), I gave it a try and I finally reached sweet potato nirvana. Tip: The instructions say to roast on medium heat for 20-30 minutes but I found that roasting for about an hour on low heat produces the best results. Armed with my new roasting pot, I wanted to feature sweet potatoes differently and made these macarons. Purple sweet potatoes are just as sweet but not as flavorful as their yellow cousins. However, I couldn’t resist their beautiful purple flesh. I suppose I could’ve made the frosting a vibrant purple by adding a little food dye, but I wanted you to be able to see what it would look like without it. The best part about the frosting is that it takes just one stick of butter and about ¾ cup of powdered sugar (which just might be perfect for filling cakes for babies since you are using minimal sugar). Can you tell that I originally made these for Valentine’s Day? The purple ombre effect is easy to achieve by using an edible food color spray can. They’re easy enough to find on amazon. You want to be careful to be light handed or you will end up spraying the entire macaron purple. This is especially true if your spray can is new. There are so many options out there, I feel like you have a rainbow at your fingertips and it’s an easy way to spruce up a plain macaron. Even if you don’t decorate it, they’re definitely worth giving a try and best eaten within two days. Since the frosting has low butter/sugar content, it will turn your macarons soggy as the days go by.
Okinawan Sweet Potato Macarons
For the macaron shells:
Ingredients:
212 g. almond meal
212 g. powdered sugar
172 g. egg whites, divided to 82 g. and 90 g
236 g. sugar
158 g. water
purple edible spray paint
heart sprinkles
white pearl sprinkles
Instructions:
Line two baking sheets with parchment paper or silicone mats.
In the bowl of a food processor, add the almond meal and powdered sugar and pulse until thoroughly combined.
Sift the mixture over a large mixing bowl, throwing out the lumps as they appear. Add 82 g. of the egg whites and stir until you get a thick mixture.
In a small pot attached with a candy thermometer, combine the sugar and water over medium heat and boil until the syrup reaches 200˚F.
Once the syrup reaches 200˚F, start whipping the remaining 90 g. in the bowl of your stand mixer with the whisk attachment on medium speed until soft peaks are reached.
Once the syrup reaches 248 degrees, remove the pot off the burner and slowly pour the syrup down the side of the mixing bowl with the egg whites on medium speed.
Once the egg whites are fully incorporated, increase the speed to medium high until egg whites form glossy, stiff peaks
Mix ⅓ of the egg white mix to the almond mixture and stir together until the batter is slightly lighter and less pasty. From then on, fold in ⅓ of the egg white mixture twice until the mixture “flows like magma”. The mixture should be smooth and run thick ribbons off the spatula.
Fill batter in a pastry bag fitted with a ½ in. plain tip.
The piped batter may have peaks but should smooth away in a minute or two. Sprinkle the top of the macaron batter with the pearl and heart sprinkles. Let the batter stand until the tops of the macaron batter are dry to the touch, about 30 mins to 1 hour.
Preheat the oven to 350˚F.
Once you place the macarons in the oven, reduce the heat to 300˚F. Bake 10-13 minutes, until the feet are formed and the tops are smooth. The macarons are done when you slightly wiggle them and they start to come off of the parchment paper / silicone mat.
Once you remove the macarons, reheat the oven to 350˚F for ten minutes before baking another pan of macarons at 300˚F.
Once the shells are cool, spray one side of the macarons lightly about 7 inches away from the surface. Fill with frosting.
Okinawan Sweet Potato Frosting
Ingredients:
1 ½ lb Okinawan sweet potatoes, roasted (about 3 medium potatoes)
4 oz. (one stick) unsalted butter
¾ – 1 c. powdered sugar
Instructions:
Peel the outer skin of the sweet potatoes and put them the food processor.
Puree the sweet potatoes until very smooth and silky. Set aside.
In a bowl of a standing mixer fitted with the whisk attachment, whip the butter until light and fluffy.
Add in ¾ c. of the powdered sugar and the sweet potato puree and whip until a smooth frosting forms. If not sweet enough, add the remaining ¼ c. powdered sugar and whip until smooth. Fill the macarons.
Oh, hello. It’s been a while. It’s been a whirlwind of a month since my last post. During the time I was away, I made a wedding cake, 200 cupcakes and threw an engagement party for my brother. There was a dessert bar, which I’ve wanted to do forever and a beautiful mini cake filled with flowers. I need to share photos with you guys asap as possible (<=the office). I almost called this soup, a shepherd’s pie French onion soup because of the mashed potato. But, as shepherd’s pie usually has beef and this does not, I felt like I would be misleading you. It has a ring of mashed potato that floats around the crouton, like a delicious moat around a castle of bread and cheese. The mashed potatoes meld into the soup once you dig into it giving it a velvety finish similar to potato soup. I didn’t even plan on making it this way until I realized that I had some mashed potatoes left over from dinner the other night and thought that it was a great way to use up the rest of it. Because in the world of food math: potatoes + onions = winning. But really, you don’t have to go out of your way to make mashed potatoes because even without it, it’s a pretty darn awesome French onion soup. I know it’s customary to put either gruyère or mozzarella on top of French onion soup, but I had some sliced Muenster cheese in my fridge and it melted beautifully. Insert heart eyes emoji . P.S. I have this really awesome Christmas cake coming your way. Like my-mind-can’t-handle-it-cute. I can’t wait to share it with you as soon as I put it together. Hopefully, by next week!
French Onion Mashed Potato Soup
Makes about 2-3 servings
Ingredients:
4 tbsp. unsalted butter
2 large onions, sliced thin
1 garlic clove, minced
1 bay leaf
1 thyme sprig
kosher salt and freshly ground black pepper, to taste
½ c. red wine
1 ½ tbsp. flour
1 qt. beef broth
1 baguette, sliced
2 slices muenster cheese
mashed potatoes (recipe below)
Instructions:
In a medium pot over medium heat, melt butter. Add the onions, garlic, bay leaf, thyme, salt and pepper. Cook over medium heat until onions are caramelized, about 30 minutes.
Add the wine and cook until the wine evaporates and the onions are dry.
Discard the bay leaf and thyme spring. Stir in flour.
Cook the flour over low heat for about 2-3 minutes (do not burn the flour).
Slowly add in the beef broth while stirring.
Simmer the soup for about 10 minutes. Season with salt and pepper if needed.
Preheat your broiler. Fill your soup bowl or crock bowls with the soup.
Place a large baguette slice in the center of the soup.
Fill a piping bag fitted with large frosting tip with the mashed potato. (I used one with a lot of teeth hoping that it would make a pretty presentation with the toasted edges, but once the cheese covered it, it didn’t matter. So, any large cake tip will work.)
Pipe around the floating slice of baguette.
Place a slice of cheese on each bowl and broil until the cheese gets nice and toasty.
Serve hot.
Creamy Mashed Potatoes
Ingredients:
2 lbs. Yukon gold potatoes, scrubbed
1 stick butter, melted
1 c. heavy cream, divided
about ½ c. low-sodium chicken stock
kosher salt and freshly ground black pepper, to taste
Instructions:
Place potatoes in a large pot and cover with cold water. Bring to boil and then reduce to a simmer. Cook potatoes until tender and easily pierced with a fork.
Drain and peel potatoes under cool running water.
Pass potatoes through a ricer into the bowl of a stand mixer fitted with a paddle attachment.
Add the melted butter and half of cream.
Whip on low speed until cream and butter are incorporated. Move to a higher speed and whip until smooth and creamy, about 1 minute.
Adjust the taste and consistency with more heavy cream or chicken stock.
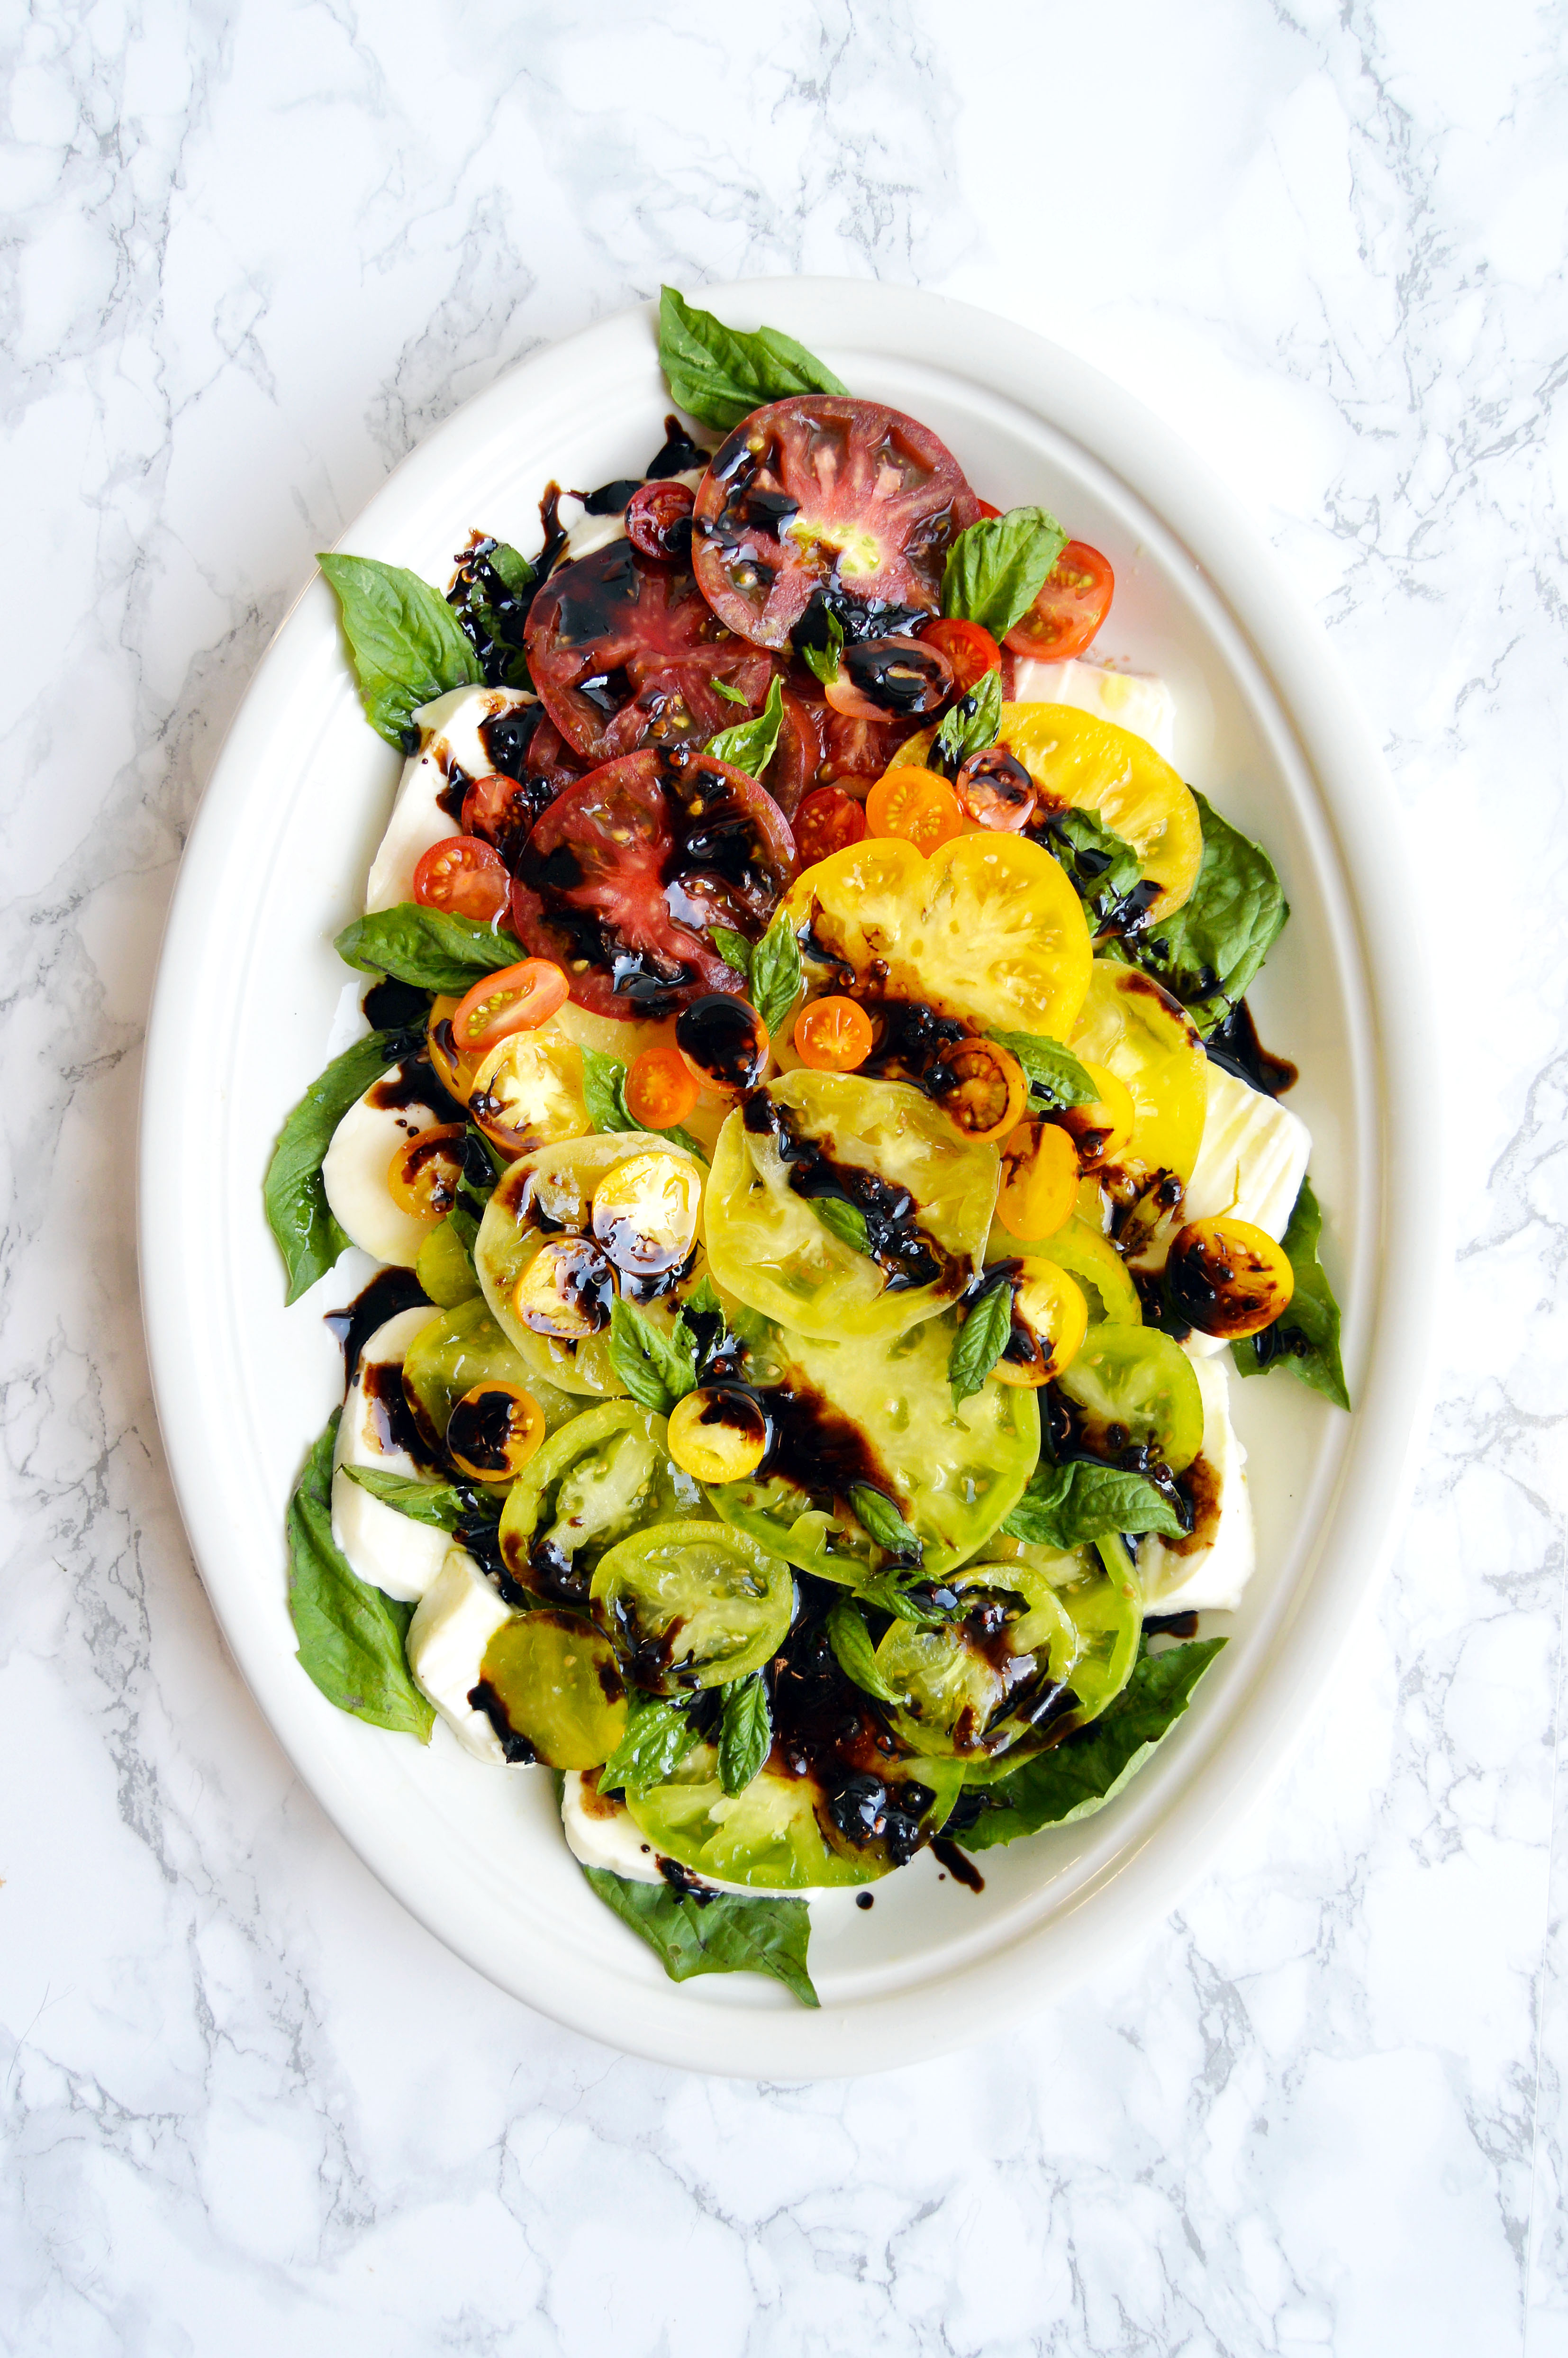
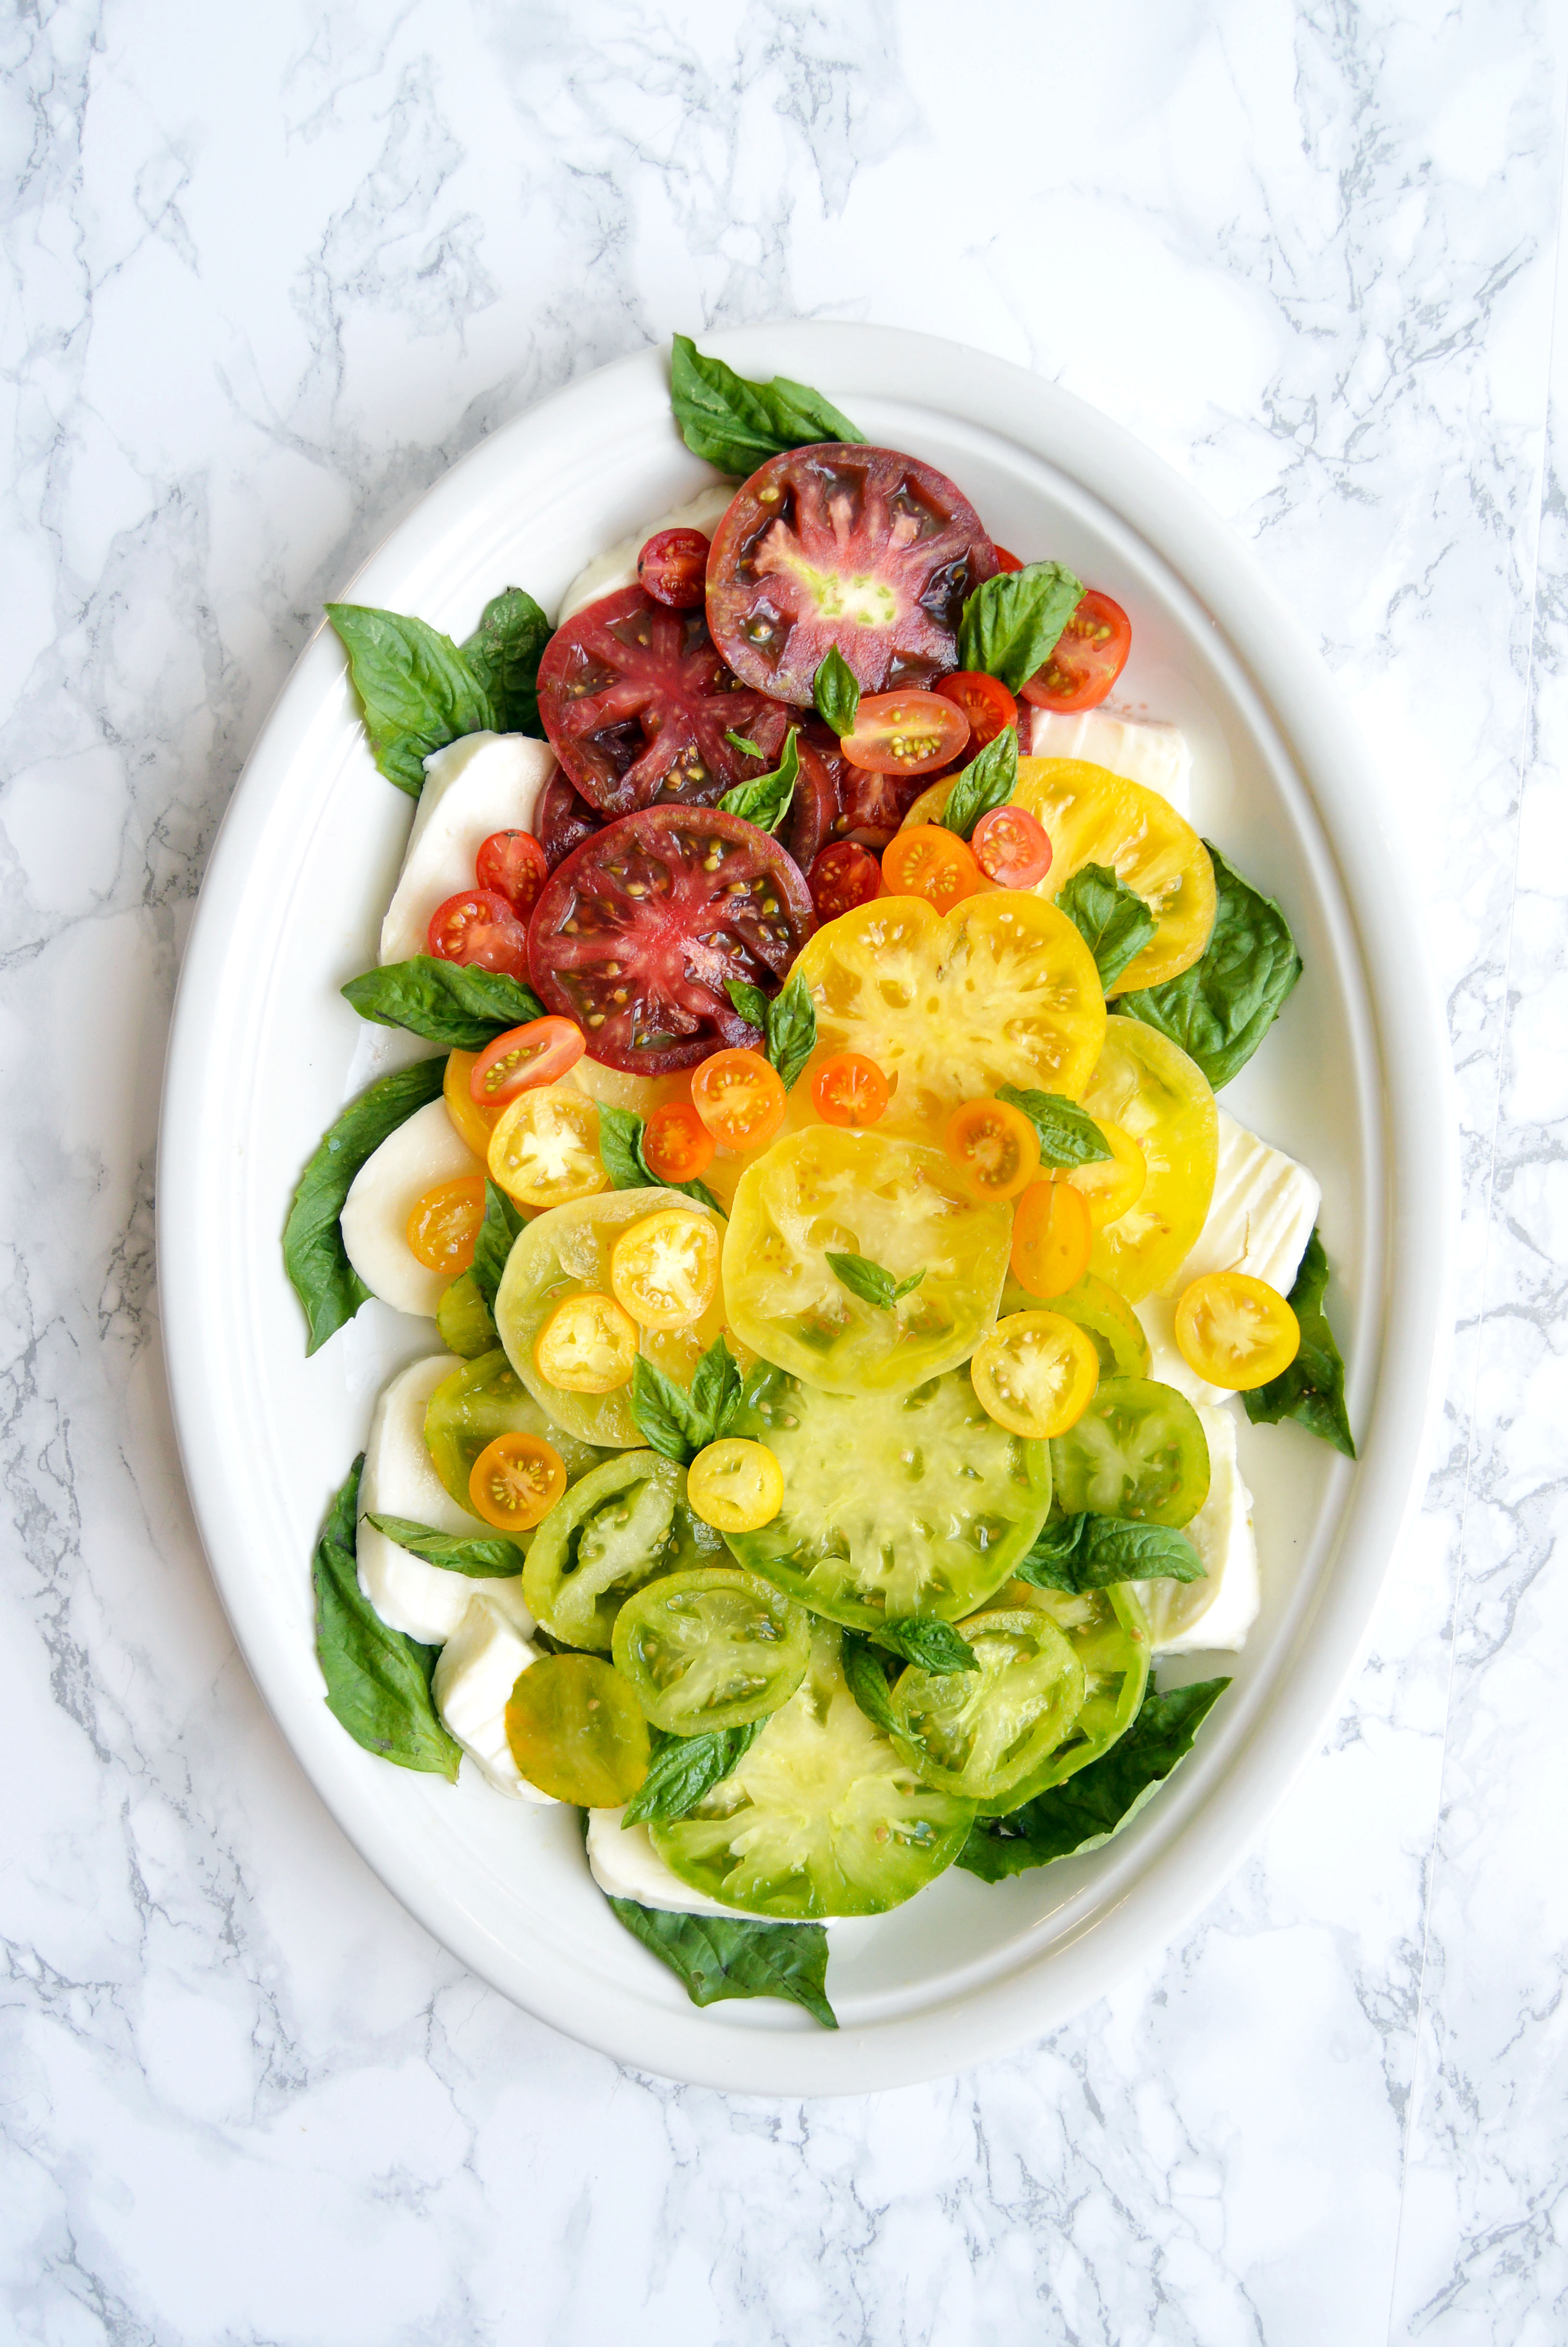
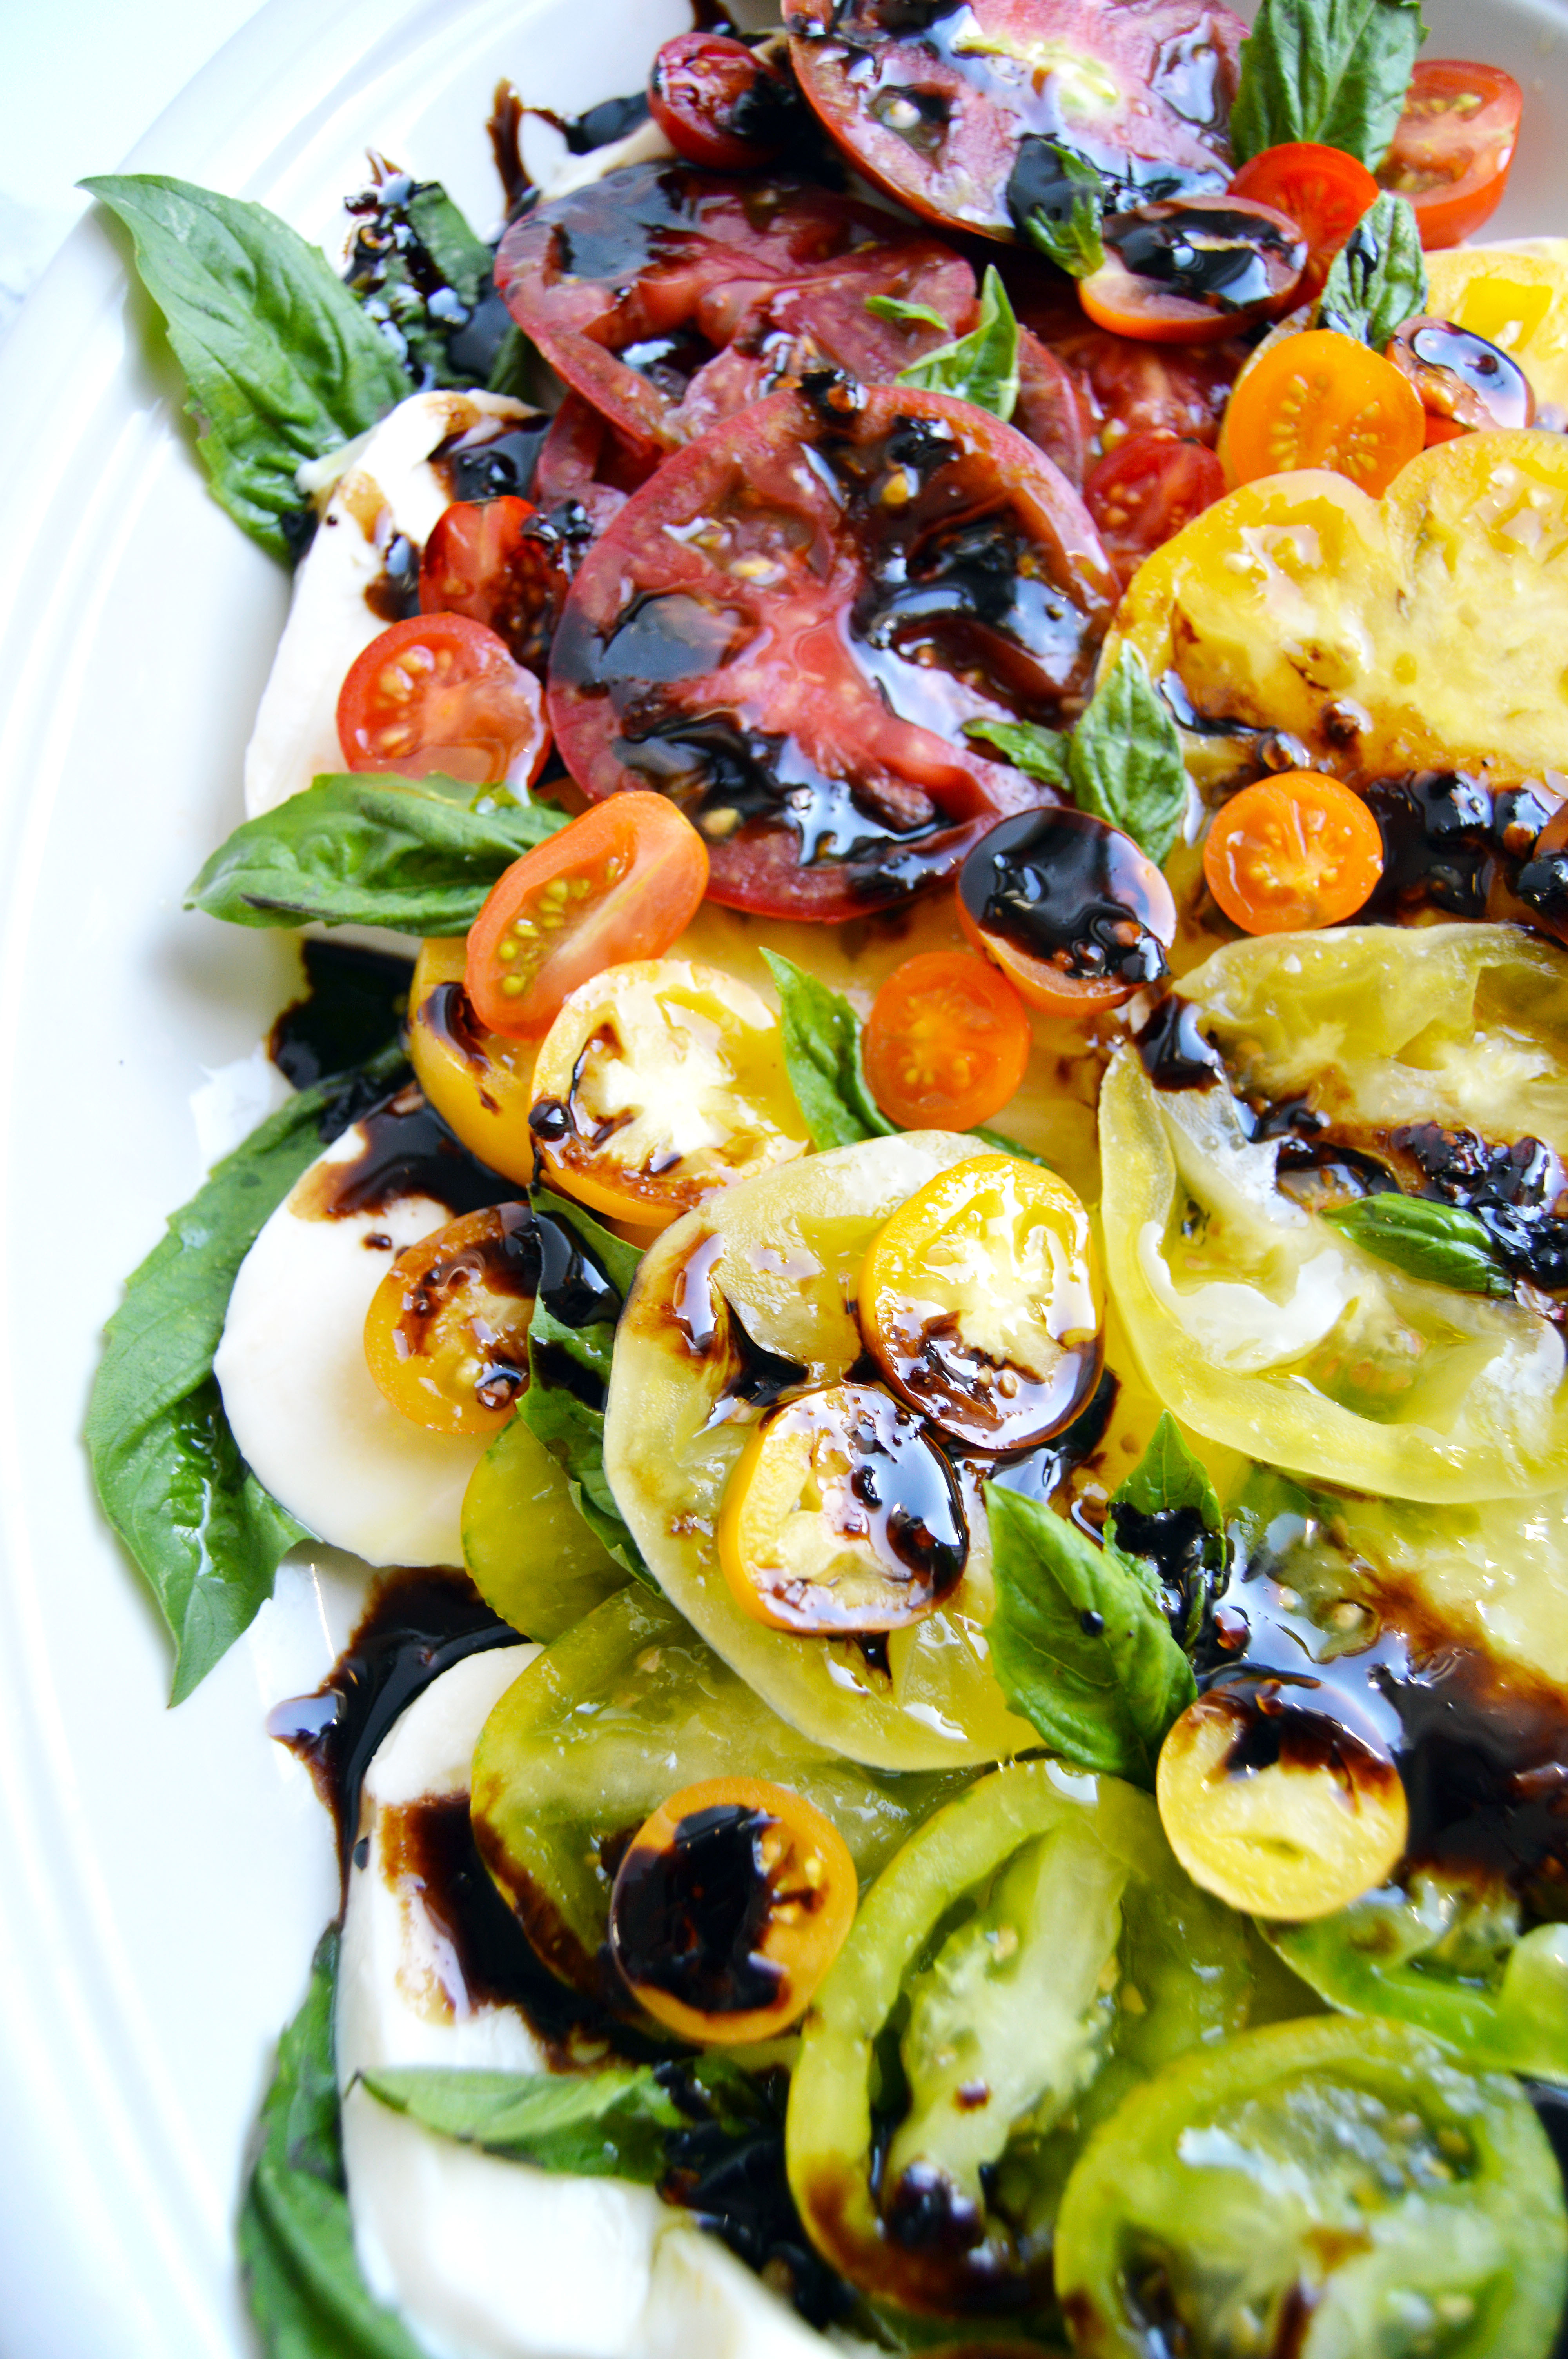
It’s that time of the year where it’s not exactly summer or fall. I’m dying to wear boots and sweaters but I’m not looking forward to winter. The other day I was watching Quantico (Awesome show btw. Priyanka Chopra is absolutely stunning.), and there was a scene with slushy streets in NYC. My mind immediately curled itself up into a ball thinking, “No…… I’m not ready for another winter.” Luckily, we still have some summer produce to cling on to the last whisper of summer. I found some heirloom tomatoes at Trader Joe’s this past week and they were available in so many different hues that a rainbow was the first thing that came to my mind. I’m almost embarrassed to say that nearly every ingredient that I used in this recipe is from Trader Joe’s (even the paprika!), but imo a one-stop shop is always good news.I love Caprese salad because it’s a solid balance of flavors. But more than half of the time, I’m disappointed when I order it in a restaurant. The ratio to tomato, cheese, basil and balsamic glaze is usually off. I suppose everyone has their own idea of what makes the perfect ratio and that’s why making it at home is the best option all around. (It’s usually cheaper too.)Heirloom tomatoes are super sweet and juicy so you want to use a very sharp knife to slice them neatly. Tip: when cutting the little tomatoes, cut them vertically (from the stem end) to get the prettiest shot of the seedy insides. I wanted to balance the sweetness with a hint of heat and it turned out well. I may be biased because I love hot sauce on almost anything and everything. Even if you forgo the spicy glaze and opt for plain balsamic vinegar, it’s still delicious since vegetables + cheese = always tasty.
Rainbow Caprese Salad with Spicy Balsamic Glaze
Ingredients:
2-3 lbs. heirloom tomatoes in various colors, shapes and sizes
16 oz. fresh mozzarella
1 bunch fresh basil
extra virgin olive oil
kosher salt
spicy balsamic glaze (recipe below)
Instructions:
Wash and slice your tomatoes.
Slice your mozzarella.
Pick out the freshest leaves from your basil bunch. Save the tiny ones for garnish.
Line the plate with basil leaves and top it with the mozzarella slices.
Arrange the tomato slices from red to green, starting from the darkest red.
Put some basil slices in between the tomatoes.
Sprinkle the tomatoes lightly with salt and drizzle the olive oil.
Drizzle the balsamic glaze and top with the remaining basil leaves.
Spicy Balsamic Glaze
Ingredients:
½ c. plus ½ tbsp. balsamic vinegar (6% acidity)
½ tsp. red pepper flakes (if you just want a hint of spice, dial it back to ¼ even ⅛ tsp. if you’re sensitive)
¼ tsp. smoked paprika
freshly ground black pepper
¾ tbsp. sugar
Instructions:
In a small pot, add ½ c. balsamic vinegar, red pepper flakes, paprika, sugar and as much black pepper as you want.
Boil down the vinegar until thickened, about 3-5 minutes. Keep a close eye on it so that it doesn’t burn.
Add ½ tbsp. balsamic vinegar to up the acidity that you lost.
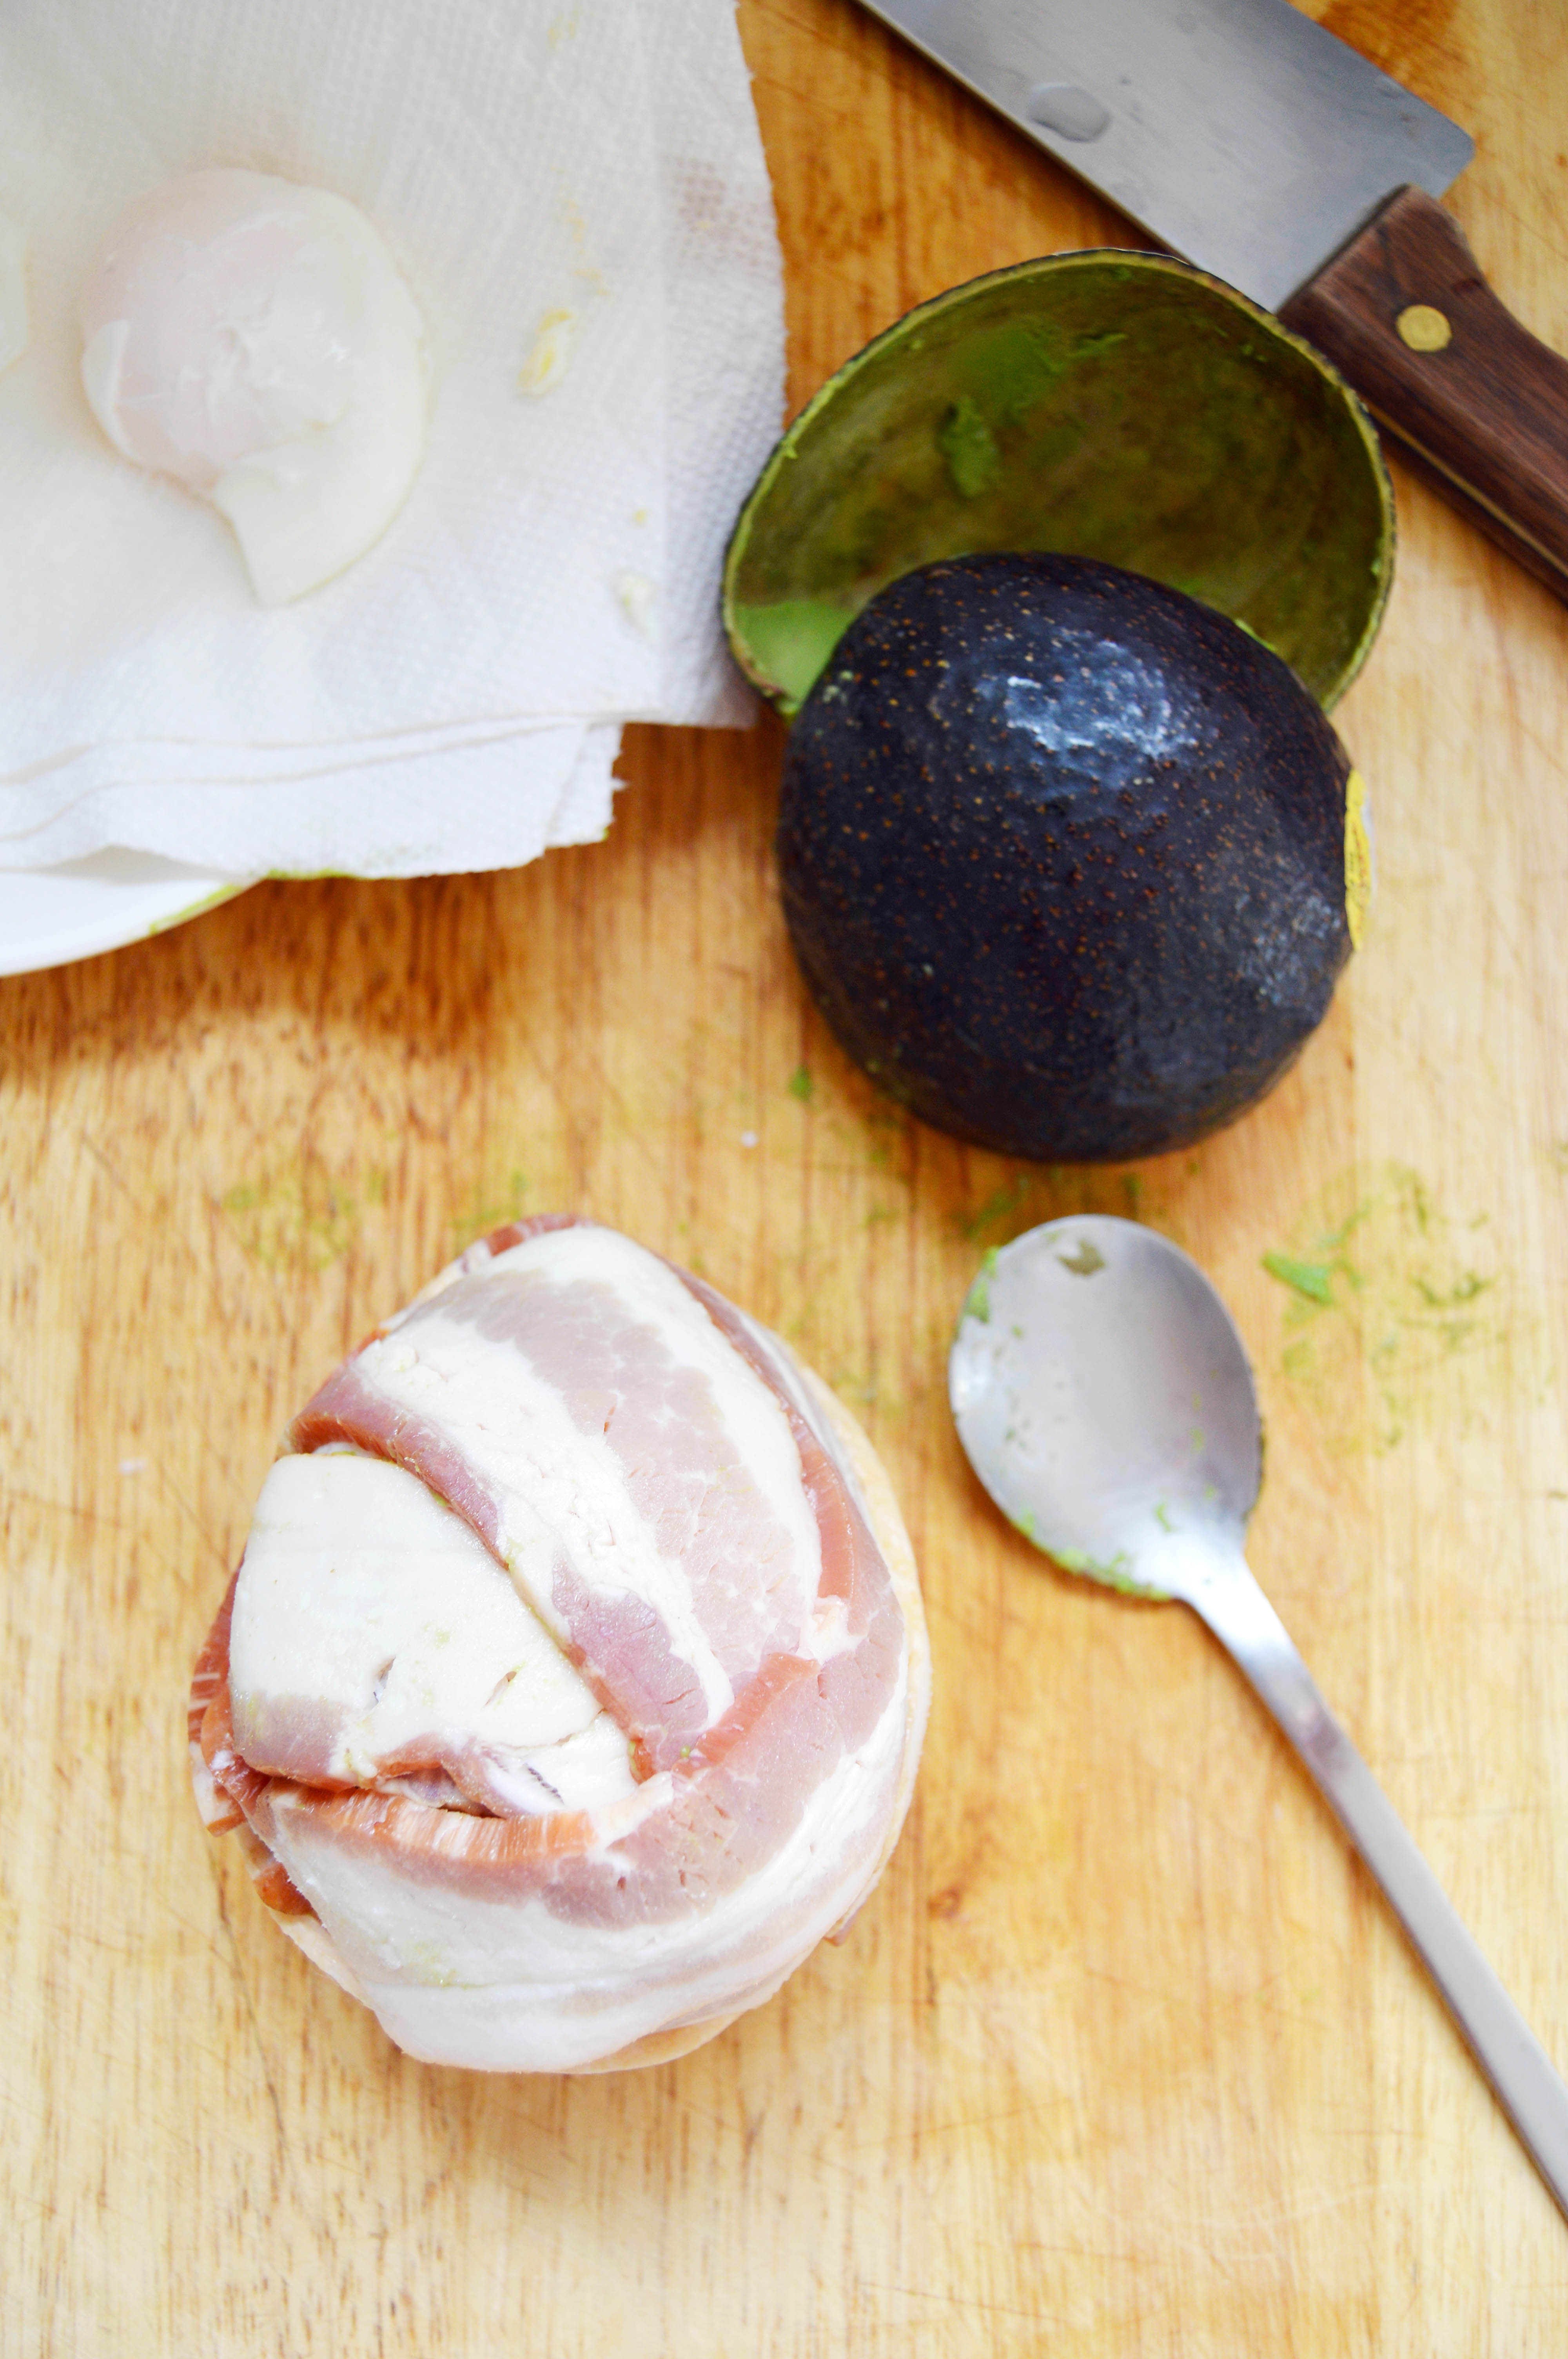
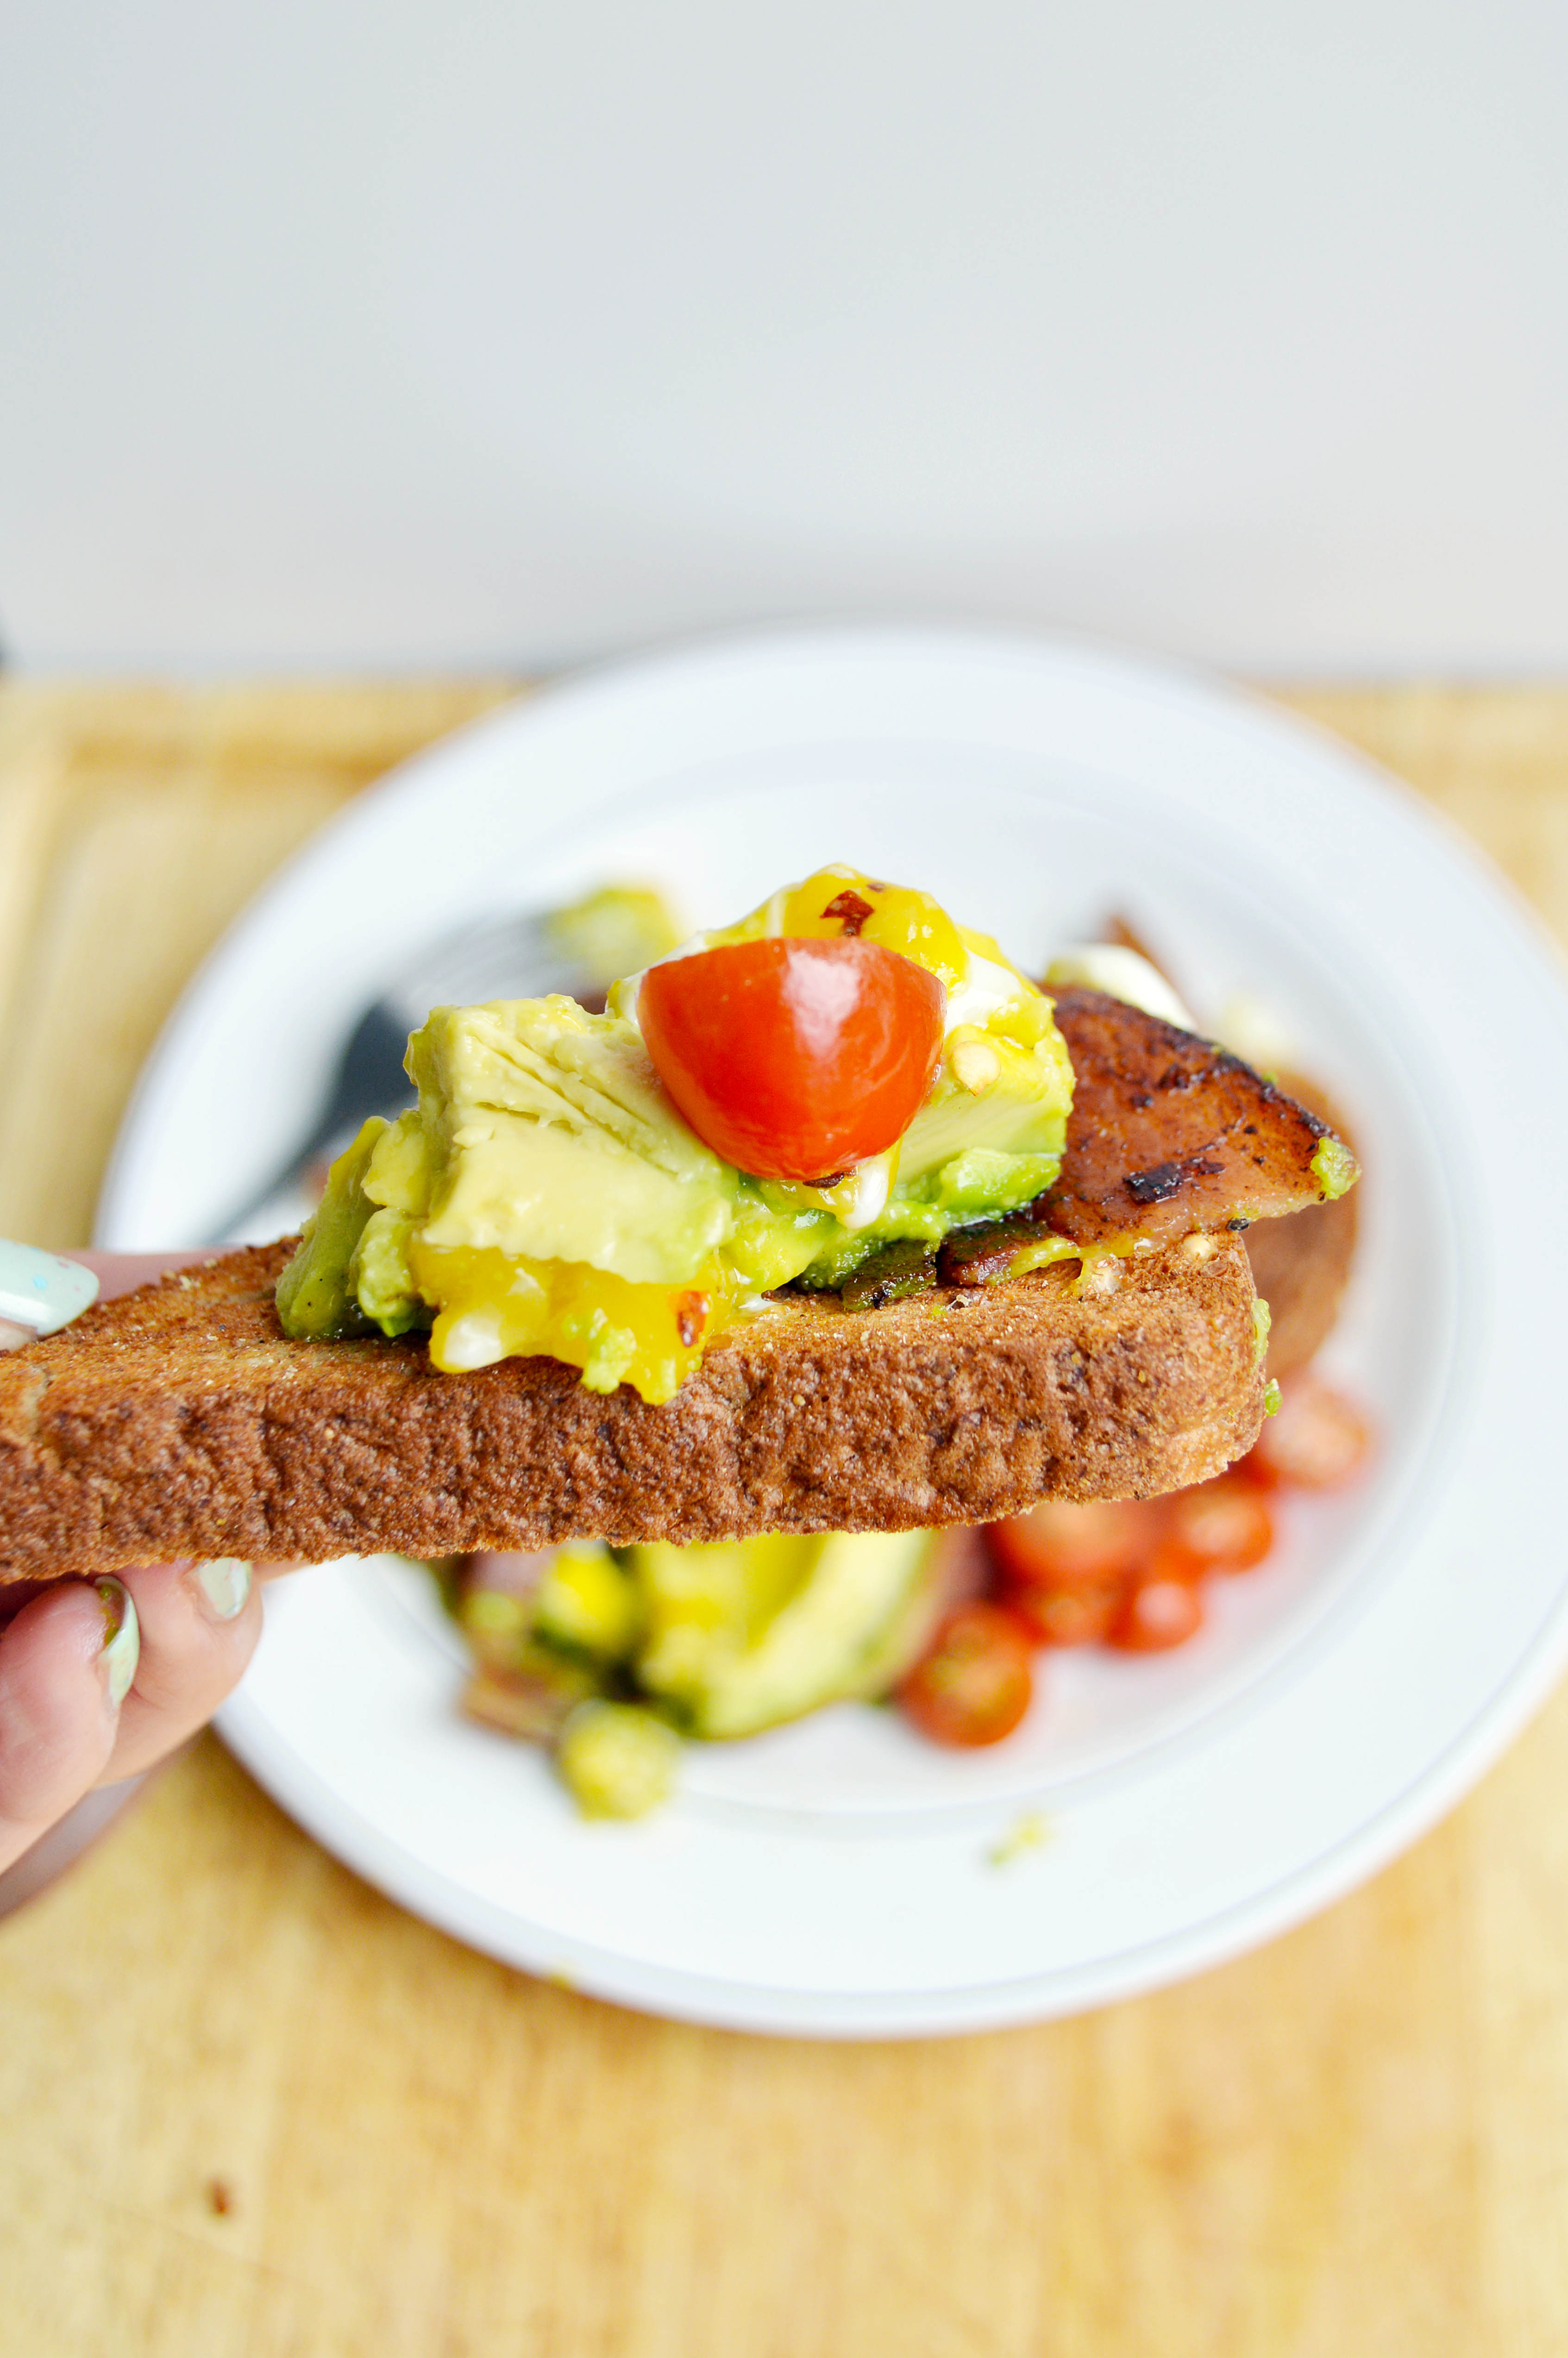
Remember when Facebook was exclusive to profiles and writing on someone’s wall? It was a simpler past. These days, I feel like Facebook is a black hole for wasting time, especially since they made videos play automatically. Occasionally, I’ll scroll through and catch myself watching every single clip. The beauty of it is that each clip is usually short and you don’t even notice the time go by. This especially holds true for those “Tasty” videos. If you’re active on Facebook, then you know what I’m talking about. If you don’t, I’m referring to ridiculously short clips of (mostly) very simple recipes, done in a fraction of a time. The videography is pretty good and the food usually looks, as the name suggests, tasty. So one day, I was scrolling through and I saw a video clip of a bacon wrapped avocado that was filled with a poached egg. It wasn’t a “Tasty” video, but a clip of a restaurant’s dish. No instructions or recipes, just how they made it. After watching it once, I thought that I could do it. So without even really prepping anything, I decided to try it. Yes, I’ve never poached an egg and I’ve never tried to wrap an avocado with bacon before, but how hard could it be? I wish I could say it was super simple, but I was very wrong. My poached egg was a little over done, and when I tried to put it in my avocado, I realized that I happened to have a larger than average avocado with a huge pit. The egg looked a little sad in there, but I figured, “It’s alright. Let’s just wrap the thing in bacon like the video.” So I put the two halves together, and wrapped it in bacon and set it in a low heat, nonstick pan. Well, I know that bacon shrinks from cooking, but I thought I wrapped it well enough that it should hold. As soon as I turned the avocado, the avocado started sliding in half. Now, I don’t know what kind of magic they used to keep the avocado together, but no matter how carefully I turned it, the avocado started sliding more and more, loosening the bacon wrap at the same time. Frustrated, I took the whole thing out, unwrapped the half cooked bacon and stuck a few toothpicks on the outer corners of the avocado (not the center because you don’t want to pop the poached egg). Then I re-wrapped it with the partially cooked bacon, sticking it into the ends of the toothpicks that were sticking out and put it back into the pan. The bacon continued to shrink and slowly started coming off of the toothpick. So instead of the neat bacon covered avocado I wanted, I ended up with an avocado wearing a shredded bacon sweater. I wondered if it was even worth putting on the blog and if I had just wasted my precious Saturday. Even if it wasn’t the perfect dish I was looking for, cut in half and served on toast with some fresh tomatoes, it still tasted great. What I learned though, was to never trust a Facebook video without real instructions. Bacon Avocado Egg
Fill a small shallow nonstick frying pan with water and heat until it reaches a rapid boil.
While the water is heating, crack eggs into two separate small bowls.
Once the water reaches a rapid boil, turn off heat and stir in 1 tbsp. of vinegar.
Slide eggs carefully into the hot water, one at time and cook for 4 minutes.
Once the time is up, carefully remove the eggs from the water and drain on a paper towel.
Cut open the avocado in half and pop out the pit by using the blunt end of the knife. Use a spoon to scoop out the two halves.
Slide the poached egg into the hollow center of one half of the avocado and line the second half of the avocado so that it is perfectly lined with the first half.
Use four toothpicks to secure the four corners of the avocado, do not puncture center of the avocado, you will pop the yolk.
Carefully wrap the bacon strips over the avocado, using the toothpick ends to secure the bacon.
In a small nonstick pan, over medium-low heat, cook bacon on all sides of the avocado until cooked through and crisp.
Serve with toasted bread and fresh tomatoes if desired. (highly recommended)
It’s officially fall. Only it’s too cold for fall. Last night it was 35 degrees outside and this morning there was a chance of snow for a couple of hours. As much as I love having four seasons, I feel like fall in New Jersey only lasts a few weeks. Whenever I’m on Pinterest or on Instagram I see posts of girls in short sweater dresses with ankle boots without tights or thick coats, I ask myself, “Just where do these girls live? And how can I get myself there?” Although it may not feel so much like fall, we can certainly eat like it is. The color orange seems to be the theme of fall food. Pumpkin, butternut squash, sweet potatoes, acorn squash… all of these have orange flesh that not only taste great but are healthy too. If you’ve never tried Kabocha squash, it also has an orange flesh but is sweeter than a butternut squash. Mix that with the salty bacon and the delicate fruitiness of the Enoki mushroom, you have a winner. I added a dash of Unagi sauce on one of them and it was the perfect touch. It is incredibly easy to put together and you don’t even have to put in the Kabocha squash or the Unagi sauce. It can be as easy as wrapping the mushroom with the bacon and you’ll still have a crowd-pleasing appetizer that can be made on the fly. I probably won’t be able to write another post before Thanksgiving. So, I hope you have the happiest of Thanksgivings with your loved ones this Thursday and I’m so thankful for all of you reading this. ❤
Bacon Wrapped Enoki Mushrooms and Kabocha Squash
1 – 4 oz. package of Enoki mushrooms, split into 8 bundles
4 slices of bacon, halved vertically
8 slivers of Kabocha squash, raw
salt and pepper to taste
parsley, minced, for garnish
Unagi (eel) sauce, optional
Instructions
Preheat oven to 375˚F and line a baking sheet with aluminum foil, shiny side down.
Top a bundle of mushrooms with slice of squash and very lightly sprinkle salt on top of the squash.
Wrap the vegetable bundle with a slice of bacon and secure with toothpick. Repeat for the rest of the bundles.
Season the bundles with pepper and roast the bundles for 15-20 minutes, until the bacon is browned and crisp.
Drain bundles on paper towels and if using the unagi sauce, lightly drizzle sauce before serving.
It’s rare that I find a technique that is life-changing. I love trying out new ways to do things. Mostly because they are novel and I’m always looking for ways to grow and learn in general. I’ll usually try something once or twice, but that’s about it. It’s on to the next obsession, the next trend, the next new way to do something. But this, oh man… It is such a simple technique but it makes the average hot dog 10000% tastier than what it was before. You simply stick a skewer into the sausage, take a knife and create a swirl pattern along the meat, which will result in a Slinky looking piece of meat. It does not look like much but once you cook it, the increased surface to volume ratio creates extra crisp, juicy, meaty goodness. The first time I made this on a grill, the neighboring party came over and asked what kind of meat I was cooking. Once they saw that it was just a hot dog cut up into a fancy shape, they amused at its novelty and went about their merry way. Little did I know that I was a monkey about to touch the monolith. I’ve eaten my fair share of hot dogs and this one is right at the top. Neck and neck with the deep fried hot dogs they sell at a local hot dog joint in my town. Yes, true to the busy spatula fashion, I had to jazz it up by adding bacon, avocado, Sriracha and Kewpie mayo. (Which by the way, if you can do it, you must. It is a serious flavor bomb.) But honestly, this post is really about the technique. Simply cutting it up in a spiral shape will be life changing. I promise.
Avocado Bacon Spiralized Hotdogs
Ingredients:
Hot dog sausage
Avocado, peeled and cut into thin slices
Bacon
Sriracha
Kewpie Mayo (yes, there is a difference between this and regular mayonnaise)
Potato hot dog buns
Skewers (I understand that this is not an ingredient but SO NECESSARY)
Instructions:
Stick a skewer through the middle of a hot dog sausage. If it does not go straight and pokes out the side, pull it back and continue until you get it to the other end of the sausage.
With a sharp knife, make a continuous spiral cut along the sausage, using the skewer as a guide to know how deep to cut the sausage.
Spread a thin layer of mayo over potato hot dog buns and toast it in a heated frying pan.
Remove toasted buns and cook sausage over medium heat until well browned and crispy.
Remove sausages, turn heat to low and cook bacon until desired level of crispness.
Top toasted hot dog bun with sausage, avocado slices, bacon, Kewpie mayo and Sriracha.


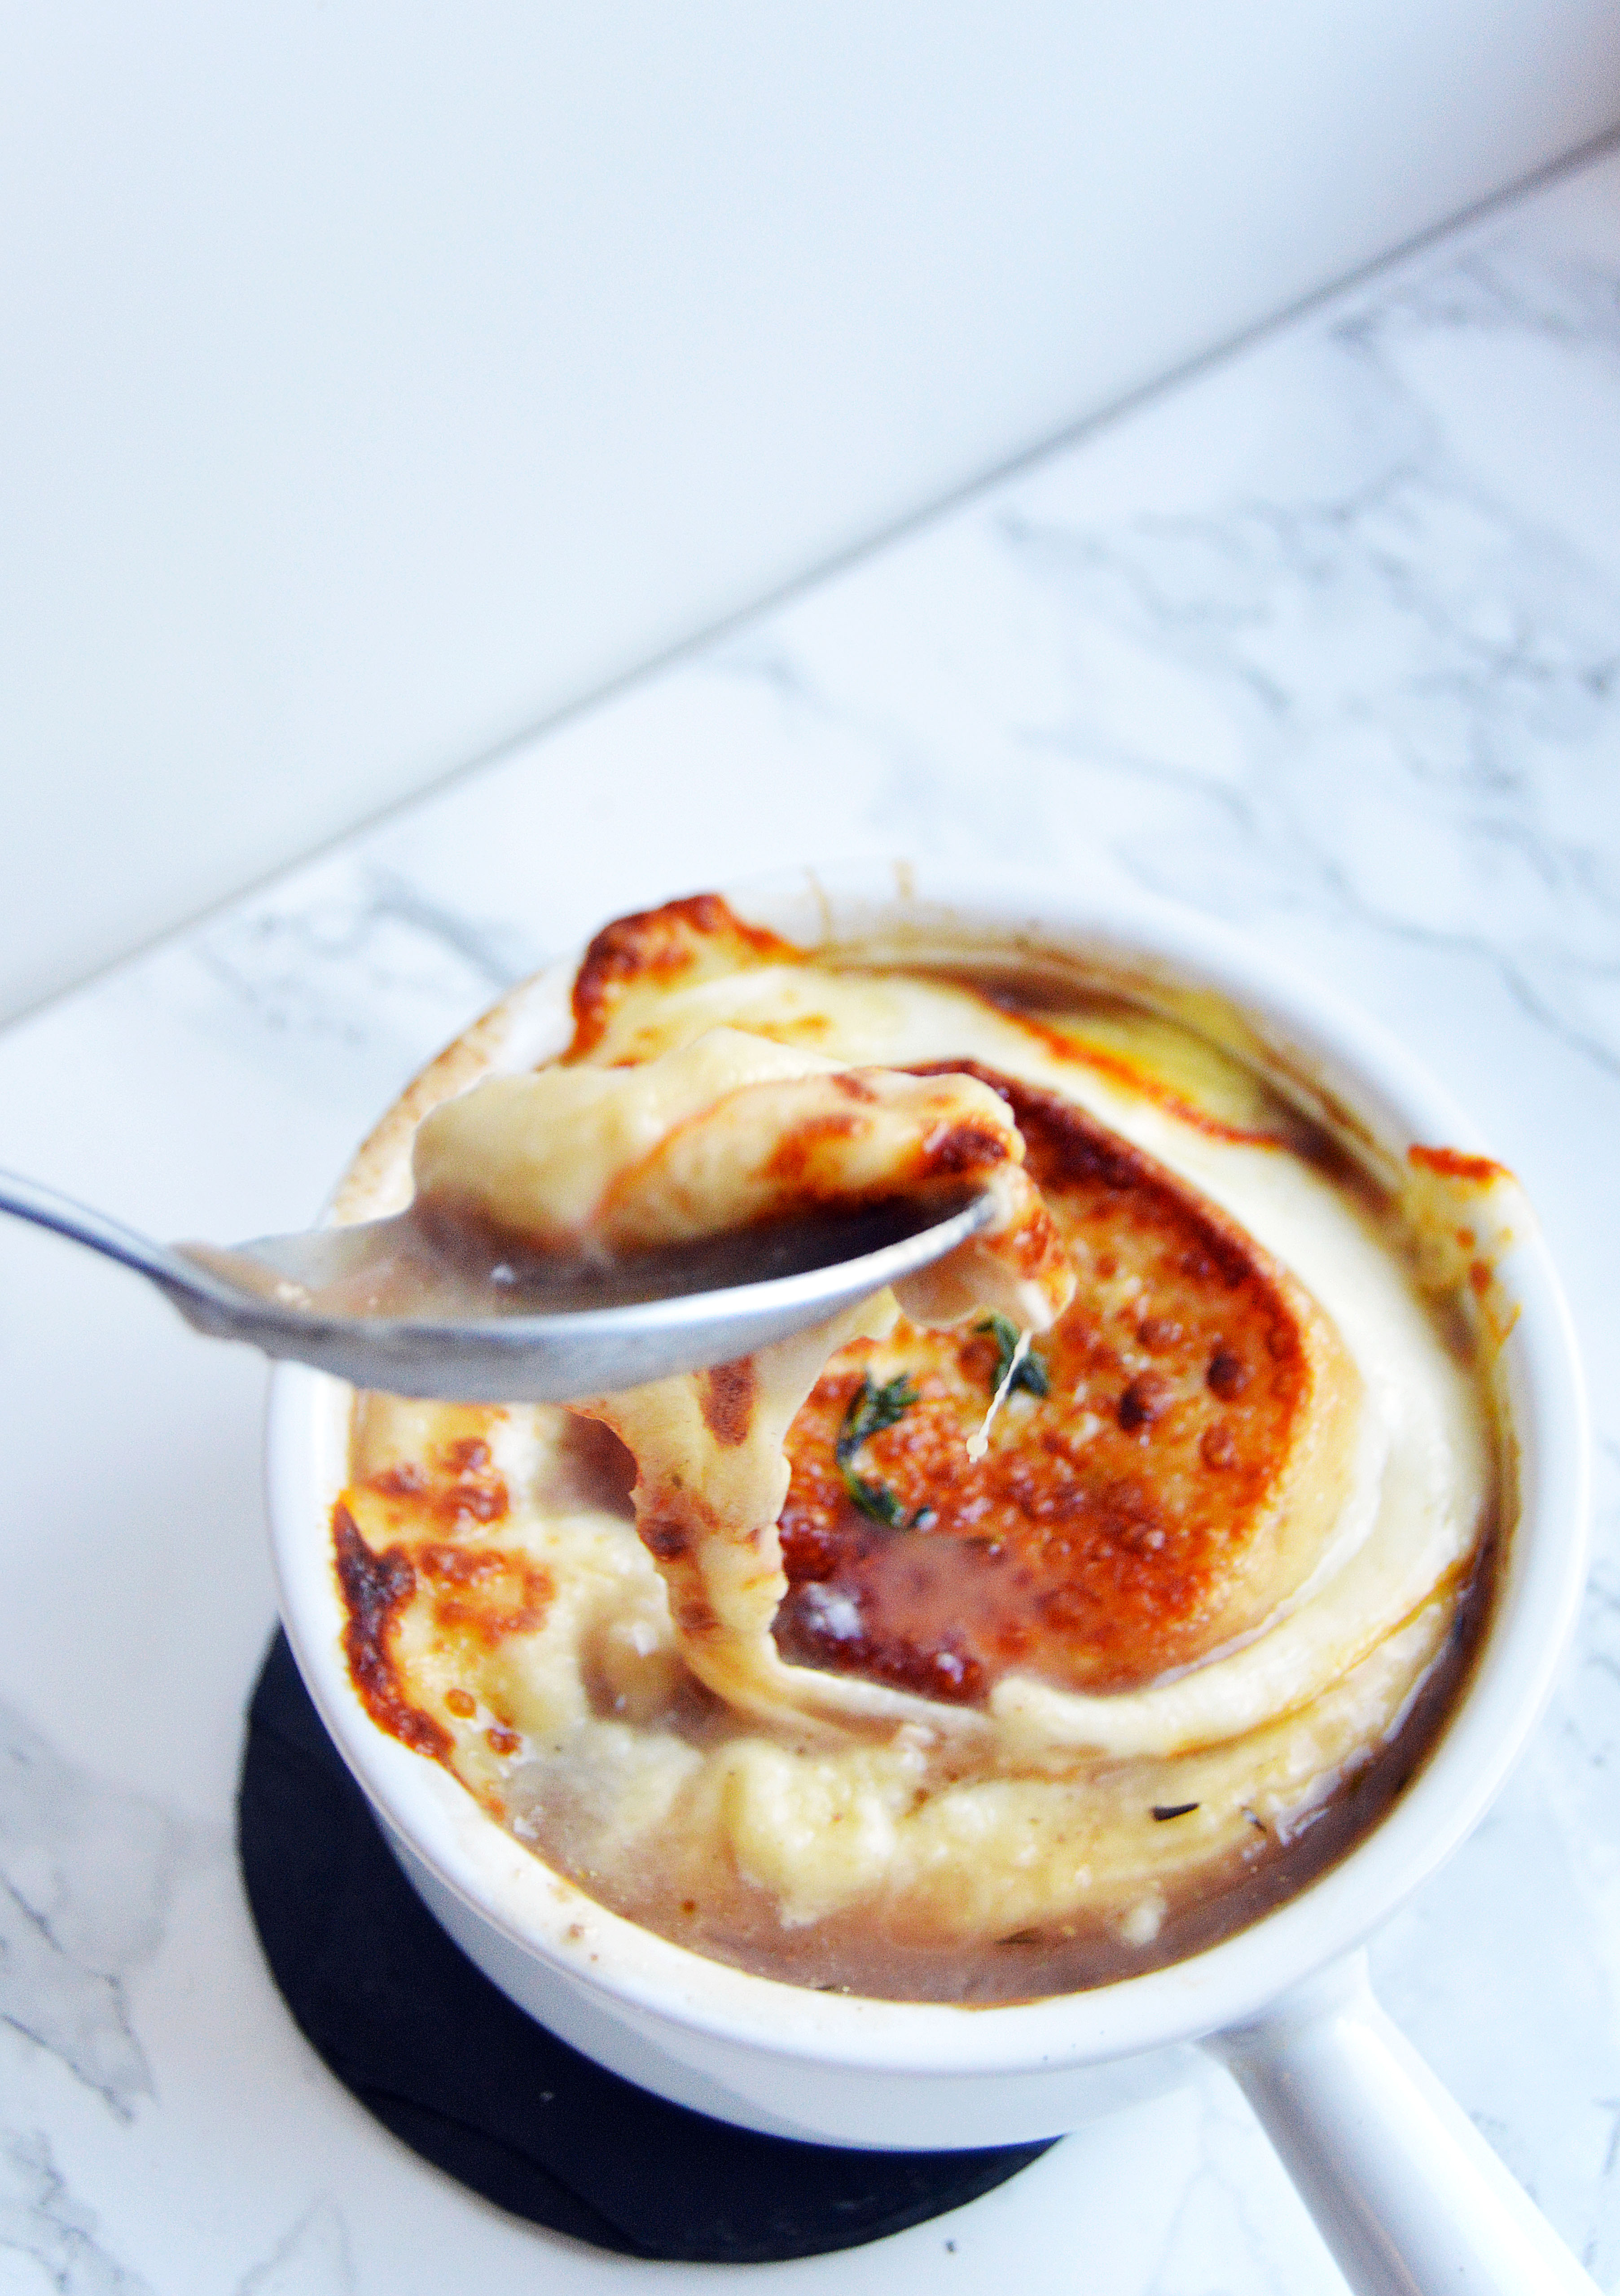
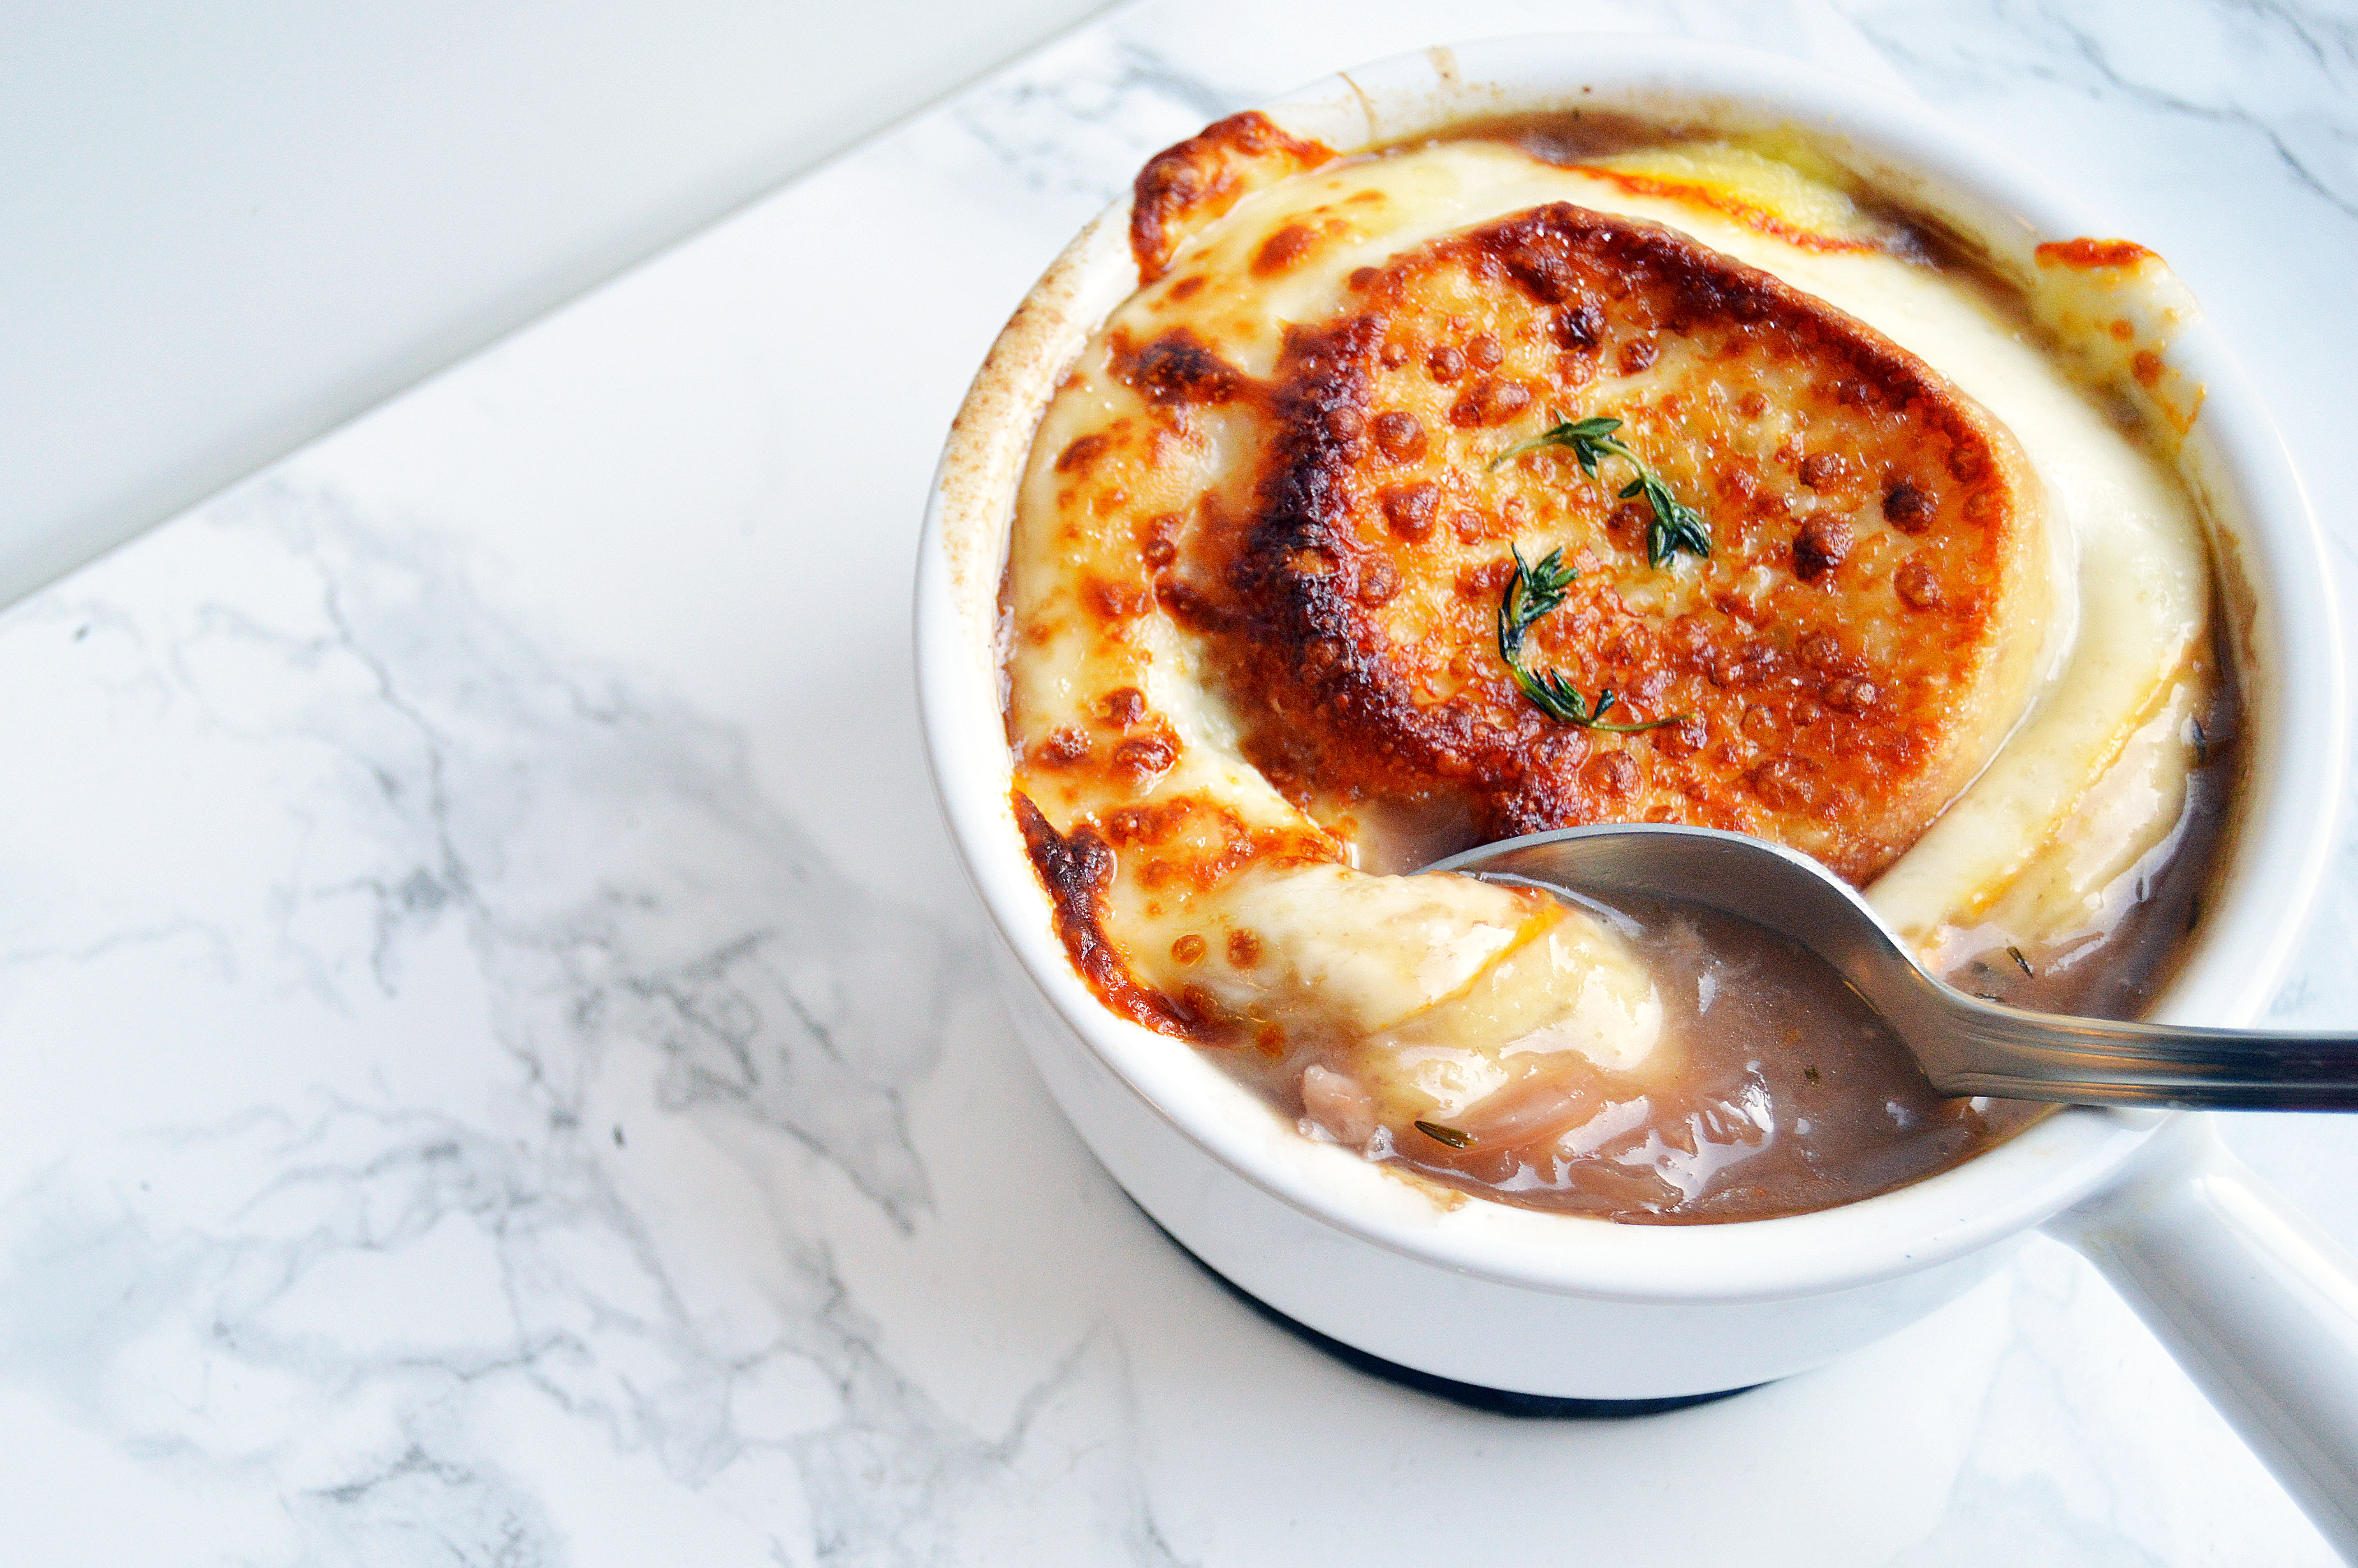
 I know it’s customary to put either gruyère or mozzarella on top of French onion soup, but I had some sliced Muenster cheese in my fridge and it melted beautifully. Insert heart eyes emoji .


 Bacon Avocado Egg
 It’s officially fall. Only it’s too cold for fall. Last night it was 35 degrees outside and this morning there was a chance of snow for a couple of hours. As much as I love having four seasons, I feel like fall in New Jersey only lasts a few weeks. Whenever I’m on Pinterest or on Instagram I see posts of girls in short sweater dresses with ankle boots without tights or thick coats, I ask myself, “Just where do these girls live? And how can I get myself there?”
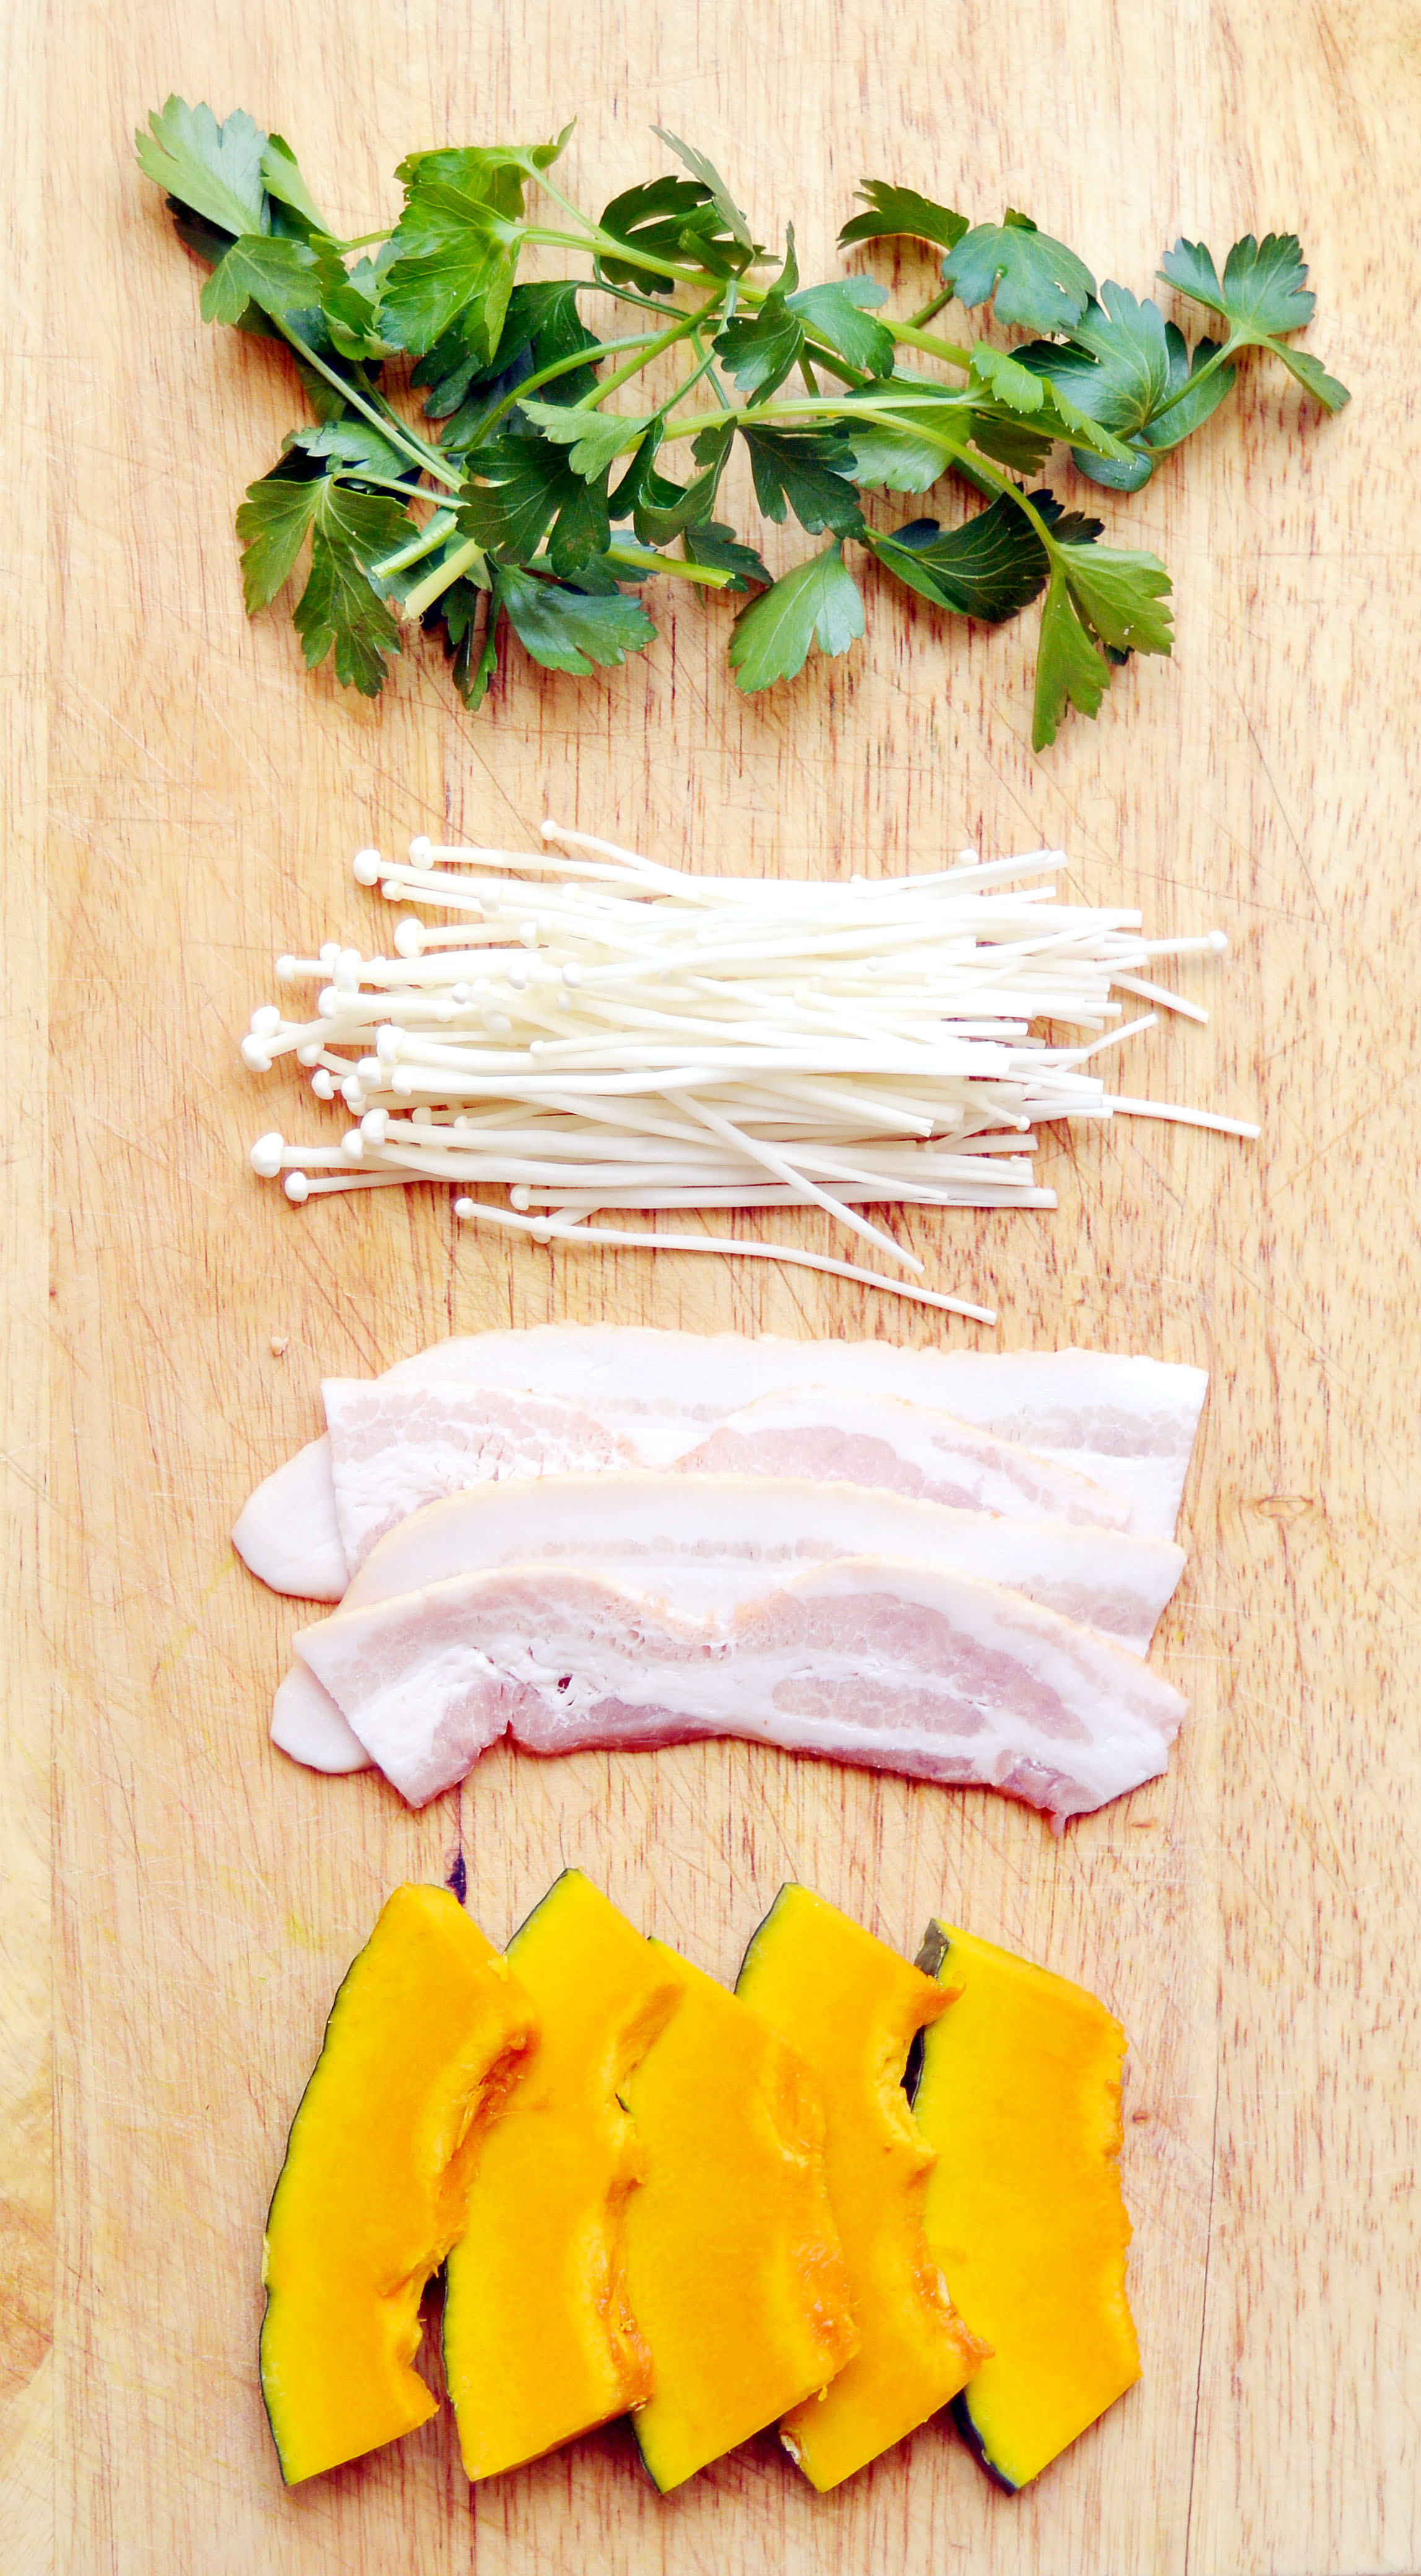 Although it may not feel so much like fall, we can certainly eat like it is. The color orange seems to be the theme of fall food. Pumpkin, butternut squash, sweet potatoes, acorn squash… all of these have orange flesh that not only taste great but are healthy too. If you’ve never tried Kabocha squash, it also has an orange flesh but is sweeter than a butternut squash. Mix that with the salty bacon and the delicate fruitiness of the Enoki mushroom, you have a winner. I added a dash of Unagi sauce on one of them and it was the perfect touch.
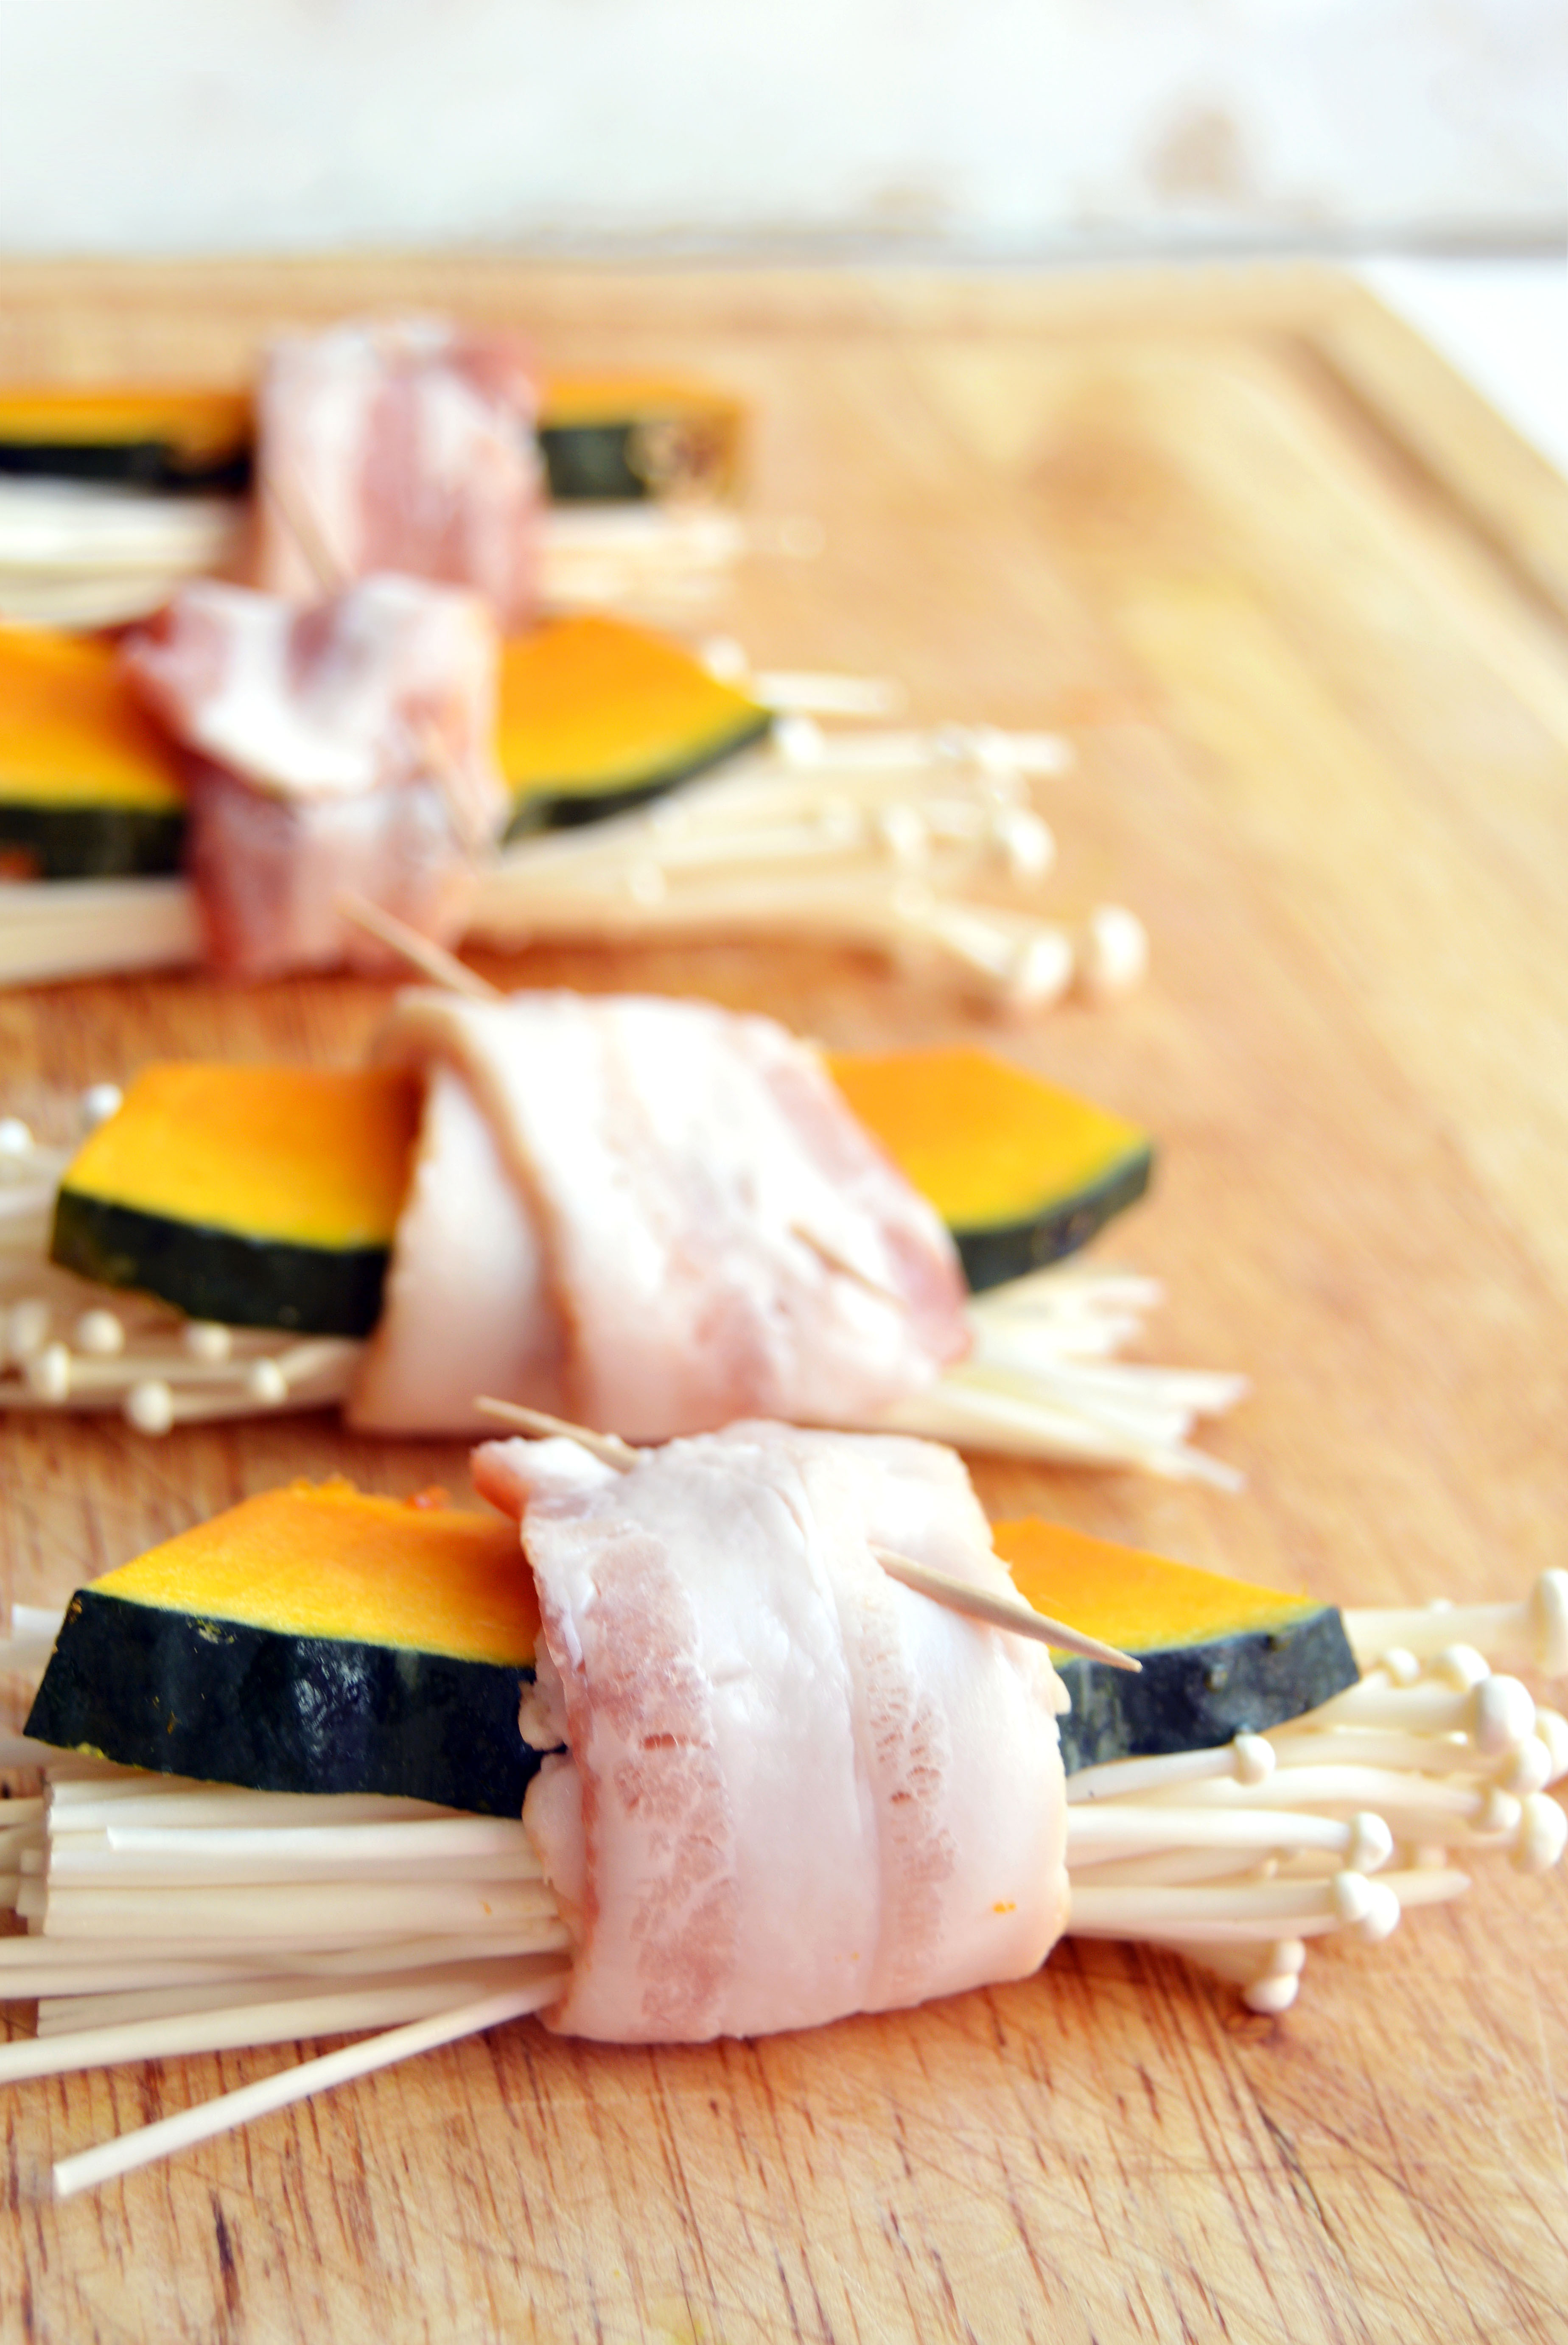 It is incredibly easy to put together and you don’t even have to put in the Kabocha squash or the Unagi sauce. It can be as easy as wrapping the mushroom with the bacon and you’ll still have a crowd-pleasing appetizer that can be made on the fly.
 I probably won’t be able to write another post before Thanksgiving. So, I hope you have the happiest of Thanksgivings with your loved ones this Thursday and I’m so thankful for all of you reading this. ❤
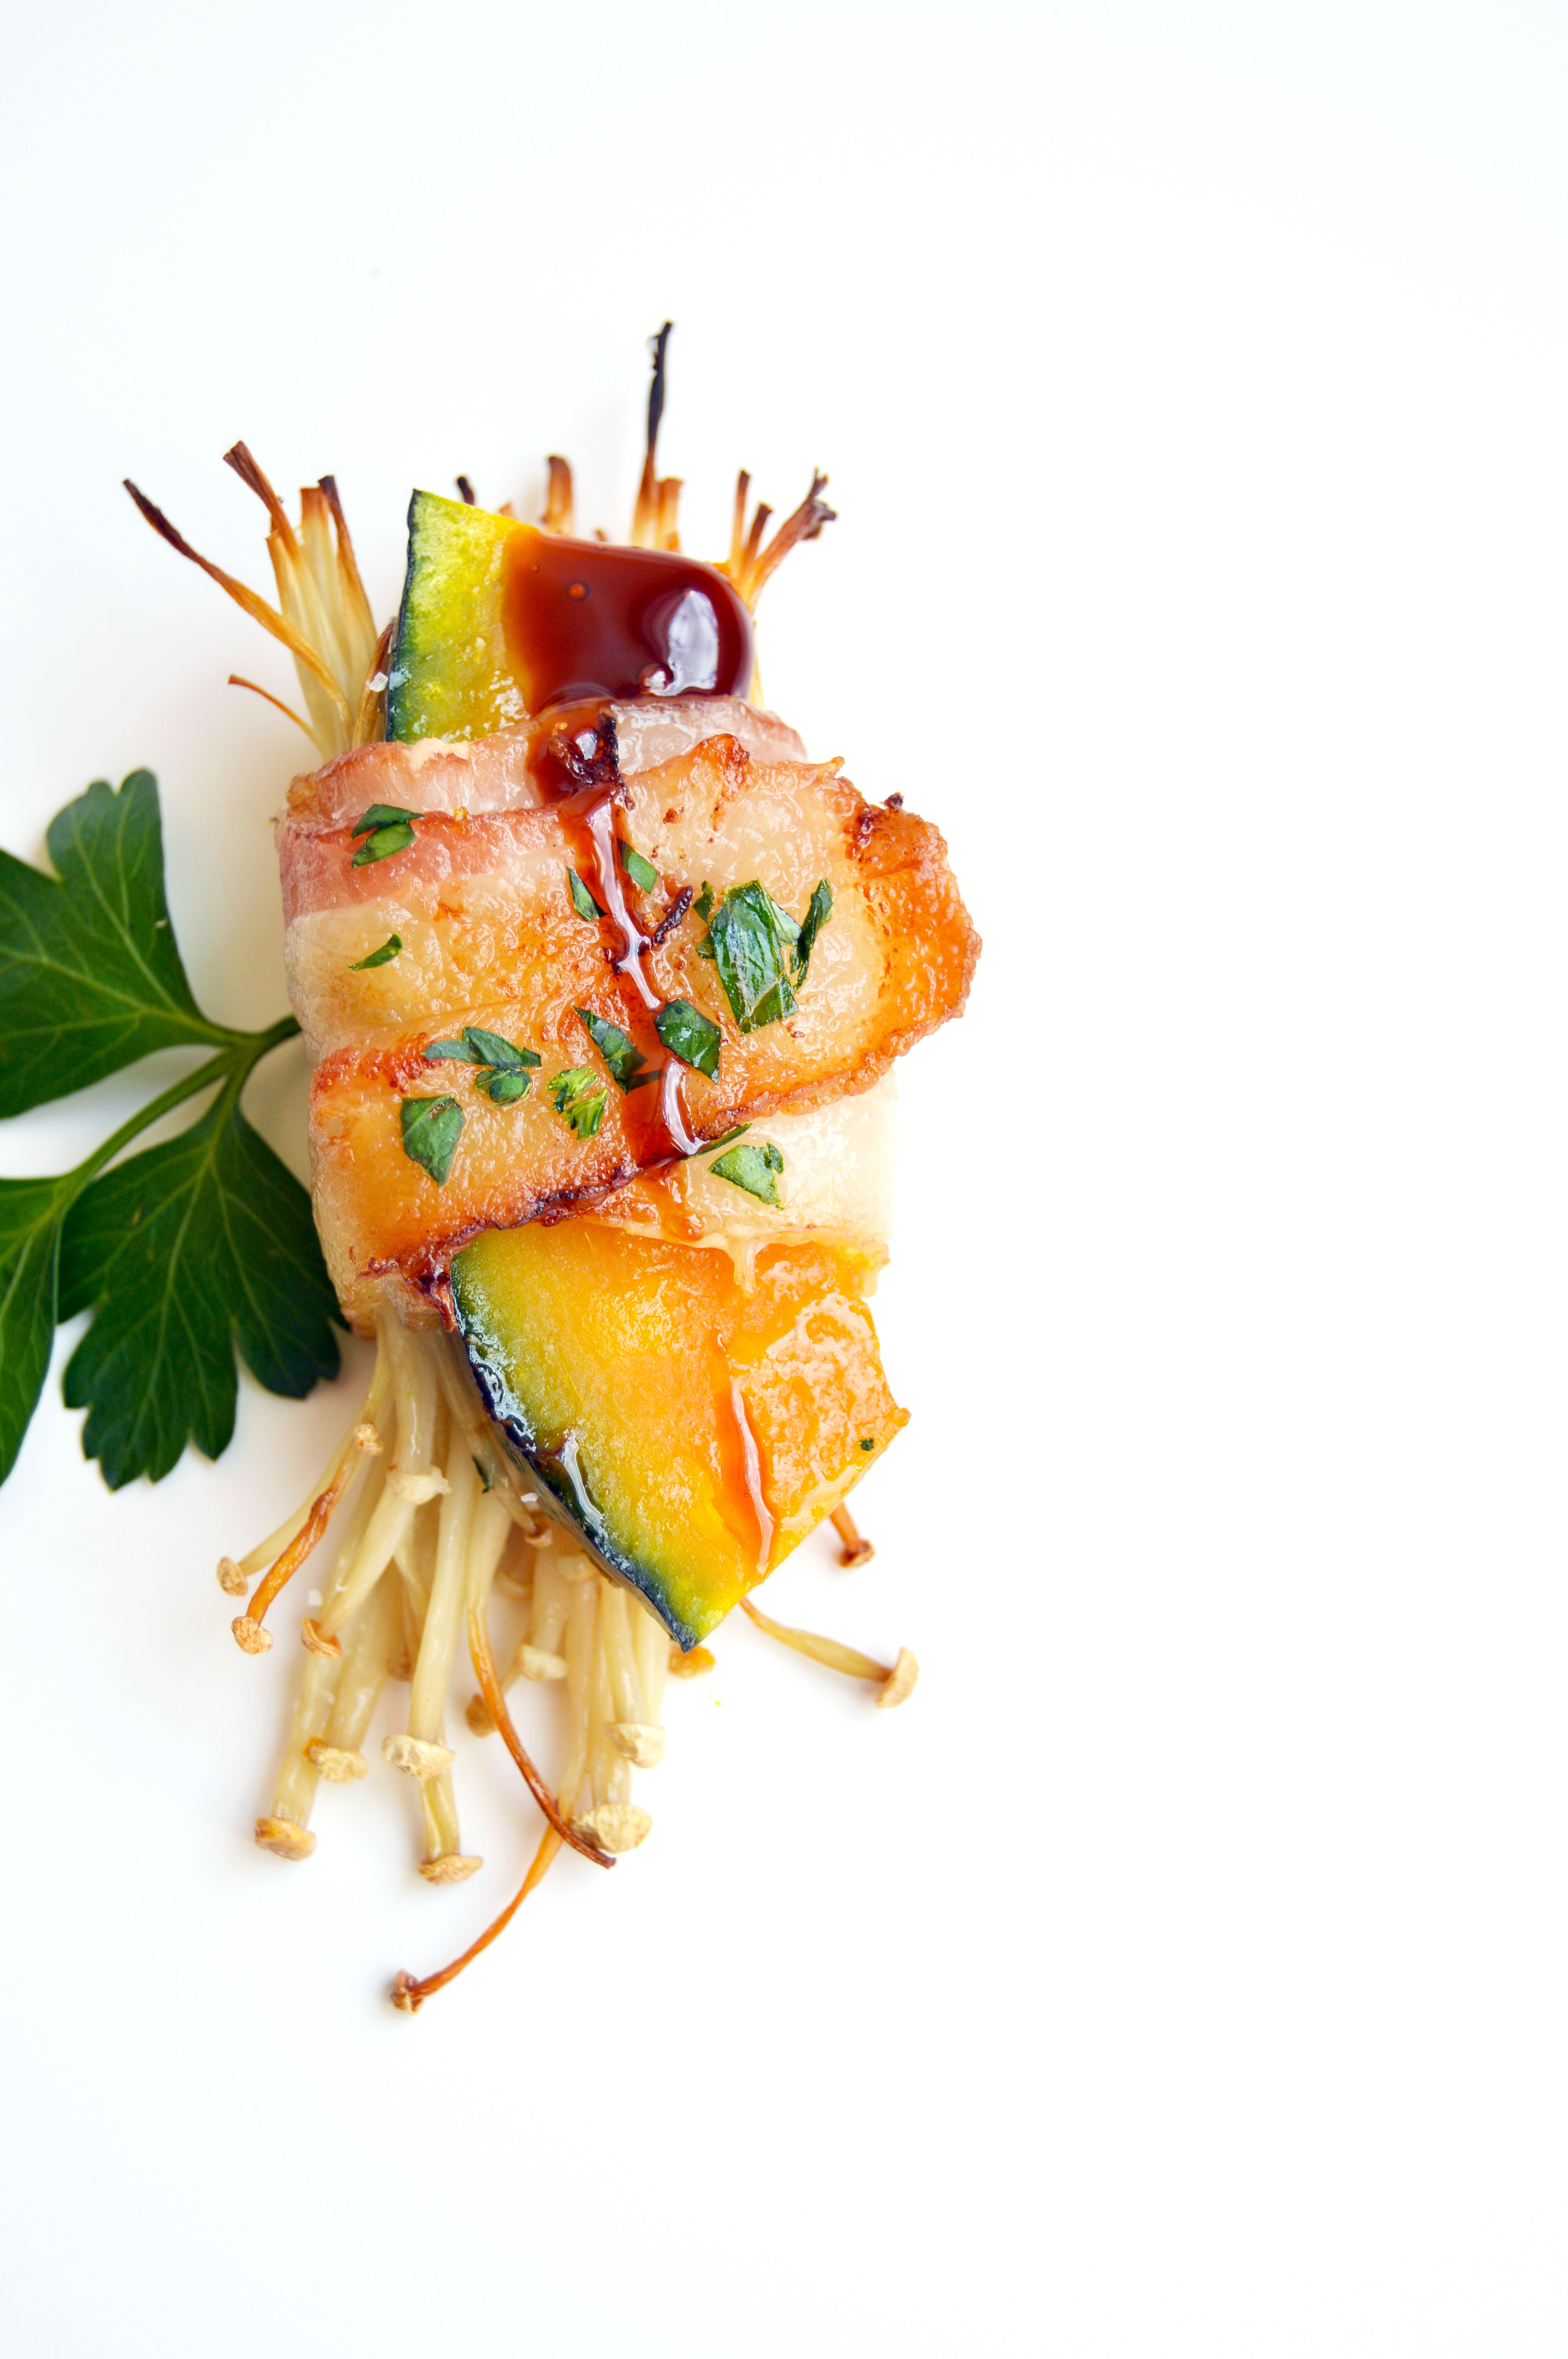


 But this, oh man… It is such a simple technique but it makes the average hot dog 10000% tastier than what it was before. You simply stick a skewer into the sausage, take a knife and create a swirl pattern along the meat, which will result in a Slinky looking piece of meat. It does not look like much but once you cook it, the increased surface to volume ratio creates extra crisp, juicy, meaty goodness.


