Red Velvet Strawberry Rose Cake

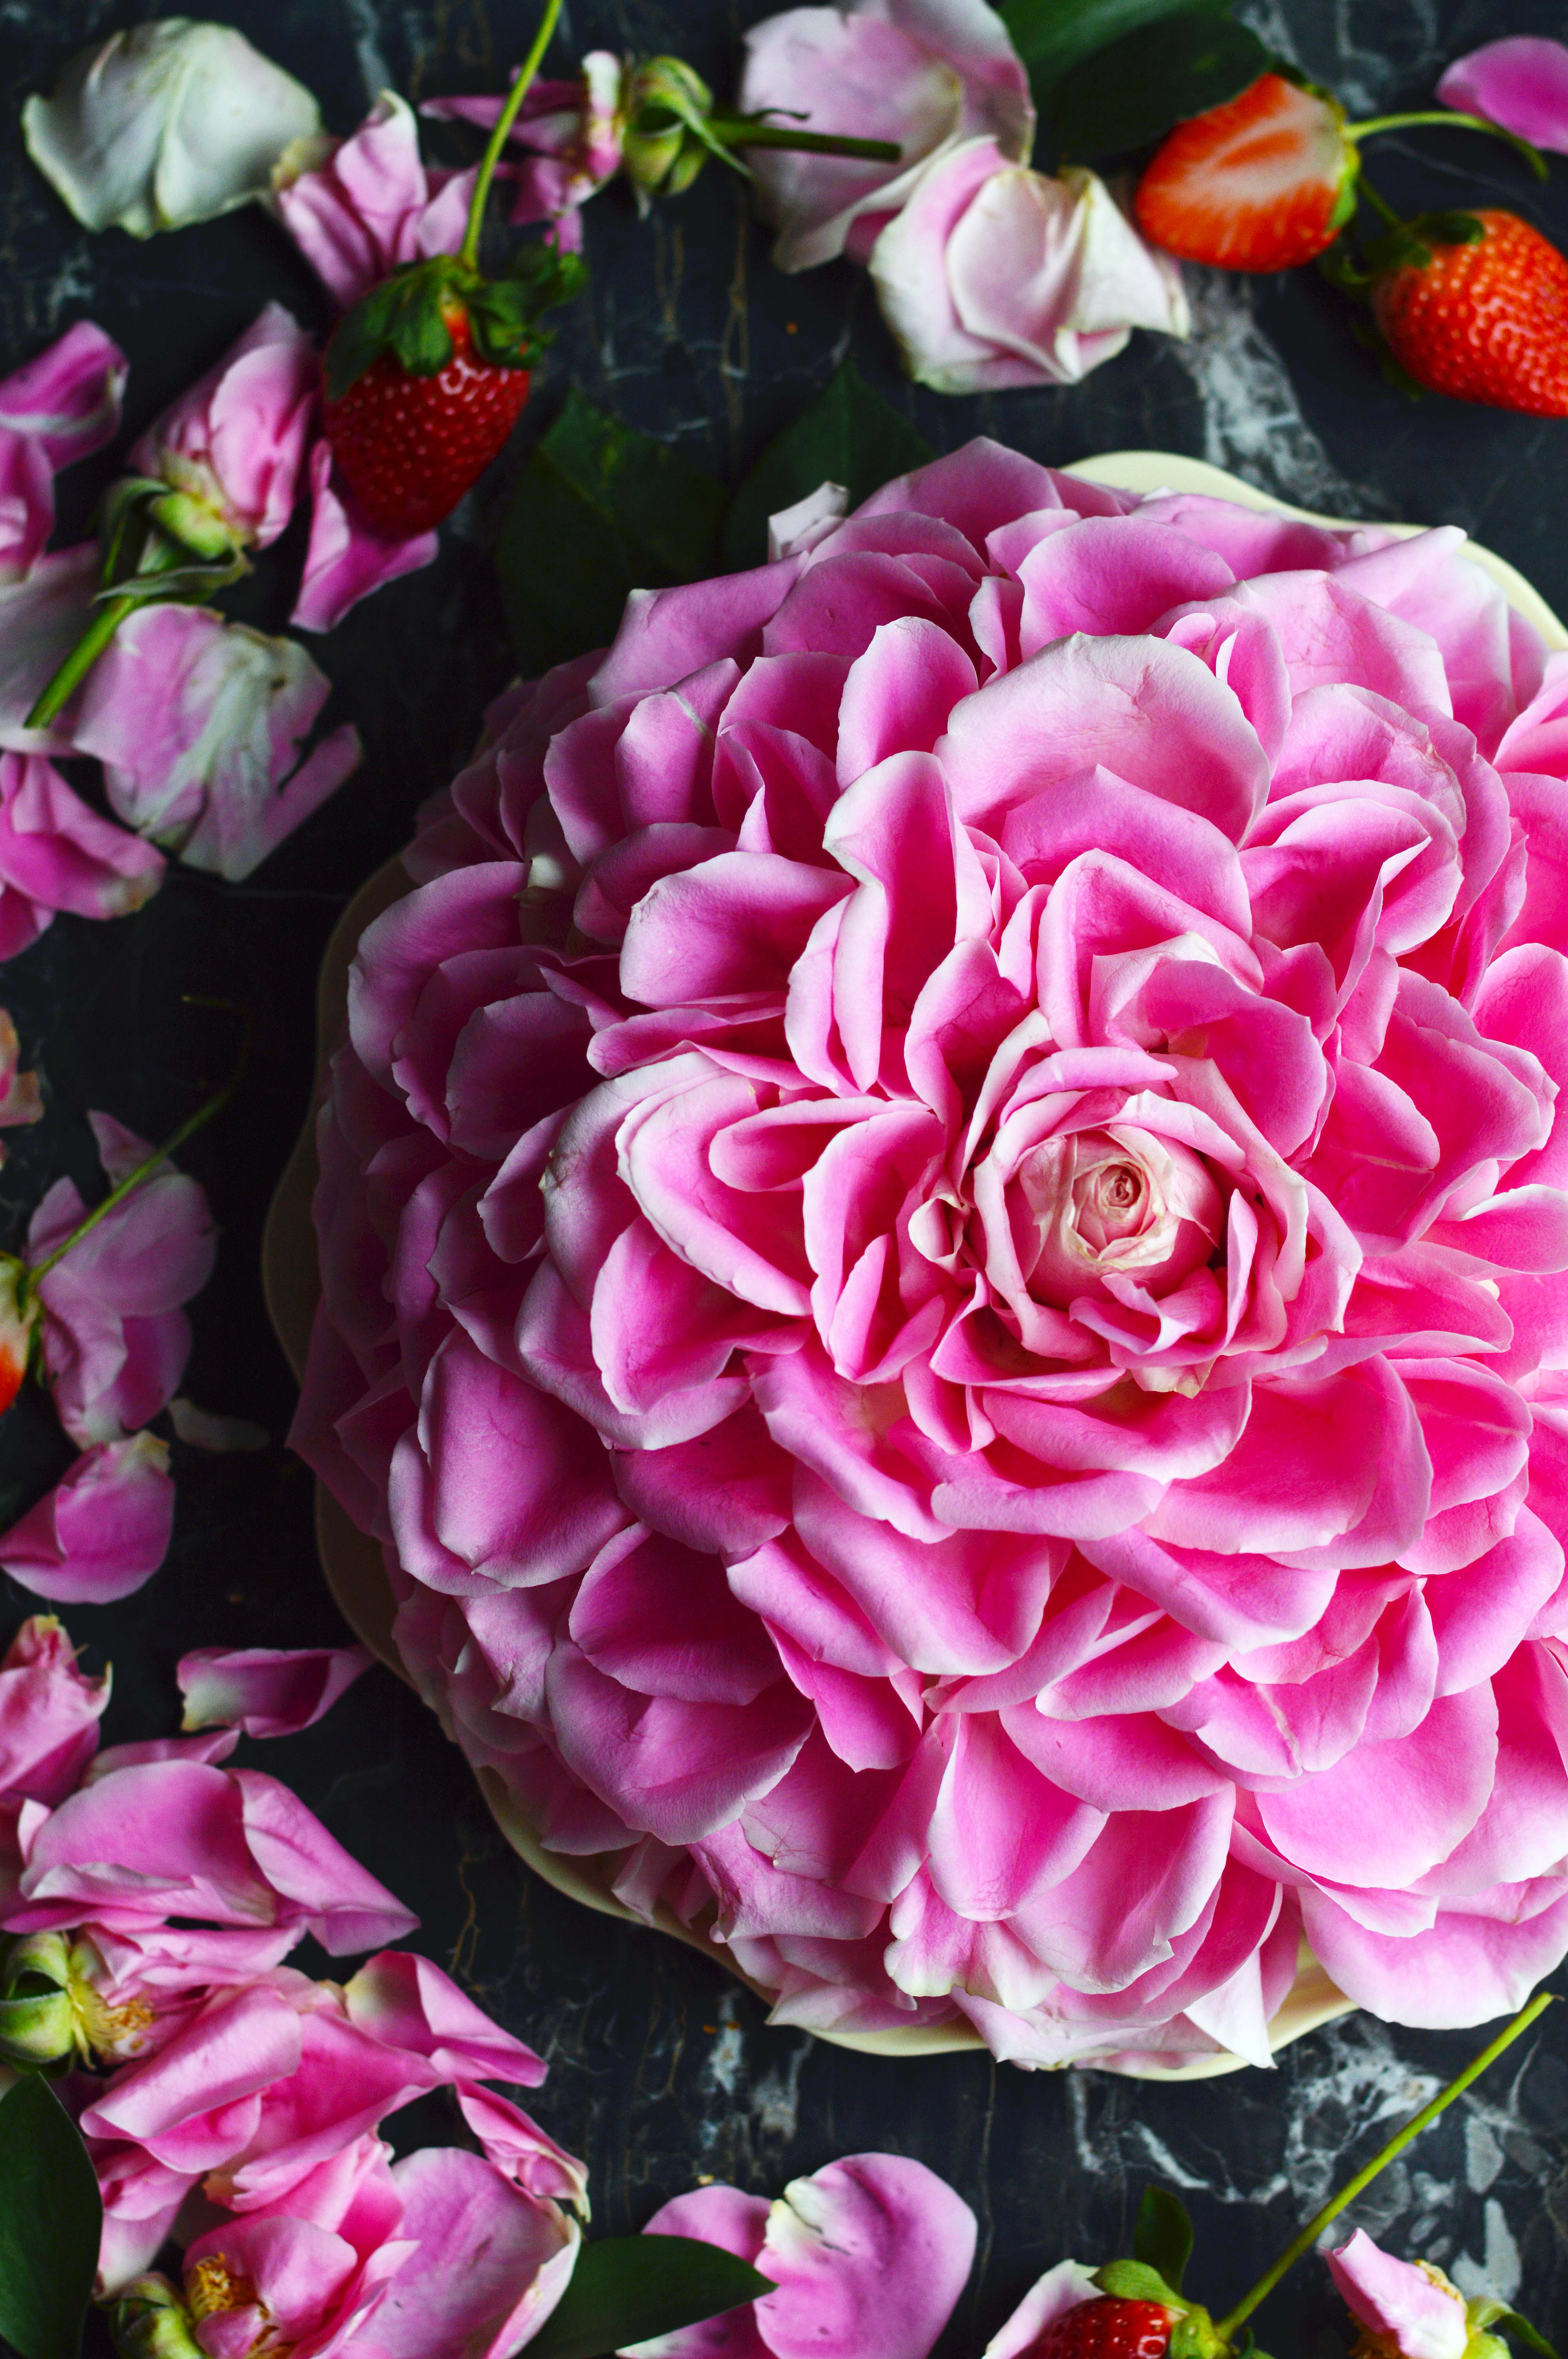
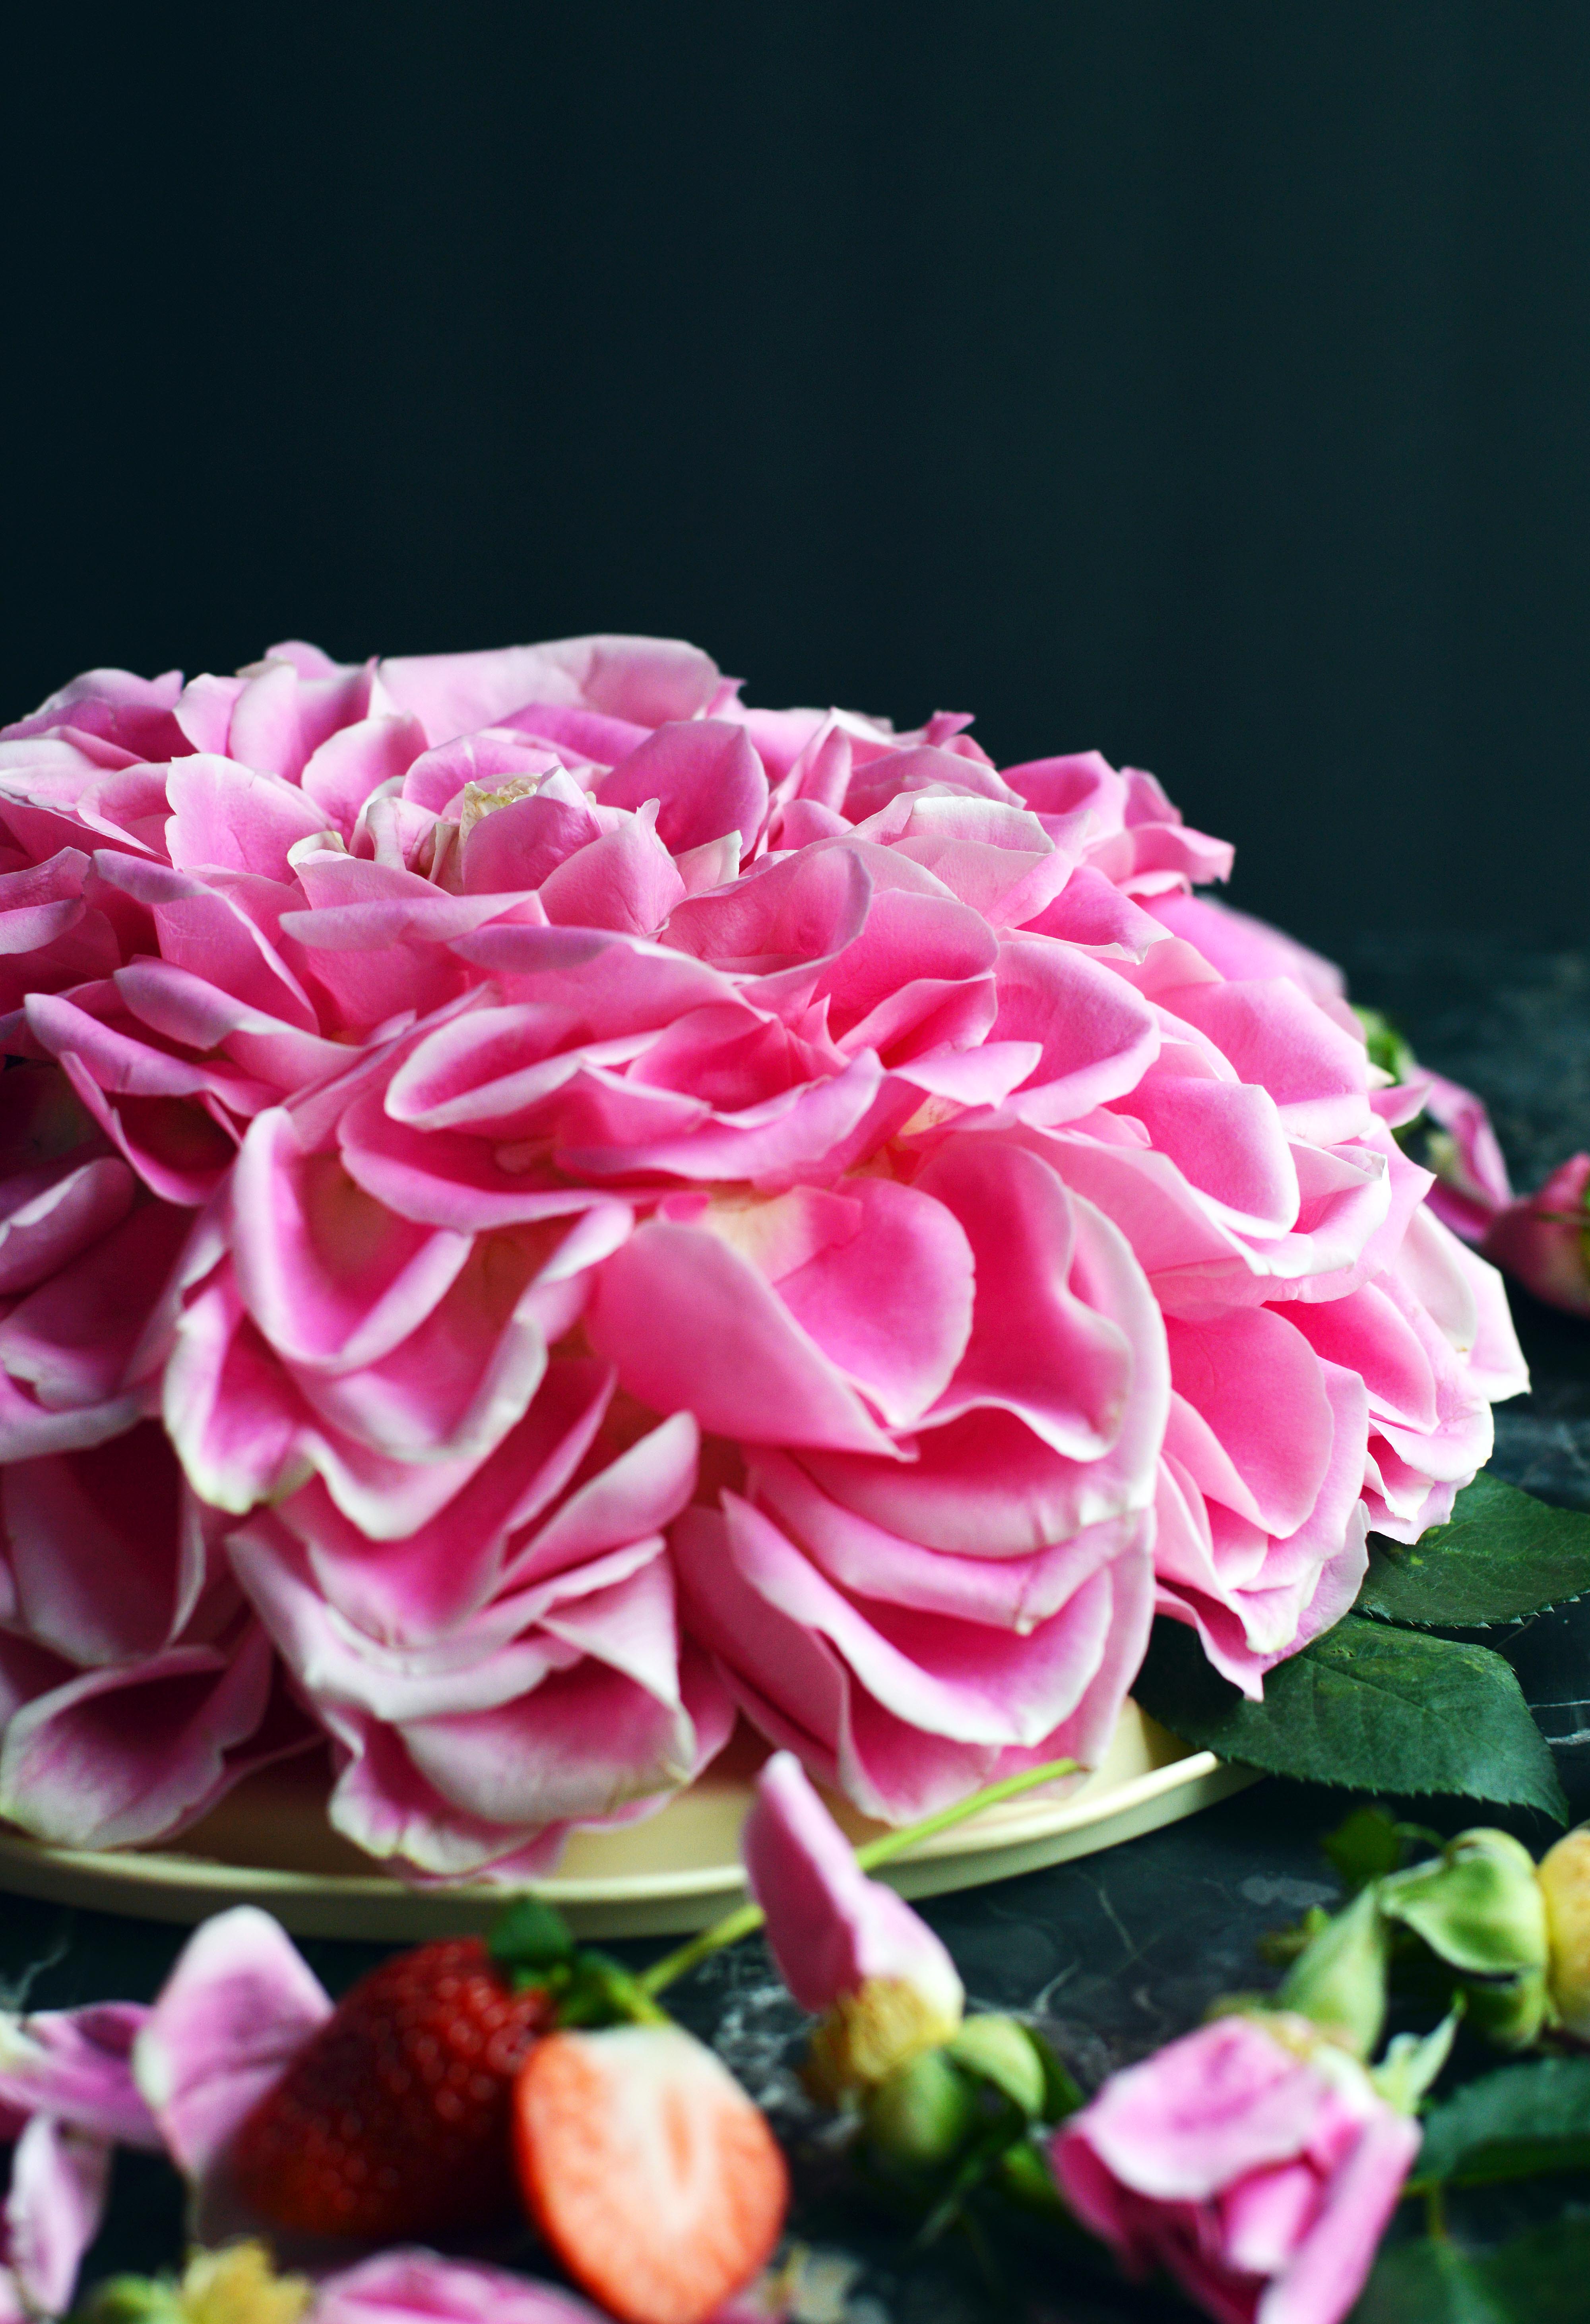
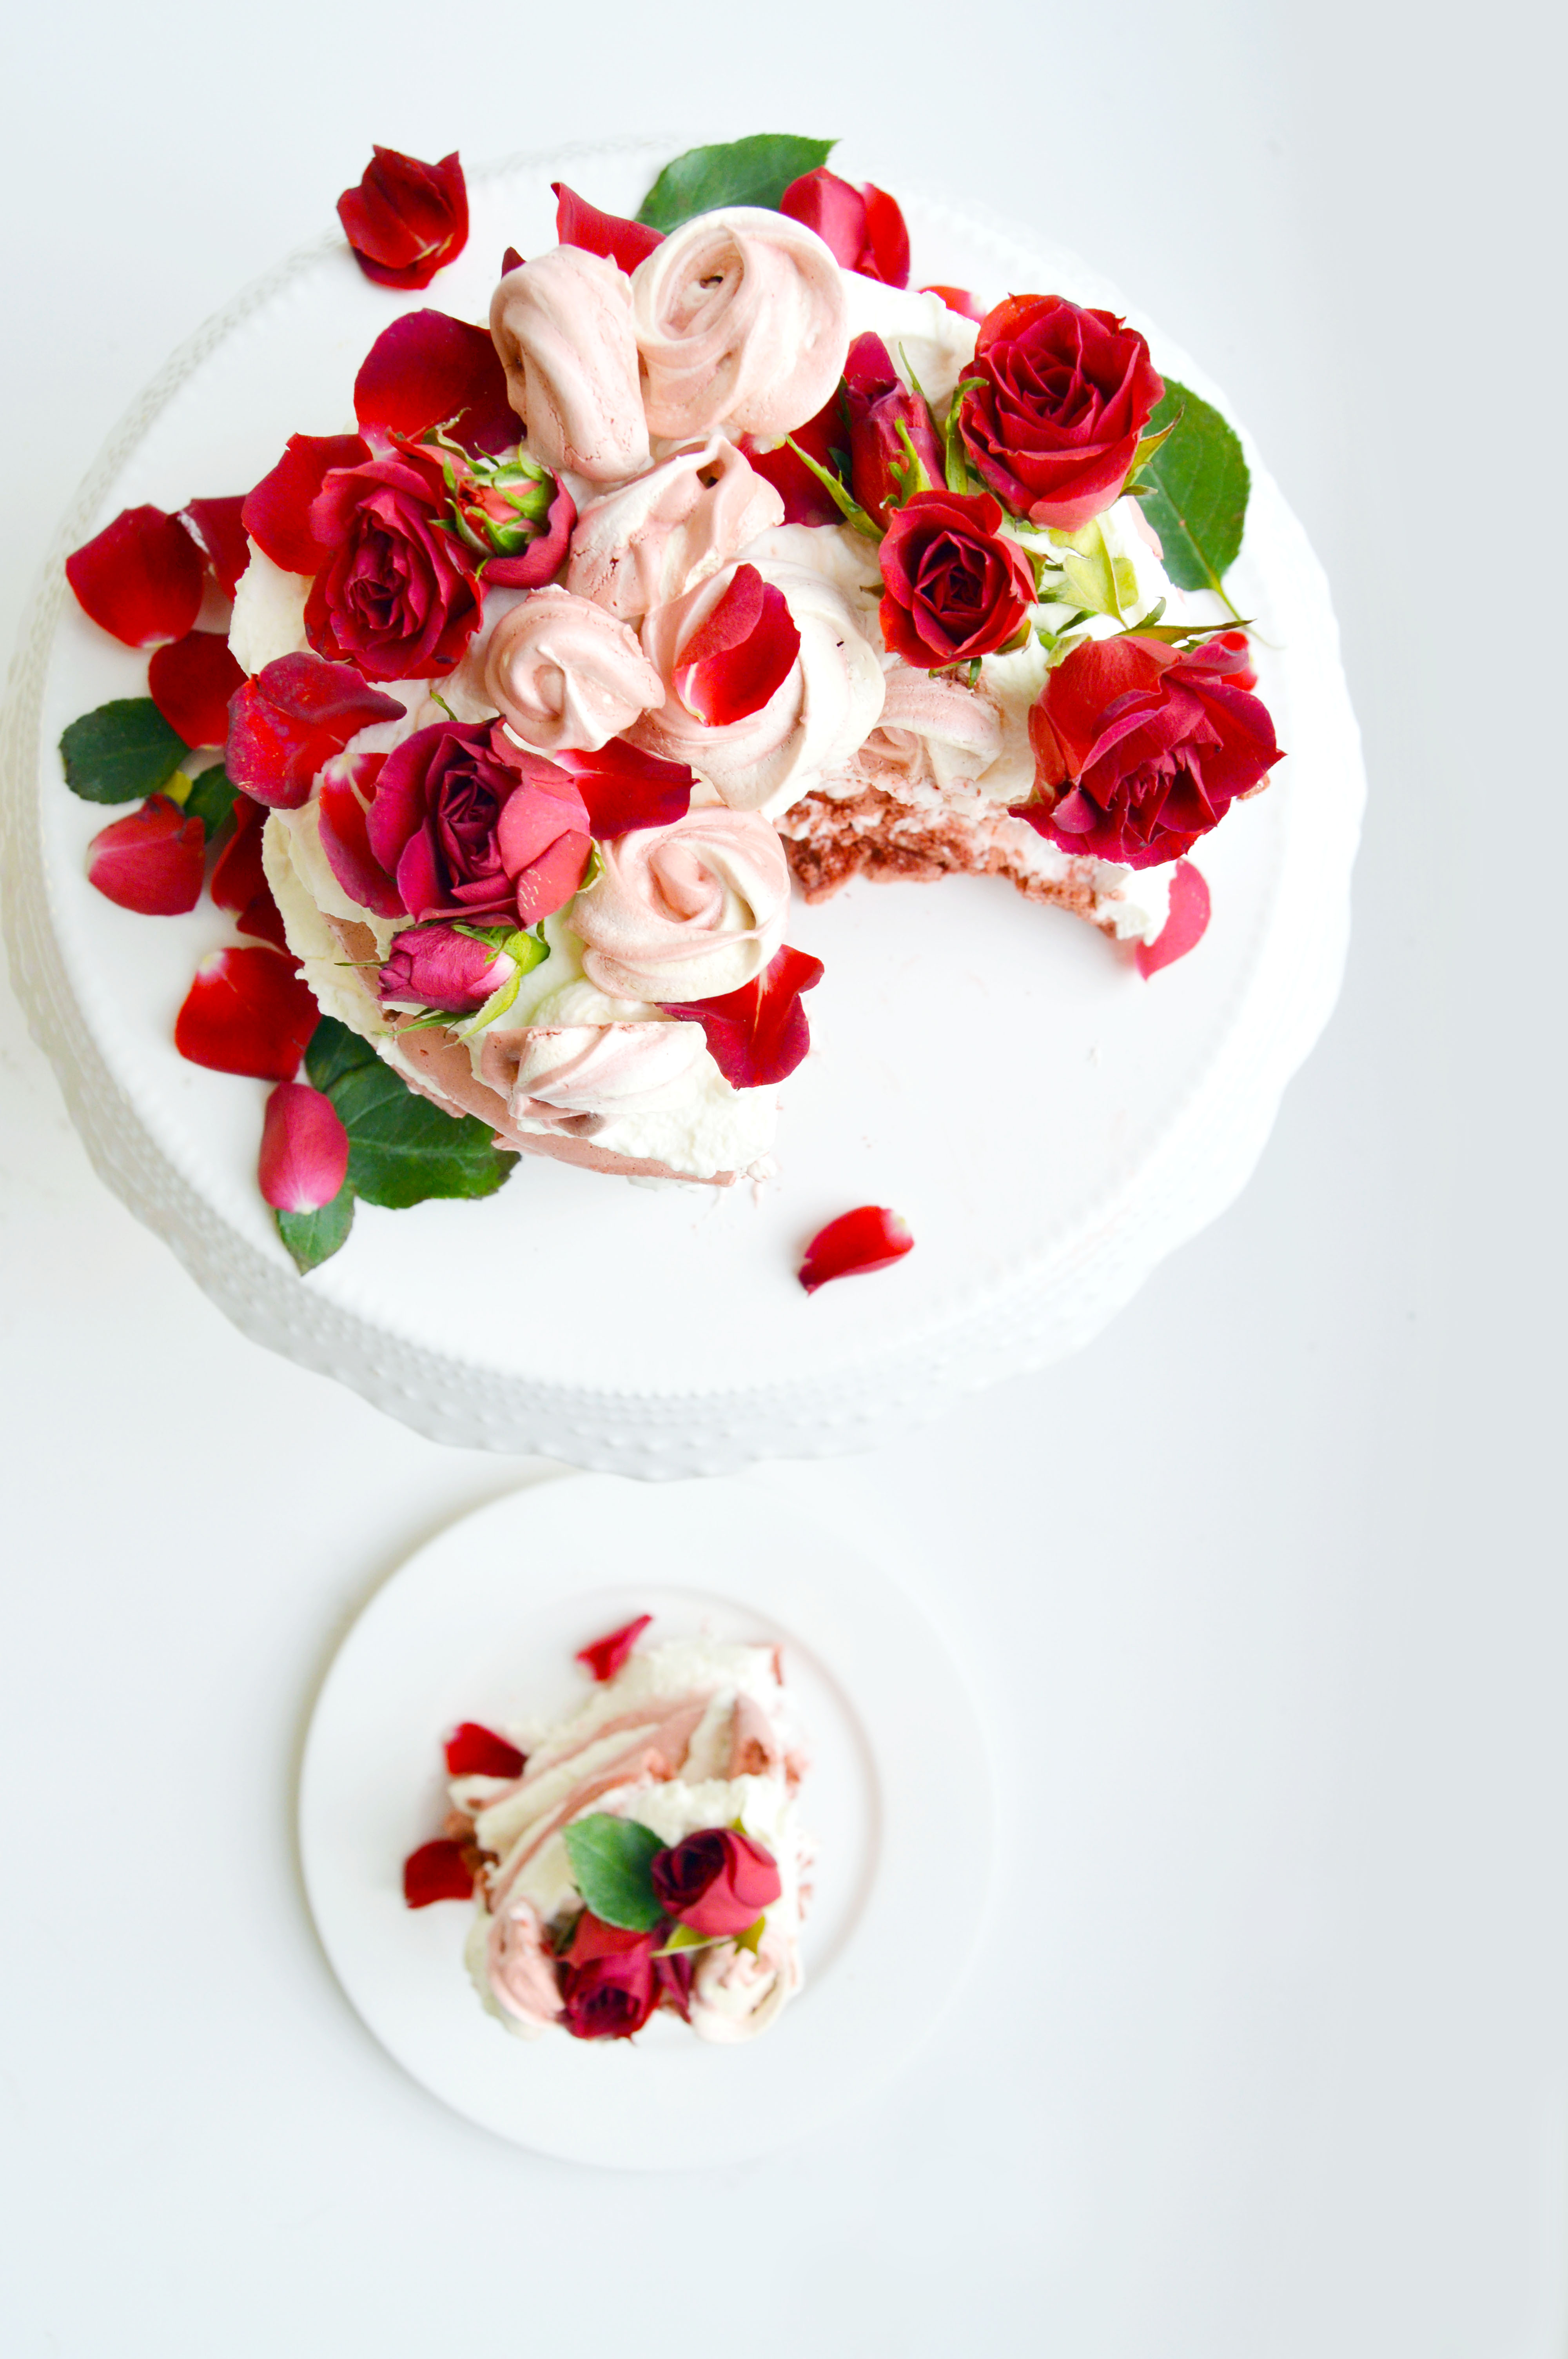
Happy Valentine’s Day! As someone who loves all things pink and feminine, Valentine’s Day décor is right up my alley. This cake was inspired by Ron Ben Israel’s rose cake which I’ve been obsessed with as soon as I laid my eyes on it. It was always on my “to-try” list but I never got the chance to take on the challenge. Recently, there was a blog post by NYC Cake Girl who used to work with Ron Ben Israel with a how-to on the very cake I loved. The amount of work and the detail work was perfection (as always), and I knew I simply didn’t have the time (and possibly even the skill) to recreate the cake. So I created this cake which looks similar and uses real rose petals.
As for the cake itself, I used half of my giant doughnut cake pan instead of baking a round cake and carving it into a dome like the tutorial. A similar effect could be produced with a shallow bundt cake, but I think the smooth exterior of the doughnut pan really makes things easier. The cake flavor is red velvet (because it is THE cake of Valentine ’s Day), and is layered on the inside with fresh strawberries and vanilla frosting. I know I know, I almost felt like it was sacrilege not to use cream cheese frosting, but I didn’t have cream cheese in the fridge so, vanilla it is. Please feel free to use cream cheese frosting if you prefer it.
I picked a bouquet of flowers that varied in shades of pink in hopes of making an ombre effect. However, once the petals were stripped from the flowers, they kind of ended up being the same color. I saved the lightest rose for the center though. Although in hindsight, I think I should’ve just picked the flower that had the least blemishes. You essentially layer the petals one by one in alternating layers around the cake to form a giant rose. It is a bit time consuming and is not completely symmetrical like the fondant petals from the original cake. But, I think it kind of gives it a homemade vibe that people can appreciate.I went a little heavy with the pictures because it was SO STUNNING. Like… the photos can’t do it justice. I loved even how the slices had petals on them fanning out the back, like a very fancy cape or headdress. I can almost guarantee that you will get “wows” and surprised looks when you bring this cake. It won’t disappoint.
I hope all of you got some sort of recognition of love this Valentine’s Day. If not, I baked this cake for you. 😉

Red Velvet Strawberry Rose Cake

You will need:

1 batch red velvet cake, baked in a dome shape (recipe below)
1 batch vanilla frosting (recipe below)
About ½ pint strawberries, sliced horizontally (enough to cover the area of the cake twice)
1 dozen roses (pesticide-free)

Instructions:

  1. Slice the red velvet cake in half (horizontally), and smooth a thin layer of vanilla frosting.
  2. Layer it with fresh strawberry slices and repeat layer with vanilla frosting and fresh strawberries using frosting to fill in any gaps. (shown in picture #2)
  3. Place the top half of the cake onto the frosting layer and crumb coat the entire cake with a thin layer of frosting. (shown in picture #3)
  4. Put cake in freezer for about 10-15 minutes until the frosting is set and then remove from fridge and give it a full coating. (shown in picture #4)
  5. Pick the flower you will be using as your center flower. Trim and place it in the center of the cake. (shown in picture #5)
  6. Get a few petals and fill in the gaps around the hole. (shown in picture #6)
  7. Now start layering the bottom part of the cake by pressing the petals into the frosting of the cake. Try to press the bottom edge of the petal only. (shown in picture #7)
  8. Try to use the largest petals you have for the bottom layer and go all around the cake. (shown in picture #8)
  9. Layer the next row of petals around the cake. (shown in picture #9)
  10. Try to alternate the position of the petals. As in, try to place the petal of the next layer between two petals of the bottom layer. (shown in picture #10)
  11. Repeat until you get to the center of the cake, try to use smaller petals as you get to the top of the cake. I had to replace some of the lighter petals because the lower petals turned out to be too pink to get a more seamless look. (shown in picture #11)
  12. Get ready to stun the room. 😉

Red Velvet Cake

Ingredients

1 ½ cups all-purpose flour
1 ½ cups cake flour
3 tablespoons unsweetened cocoa powder
¾ tsp. salt
3 large eggs, at room temperature
¾ (1 ½ sticks) cup butter, at room temperature
2 ¼ cups granulated white sugar
2 tsp. vanilla extract
1 ounce bottle of red food coloring (2 Tablespoons)
1 ¼ cups buttermilk
1 ½ teaspoons baking soda
1 ½ teaspoons vinegar

Directions:

  1. Preheat oven to 350°F, spray either your bundt pan or the top half of your giant doughnut cake pan with nonstick spray. (I highly suggest using either pam for baking or baker’s joy for extra insurance of “nonstickage”.)
  2. In a medium bowl, whisk together flour, cocoa powder and salt. Set aside.
  3. In the bowl of a standing mixer, beat butter on medium speed for 30 seconds.
  4. Add sugar and vanilla, and beat until combined.
  5. Add eggs one at a time on medium speed.
  6. Lower speed to low and add in food coloring.
  7. Add ⅓ of flour mixture to the egg mixture on low and add ½ of the buttermilk.
  8. Repeat with ⅓ flour mix and the rest of the buttermilk.
  9. Finish mixing with the rest of the flour mixture. Mix until just combined.
  10. Stir together baking soda and vinegar in a small bowl. Add to cake batter and beat just until combined.
  11. Fill cake pan until ⅔ full, bake 30-40 minutes or until a cake tester comes out clean.
  12. Cool pan on rack for about 15-20 minutes. Try to use a small spatula around the edges to ensure a clean removal. Remove cake from pan.
  13. Let cool completely.

Vanilla Frosting

Ingredients:

1 c. whole milk
¼ c. flour
¼ tsp. salt
8 oz. (2 sticks) unsalted butter, room temperature
1 c. sugar
2 tsp. vanilla extract

Instructions:

  1. In a saucier pan, put milk, salt and flour and whisk until combined on medium heat.
  2. Continuously whisk mixture until thickened to a pudding like consistency.
  3. Once thickened, strain through a mesh strainer into a bowl with a spatula to remove lumps.
  4. Place a piece of plastic wrap on top of the flour mixture and put into the fridge until fully cool.
  5. In a mixer bowl fitted with the whisk attachment, mix the sugar and butter on high speed until fluffy and pale about, 5-10 minutes.
  6. Add the chilled flour mixture and continue to whip on high speed until the sugar is completely dissolved and the mixture is no longer gritty, about 5-10 minutes.
  7. Add vanilla extract and mix until combined.


Ranunculus Cake with Sweet Potato Pastry Cream

I’ve been kind of obsessed with flower everything on my cakes these days. Real or buttercream, I love them all. I actually made this cake back in May, and by the time I got to editing photos it was the peak of summer.  And because the filling is sweet potato pastry cream, it just didn’t go with the season. But now that it is on the cusp of fall, I feel like it’s appropriate to post this. (Although, personally, this is my favorite pastry cream of all time and I love it any time of the year.)
The star of this cake is the sweet potato, but not the orange fleshed kind but the purple skinned, yellow fleshed kind. This type of sweet potato is popular in Korean desserts and tastes similar to a roasted chestnut. In the past, I’ve also featured this type of sweet potato in this post: Mini Green Tea Cake.
If you’ve never made pastry cream before, my advice for you is to go slow with pouring the hot milk into the egg mixture, as in a slow drizzle, not a pour. You want to avoid curdling at all costs. But if you do it right, man oh man is it worth it. Gone are the days of powdered mixes. You will never look back. Fill it between your favorite vanilla cake and watch the compliments roll.
As for the decoration, I’ve always loved ranunculus and decided to try to pipe it. It is easier than It looks but is quite time consuming to pipe each flower, especially since they have so many petals. Here are the steps to pipe the flower:

  1. Cut out many squares of parchment or wax paper. You will use one square per flower. (I usually cut mine around 3×3 inches.)
  2. With a flower nail in your hand, pipe a small amount of frosting onto the center of it. (As shown in Photo 2.)
  3. Place a piece of parchment paper on top of the frosting. (As shown in Photo 3.)
  4. Using a small round tip (wilton #2 or #3), pipe a small amount of green frosting in the center of the flower nail in a round, circular shape. (As shown in Photo 4.)
  5. In a piping bag filled with light green frosting and fitted with a petal tip with the wider side facing the flower nail (wilton #102, or larger pending on the size of the flower you want to pipe), pipe a square around the circle, overlapping each other on the ends. (As shown in Photo 5.)
  6. In a piping bag filled with light pink frosting and fitted with a petal tip with the wider side facing the flower nail (wilton #104, or larger pending on the size of the flower you want to pipe), pipe 5 dashes around the light green square overlapping the ends. (As shown in Photo 6.)
  7. Using the same piping bag, pipe 6 dashes around the pink circle. You want to show a little bit of the circle beforehand to create an illusion of overlapping petals. (As shown in Photo 7.)
  8. Continue piping dashes along the outer edge of the flower, increasing the number of dashes by 1 until you reach the size of the flower you desire. (As shown in Photo 8.)

I hope you try it soon! I know it’s been a while I’ve missed you!

Sweet Potato Pastry Cream

Ingredients:

3 medium sized Korean sweet potatoes, roasted and peeled.
2 c. whole milk
½ c. sugar, divided
2 egg yolks
1 egg, large
¼ c. cornstarch
a pinch of kosher salt
2 tbsp. unsalted butter
1 tsp. vanilla extract

Instructions:

  1. In a food processor, mix the sweet potatoes until a smooth puree forms. Set aside.
  2. In a medium saucepan, whisk the milk and ¼ c. of sugar and heat until the milk boils.
  3. While the milk heats, grab a medium bowl and whisk together the egg yolks, egg, ¼ c. sugar, cornstarch and the salt until smooth.
  4. Once the milk is heated, slowly drizzle in the milk mixture into the egg mixture with one hand while whisking the egg mixture with the other. Once the milk is completely incorporated into the egg mix, return the entire mixture into the saucepan.
  5. Heat the saucepan while whisking until the mixture becomes thickened like pudding.
  6. Take it off the heat and stir in the butter and vanilla extract.
  7. Mix the sweet potato with the pastry cream until homogenous.
  8. Place a piece of plastic wrap directly onto the pastry cream and refrigerate until cool and set. (about 4 hours, or overnight)

Weekday Update

pink swirl cakeIt’s been a quiet few weeks on the busy spatula. Mostly, I’ve been busy filling cake orders and baking here and there. Not enough photos to write an actual blog about, but just enough for a glimpse of what’s been going on. (If you follow me on Instagram, you probably saw some of these already.)

Pink and Gold Swirl Cake – It’s such a whimsical cake, I couldn’t help taking close up photos of this one. Swirled with pastel pink and white frosting then filled to the brim with pearls, gold stars, and dragees. It was four layers of chocolate cake filled with toffee coffee frosting.

DSC_0487DSC_0428DSC_0475DSC_0477

Baymax Macarons – I wanted to post these for Valentine’s Day, but I never had the time. Place a few red heart sprinkles on each macaron and draw in two circles and connect with a line with a black edible color marker. I filled the inside with some leftover strawberry frosting. So simple and very cute.

baymax macarons baymax macarons

Pink Ombre Ranunculus Cake – The inside of this cake was layered with layers of pink ombre cake. Filled with fresh strawberry frosting and topped with fresh ranunclus, it was so pretty. I originally wanted peonies, but the florist didn’t have any that were in bloom. Did you know that you had to order peonies in advance? I never knew.

pink ombre flower cakeranunculus flowers on cake

Red Velvet Rose Pavlova

Red Velvet Rose PavlovaAs much as I love flowers, I’ve learned over the years that I have a black thumb. No matter how hard I try or how “low-maintenance” the plant is, I manage to kill it. I’ve even killed a cactus. Don’t ask me how I did it. But one day it started to shrivel up and before I knew it, it was dead.  These days, I run away from plants like the plague. The cute DIY terrariums that everyone talks about? Nope. Growing my own herbs? No way. So instead of growing my own plants, I prefer already cut plants because (not to sound morbid) they’re already dying. It gives me a little less stress.
Red Velvet Rose Pavlova 2In the food world, I think Valentine’s Day can be renamed as Red Velvet Everything Day. Is it just me or when February rolls around, everything is red velvet flavored? They come in forms of cake, brownies, whoopie pies, cupcakes and cookies. It is not their fault. There aren’t that many red cakes out there and that deep red hue is kind of perfect for the season.
Red Velvet Rose PavlovaRed Velvet Rose Pavlova Instead of doing the usual red velvet cake, I decided to make a red velvet pavlova. I dyed the layers of pavolva red (or as red as I could get them) and flavored them with a hint of cocoa. Then I made a cream cheese whipped cream (because how would you have anything red velvet without cream cheese) and flavored it with some rose water for a floral note. I finally decorated it with some tiny rose meringues and actual tiny roses. If you are using fresh flowers, make sure they’re pesticide-free and if you want to eat them, make sure they’re edible.
Red Velvet Rose PavlovaThis may be the most romantic cake I’ve made. (Followed closely by this one.)

Red Velvet Rose Pavlova
Makes one 4-layered mini cake

Ingredients
300 g. superfine sugar
150 g. egg whites, room temperature
1 pinch cream of tartar
2 tbsp. cocoa powder
red gel food color
1 batch of cream cheese rose whipped cream (recipe below)
mini red roses, organic pesticide-free (for decoration)

Instructions:

  1. Preheat oven to 400˚F and line a rimmed baking sheet with parchment paper.
  2. Spread sugar in an even layer over parchment.
  3. In the bowl of a standing mixer fitted with the whisk attachment, add the egg whites and the cream of tartar.
  4. Place sugar into the oven and bake until the edges of the sugar begins to melt but not brown, about 5 minutes.
  5. Once the sugar begins to melt, turn the mixer onto high.
  6. Remove baking sheet from the oven and the eggs whites should be foamy.
  7. Turn the mixer to medium high and slowly pour the hot sugar from the parchment paper into egg whites.
  8. Once all the sugar is added, turn the mixer onto high and mix until stiff, shiny peaks form.
  9. Reserve ¼ c. of white meringue batter in a different bowl.
  10. Add cocoa powder and red gel food color to the rest of the batter and mix until desired color is reached.
  11. Reserve ¼ c. of red meringue batter in a separate bowl.
  12. Reduce oven to lowest setting 140˚F.
  13. Line two baking sheets with parchment paper.
  14. On one baking sheet, spoon 4 five-inch circles of the red meringue.
  15. Fit a medium closed star piping tip into a piping bag and add ¼ c. each of reserved white and red meringue batter.
  16. On the second baking sheet, form small roses by making small circles with the piping tip.
  17. Bake the baking sheet with the five-inch circles for 1- 2 hours until they are crisp and hollow.
  18. Bake the baking sheet with the mini roses for 30 minutes to 1 hour until they are crisp and hollow.
  19. Turn off oven and let it dry out for about 30 minutes to an hour.
  20. When meringues are completely cool and dry, alternate a layer of the meringue with the layer of the whipped cream.
  21. Decorate the top with the mini meringue roses and mini roses.

Cream Cheese Rose Whipped Cream

Ingredients:

1 ½ c. heavy whipping cream, cold
4 oz. cream cheese, room temperature
½ c. powdered sugar
½ – 1 tsp. rose water (be careful with the rose water, too much of it will make the frosting taste like soap)

Instructions:

  1. In a bowl of a standing mixer fitted with the whisk attachment, whip the heavy cream until stiff peaks form.
  2. Set aside the whipped cream mixture into a different bowl.
  3. In the same bowl, add the cream cheese and powdered sugar and mix until light, fluffy and fully incorporated.
  4. Fold the whipped cream into the cream cheese mixture.
  5. Add ½ tsp. rose water and taste. If you feel like it needs more, add ¼ tsp. at a time until desired flavor is reached.

Rose Cake

rose cake 2This weekend was crazy busy for the Park family.  We had a graduation, Mother’s Day and my dad’s birthday lined up 3 days in a row.  We ended up celebrating Mother’s day and my dad’s birthday in one go, and I tried to think of a birthday cake that would serve both occasions.  I suppose the mauve color of the cake was a little too feminine for a man’s birthday, but my mom didn’t get any flowers for Mother’s day so I hope this made up for it a bit.
Rose cake 1Like many celebration cakes, this cake takes a long time to decorate but isn’t necessarily challenging.  What takes the most time is rolling out the petals and chilling the petals in between steps.  I wanted to use 100% modeling chocolate for the cake, but something went wrong during the process and I had to add about 30% fondant to make it useable.  Do not fight the weather, as soon as your modeling chocolate/fondant starts to lose its shape, stop and chill it in the freezer.  This will save you a lot of frustration and heartache down the line.
rose cake 3It does have a certain eye opening charm and it’s very flexible in terms of the variation of celebrations and colors.  An all-around crowd pleaser.
rose cake 4Rose Cake
You Will Need:
14 oz of modeling chocolate or a mixture of fondant and modeling chocolate
1 batch of vanilla buttercream
1 8” cake, layered and filled
a set of round cookie cutters 
round ended fondant tool

Instructions:

  1. Frost your cake with vanilla frosting into a dome shape.*  (Pic 1)
  2. Mold a 1½ in. cone with modeling chocolate and place in center of the cake. (Pic 2)
  3. From this point on, the modeling chocolate will be rolled out to 1/8-1/16 in. thickness.
  4. With your 1.75 in. round cutter, cut out 2 pieces of modeling chocolate and mold it to a petal shape using a round ended fondant tool.
  5. Wrap the cone with the 2 petals with some buttercream, overlapping each other to form a bud. (Pic 3 and 4)
  6. With your 1.75 in. round cutter, cut out 3 pieces of modeling chocolate and mold it to a petal shape using a round ended fondant tool.
  7. Wrap the bud with the 3 petals with some buttercream, overlapping each other at the edges. (Pic 5 and 6)
  8. With your 2.25 in. round cutter, cut out 5 pieces of modeling chocolate and mold it to a petal shape using a round ended fondant tool.
  9. Wrap the bud with the 5 petals with some buttercream, overlapping each other at the edges. (Pic 7 and 8)
  10. With your 2.5 in. round cutter, cut out 5 pieces of modeling chocolate and mold it to a petal shape using a round ended fondant tool.
  11. Wrap the bud with the 5 petals with some buttercream, overlapping each other at the edges. (Pic 9 and 10)
  12. With your 2.75 in. round cutter, cut out 5 pieces of modeling chocolate and mold it to a petal shape using a round ended fondant tool.
  13. Wrap the bud with the 5 petals with some buttercream, overlapping each other at the edges. (Pic 11 and 12)
  14. With your 3 in. round cutter, cut out 5 pieces of modeling chocolate and mold it to a petal shape using a round ended fondant tool.
  15. Wrap the bud with the 5 petals with some buttercream, overlapping each other at the edges. (Pic 13)
  16. With your 3.25 in. round cutter, cut out 7 pieces of modeling chocolate and mold it to a petal shape using a round ended fondant tool.
  17. Wrap the bud with the 7 petals with some buttercream, overlapping each other at the edges. (Pic 15)
  18. Cut 2-3 in. wide strips of molding chocolate and curl the edges with a straw, about 8-13 pieces.
  19. Chill in the freezer to set, about 1-3 minutes.
  20. Use some frosting to wrap the cake with the strips, overlapping at the edges and curled edge pointing up.  (Pic 16)

* This is what I did.  In hindsight, you could do the regular sharp corners, it shouldn’t make a difference.