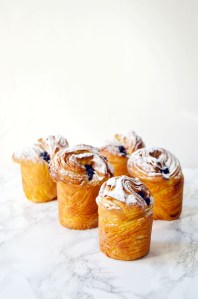
 Hybrid food seems to be the trend these days and they usually involve a doughnut. Doughnut ice cream sandwiches, cronuts (doughnut + croissant), macaron doughnuts, and doughnut bagels are all examples that have popped up on our social media feeds. I freaking love doughnuts and I think they’re perfect as they are so I’m moving onto the cruffin. A cruffin is a croissant + muffin. Insanely crisp and flaky on the outside and fluffy, buttery and moist on the inside, it’s the perfect combo of both worlds. Oh, and because Mr. H loves jam filled doughnuts, I filled mine with my favorite blueberry jam (seriously, my favorite for years! I used for my blueberry pie cookies and blueberry pie doughnuts too) and dusted it off with powdered sugar.
 Cruffins have become popular in the U.S. by Mr. Holmes Bakehouse in San Francisco. In fact, they are so desired that someone broke into the bakery to steal the recipe in 2015. The thief didn’t steal anything else, not even the cash. In a way it sounds like a ridiculous reason to risk going to jail, but it also shows how awesome a cruffin is. You know how they say there is no such thing as love at first sight but there is lust at first sight? When I first saw the photos of the cruffin from Mr. Holmes Bakehouse, I fell in deep lust. I needed to have this cruffin, like now. But San Francisco is on the other side of the continent, what can I do? The only other way was to bake it on my own.
 There is a very popular cruffin recipe that is on Pinterest by Lady & Pups. They’re ridiculously cute and have tons of layers, but they weren’t tall like the cruffins I was looking for. Enter the popover pan. It’s twice as tall as a muffin pan and perfect for the recipe. Am I telling you to buy a popover pan just for this cruffin? Heck yes. Before this recipe, I’ve even settled for making popovers in muffin pans but there is just no other way around it. I think if you make these in a muffin pan, there isn’t enough surface area for the fluffy interior and the ratio of the crisp to chewy would be off.

 So how difficult is this recipe? If I’m being completely honest with you, it’s not easy. It is labor intensive and the yield is very small. Only 6 cruffins. But the6 cruffins are worth it. It’s like asking someone would you rather eat one fresh-off-the-conveyor-belt Krispy Kreme doughnut or a dozen stale supermarket ones? If you are the type of person who would go for the dozen stale ones, this recipe is not for you. But if you, like me, would rather have that one delicious doughnut, then dust out your pasta roller. Yes, you need a pasta roller. I’m going to say it is impossible to roll out the dough this thin with a rolling pin. Also, I recommend using a kitchen scale to weigh out your ingredients.
 The ingredient list is short so you want to use the best ingredients on hand. I love King Arthur flour and I used the best butter I could get my hands on which was Kerrygold’s Irish butter. Irish butter is much more flavorful and rich than American butter and every penny was worth buying it for this recipe. I changed my technique just slightly from Lady & Pups. Her post has beautiful photos of how she did it, and I recommend looking through the photos if you have a difficult time understanding how to put this together. It does look a little intimidating, but don’t get scared because once you get the hang of it, it becomes a rhythmic process, kind of like knitting.

I promise you, it’s worth it. 🙂 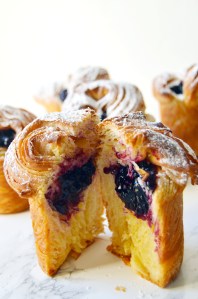
Blueberry Cruffins
makes 6 tall cruffins
Ingredients:
150 grams (1 cup + 1 tbsp) bread flour
150 grams (1 cup + 1 tbsp) all-purpose flour
1 1/2 tsp (6 grams) instant dry yeast
2 tbsp. granulated sugar
160 grams (1/2 cup + 2 tbsp) luke-warm filted water (not tap)
50 grams (3 1/2 tbsp) salted butter, soften and cubed
165 grams (11 1/2 tbsp) salted butter, room-temperature
blueberry jam
powdered sugar
Instructions:
- In a bowl of a standing mixer attached with a dough hook, mix bread flour, all-purpose flour, yeast, and sugar.
- Once mixed, add in your water and knead on low speed until a shaggy dough forms, about 3 minutes.
- Add in the 50 grams of softened and cubed butter and knead for 5 minutes on low speed until the butter is incorporated and then raise your speed to medium and knead for about 10-15 minutes until a smooth ball of dough forms.
- Cover the bowl with plastic wrap and let the dough rise for about 45 minutes, the dough will puff up and be larger in size.
- Prepare your popover pan by lightly greasing the inside with shortening and dusting it with flour. DO NOT skip this step. It would be very sad if the cuffins do not come out of the pan as one whole piece.
- Move dough to a lightly floured surface, and divide into 6 equal portions. (as shown in the above picture # 1). Take one portion out and cover the remaining under plastic wrap so the dough does not dry out.
- Flatten the dough with your hands to about ½ inch thick and with your pasta roller on the widest setting (or the lowest number), work the dough through your pasta roller.
- After you move the pasta through the widest setting once, fold the dough in thirds and then move it through the widest setting again. Repeat this step once more before moving onto the next step.
- Once the dough has been moved through three times on the widest setting, cut the dough in half.
- Lightly dust both sides of one half of the dough and move it through your pasta roller from the widest to the thinnest setting or as thin as you can get it without the dough tearing. (My pasta machine goes from 0-9, 9 was too delicate of a dough to work with so I only went to 8. It was still tissue thin and that is what you are looking for.)
- Set the first half of the dough aside and work the second half of the dough in the same way until the same thinness is reached. (as shown in the above picture #2)
- With an offset spatula, lightly butter one side of each half of the dough with the 165 grams of the room temperature butter (not all at once, divide the 165 grams for all the flattened dough). Be careful not to tear the dough and to completely cover each side with butter. (as shown in the above picture #3)
- Roll up one half of the dough, kind of like a fruit roll-up. (as shown in the above picture #4)
- Take the rolled up dough and place it on one end of the second buttered dough. (as shown in the above picture #5)
- Roll up the dough in the same way as the first dough to make one fat roll of dough. (as shown in the above picture #6)
- With a very sharp knife, cut the rolled up dough in half lengthwise. (as shown in the above picture #7)
- Place both halves of the dough into one cup of the popover pan with the layers (cut-side) facing outwards. You want to curl the first half of the dough in on the bottom, and then layer the second half of the dough on top of that one. Do not squish the dough into the pan, because it needs room to rise. (as shown in the above picture #8).
- Repeat steps 7-17 until you are done with all 6 pieces of the original dough.
- Loosely place a piece of plastic wrap on top of the popover pan and let the dough rise at room temperature for 2-3 hours or until the dough is fully doubled in size. (as shown in the above picture #9)
- Preheat the oven to 400˚F. Place a sheet pan underneath the popover pan (to catch the butter drippings) and bake until golden brown and puffed up, about 20-30 minutes.
- Let cool in the pan for about 10 minutes before removing it to a wire rack.
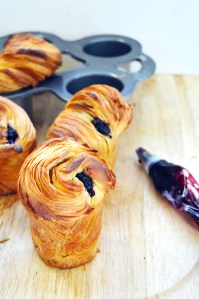
- Fill a piping bag fitted with a medium star tip with blueberry jam.
- Find a divot on top of a completely cool cruffin and wedge the tip into the cruffin.
- Squeeze the piping bag to fill the cruffin with jam until you feel resistance.
- Repeat with the other cruffins.
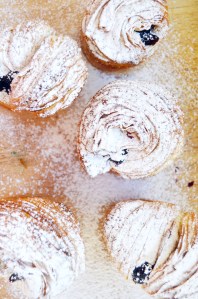
- Lightly dust the top of each cruffins with powdered sugar.
Recipe adapted from Lady & Pups.


 Bacon Avocado Egg
