

I can’t believe Easter is this Sunday! I don’t know about you, but personally, all the days seem to blend together these days. (I honestly thought today was Saturday and was panicking that I didn’t write this up fast enough for you guys.) Like most holidays, Easter was the most memorable to me as a kid. While I never got to participate in Easter egg hunts, I knew I would get some sort of treat at church. Whether it was opening up the contents of a hollow plastic egg, or getting a chocolate bunny, it was a day of celebration and joy. As an adult, Easter arrives with a depth of meaning but that undertone of childlike excitement still persists in my heart.

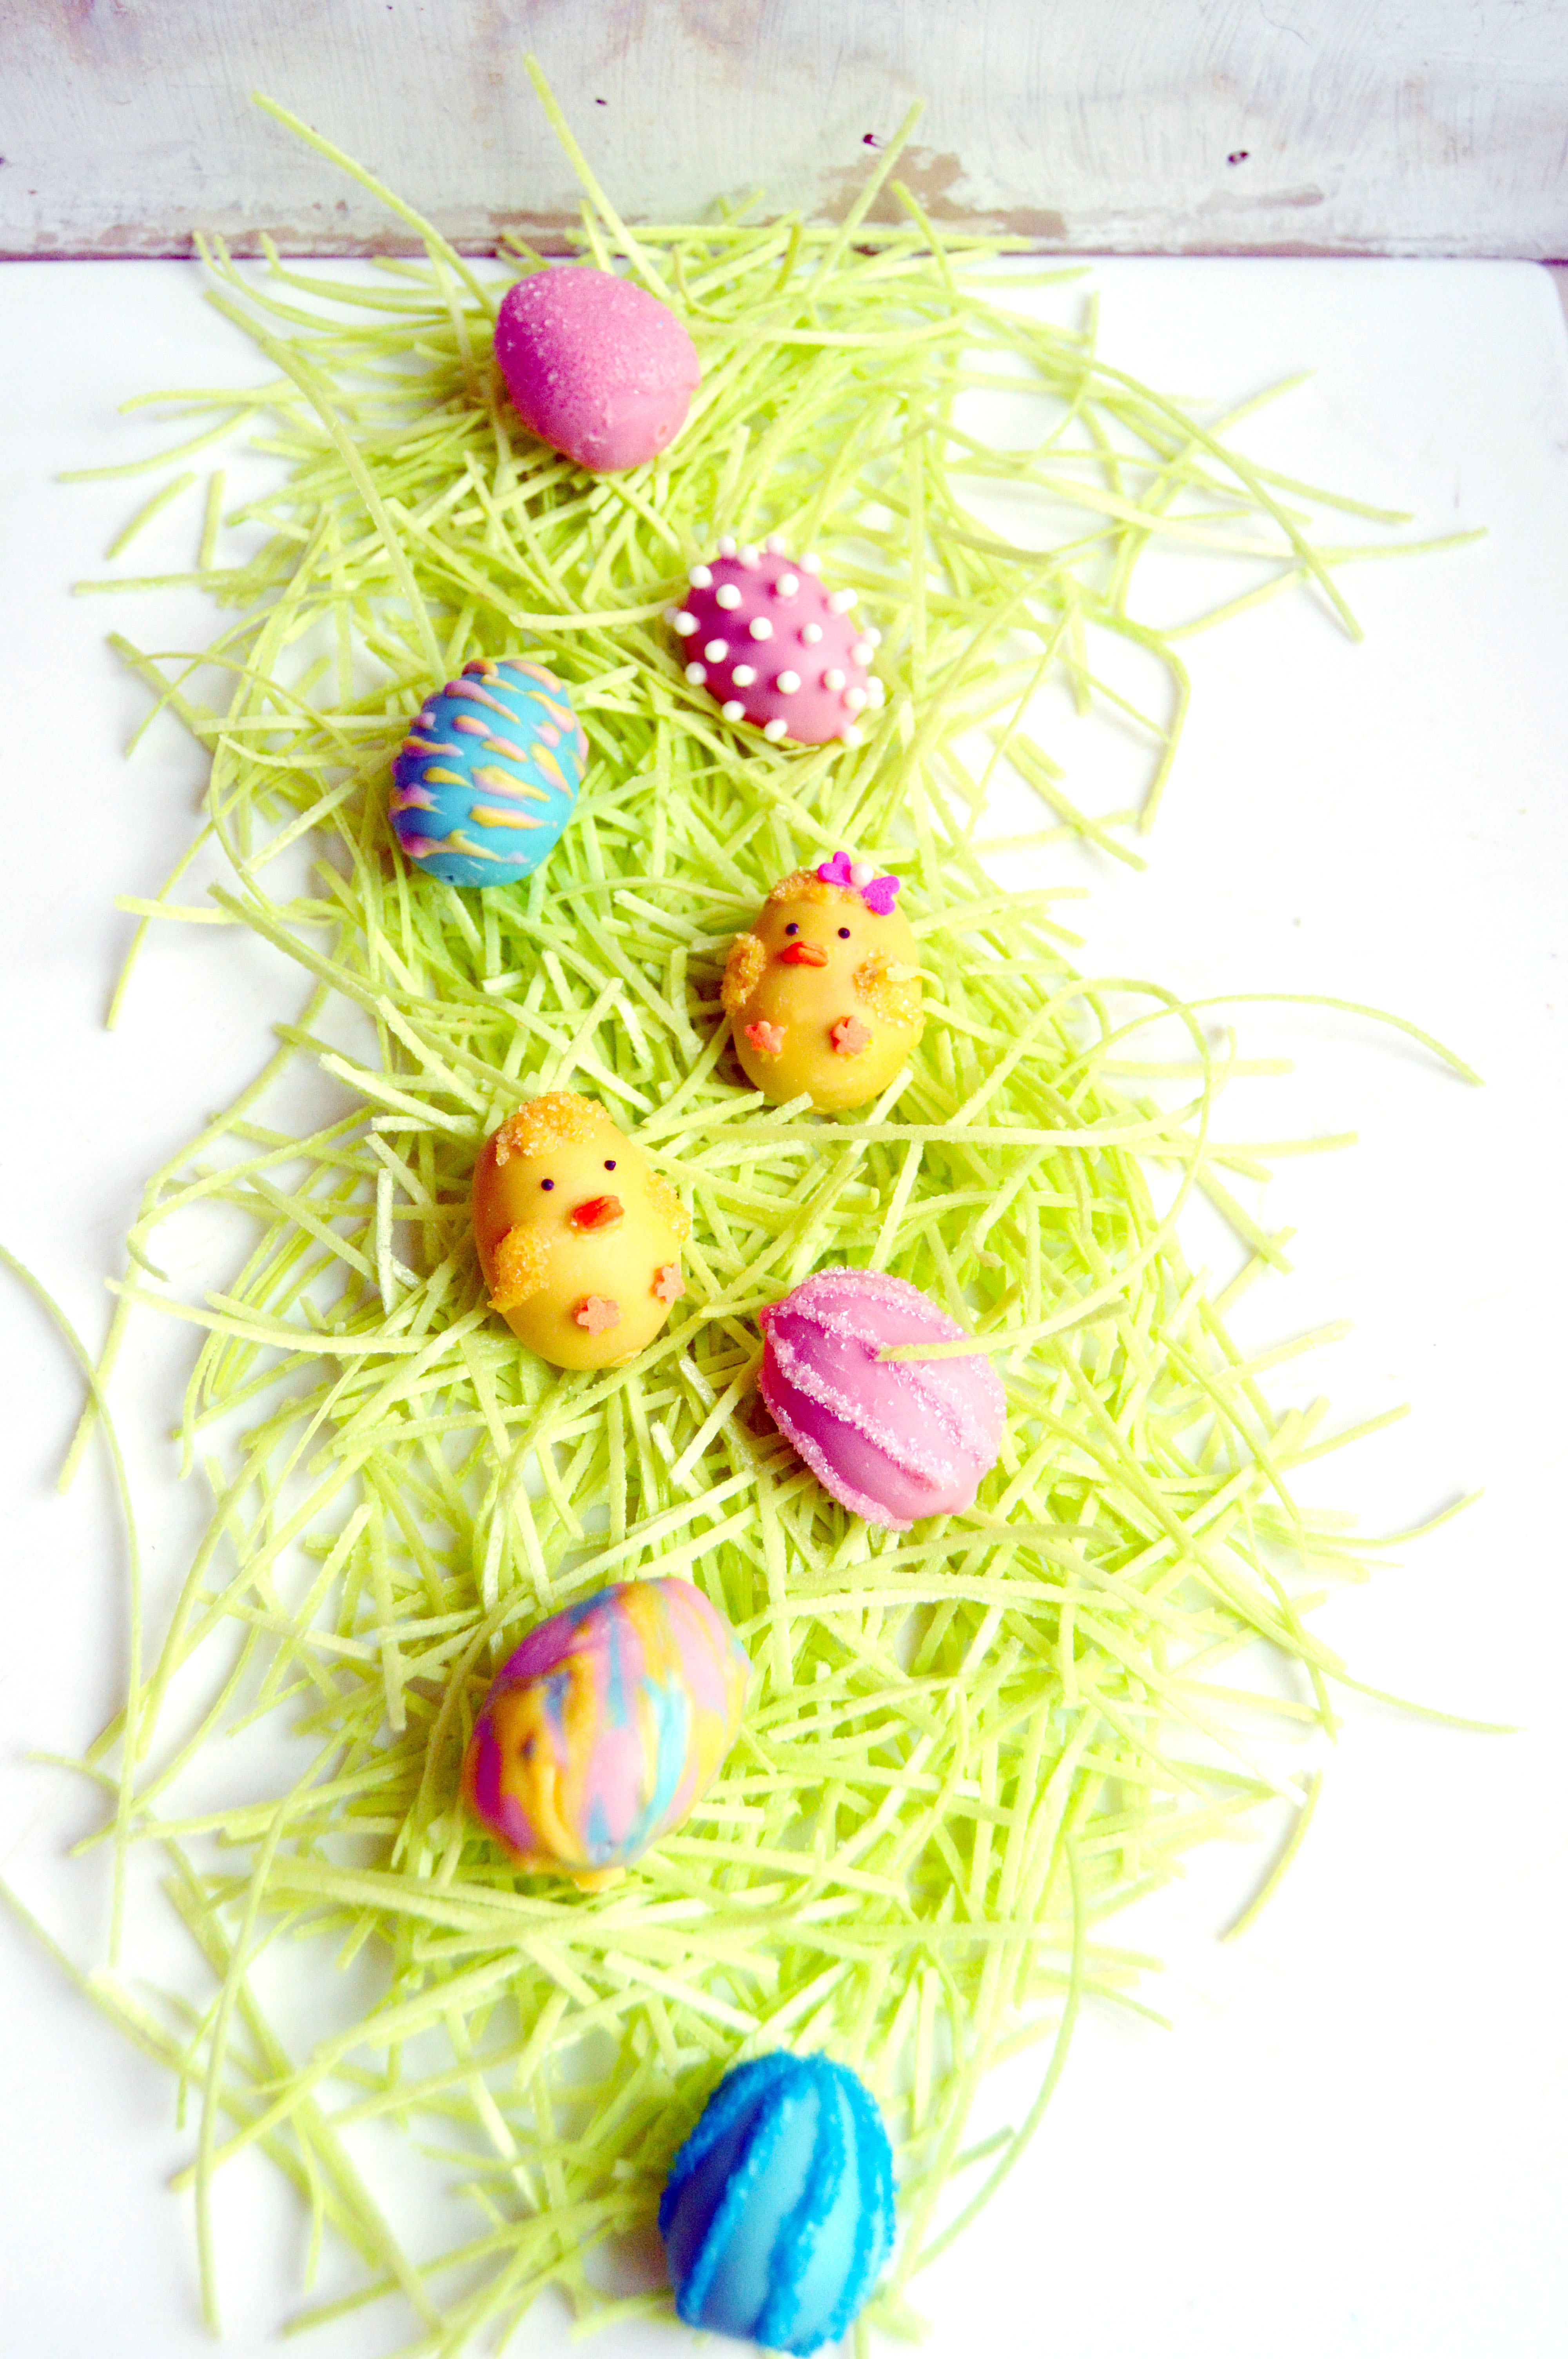
A year ago, faultline cakes became super popular. A cake that has a fracture in the center of a cake to display a fun interior was a novel design that took the Instagram world by storm. It was always an idea that I had pinned in the back of my mind but never got to try. So with Easter coming, it was natural to marry those ideas together. This faultline cake features super cute Easter sprinkles and pastel hued candy. The pastel candy against the yellow buttercream background cheers me up just by looking at it.

The cake itself is inspired by Momofuku’s carrot cake. It features a graham cracker frosting, their signature milk crumb, a cheesecake filling and a sunken in carrot cake that serves as a pie crust like layer for the filling. Is it a lot of work? Yes. Is it worth it? A resounding YES. If you prepare for the cake in advance and make each component a few days ahead, it’ll save you time and sanity.
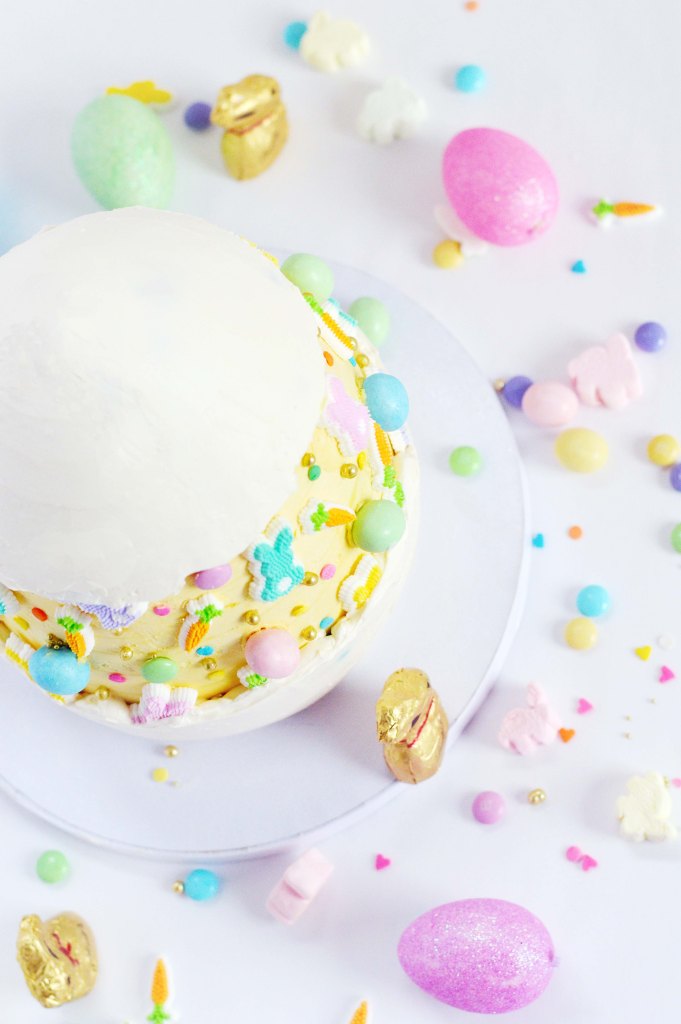
And yes, I had to shape the cake into an egg shape. The top of the cake is actually a molded cake ball out of all the cut scraps of the cake, so you don’t waste any of the delicious bits. Unlike a traditional cake that has more structure, this was not a clean cut project. You try your best to make it into an egg shape and stop cutting if you think you are shaving off too much. You can always add a bit more frosting to cover up your mistakes. But shaping the cake is an optional task. All of this is. If you want to just make the cake without decoration? That’s cool. If you want to decorate the cake without shaping it? That’s awesome. If you just want to bake the liquid cheesecake filling and eat it with a spoon? I caution you that it’s addictive and please, save me some. The point is, do what brings you the most joy and go with it. Happy Easter.

Easter Egg Faultline Cake (Milk Bar Carrot Cake)
You will need:
1 batch of carrot cake (recipe below)
1 batch of liquid cheesecake (recipe below)
1batch of milk crumbs (recipe below)
1 batch of graham frosting (recipe below)
1 batch of vanilla swiss meringue frosting, ¼ of the batch tinted yellow (recipe below)
assortment of Easter candies
5 inch cake board
thick straws
Assembly:
- On a cake board, place one 6-inch cake with the concave side facing up.
- Using an offset spatula spread a third of the liquid cheesecake in an even layer over the cake. The cake layer should now be a flat and even surface.
- Sprinkle one-third of the milk crumbs evenly over the cheesecake. Use the back of your hand to anchor them in place.
- Using an offset spatula spread an even layer of graham frosting taking care to smooth the edges of the cake.
- Chill cake until firm in freezer. About 10-20 minutes.
- Remove cake from freezer.
- Top the cake with the 7-inch cake with the concave side facing up.
- Fill with liquid cheesecake, and layer milk crumbs and graham frosting.
- Chill cake until firm in freezer. About 10-20 minutes.
- Remove cake from freezer.
- Place a 5 inch cake board in the center of the cake and trace outline of the cake board. Remove cake board.
- Mark halfway between the center of the cake and the center of the traced circle at the 12, 3, 6, and 9 o’clock position.
- Insert a straw into the 12 o’clock mark on the cake and snip the straw where the straw sticks out of the cake. Continue for the 3, 6, and 9 o’clock position.
- Place the 5 inch cake board back on the center of the cake. The cake is now stable and will not sink from the extra weight of the upper layers.
- Place one 6-inch cake with the concave side facing up.
- Fill with liquid cheesecake, and layer milk crumbs and graham frosting.
- Chill cake until firm in freezer. About 10-20 minutes.
- Remove cake from freezer.
- Top the cake with the 5-inch cake with the concave side facing up.
- Fill with liquid cheesecake, and layer milk crumbs and graham frosting.
- Chill cake until firm in freezer. About 10-20 minutes.
- Carve the cake to an egg like shape.
- Take the cake scraps, liquid cheesecake, and milk crumbs and mix to make a large cake ball. Add some graham frosting if the cake ball won’t hold together.
- Shape it to be the pointed part of the cake.
- Chill cake.
- Remove cake and crumb coat the entire cake with a thin layer of graham frosting.
- Chill cake.
- Remove cake and frost a thin, smooth layer of yellow buttercream in the center of the cake, and decorate the cake with sprinkles and candies.
- Chill cake.
- Remove cake and using a piping bag with a large, round decorating tip, pipe the upper and lower half of the cake as high as you desire.
- Scrape off the extra frosting with a cake scraper for a smooth finish.
- Enjoy.
For the Carrot Cake
Ingredients:
1 ½ c. vegetable oil
2 c. sugar
4 large eggs
2 c. all-purpose flour
2 tsp. baking powder
2 tsp. baking soda
1 tsp. salt
1 tsp. cinnamon
½ tsp. freshly ground nutmeg
3 cups finely grated, peeled carrots (about 1 pound)
Instructions:
- Preheat oven to 325˚F and grease and line your baking pans with parchment paper. If you are planning on making the cake egg shaped, bake your cake in one 5-inch pan, two 6-inch pans, and one 7-inch pan. If you are making a standard cake, use four 6-inch pans.
- In a medium bowl, whisk together flour, baking powder, baking soda, salt, cinnamon and nutmeg.
- In the bowl of a standing mixer fitted with a paddle attachment, beat the sugar and oil together on medium speed until combined. Add eggs, one at a time, mixing well after each egg.
- On low speed add the dry mixture and mix until just combined.
- Take the bowl off of the standing mixer and fold in the grated carrots.
- Divide the batter evenly into your prepared pans. (If you are using different sized pans, divide the batter so the batter comes up evenly amongst all the pans. So if it comes up ¼ way up the pan for 5-inch pan, it should also come up ¼ way up the side of your 6-inch pan). Bake about 20-25 minutes until the top is golden brown and until a toothpick poked in the middle comes out clean. Note: The cake will be sunken in the middle. This is done on purpose to have a pie crust-like cake for the filling.
- Cool cakes on cooling rack until ready to assemble.
For the Liquid Cheesecake
Ingredients:
16 oz. cream cheese, room temp
1 ½ c. sugar
2 tbsps. cornstarch
1 tsp. kosher salt
¼ c. milk
2 large eggs
Instructions:
- Heat the oven to 350° F.
- In a medium bowl, whisk together the cornstarch and salt. Whisk in the milk in a slow, steady stream, then whisk in the egg until homogenous.
- In the bowl of a stand mixer fitted with a paddle attachment, add the cream cheese and mix on low speed for 2 minutes. Scrape down the sides of the bowl with a spatula. Add the sugar and mix for 1 to 2 minutes, until the sugar has been completely incorporated.
- Turn the mixer to medium-low speed, and stream in the egg slurry. Mix for 3 to 4 minutes, until the mixture is smooth.
- Line the bottom and sides of an 8×8 inch baking pan with parchment paper. Pour the batter into the pan, put the pan in the oven, and bake for 20 minutes. Gently shake the pan. The cheesecake should be set on the outer edges of the baking pan but still wobble in the very center. If the cheesecake is not set at all, bake for 5 more minutes. Avoid browning the cheesecake at all. If it does brown, remove immediately.
- Cool the cheesecake on a wire rack. Once completely cool, it is ready for use. If making ahead of time, the cheesecake can be wrapped and stored in an airtight container in the fridge for up to 1 week.
For the Milk Crumb
Ingredients:
½ c. milk powder
¼ c. flour
2 tbsp. cornstarch
2 tbsp. sugar
½ tsp. kosher salt
4 tbsp. (½ stick) butter, melted
¼ c. milk powder
3 oz. (90g) white chocolate, melted
Instructions:
- Heat the oven to 250° F.
- Combine the ½ c. milk powder, the flour, cornstarch, sugar, and salt in a medium bowl. Add the melted butter and mix using a spatula, until the mixture starts to come together and form small clusters.
- Spread the clusters on a parchment- or Silpat-lined sheet pan and bake for 20 minutes. The crumbs should have sand like appearance. Cool the crumbs completely.
- Crumble any milk crumb clusters that are larger than ½ inch in diameter and put the crumbs in a medium bowl. Add the ¼ c. milk powder and toss together until it is evenly distributed throughout the mixtures.
- Pour the white chocolate over the crumbs and toss until your clusters are enrobed. Then continue tossing them every 5 minutes until the white chocolate hardens and the clusters are no longer sticky. The crumbs will keep in an airtight container in the fridge or freezer for up to 1 month.
For the Graham Frosting
Ingredients:
1 recipe Graham Crust
⅔ c. milk
¾ tsp. kosher salt
12 tbsp. butter, at room temperature
2 tbsp. light brown sugar, tightly packed
2 tbsp. confectioners’ sugar
1 tsp. ground cinnamon
¼ tsp. kosher salt
Instructions:
- Combine the graham crust, milk, and ¾ tsp. salt in a blender, turn the speed on to medium-high, and puree until smooth and homogenous. It will take 1 to 3 minutes.
- In the bowl of a stand mixer fitted with the paddle attachment, cream the butter, sugars, cinnamon, and ¼ tsp. on medium-high for 2 to 3 minutes, until fluffy and lighter in color. Scrape down the sides of the bowl with a spatula.
- On low speed, add in the graham mixture from blender. Mix on medium speed until the color is a uniform tan and silky smooth.
- Use the frosting immediately, or store it in an airtight container in the fridge for up to 1 week.
For the Graham Crust
Ingredients:
1½ c. graham cracker crumbs
¼ c. milk powder
2 tbsp. sugar
¾ tsp. kosher salt
4 tbsp. (½ stick) butter, melted, or as needed
¼ c. heavy cream
Instructions:
- In a medium bowl, add and mix the graham crumbs, milk powder, sugar, and salt.
- In a small bowl, whisk the butter and heavy cream together. Add to the dry ingredients and mix again to evenly distribute. The butter will act as a glue, adhering to the dry ingredients and turning the mixture into small clusters. The mixture should hold its shape if squeezed tightly in the palm of your hand. If it is not moist enough to do so, melt an additional 1 to 1½ tablespoons butter and mix it in.
- Eat immediately, or use as directed in a recipe. Stored in an airtight container, graham crust will keep fresh for 1 week at room temperature or for 1 month in the fridge or freezer.
For the Swiss Meringue Frosting
Ingredients:
1 ¼ c. sugar
5 large egg whites
2 c. (4 sticks) unsalted butter
2 tsp. vanilla extract
a pinch of kosher salt
Instructions:
- Bring a small pot filled with about an inch of water to a simmer.
- In a bowl of a standing mixer, whisk the egg whites, sugar, and salt together.
- Place the bowl on top of the pot and whisk continuously until the mixture becomes slightly foamy and you cannot feel the grittiness of the sugar, about 5-8 minutes. The mixture will be hot. Be careful.
- Move the bowl to the standing mixer fitted with the whisk attachment and whip the egg mixture until the bowl feels cool to the touch.
- Add in the butter, and continue to whip until a smooth buttercream forms.
- Add in the vanilla extract and continue to whip until incorporated.


 One of the best things about holidays is all the holiday themed candy that comes out on display. Packaged in brightly colored bags and interesting designs, they are already hard to pass by, but what makes me really want to buy them are the words, “limited edition”. What do they mean by limited edition? Am I going to see the same product next year or is this a once-in-a-lifetime opportunity? What if it is something absolutely delicious and I can never have it again? All of the sudden I HAVE to have whatever is in inside the shiny wrapper. I would say 9 out of 10 times I end up buying it to try it out. Am I the only person who is like this? … Possibly.
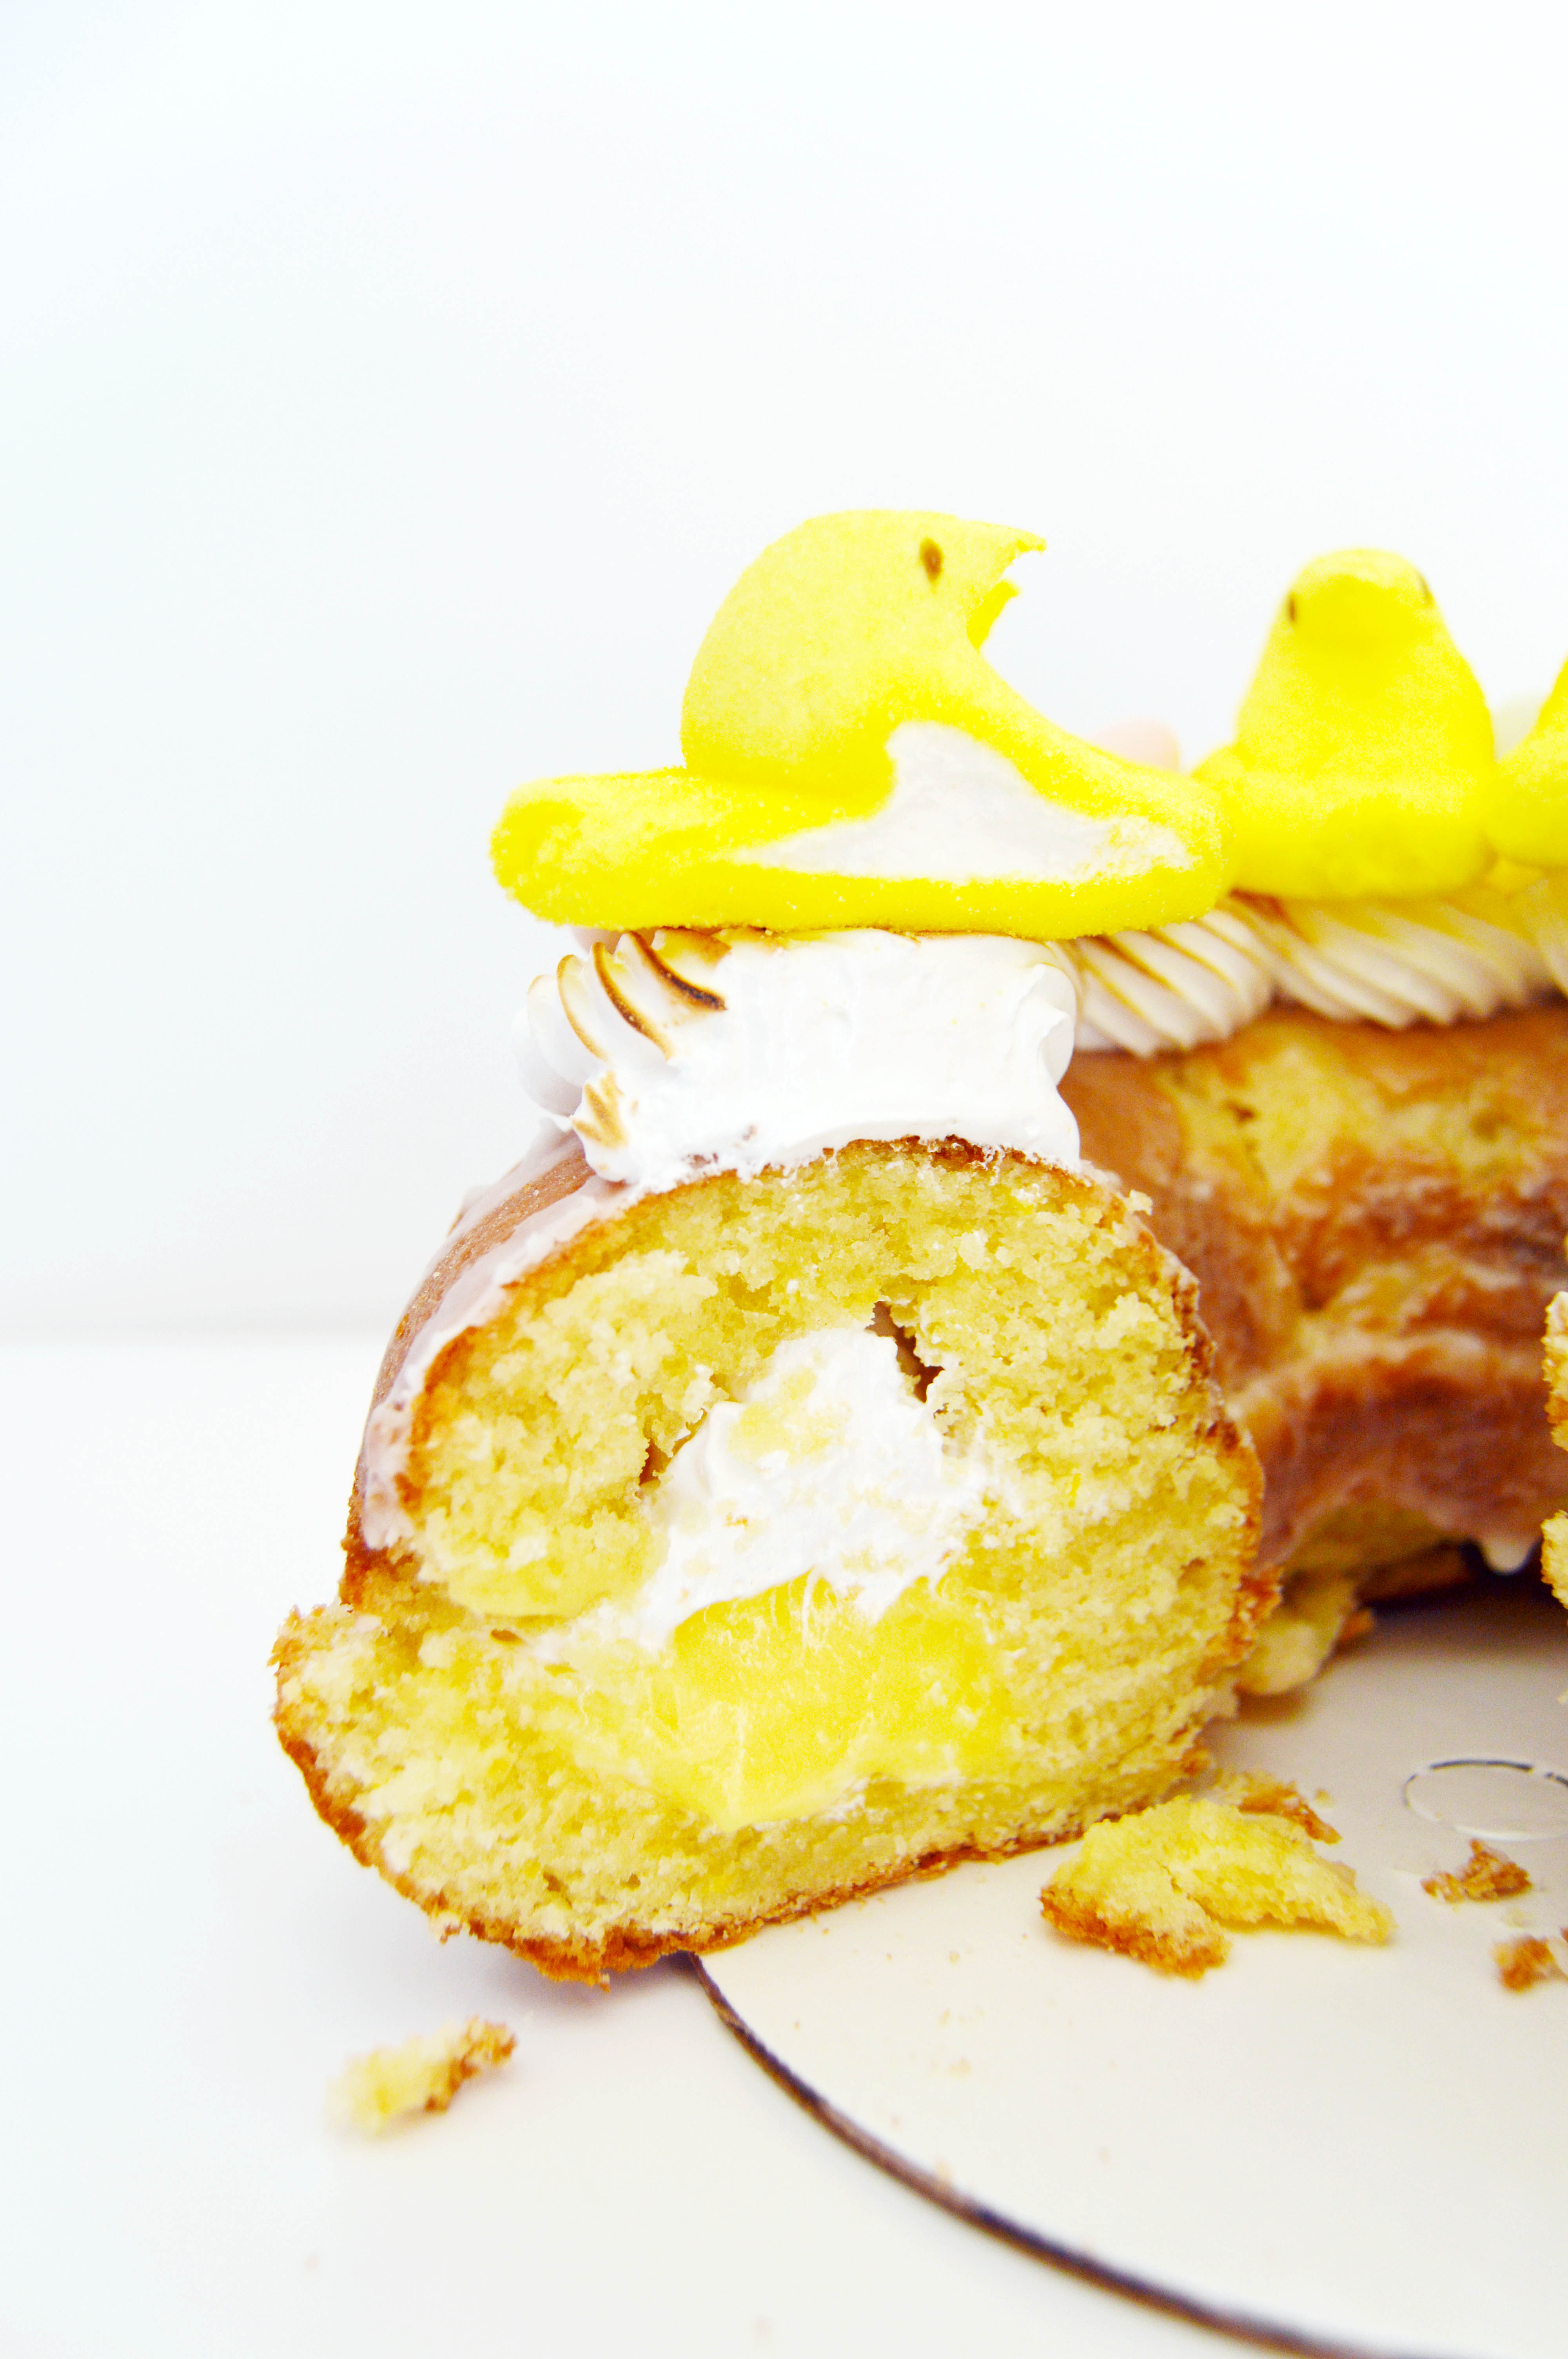
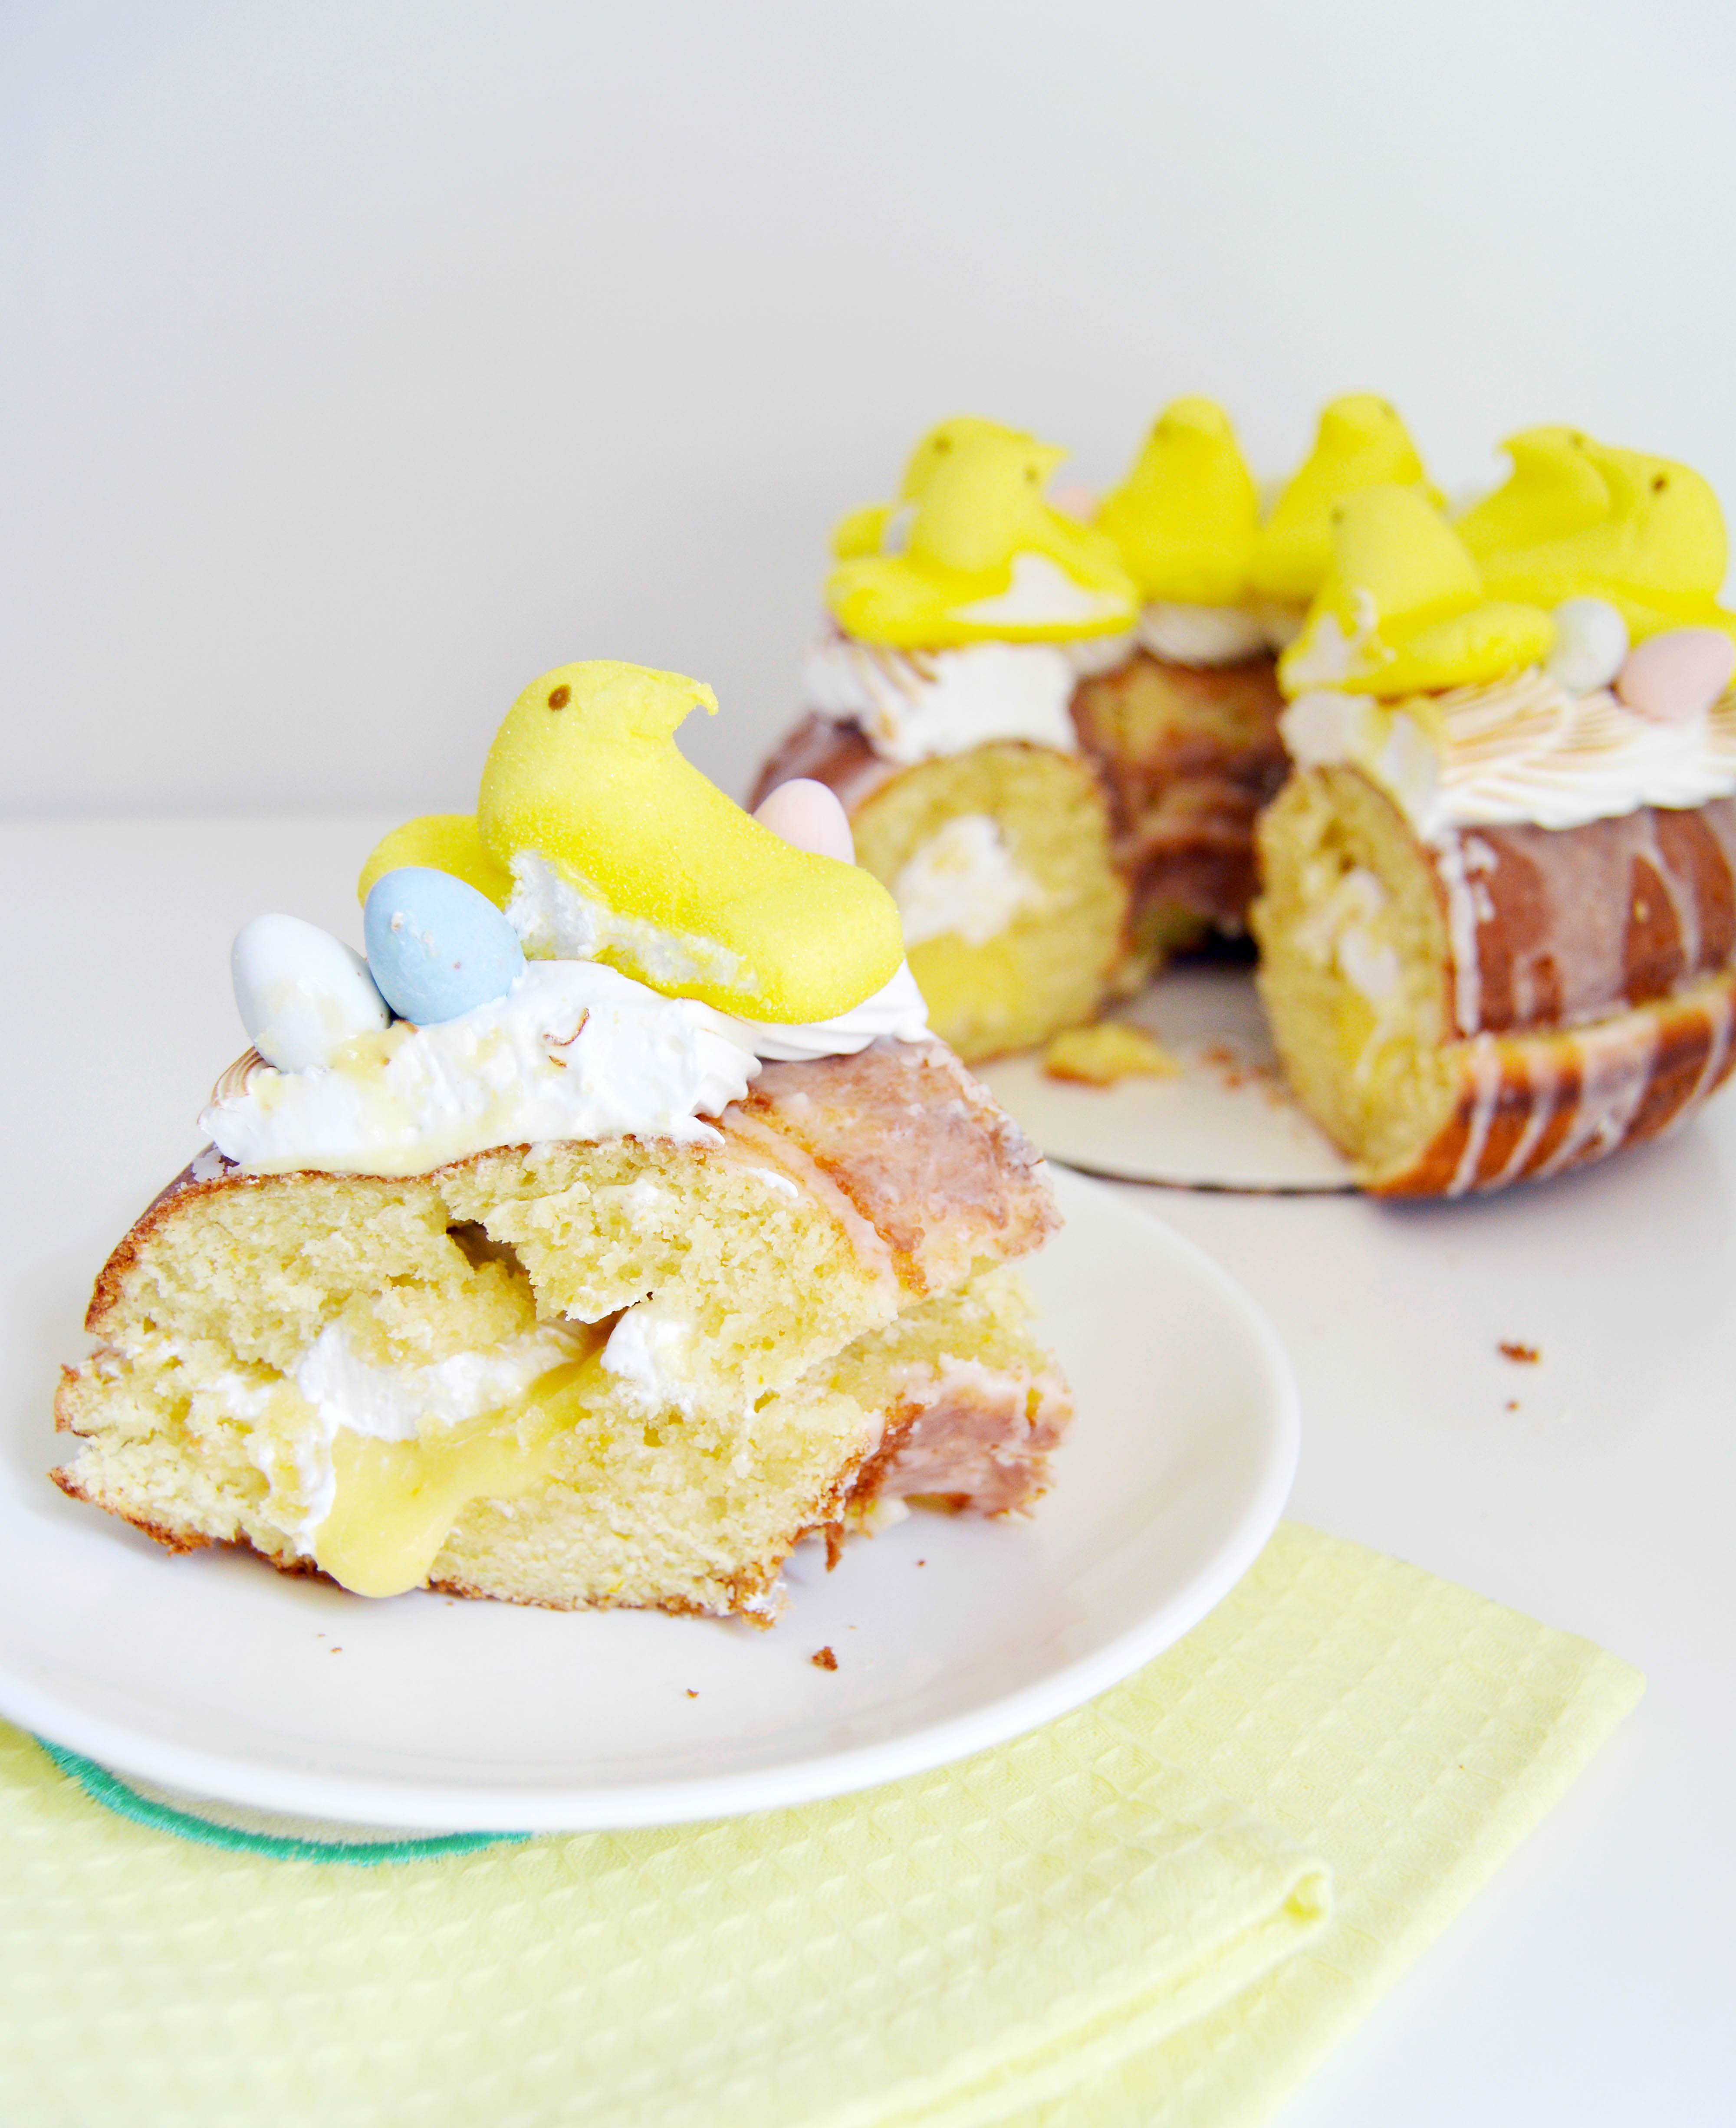
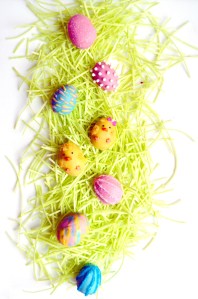 My #1 favorite Easter candy is the Reese’s peanut butter eggs. I think the ratio of the peanut filling to chocolate is just right and it is perfectly smooth without the thick ridges that the peanut butter cups have. The lazy side of me secretly likes the fact that I don’t have to unwrap each egg I consume (except for the initial packaging of course).

