Baymax Macarons

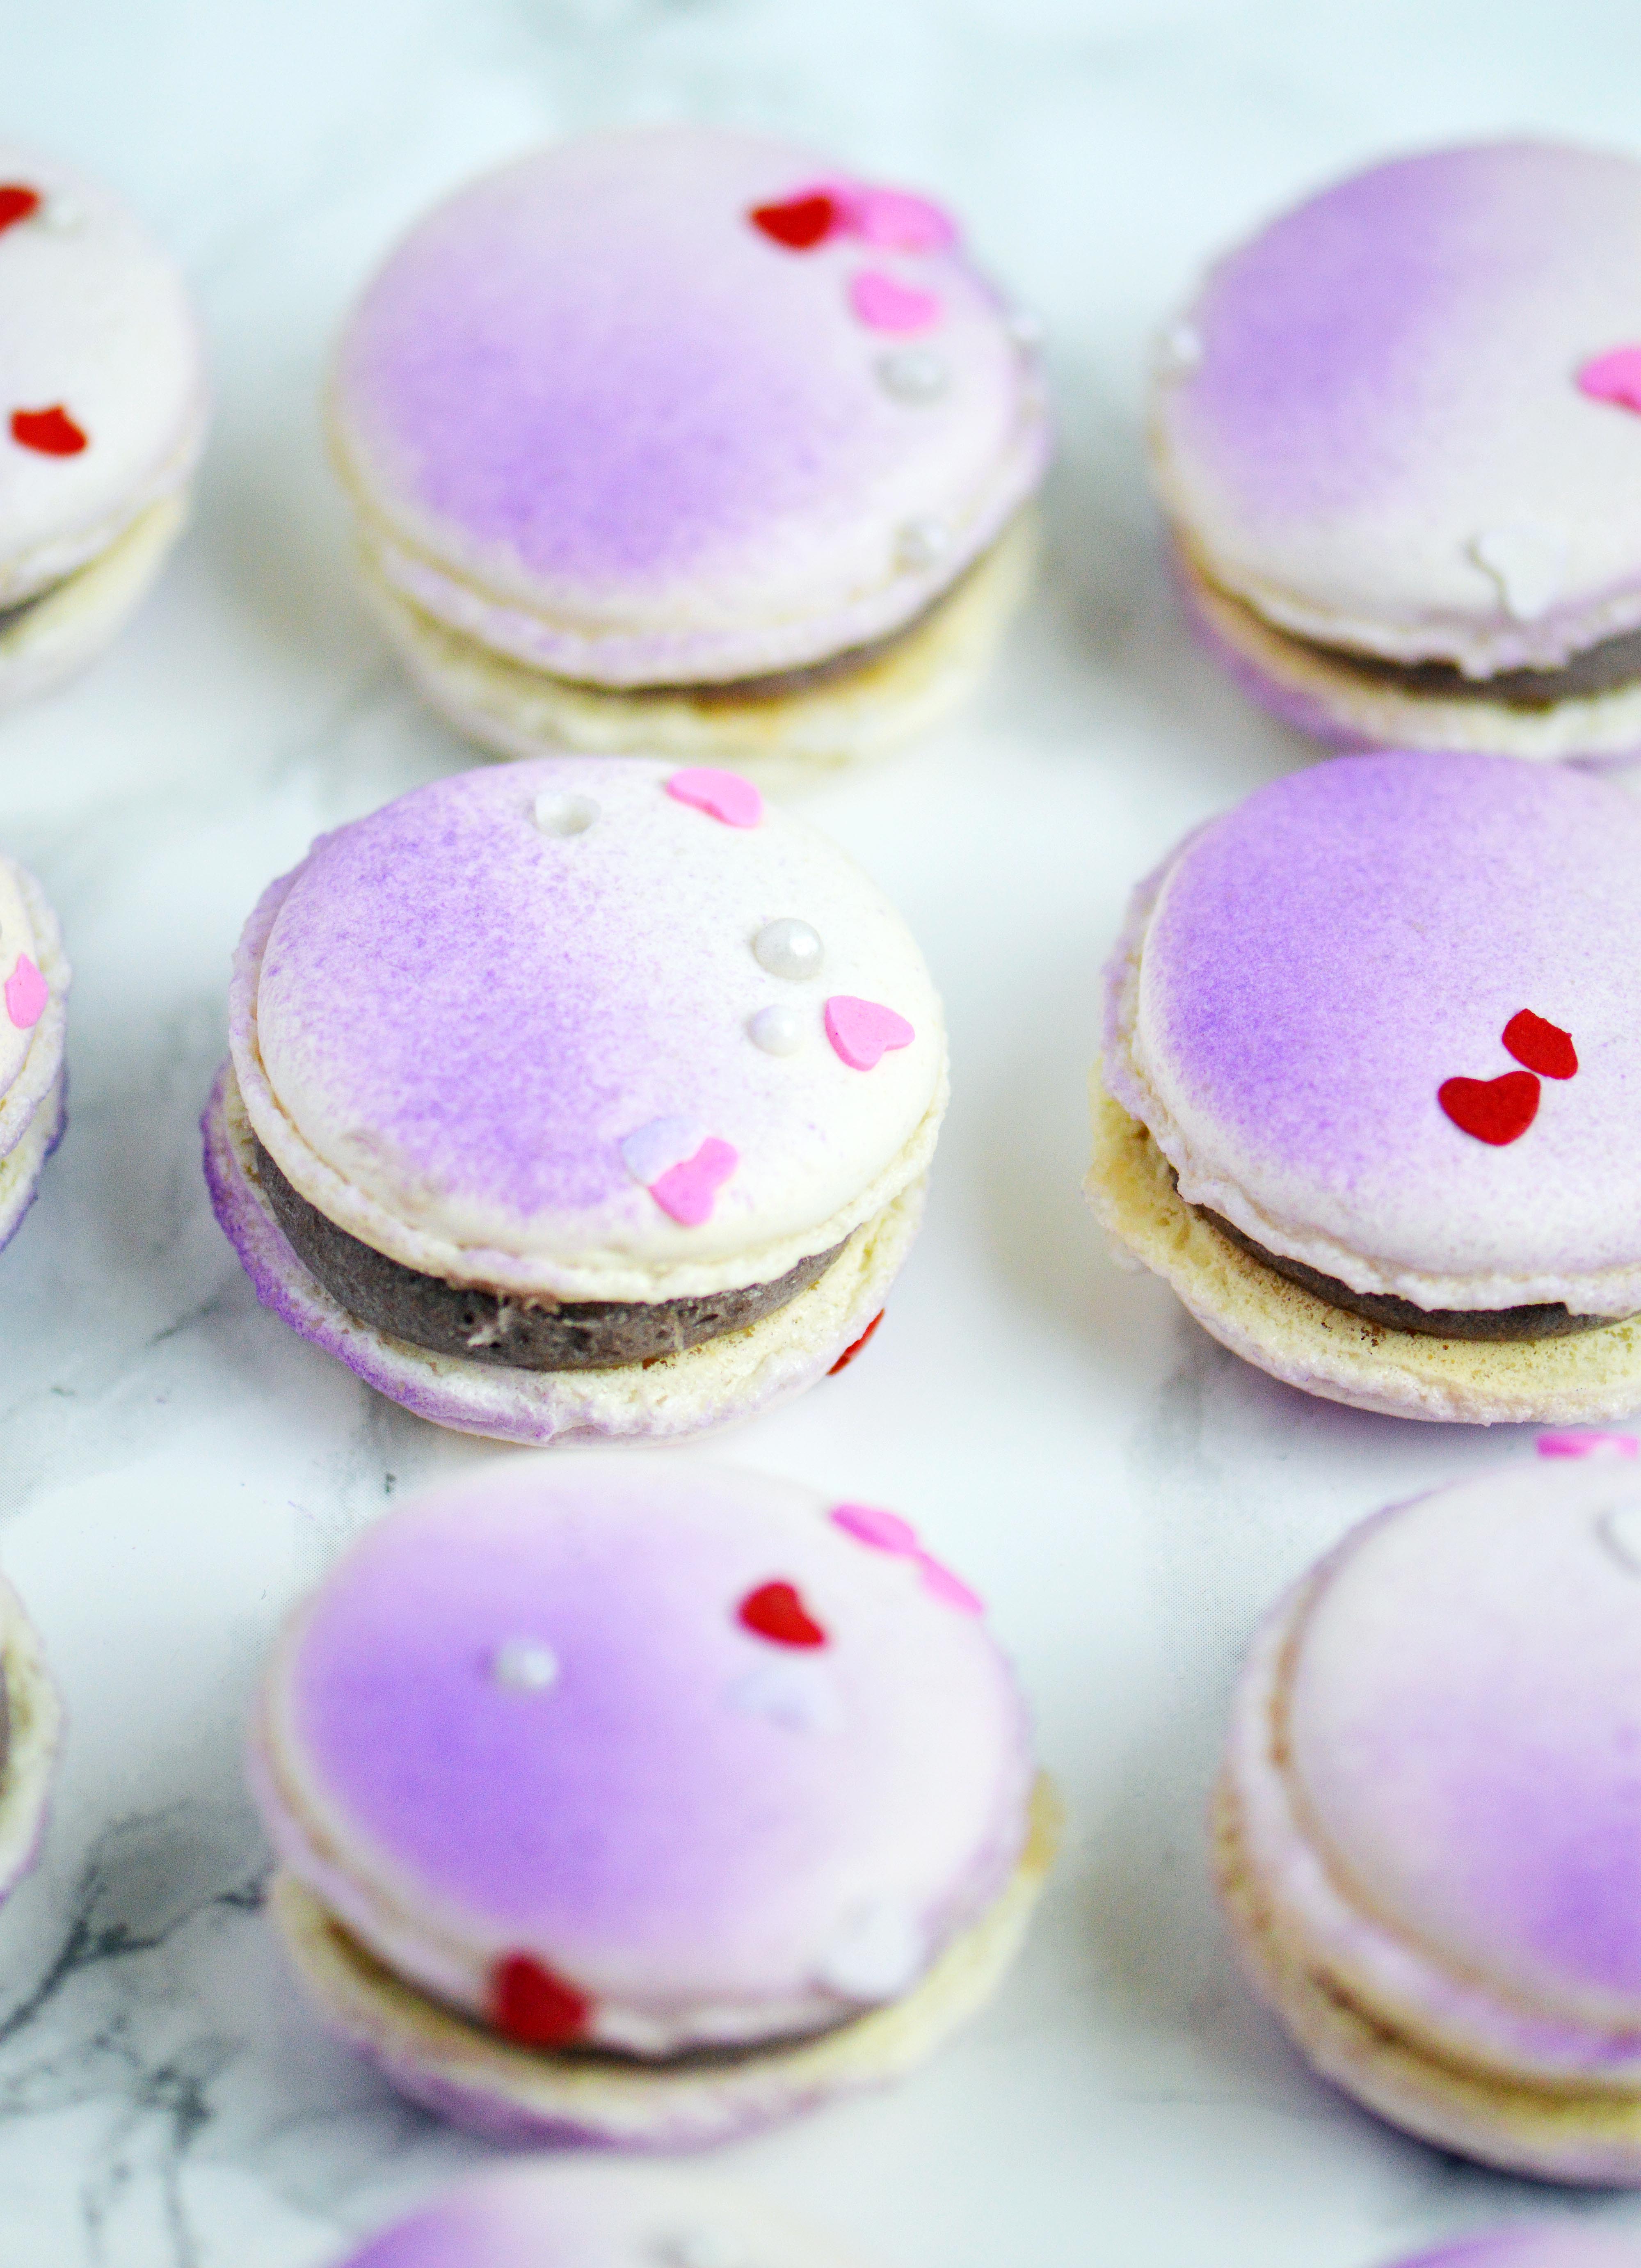
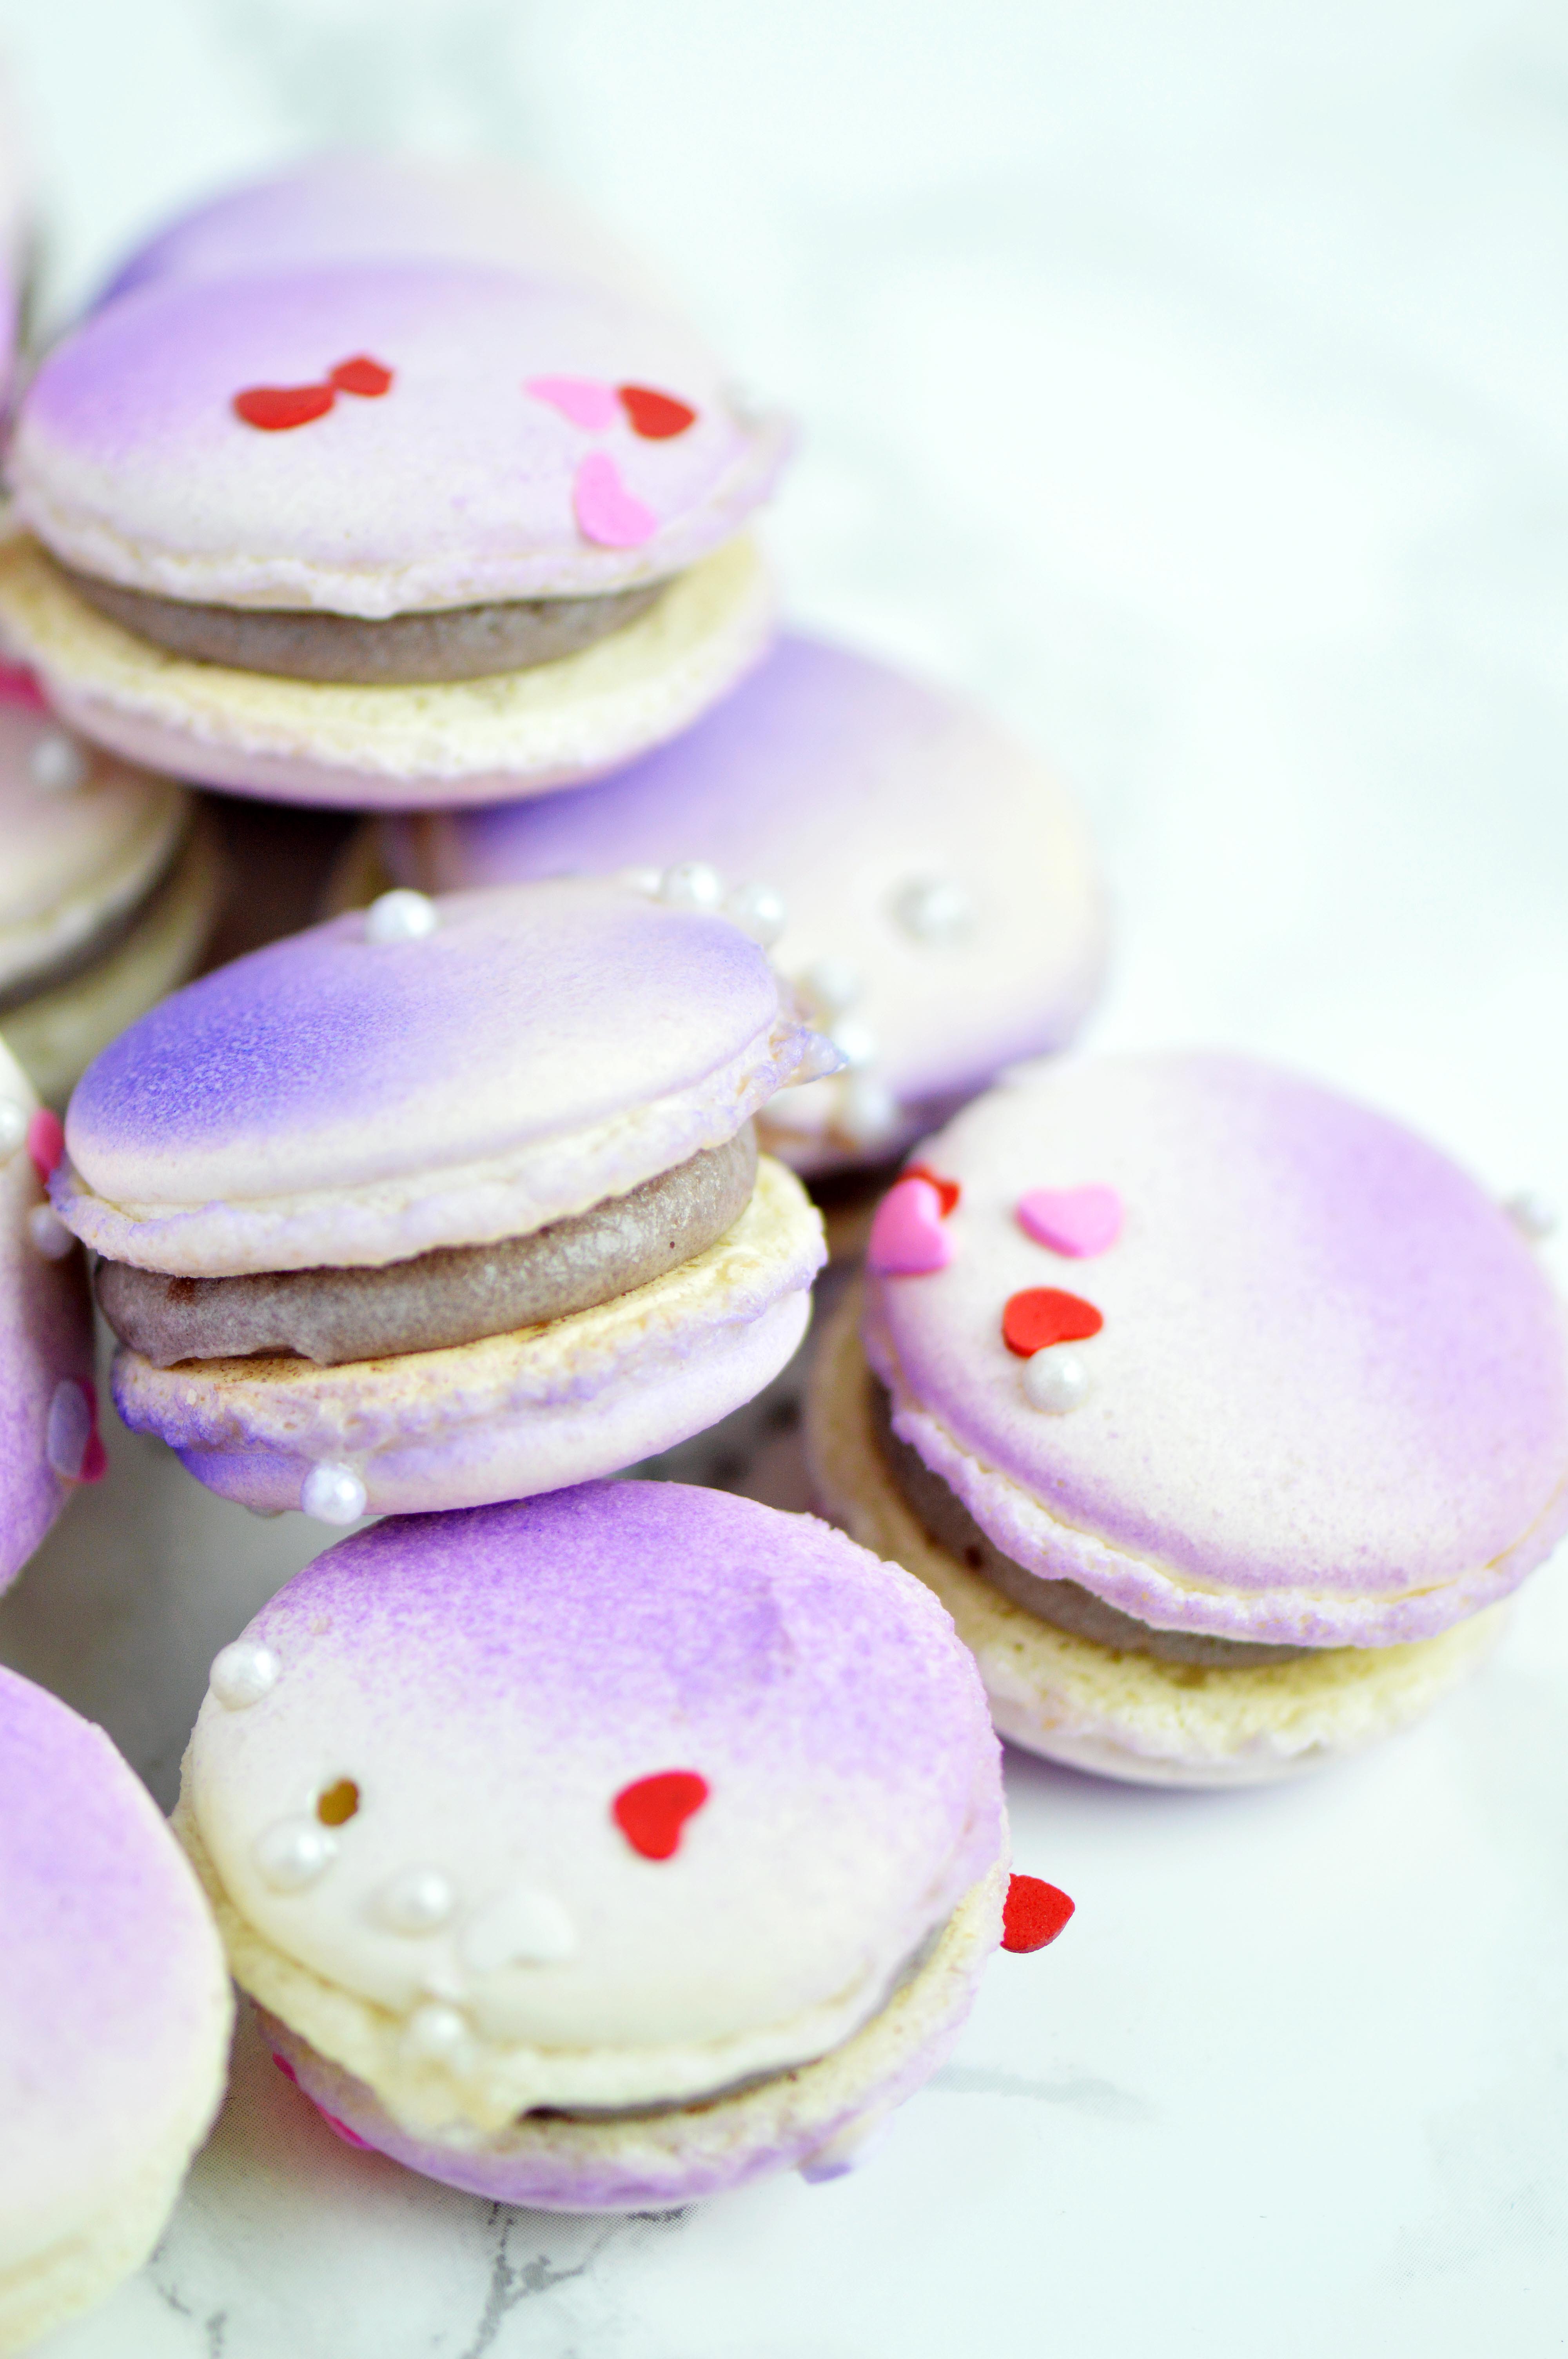
I’ve always been intimated by shaped macarons. If you look back on my archives, they’re mostly round with details added to them. But recently, I made Hello Kitty macarons and I learned that it is quite easy to do as long as you use a smaller piping tip. The key is understanding that macaron batter is not like frosting, it moves and doesn’t make crisp lines without help.
As you know, I have made Baymax macarons before, but never posted a tutorial on it. So this time, I added tiny hands to make it a little more dimensional and fun. I think that if you’ve made macaron batter before, then this is possibly the easiest shaped macaron you can do.
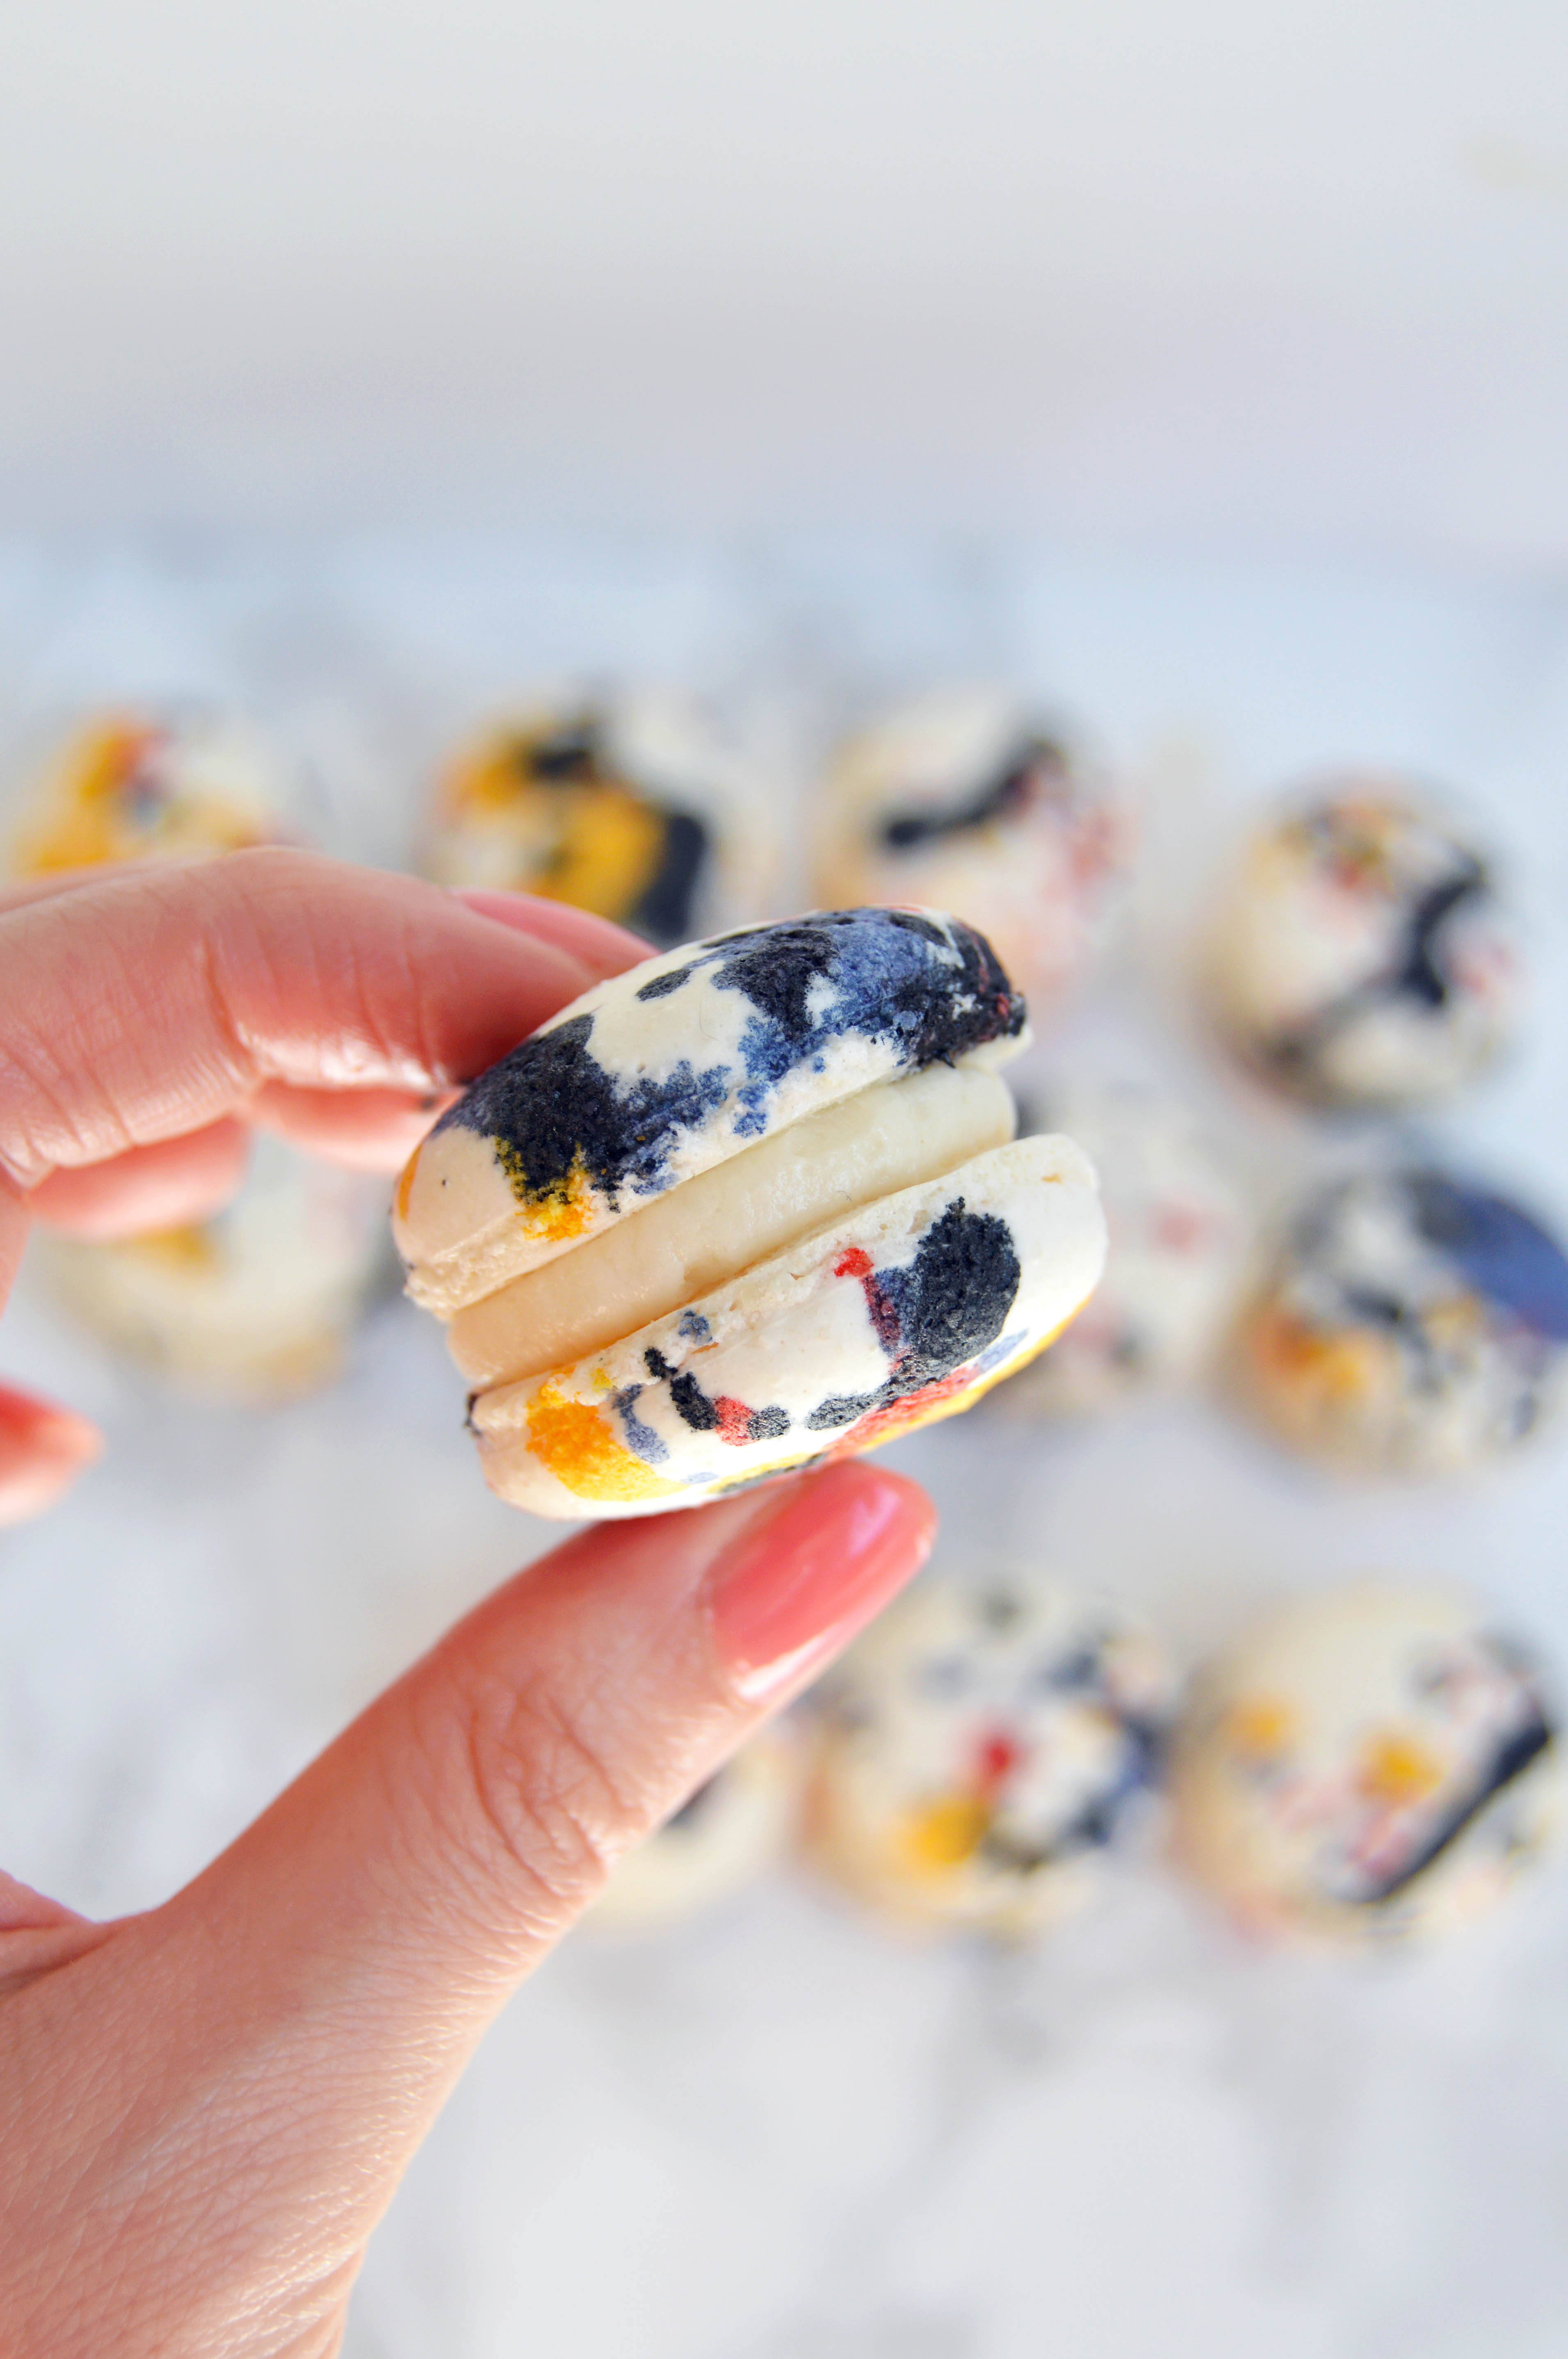
These were filled with black sesame frosting which was quite interesting, and have their own post coming up. But before I post that one,  I have an amazing chocolate banana bread recipe I want to share. So there is something to look forward to soon!

Baymax Macarons

You will need:

1 batch of basic macaron batter (recipe below)
frosting
edible black marker
wilton decorating tip, #2 (or any tiny round tip)
½ inch round decorating tip

Instructions:

  1. Prepare two piping bags each fitted with the ½ inch round tip and the #2 tip.
  2. Divide ⅞ of the batter into the ½ inch round tip bag and ⅛ of the batter into the #2 tip bag.
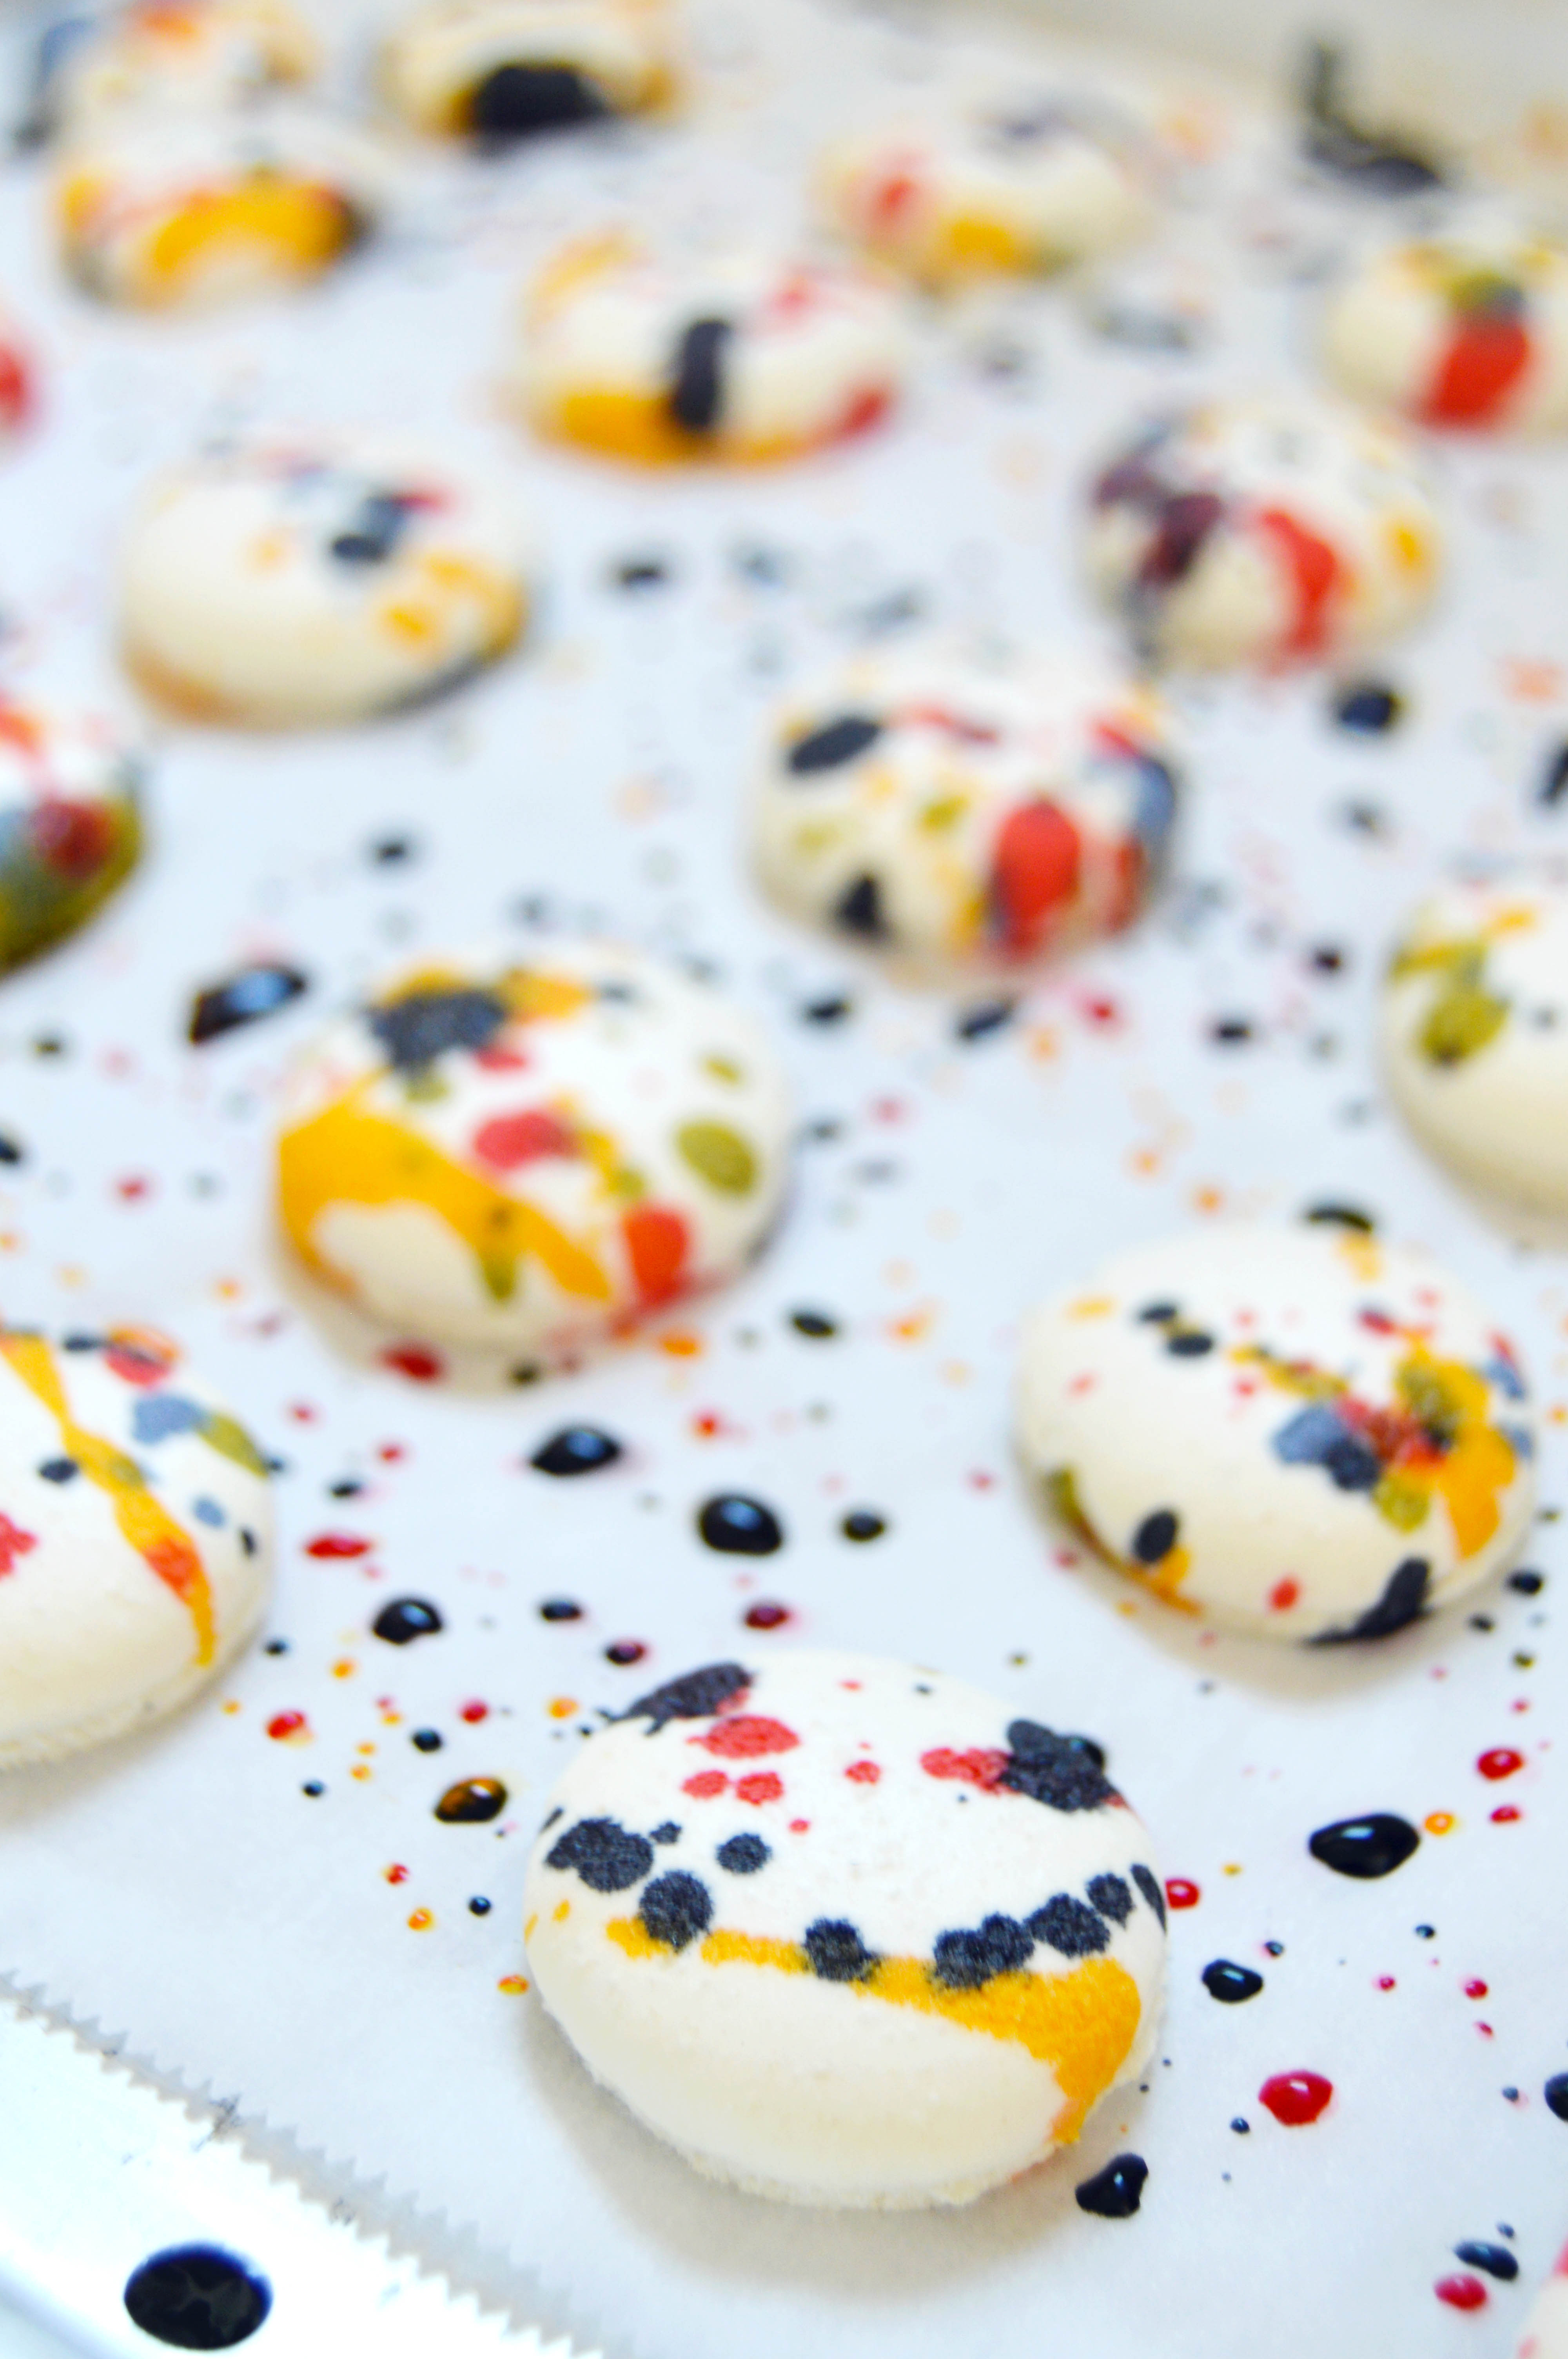
  3. On a baking sheet lined with a macaron template and parchment paper, pipe rounds of macarons as you usually would with the ½ inch round tip bag. (as shown in picture #1)
  4. Let the macarons set until dry, about 20 minutes. Then pipe tiny rounds on the bottom half of the macaron circles forming hands with the #2 tip bag. (as shown in picture #2)
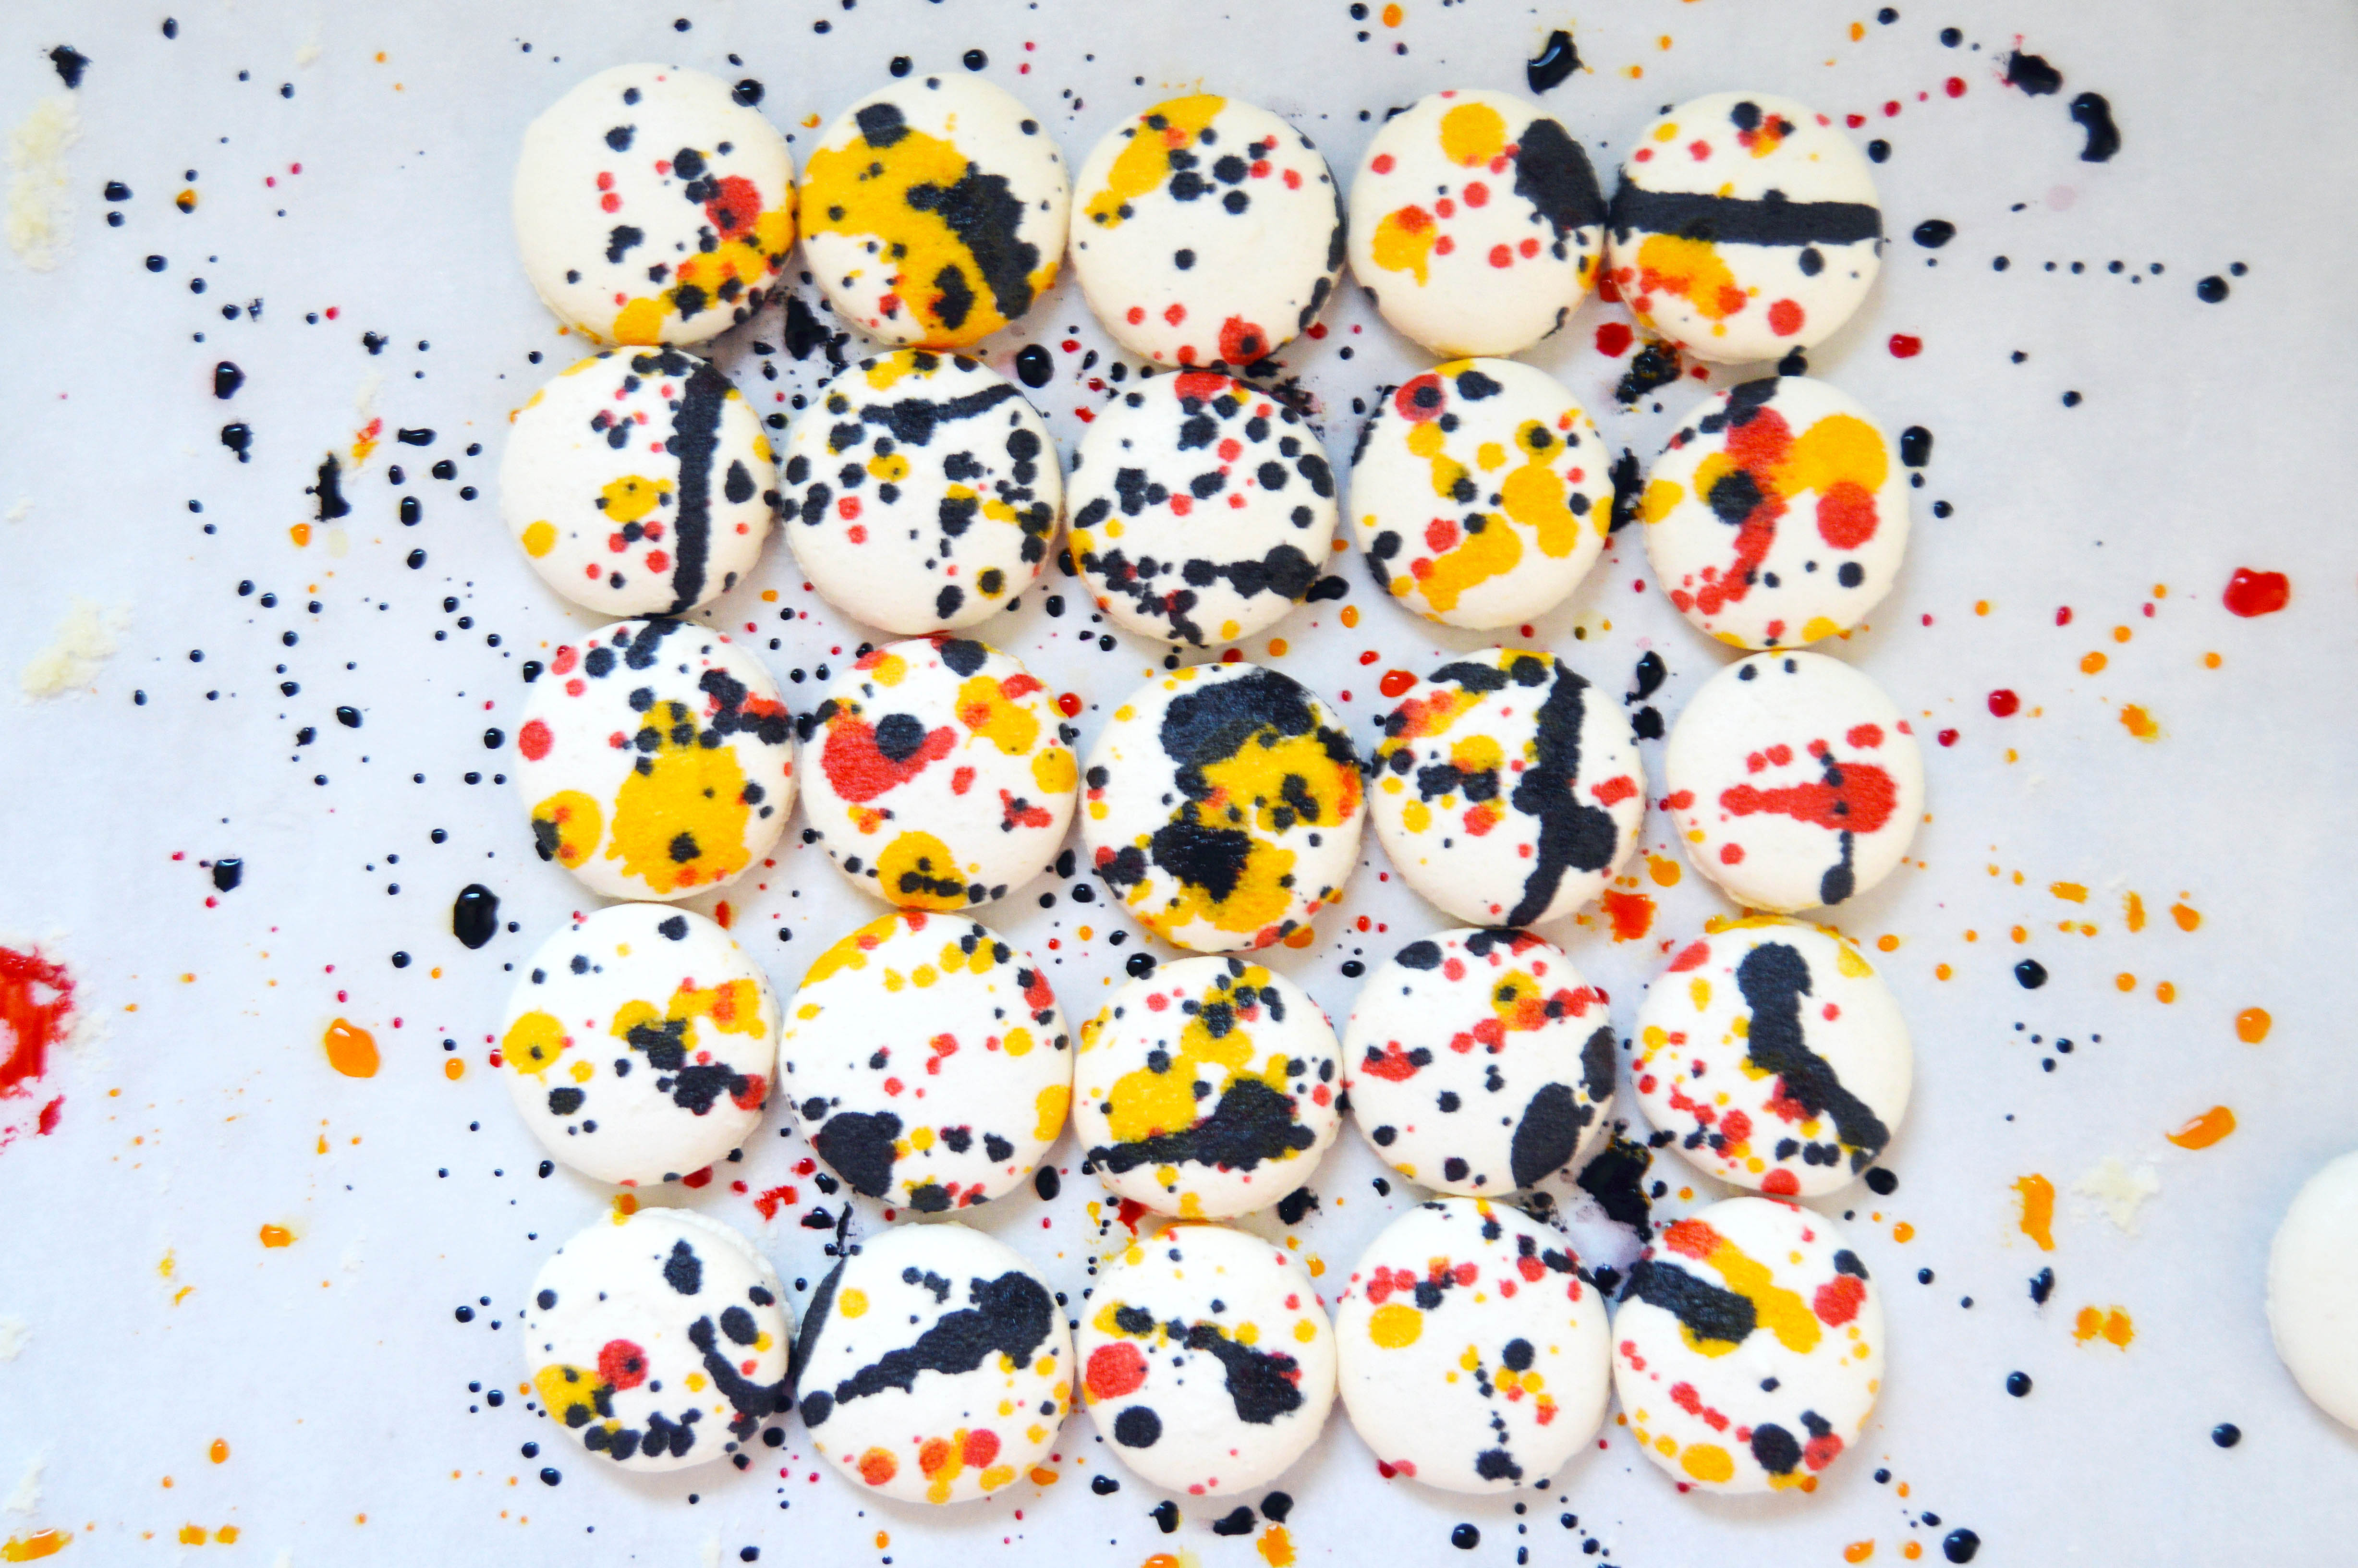
  5. Bake macarons as usual. (as shown in picture #3)
  6. Once cool, find a match for each macaron sandwich. Sometimes the hands will not line up perfectly, that is okay.
  7. Using an edible marker, make two dots and a line in the middle forming Baymax’s face. (as shown in picture #4)
  8. Fill each half with frosting and sandwich together.
  9. Enjoy

Basic Macaron Batter

Ingredients:

212 g. almond meal (aka almond flour)
212 g. powdered sugar
172 g. egg whites, divided to 82 g. and 90 g (aged, if possible)
236 g. sugar
158 g. water

Instructions:

  1. Line two baking sheets with parchment paper or silicone mats.
  2. In the bowl of a food processor, add the almond meal and powdered sugar and pulse until thoroughly combined.
  3. Sift the mixture over a large mixing bowl, throwing out the lumps as they appear.  Add 82 g. of the egg whites and stir until you get a thick mixture.
  4. In a small pot attached with a candy thermometer, combine the sugar and water over medium heat and boil until the syrup reaches 200˚F.
  5. Once the syrup reaches 200˚F, start whipping the remaining 90 g. in the bowl of your stand mixer with the whisk attachment on medium speed until soft peaks are reached.
  6. Once the syrup reaches 248 ˚F, remove the pot off the burner and slowly pour the syrup down the side of the mixing bowl with the egg whites on medium speed.
  7. Once the egg whites are fully incorporated, increase the speed to medium high until egg whites form glossy, stiff peaks.
  8. Mix a ⅓ of the egg white mix to the almond mixture and stir together until the batter is slightly lighter and less pasty.  From then on, fold in ⅓ of the egg white mixture at a time until the mixture “flows like magma”.  The mixture should be smooth and run thick ribbons off the spatula.
  9. With a pastry bag fitted with a ½ in. plain tip, pipe 1¼ – 1½ in. rounds.
  10. The piped batter may have peaks but should smooth away in a minute or two.
  11. Let the batter stand until the tops of the macarons are dry to the touch, about 30 minutes to 1 hour.
  12. Preheat the oven to 325-350˚F.  If your oven tends to run hot go for 325˚F, if not then 350˚F.
  13. Lower the heat to from 350˚F to 300˚F. (If starting from 325˚F, lower to 275˚F.)
  14. Bake 10-12 minutes, until the feet are formed and the tops are smooth.  The macaron shell is done when you slightly wiggle it and it starts to come off of the parchment paper / silicone mat.
  15. Remove pan from oven and reheat oven to higher temperature for 10 minutes before baking the next tray, lowering the temperature when you start baking it.
  16. Continue until you bake all of the macaron shells.


Okinawan Sweet Potato Macarons

Okinawan Sweet Potato MacaronsThere isn’t much that I remember about living in Seoul, South Korea as a little girl. But one memory that lingers after all these years is how the streets were perfumed with the scent of roasted sweet potatoes in the winter. I don’t know how it is now, but back then the streets were filled with carts that sold perfectly roasted sweet potatoes. Roasted Korean sweet potatoes are very different from their American counterpart. They are insanely sweet and the flavor is chestnut-like. And unlike American sweet potatoes, they don’t get watery. Instead, they are more fibrous and hold their shape when peeled. For many years, I’ve tried to recapture that memory by roasting Korean sweet potatoes in my oven. The smell was spot on, but I couldn’t get that same roasted taste that I remembered.
Okinawan Sweet Potato MacaronsThere is a Korean market that I stop by for snacks when I’m at my local Laundromat. If you stop by in the colder months, there is a small machine that churns out roasted sweet potatoes and the whole store smells has that warm roasty toasty smell. Anyways, after having one that was properly roasted, I became obsessed with trying to recreate it at home and scoured the internet on how to do it. I finally came upon a blog that featured this pot and after finding it in a Korean supermarket (It’s so much cheaper. I got it for less than $20 because it was on sale), I gave it a try and I finally reached sweet potato nirvana. Tip: The instructions say to roast on medium heat for 20-30 minutes but I found that roasting for about an hour on low heat produces the best results.
Okinawan Sweet Potato MacaronsArmed with my new roasting pot, I wanted to feature sweet potatoes differently and made these macarons. Purple sweet potatoes are just as sweet but not as flavorful as their yellow cousins. However, I couldn’t resist their beautiful purple flesh. I suppose I could’ve made the frosting a vibrant purple by adding a little food dye, but I wanted you to be able to see what it would look like without it. The best part about the frosting is that it takes just one stick of butter and about ¾ cup of powdered sugar (which just might be perfect for filling cakes for babies since you are using minimal sugar).
Okinawan Sweet Potato MacaronsCan you tell that I originally made these for Valentine’s Day? The purple ombre effect is easy to achieve by using an edible food color spray can. They’re easy enough to find on amazon. You want to be careful to be light handed or you will end up spraying the entire macaron purple. This is especially true if your spray can is new. There are so many options out there, I feel like you have a rainbow at your fingertips and it’s an easy way to spruce up a plain macaron.
Okinawan Sweet Potato MacaronsEven if you don’t decorate it, they’re definitely worth giving a try and best eaten within two days. Since the frosting has low butter/sugar content, it will turn your macarons soggy as the days go by.

Okinawan Sweet Potato Macarons

For the macaron shells:

Ingredients:
212 g. almond meal
212 g. powdered sugar
172 g. egg whites, divided to 82 g. and 90 g
236 g. sugar
158 g. water
purple edible spray paint
heart sprinkles
white pearl sprinkles

Instructions:

  1. Line two baking sheets with parchment paper or silicone mats.
  2. In the bowl of a food processor, add the almond meal and powdered sugar and pulse until thoroughly combined.
  3. Sift the mixture over a large mixing bowl, throwing out the lumps as they appear.  Add 82 g. of the egg whites and stir until you get a thick mixture.
  4. In a small pot attached with a candy thermometer, combine the sugar and water over medium heat and boil until the syrup reaches 200˚F.
  5. Once the syrup reaches 200˚F, start whipping the remaining 90 g. in the bowl of your stand mixer with the whisk attachment on medium speed until soft peaks are reached.
  6. Once the syrup reaches 248 degrees, remove the pot off the burner and slowly pour the syrup down the side of the mixing bowl with the egg whites on medium speed.
  7. Once the egg whites are fully incorporated, increase the speed to medium high until egg whites form glossy, stiff peaks
  8. Mix ⅓ of the egg white mix to the almond mixture and stir together until the batter is slightly lighter and less pasty.  From then on, fold in ⅓ of the egg white mixture twice until the mixture “flows like magma”.  The mixture should be smooth and run thick ribbons off the spatula.
  9. Fill batter in a pastry bag fitted with a ½ in. plain tip.
  10. The piped batter may have peaks but should smooth away in a minute or two. Sprinkle the top of the macaron batter with the pearl and heart sprinkles. Let the batter stand until the tops of the macaron batter are dry to the touch, about 30 mins to 1 hour.
  11. Preheat the oven to 350˚F.
  12. Once you place the macarons in the oven, reduce the heat to 300˚F. Bake 10-13 minutes, until the feet are formed and the tops are smooth.  The macarons are done when you slightly wiggle them and they start to come off of the parchment paper / silicone mat.
  13. Once you remove the macarons, reheat the oven to 350˚F for ten minutes before baking another pan of macarons at 300˚F.
  14. Once the shells are cool, spray one side of the macarons lightly about 7 inches away from the surface. Fill with frosting.

Okinawan Sweet Potato Frosting

Ingredients:
1 ½ lb Okinawan sweet potatoes, roasted (about 3 medium potatoes)
4 oz. (one stick) unsalted butter
¾ – 1 c. powdered sugar

Instructions:

  1. Peel the outer skin of the sweet potatoes and put them the food processor.
  2. Puree the sweet potatoes until very smooth and silky. Set aside.
  3. In a bowl of a standing mixer fitted with the whisk attachment, whip the butter until light and fluffy.
  4. Add in ¾ c. of the powdered sugar and the sweet potato puree and whip until a smooth frosting forms. If not sweet enough, add the remaining ¼ c. powdered sugar and whip until smooth. Fill the macarons.

2016: A Year Recap

This was my #1 post this year.

I’m not sorry to see 2016 go. I kind of felt like it could be salvaged until Carrie Fisher died. That kind of gave it the nail in the coffin. It was as if 2016 was saying, “Sayonara, sucker!” while waving a rude gesture. I’m not quite looking forward to 2017 either, the exception being that I am looking forward to creating more projects for you and sharing this and that about my life (hopefully good news, and not bad). By the way, I did finish the holiday cake I was raving about in my last post. Unfortunately, I came down with a severe case of sinusitis and I couldn’t work on the actual post. I think I will save it for 2017. (Side note: I hope unicorns are still relevant by this point next year.)

top posts 2016

Here are the top 10 posts from this year:

  1. Lucky Charms Cake (featured in beginning of post)
  2. Blueberry Cruffins (Croissant + Muffin)
  3. Paw Patrol Cake
  4. Bacon Wrapped Meatloaf with Brown Sugar Ketchup Glaze
  5. Red Velvet Rose Pavlova
  6. Strawberry Ombre Cake
  7. Conversation Heart Macarons with Vanilla Elderflower Frosting
  8. Croquembouche with Vanilla Orange Blossom Pastry Cream
  9. Star Wars Mini Doughnuts – Part 1 & 2
  10. Calcifer Meringues

As always, thank you for sticking with me. I mean every word of it.

Raspberry Rosé Macarons

Raspberry Rosé MacaronSummer is quickly nearing its end and I felt like I had to make something “summer” before it became too late. When I look back on the summer of 2016, I would have to say that it was the summer of rosé. The internet has been buzzing with things from made from rosé such as frozé (frozen, slushy like rosé) and rosé gummy bears with thousands of people on their wait list. It is the prettiest out of all the wines and (for this wine newb) the tastiest.
Rosé MacaronSo I set out to make the prettiest macarons I could dream of. The pinks in the macaron shells are inspired by the many pink hues of rosé and the filling is a raspberry rosé frosting. To get it to taste like rosé, I used sparkling wine flavoring and also boiled down one cup of rosé to a mere 1/4 cup. (The process goes quick because of the alcohol content.)
Raspberry Rosé MacaronsRosés tend to have a fruity note so I wanted to add a raspberry flavoring. The raspberry flavor comes from powdered freeze dried raspberries (I got mine from Trader Joe’s.). As much as I love fresh fruit in my frosting, I knew I was adding more liquid with the rosé so this was a great way to decrease the liquid content without compromising the flavor. The raspberries have seeds in them so if you do not want seeds in your frosting, use a fine mesh strainer to sort them out.
Raspberry MacaronsThe end result is a definite raspberry flavor with a hint of rosé that grows stronger at the end. I think the way you perceive rosé is different for each person. My sister said she barely tasted it while other people said they could definitely taste it. Either way it is not straight up raspberry, there is something different about it.

Raspberry Rosé Macarons

For the macaron shells:

Ingredients:
212 g. almond meal
212 g. powdered sugar
172 g. egg whites, divided to 82 g. and 90 g
236 g. sugar
158 g. water
edible silver stars
edible pink shimmer powder
light pink gel food coloring
pink gel food coloring

Instructions:

  1. Line two baking sheets with parchment paper or silicone mats.
  2. In the bowl of a food processor, add the almond meal and powdered sugar and pulse until thoroughly combined.
  3. Sift the mixture over a large mixing bowl, throwing out the lumps as they appear.  Add 82 g. of the egg whites and stir until you get a thick mixture.
  4. Separate the almond flour mixture into two bowls (253 g. each). Mix one bowl with light pink gel food coloring and the other with pink food coloring.
  5. In a small pot attached with a candy thermometer, combine the sugar and water over medium heat and boil until the syrup reaches 200˚F.
  6. Once the syrup reaches 200˚F, start whipping the remaining 90 g. in the bowl of your stand mixer with the whisk attachment on medium speed until soft peaks are reached.
  7. Once the syrup reaches 248 degrees, remove the pot off the burner and slowly pour the syrup down the side of the mixing bowl with the egg whites on medium speed.
  8. Once the egg whites are fully incorporated, increase the speed to medium high until egg whites form glossy, stiff peaks
  9. Mix a ⅙ of the egg white mix to the light pink almond mixture and stir together until the batter is slightly lighter and less pasty.  From then on, fold in ⅙ of the egg white mixture twice until the mixture “flows like magma”.  The mixture should be smooth and run thick ribbons off the spatula. Repeat with the pink almond mixture.
  10. With a pastry bag fitted with a ½ in. plain tip, paint stripes in the inside of the pastry bag with the pink gel food coloring.
  11. Fill half of the pastry bag with the light pink and the other half with the pink batter. Pipe 1¼ – 1½ in. rounds.
  12. The piped batter may have peaks but should smooth away in a minute or two. Sprinkle the top of the macaron batter with tiny silver stars. Let the batter stand until the tops of the macaron batter are dry to the touch, about 30 mins to 1 hour.
  13. Preheat the oven to 350˚F.
  14. Once you place the macarons in the oven, reduce the heat to 275˚F. Bake 10-13 minutes, until the feet are formed and the tops are smooth.  The macarons are done when you slightly wiggle them and they start to come off of the parchment paper / silicone mat.
  15. Once you remove the macarons, reheat the oven to 350˚F for ten minutes before baking another pan of macarons at 275˚F.
  16. Let cool and dust the tops with pink shimmer dust. Fill with frosting.

Raspberry Rosé Frosting

Ingredients:
1 c. whole milk
¼ c. flour
a pinch of salt
8 oz. (2 sticks) unsalted butter, room temperature
1 c. sugar
1 ½ tsp. sparkling wine flavor
1 c. rosé wine
3 tbsp. powdered freeze dried raspberries

Instructions:

  1. In a small pot, boil 1 c. of wine until ¼ c. remains. Let cool and set aside.
  2. In a saucier pan, put milk, salt and flour and whisk until combined on medium heat.
  3. Continuously whisk mixture until thickened to a pudding like consistency.
  4. Once thickened, strain through a mesh strainer into a bowl with a spatula to remove lumps.
  5. Place a piece of plastic wrap on top of the flour mixture and put into the fridge until fully cool.
  6. In a mixer bowl fitted with the whisk attachment, mix the sugar and butter on high speed until fluffy and pale about, 5-10 minutes.
  7. Add the chilled flour mixture and continue to whip on high speed until the sugar is completely dissolved and the mixture is no longer gritty, about 5-10 minutes.
  8. Add the rosé, freeze dried raspberries, sparkling wine flavoring and mix until combined.

Jackson Pollock Macarons

Jackson Pollock MacaronsThere is a store called “Marbles: The Brain Store” in my local mall. As the name suggests, the store mainly sells puzzles and games that exercise your brain. I ended up stopping by a few years ago with my friends and while we were browsing, we noticed a display of various puzzles. When one of us picked up a jigsaw puzzle of Jackson Pollock’s Convergence, a store clerk leaned over to us and commented, “I’ve never seen anyone complete it.” Of course after a comment like that, we HAD to take it home and try to solve it. A few years later, it’s still incomplete and sitting in my room.Jackson Pollock MacaronsJackson Pollock MacaronsThese macarons are inspired by my incomplete puzzle. I’ve done paint strokes on my macarons before and the difference between the strokes and the splatters is the amount of liquid you add to the food coloring. In order to make your splatters look imperfect and messy, you need to dilute your gel food coloring with a generous dose of vodka.Jackson Pollock MacaronsJackson Pollock Macarons Jackson Pollock Macarons Jackson Pollock MacaronsJackson Pollock Macarons Jackson Pollock MacaronsI’ve done the splatters two ways, and I believe it works the best when you arrange your macarons side by side as if you’re creating a blank canvas for a painting. If you leave the gaps in between the macarons like my first try, you’ll miss the trail of paint that makes it look so convincing and similar to Pollock’s work. I absolutely love the effect that it makes. Try to get a small bit of each color on every macaron so that when you get the full effect for each macaron.
Jackson Pollock MacaronsJackson Pollock MacaronsAs fun as it is to splatter food coloring everywhere, I will leave you with a word of warning. The food coloring will get everywhere. It will get on your counter, on your clothes, and on your skin. My best advice is to lay a layer of paper towels on your work surface and wear an apron before you start. Now go satisfy your inner artist and have fun.Jackson Pollock MacaronsJackson Pollock Macarons

Jackson Pollock Macarons

You will need:

1 batch of vanilla macarons (recipe below)
1 batch vanilla frosting (recipe below)
red gel food coloring
yellow gel food coloring
blue gel food coloring
black gel food coloring
vodka

Instructions:

  1. Cover your work surface with a layer of paper towels.
  2. Arrange your unfilled macaron shells closely in a square/rectangular shape.
  3. In four plastic cups, place a few drops of gel food coloring in each cup.
  4. Dilute each color with a tablespoon of vodka and mix until your desired color is reached.
  5. Using a clean, food use only paint brush, saturate your brush with the yellow paint and use a flicking motion with your wrist to create a splatter pattern on your macarons.
  6. Once done, thoroughly clean your brush with water and dry as well as you can with a paper towel before repeating step 5 with a different color.
  7. Let macarons dry completely before filling and sandwiching them with your vanilla frosting.

Vanilla Macarons

Ingredients:

212 g. almond meal
212 g. powdered sugar
172 g. egg whites, divided to 82 g. and 90 g
236 g. sugar
158 g. water

Instructions:

  1. Line two baking sheets with parchment paper or silicone mats.
  2. In the bowl of a food processor, add the almond meal and powdered sugar and pulse until thoroughly combined.
  3. Sift the mixture over a large mixing bowl, throwing out the lumps as they appear.  Add 82 g. of the egg whites and stir until you get a thick mixture.
  4. In a small pot attached with a candy thermometer, combine the sugar and water over medium heat and boil until the syrup reaches 200˚F.
  5. Once the syrup reaches 200˚F, start whipping the remaining 90 g. in the bowl of your stand mixer with the whisk attachment on medium speed until soft peaks are reached.
  6. Once the syrup reaches 248 degrees, remove the pot off the burner and slowly pour the syrup down the side of the mixing bowl with the egg whites on medium speed.
  7. Once the egg whites are fully incorporated, increase the speed to medium high until egg whites form glossy, stiff peaks
  8. Mix a ⅓ of the egg white mix to the almond mixture and stir together until the batter is slightly lighter and less pasty.  From then on, fold in ⅓ of the egg white mixture at a time until the mixture “flows like magma”.  The mixture should be smooth and run thick ribbons off the spatula.
  9. With a pastry bag fitted with a ½ in. plain tip, pipe 1¼ – 1½ in. rounds.
  10. The piped batter may have peaks but should smooth away in a minute or two.  Let the batter stand until the tops of the macaron batter are dry to the touch, about 30 mins to 1 hour.
  11. Preheat the oven to 350˚F.
  12. Once you place the macarons in the oven, reduce the heat to 275˚F. Bake 10-13 minutes, until the feet are formed and the tops are smooth.  The macarons are done when you slightly wiggle them and they start to come off of the parchment paper / silicone mat.
  13. Once you remove the macarons, reheat the oven to 350˚F for ten minutes before baking another pan of macarons at 275˚F.
  14. Let cool and fill.

Vanilla Frosting

Ingredients:

1 c. whole milk
¼ c. flour
a pinch of salt
8 oz. (2 sticks) unsalted butter, room temperature
1 c. sugar
2 tsp. vanilla extract

Instructions:

  1. In a saucier pan, put milk, salt and flour and whisk until combined on medium heat.
  2. Continuously whisk mixture until thickened to a pudding like consistency.
  3. Once thickened, strain through a mesh strainer into a bowl with a spatula to remove lumps.
  4. Place a piece of plastic wrap on top of the flour mixture and put into the fridge until fully cool.
  5. In a mixer bowl fitted with the whisk attachment, mix the sugar and butter on high speed until fluffy and pale about, 5-10 minutes.
  6. Add the chilled flour mixture and continue to whip on high speed until the sugar is completely dissolved and the mixture is no longer gritty, about 5-10 minutes.
  7. Add the vanilla extract and mix until combined.


Lucky Charms Cake

lucky charms cakeI’m pretty sure everyone is already saying this, but how is it already March? I’m definitely not complaining since I absolutely adore warm weather and I’m dying to be able to wear dresses without tights. As spring quickly approaches, the next holiday around the corner would be St. Patrick’s Day. Even closer is National Cereal Day, which is on March 7th. So I figured that I might as well tie up both and make this cake.
DSC_0584I’ve been thinking of something similar to this when I bought a bag full of “Lucky Charms” marshmallows. I say it in quotes because while it tastes very similar to the marshmallows in the cereal, the shapes of these marshmallows are less detailed and smaller. (I’m thinking it’s a copyright issue.) Either way, I wasn’t about to pick out each marshmallow from a box of Lucky Charms cereal, so I used this to decorate the outside of the cake. What is really funny is, that over time, the marshmallows will rehydrate from the frosting giving it a similar flavor and texture to a dehydrated marshmallow that was sitting in a pool of milk. They become darker in color and squishy and so this cake is best eaten the day it is baked.
DSC_0504The inside of the cake is frosted with cereal milk frosting, (like the one I posted in my cereal macaron post) but instead of Frosted Flakes, I used Lucky Charms cereal. The cereal milk turns a pale green and I think it’s perfect for the theme. The cake itself is funfetti since I was going along with the rainbow color scheme.
DSC_0526My absolute favorite part of the cake is the Lucky Charms bark I made from the marshmallows, different colors of candy melts and chock full of every kind of decorative sprinkle. You start off with a melted slab of white candy melt and swirl different colors of melted candy melts using a toothpick and then swipe along the top with an offset spatula. It blends beautifully and makes a watercolored candy bark. Then you pretty much go ham with however you want to top it. I think it’s important to restrain yourself when you do this so that you can still see the colors of the bark.
DSC_0578I had some confetti macaron shells leftover from a baking order, so I stuck some marshmallow pieces on top of it and decorated the cake, but really, I don’t think it’s worth baking a whole batch of macarons for this. If you have it, great and if it not, it still looks beautiful without it. I should warn you that this is a very sweet cake. I suppose it shouldn’t come as a surprise given the funfetti inside and the marshmallows and candy outside. But it’s so stunning, I think it’s worth the sugar overload.

Lucky Charms Cake

Funfetti Buttermilk Cake (recipe below)
Lucky Charms Cereal Milk Frosting (recipe below)
Vanilla Swiss Meringue Buttercream (recipe below)
Lucky Charms Marshmallows
Lucky Charms Bark (recipe below)
Funfetti Macarons (optional, recipe in this post)

Instructions:

  1. Evenly fill and stack each layer of funfetti cake with cereal milk frosting.
  2. Crumb coat the cake with a thin layer of the remaining cereal milk frosting
  3. Place cake in freezer for 5 minutes until the frosting on the outside sets firmly.
  4. Once crumb coat is set, frost the entire cake with swiss meringue buttercream.
  5. Take a handful of marshmallows and slowly cup the outside of the cake, patting it to ensure full coverage.
  6. Let the outside set in freezer for 5 minutes.
  7. Take cake out and top the cake with shards of Lucky Charms bark and macarons if desired.

Funfetti Buttermilk Cake

Ingredients:

2 c. cake flour
1⅓ c. sugar
¾ tbsp. baking powder
¼ tsp. salt
¾ c. buttermilk, divided
6 oz. unsalted butter, room temperature
3 eggs, room temperature
1 ½ egg yolks
1 ½ tsp. vanilla extract
¾ c. rainbow sprinkles

Instructions:

  1. Preheat the oven to 350˚F and line four 6-inch cake pans with parchment paper.
  2. In a bowl of a standing mixer with the paddle attachment, add flour, sugar, baking powder, and salt. Mix until combined.
  3. On low speed, add ½ c. buttermilk and butter and mix until combined.
  4. In a separate bowl, whisk eggs, egg yolks, ¼ c. buttermilk, and vanilla extract until homogeneous.
  5. On low speed, slowly add the egg mixture to the flour mixture.
  6. Increase speed to medium, and mix until combined.
  7. Fold in sprinkles into the batter.
  8. Evenly divide cake batter into the four cake pans.
  9. Bake about 20-25 minutes until cake is done or until a toothpick inserted into the center comes out clean.
  10. Let cool in pan for 10 minutes, and then move onto a cooling rack until completely cool.

Lucky Charms Cereal Milk Frosting (for the filling)

Ingredients:

1½ c. cereal milk (recipe below)
1/4 c. flour
½ tsp. kosher salt
8 oz. (2 sticks) unsalted butter, room temperature
¾ c. sugar
½ tsp. vanilla extract

Instructions:

  1. In a small pot over medium heat, whisk milk, salt and flour until combined.
  2. Continuously whisk mixture until thickened to a pudding like consistency.
  3. Once thickened, strain through a mesh strainer into a bowl with a spatula to remove lumps.
  4. Place a piece of plastic wrap on top of the flour mixture (to prevent skin from forming) and put bowl into the fridge until fully cool.
  5. In a mixer bowl fitted with the whisk attachment, mix the sugar and butter on high speed until fluffy and pale about, 5-10 minutes.
  6. Add the chilled flour mixture and continue to whip on high speed until the sugar is completely dissolved and the mixture is no longer gritty, about 5-10 minutes.
  7. Add the vanilla extract and mix until combined.

Cereal Milk

Ingredients:

3 ½ c. Lucky Charms cereal
4 c. whole milk, cold

Instructions:

  1. In a large bowl, mix cereal and milk and steep for 30 minutes, until cereal is soggy.
  2. Strain mixture through a fine mesh strainer. (Do not force mixture through mesh strainer. The resulting milk will be starchy and thicker than what you started with.)

Vanilla Meringue Buttercream (for the outside)

Ingredients:

1 c. sugar
4 large egg whites
3 sticks unsalted butter
1 tsp. vanilla extract

Instructions:

  1. Simmer an inch of water in a medium pot.
  2. In the bowl of a standing mixer, whisk egg whites and sugar together.
  3. Place the bowl over the pot of simmering water and whisk the egg white and sugar mixture continuously until the mixture becomes lighter and no longer grainy.
  4. Remove the bowl from the pot and transfer the bowl into the mixer fitted with a whisk attachment.
  5. Mix on high until mixture becomes white and fluffy, and cool (check for this by seeing if the outside of the bowl is cool to the touch).
  6. Add in vanilla extract and butter one stick at a time until a silky smooth frosting forms.

Lucky Charms Bark

Ingredients:

white candy melts
yellow candy melts
orange candy melts
sky blue candy melts
pink candy melts
purple candy melts
Lucky Charms cereal marshmallows
any type of sprinkles you would like to use

Instructions:

*Note: You want to move fast before the candy melts set. Try to have all of the sprinkles, marshmallows, and candy melts out and on hand before you start this recipe.

  1. Line a sheet pan with wax paper.
  2. Melt white candy melts in a bowl and spread thinly in a rectangular shape onto the wax paper.
  3. On a separate plate, melt about 3-4 disks of each color of the candy melt separately,
  4. Using a toothpick, make swirls of different colors all over the slab of white candy melt.
  5. Using an offset spatula, smooth the top of the bark in one fluid horizontal stroke.
  6. Place the marshmallows and sprinkles before the candy bark sets.
  7. Before the candy bark sets completely, (when it is similar to very soft chocolate) take a sharp knife and score shards of candy bark by making triangular shapes into the candy melt.
  8. When the candy bark sets, break along the lines you made with your knife.

Weekday Update

pink swirl cakeIt’s been a quiet few weeks on the busy spatula. Mostly, I’ve been busy filling cake orders and baking here and there. Not enough photos to write an actual blog about, but just enough for a glimpse of what’s been going on. (If you follow me on Instagram, you probably saw some of these already.)

Pink and Gold Swirl Cake – It’s such a whimsical cake, I couldn’t help taking close up photos of this one. Swirled with pastel pink and white frosting then filled to the brim with pearls, gold stars, and dragees. It was four layers of chocolate cake filled with toffee coffee frosting.

DSC_0487DSC_0428DSC_0475DSC_0477

Baymax Macarons – I wanted to post these for Valentine’s Day, but I never had the time. Place a few red heart sprinkles on each macaron and draw in two circles and connect with a line with a black edible color marker. I filled the inside with some leftover strawberry frosting. So simple and very cute.

baymax macarons baymax macarons

Pink Ombre Ranunculus Cake – The inside of this cake was layered with layers of pink ombre cake. Filled with fresh strawberry frosting and topped with fresh ranunclus, it was so pretty. I originally wanted peonies, but the florist didn’t have any that were in bloom. Did you know that you had to order peonies in advance? I never knew.

pink ombre flower cakeranunculus flowers on cake

Conversation Heart Macarons with Vanilla Elderflower Frosting

Conversation Heart Macarons I learned how stubborn I could be when I went to buy a bag of conversation hearts this past week. I was so convinced that the original conversation hearts were made by Brach’s, I stood in the candy aisle for 5 minutes debating whether Brach’s or Necco made the original conversation hearts with my sister. I guess the average person would’ve pulled out their phone right away and searched Google, but I felt like I was pretty darn sure I was right. Turns out I was wrong. It was originally made by Necco.
valentines day macaronsI was basing my fact on the memory of the boxes of conversation hearts I received during Valentine’s Day in elementary school. Many of my teachers would set up a big box for students to put in Valentine’s Day cards and hand them out on the big day. Some kids would bring a bag full of identical valentines to give out to everyone so no one felt left out. Some kids of course, received more valentines than others, but the usual stash would be a lip or heart shaped lollipop, Hershey’s kisses, and small boxes of conversation hearts. I never really liked the conversation hearts because (if memory serves me right) they tasted like chalk. But if I ever received a box from a crush I would read each heart wishing that it was a heartfelt message from them. SMH Boy crazy from such a young age I tell ya.
macaron batterSo I took a page from my childhood memory and turned them into macarons. I’ll tell you straight off the bat that these macarons are a labor of love. Perhaps it’s because my macarons are made with an Italian meringue or because I just plain stink at it, piping macaron batter into a heart shape is not easy. The batter wants to cling onto your piping tip and ruin the pointed ends that you want to achieve. Also, dividing the batter into 5 colors and changing the piping bag and washing the piping tip 5 times is tedious. And if you only have one spatula? You would have to clean that spatula every time you mix a different color for the batter and you would be dirtying 5 different bowls. This is FIVE times the work required people!

Not-So-Heart-Shaped-Macarons
The frosting on the other hand is my favorite vanilla frosting flavored with Elderflower concentrate. If you’ve ever been to Ikea, you may have seen the boxed juices that they sell. Elderflower has a mild floral and tart flavor. Why did I add the elderflower concentrate? Because in my mind, flowers = romance = Valentine’s Day.
Conversation Heart Macarons The extra labor aside, these bite size macarons are super cute and would make a very thoughtful gift. Also, I know they’re delicious because the entire batch was gone in one night. 🙂
Conversation Heart Macaron

Conversation Heart Macarons with Vanilla Elderflower Frosting
Makes about 50 small macarons

*Here is a link to the heart template that I used for my macarons:
-Macaron heart template left
-Macaron heart template right

Ingredients:
212 g. almond meal
212 g. powdered sugar
172 g. egg whites, divided to 82 g. and 90 g (aged, if possible)
236 g. sugar
158 g. water
pink gel food coloring
yellow gel food coloring
green gel food coloring
purple gel food coloring
blue gel food coloring
1 batch vanilla elderflower frosting
red food color pen

Instructions:

  1. Line two baking sheets with heart template left and right and parchment paper or silicone mats.
  2. In the bowl of a food processor, add the almond meal and powdered sugar and pulse until thoroughly combined.
  3. Sift the mixture over a large mixing bowl, throwing out the lumps as they appear.  Add 82 g. of the egg whites and stir until you get a thick mixture.
  4. Divide the almond mixture into 5 different bowls. Each fifth of the batter should weight 101g.
  5. Color each almond mixture with pink, yellow, green, purple and blue gel food coloring. Set aside.
  6. In a small pot attached with a candy thermometer, combine the sugar and water over medium heat and boil until the syrup reaches 200˚F.
  7. Once the syrup reaches 200˚F, start whipping the remaining 90 g. in the bowl of your stand mixer with the whisk attachment on medium speed until soft peaks are reached.
  8. Once the syrup reaches 248 ˚F, remove the pot off the burner and slowly pour the syrup down the side of the mixing bowl with the egg whites on medium speed.
  9. Once the egg whites are fully incorporated, increase the speed to medium high until egg whites form glossy, stiff peaks.
  10. Place one fifth of the egg mixture into each bowl of the colored almond mixture. Fold the egg white mixture into the almond mixture until the mixture “flows like magma”.  The mixture should be smooth and run thick ribbons off the spatula.
  11. With a pastry bag fitted with a ½ in. plain tip, fill the piping bag with the pink macaron batter.
  12. Pipe one side of the heart, releasing pressure as you get to the pointy tip and repeat with the other side of the heart.
  13. The piped batter may have peaks but should smooth away in a minute or two.
  14. Every time you change the batter color, remember to clean the piping tip and use a new bag.
  15. Let the batter stand until the tops of the macarons are dry to the touch, about 30 minutes to 1 hour.
  16. Preheat the oven to 325-350˚F.  If your oven tends to run hot go for 325˚F, if not then 350˚F.
  17. Lower the heat to from 350˚F to 300˚F. (If starting from 325˚F, lower to 275˚F.)
  18. Bake 8-10 minutes, until the feet are formed and the tops are smooth.  The macaron shell is done when you slightly wiggle it and it starts to come off of the parchment paper / silicone mat.
  19. Remove pan from oven and reheat oven to higher temperature for 10 minutes before baking the next tray, lowering the temperature when you start baking it.
  20. Continue until you bake all of the macaron shells.
  21. Once the macarons have cooled, pair each macaron shell to one of a similar size.
  22. Use the red food coloring pen to write out messages on one side of the macaron.
  23. Let dry and sandwich each macaron with vanilla elderflower frosting.

Vanilla Elderflower Frosting
Ingredients:
1 c. whole milk
¼ c. flour
⅛ tsp. salt
8 oz. (2 sticks) unsalted butter, room temperature
1 c. sugar
2 tsp. vanilla extract
4-6 tbsp. elderflower concentrate

Instructions:

  1. In a small pot over medium heat, whisk milk, salt and flour until combined.
  2. Continuously whisk mixture until thickened to a pudding like consistency.
  3. Once thickened, strain through a mesh strainer into a bowl with a spatula to remove lumps.
  4. Place a piece of plastic wrap on top of the flour mixture (to prevent skin from forming) and put bowl into the fridge until fully cool.
  5. In a mixer bowl fitted with the whisk attachment, mix the sugar and butter on high speed until fluffy and pale about, 5-10 minutes.
  6. Add the chilled flour mixture and continue to whip on high speed until the sugar is completely dissolved and the mixture is no longer gritty, about 5-10 minutes.
  7. Add vanilla extract and 4 tbsp. of elderflower concentrate.
  8. Taste and if you want a stronger flavor, add another 2 tbsp. of elderflower concentrate.


Coffee Macarons

coffee macaronsWhere in the world did the time go?? It’s a week before Thanksgiving! I always feel a little overwhelmed right before the week of Thanksgiving. Not so much the day of, because by then I have already planned and prepped for the big day. But the week before, I’m trying to figure out grocery lists, what dishes to remake from last year and try for this year, and the number of people coming while doing every day things like work, house chores and errands. This is the first time I ever felt like leaving Thanksgiving dinner to someone else (that says volumes since I’ve been doing Thanksgiving dinner since I was a junior in high school).
coffee macaron shellAs children of Korean immigrants, we didn’t celebrate American holidays like my non-Asian friends. Thanksgiving was just another day off of school (which we were more than grateful for) and we would maybe have a chicken for dinner. In hindsight, we didn’t even have chicken every year. I didn’t even care about having a Thanksgiving meal with turkey until my one friend said to me, “What?? You don’t eat turkey on Thanksgiving?? No mashed potatoes? No gravy or stuffing? What about sweet potatoes with marshmallows, you must have that at least.” Mind you this was over AIM (omg remember those days?? Being on AIM was the lifeline to having a social life) and it may have sounded harsher than he intended in my mind. Either way, that night (the night before Thanksgiving) I searched high and low for a turkey recipe and in the morning, I insisted that my dad buy us a turkey. (Now that I think about it, it was a miracle in itself to have found a fresh turkey the day of Thanksgiving.) So with a fresh 12-lb. turkey with no other fixings, we made our first Thanksgiving meal. It was just salted, peppered and basted with butter and it was the most delicious turkey I’ve ever had.
coffee macaronMy meals since then have evolved and developed. We have had a variation of every side dish you can think of (mashed and roasted potatoes and vegetables, stuffing, salads, cranberry sauce, gravy, sweet potatoes, mac and cheese…). I’ve tried about every method there is to making a turkey (brined, dry-brined, roasted upside down halfway and turned over, spatchcocked, blanketed with a weave of bacon strips…) with the exception of deep frying. But nothing ever tastes as good as that first turkey I made.

keurig macaronsEither way, yes, for once in my life I feel overwhelmed with Thanksgiving. Last year, when my brother asked, “Are we having a Thanksgiving dinner with everyone?” I replied, “As long as I’m living and breathing, there is always Thanksgiving dinner.” I think I forget what we started with and it’s so easy to see the tough part of the task that it’s even easier to dismiss the highlights of the fruit of the labor. So this year, I’m so incredibly thankful for every opportunity and task that I’ve been given. Not because I’m so gung ho about the work, but because I’ve been blessed with the ability and the environment to accomplish it and that is more than enough to be thankful for.
DSC_0484*
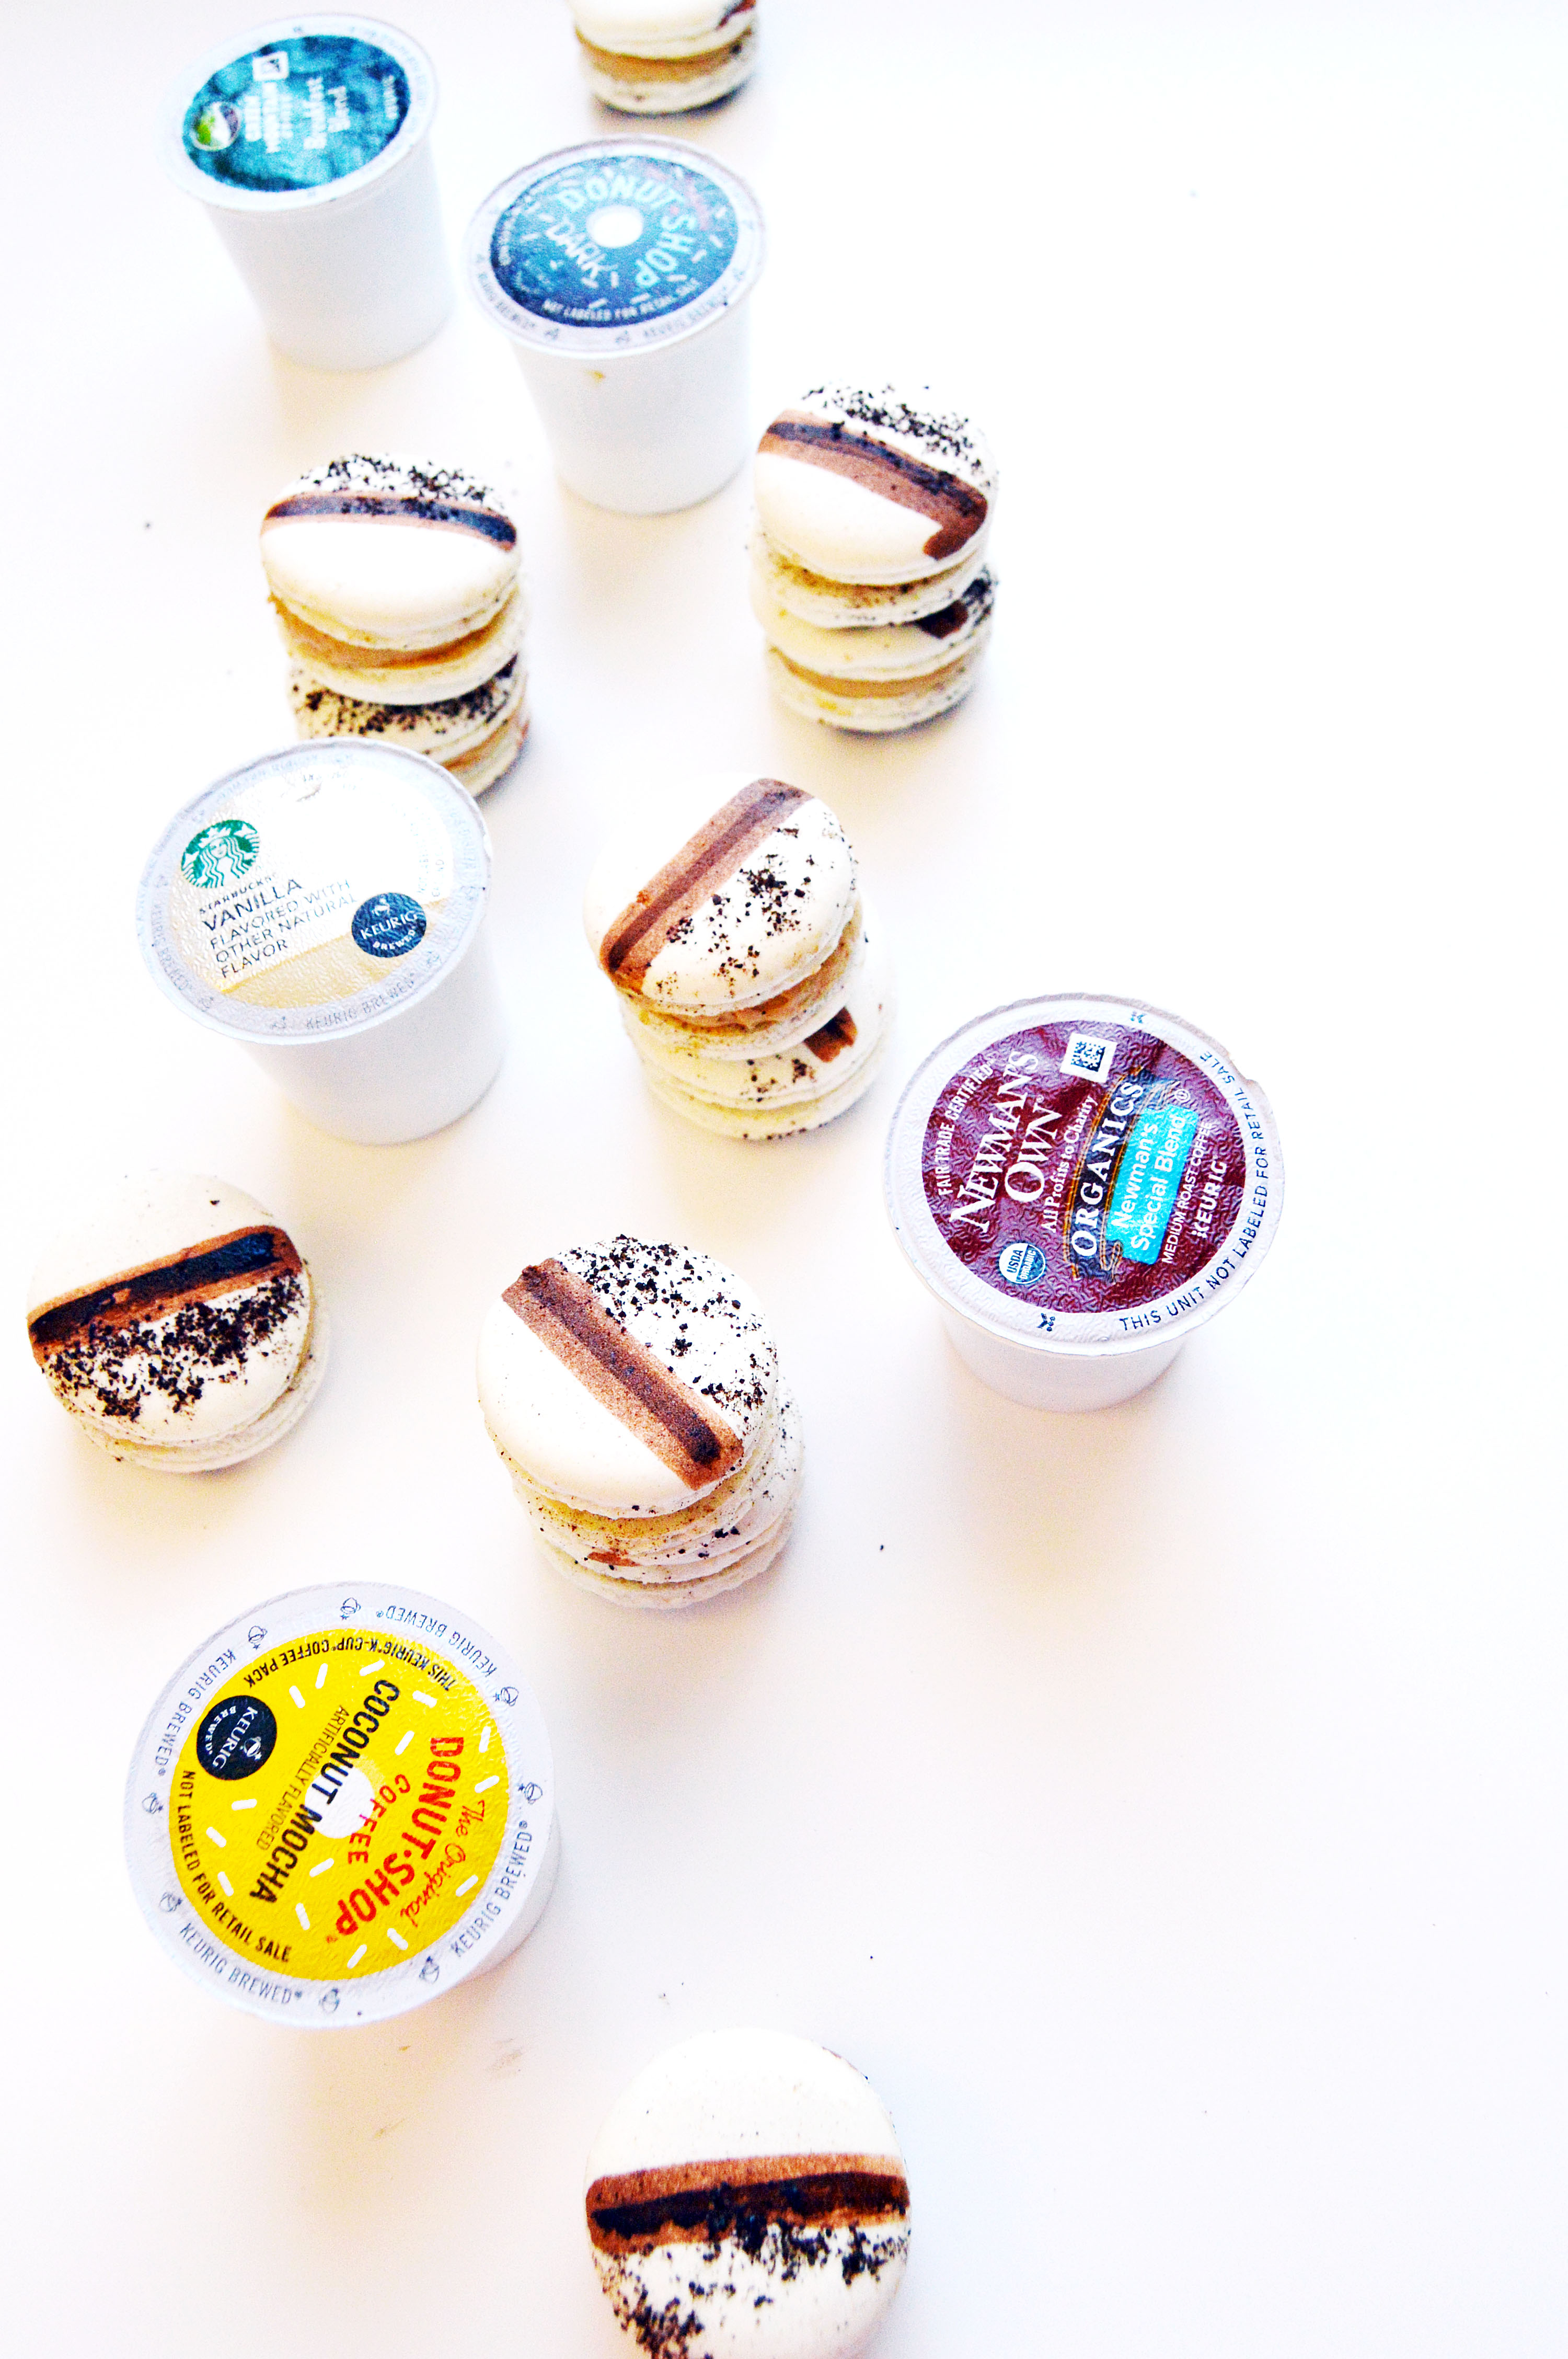
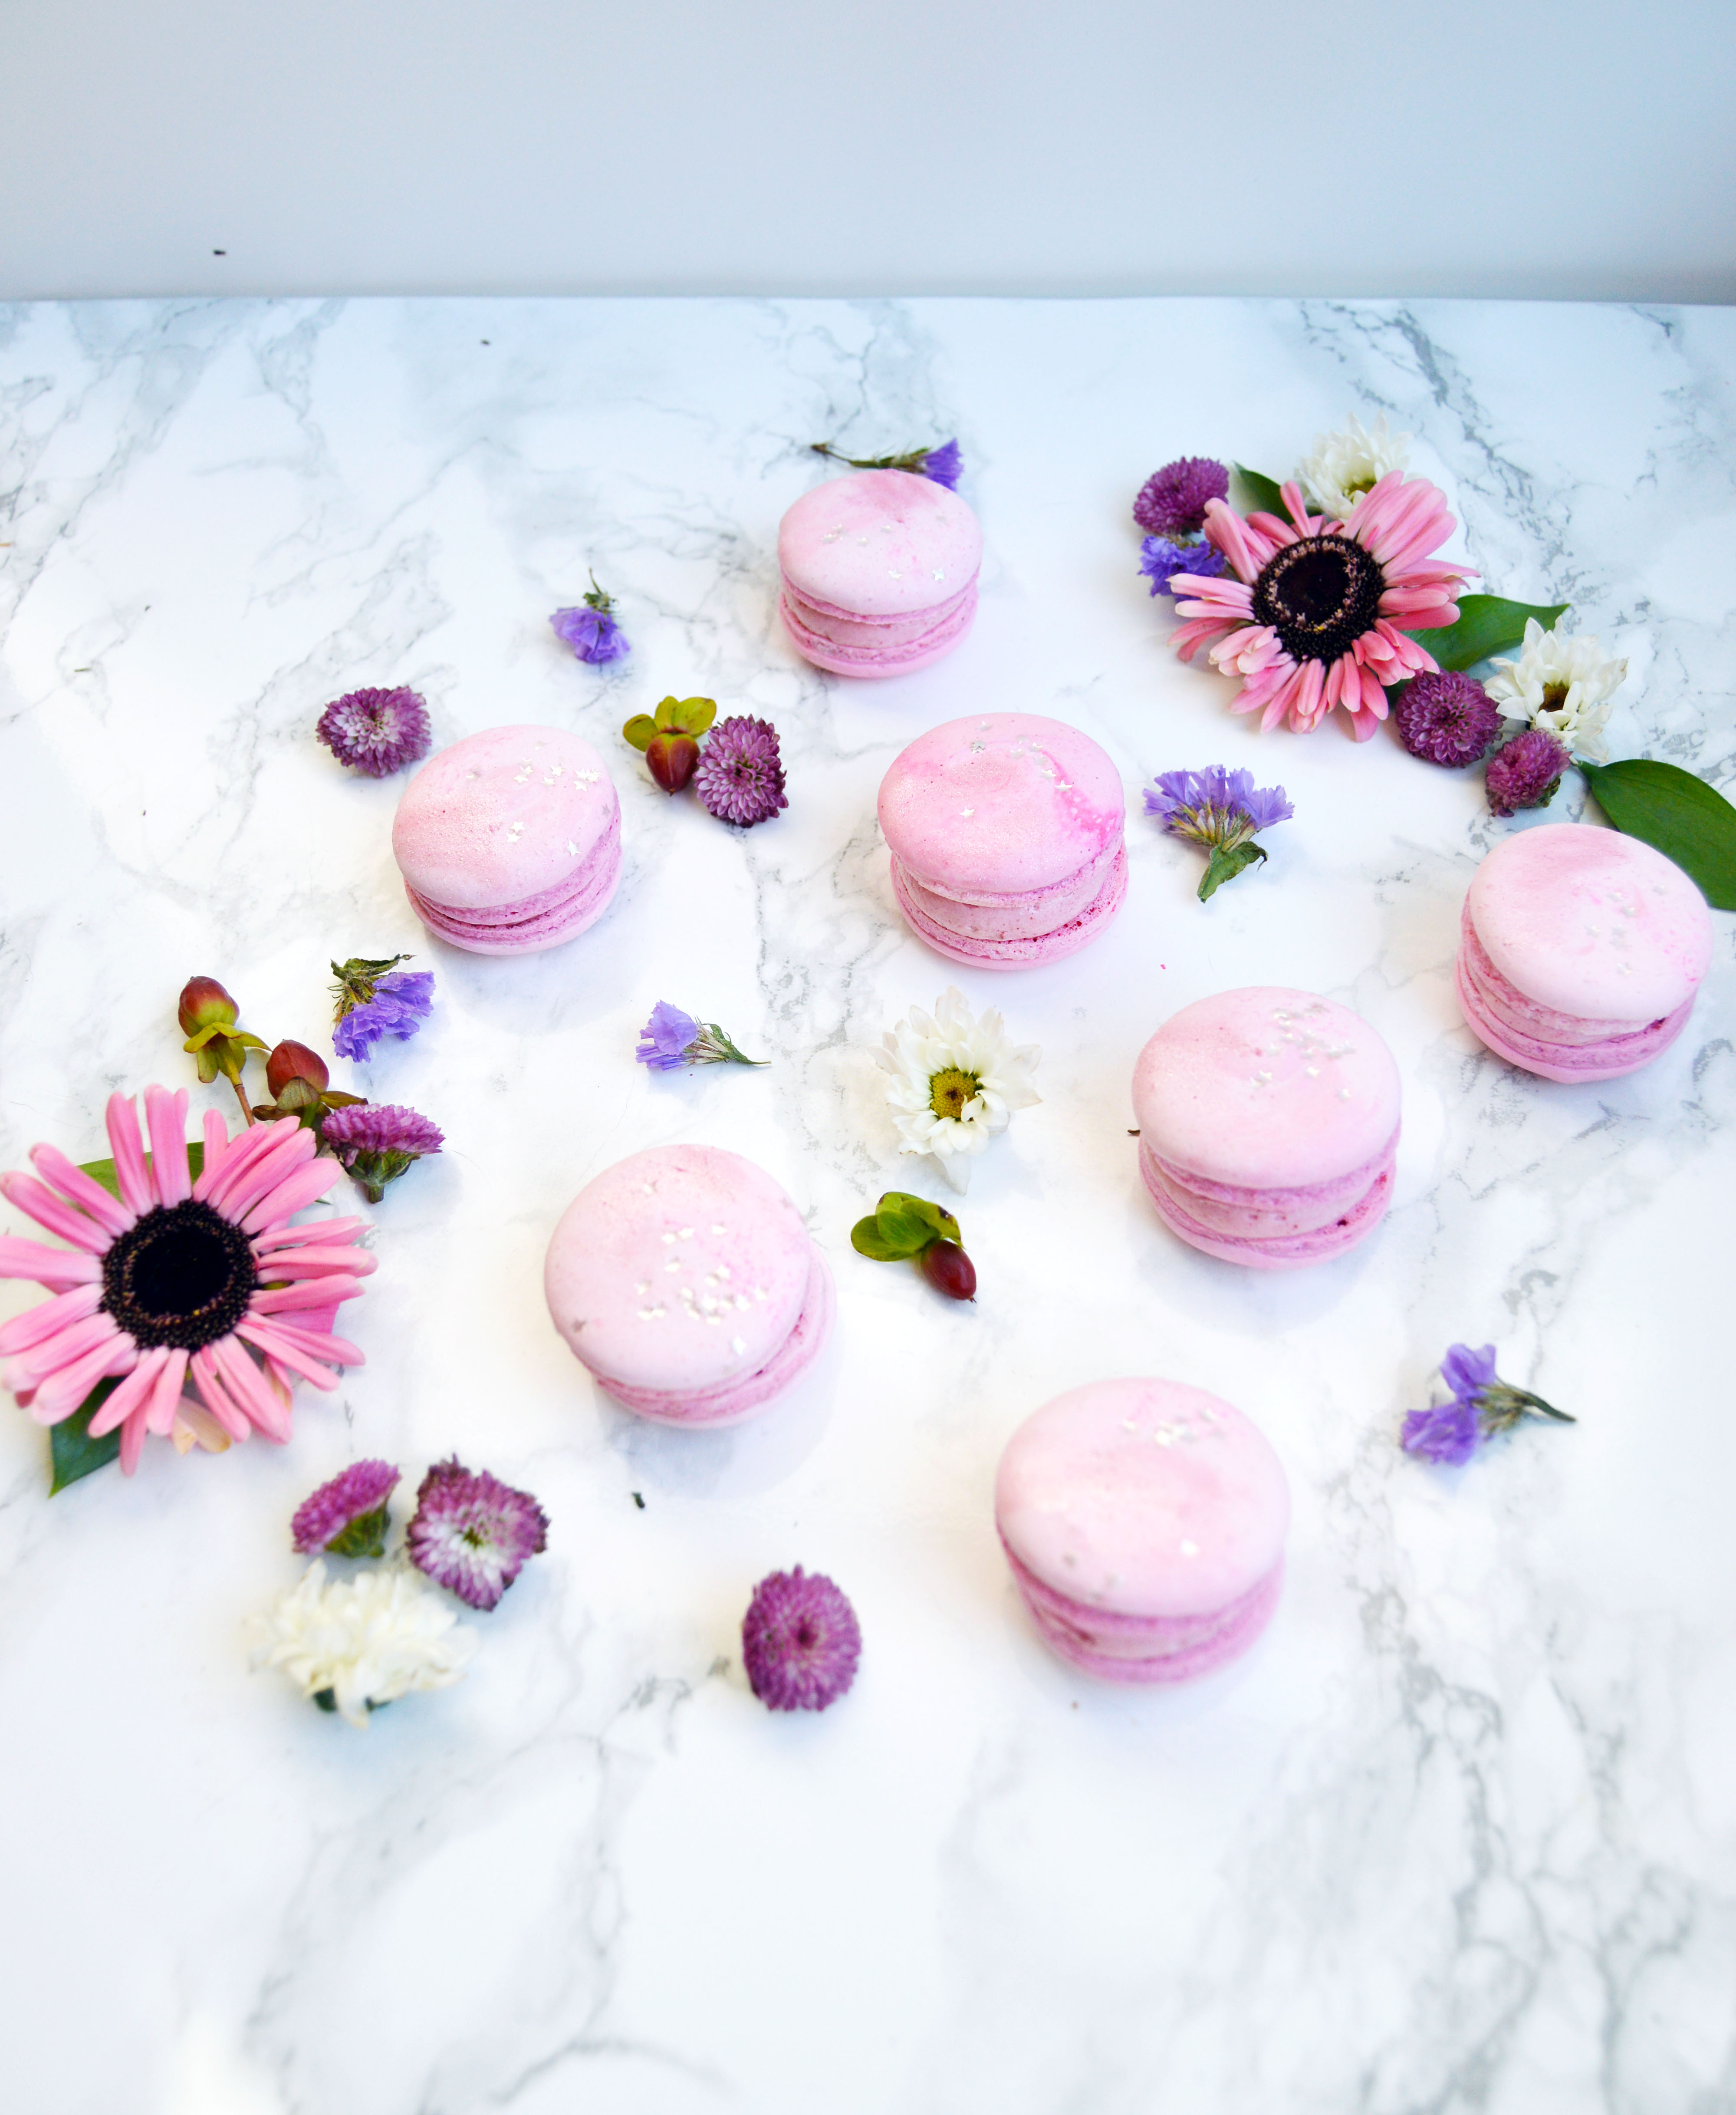
Somehow I ended up with this soliloquy about Thanksgiving. But this macaron would be the perfect ending to a meal. Thanks to the coffee emulsion (which is more potent than an extract) and a sprinkling of coffee grounds (I just opened up a fresh Keurig pod), it is bursting with coffee flavor. Also, I’m kinda macaron-ed out. Hahaha So it may be a while before you see another macaron post. But I’m looking forward to bringing different things for the blog. 🙂

Coffee Macarons

For the macaron shell:

Ingredients:
212 g. almond meal
212 g. powdered sugar
172 g. egg whites, divided to 82 g. and 90 g (aged, if possible)
236 g. sugar
158 g. water
fresh ground coffee (for garnish)
brown gel food coloring (for decorating the macaron)
vodka (for diluting the food coloring)

Instructions:

  1. Line two baking sheets with parchment paper or silicone mats.
  2. In the bowl of a food processor, add the almond meal and powdered sugar and pulse until thoroughly combined.
  3. Sift the mixture over a large mixing bowl, throwing out the lumps as they appear.  Add 82 g. of the egg whites and stir until you get a thick mixture.
  4. In a small pot attached with a candy thermometer, combine the sugar and water over medium heat and boil until the syrup reaches 200˚F.
  5. Once the syrup reaches 200˚F, start whipping the remaining 90 g. in the bowl of your stand mixer with the whisk attachment on medium speed until soft peaks are reached.
  6. Once the syrup reaches 248 ˚F, remove the pot off the burner and slowly pour the syrup down the side of the mixing bowl with the egg whites on medium speed.
  7. Once the egg whites are fully incorporated, increase the speed to medium high until egg whites form glossy, stiff peaks.
  8. Mix a ⅓ of the egg white mix to the almond mixture and stir together until the batter is slightly lighter and less pasty.  From then on, fold in ⅓ of the egg white mixture at a time until the mixture “flows like magma”.  The mixture should be smooth and run thick ribbons off the spatula.
  9. With a pastry bag fitted with a ½ in. plain tip, pipe 1¼ – 1½ in. rounds.
  10. The piped batter may have peaks but should smooth away in a minute or two.
  11. Sprinkle coffee grounds on only 1/3 of the macaron shell.
  12. Let the batter stand until the tops of the macarons are dry to the touch, about 30 minutes to 1 hour.
  13. Preheat the oven to 325-350˚F.  If your oven tends to run hot go for 325˚F, if not then 350˚F.
  14. Lower the heat to from 350˚F to 300˚F. (If starting from 325˚F, lower to 275˚F.)
  15. Bake 10-12 minutes, until the feet are formed and the tops are smooth.  The macaron shell is done when you slightly wiggle it and it starts to come off of the parchment paper / silicone mat.
  16. Remove pan from oven and reheat oven to higher temperature for 10 minutes before baking the next tray, lowering the temperature when you start baking it.
  17. Continue until you bake all of the macaron shells.
  18. Once the macarons have cooled, dilute brown food coloring in some vodka to make it paint-like.
  19. With a flat brush (food-only use), draw a thick line down the middle of the macaron.
  20. Once all the macarons have been drawn, dilute food coloring with a drop or two of vodka for a stronger color and turning the flat brush to the side, draw a thin stripe down the thick light brown stripe.
  21. Let dry and fill with coffee frosting.

For the coffee frosting:

Ingredients:
1 c. whole milk
¼ c. flour
⅛ tsp. salt
8 oz. (2 sticks) unsalted butter, room temperature
½ c. sugar
1 – 1½ tbsp. coffee emulsion  

Instructions:

  1. In a small pot over medium heat, whisk milk, salt and flour until combined.
  2. Continuously whisk mixture until thickened to a pudding like consistency.
  3. Once thickened, strain through a mesh strainer into a bowl with a spatula to remove lumps.
  4. Place a piece of plastic wrap on top of the flour mixture (to prevent skin from forming) and put bowl into the fridge until fully cool.
  5. In a mixer bowl fitted with the whisk attachment, mix the sugar and butter on high speed until fluffy and pale about, 5-10 minutes.
  6. Add the chilled flour mixture and continue to whip on high speed until the sugar is completely dissolved and the mixture is no longer gritty, about 5-10 minutes.
  7. Add 1 tbsp. coffee emulsion and mix until combined.
  8. Taste and if you want a stronger flavor, add another ½ tbsp. coffee emulsion.

Soot Sprite Macarons (Pumpkin Cookie Butter Macarons)

susuwatari macaron
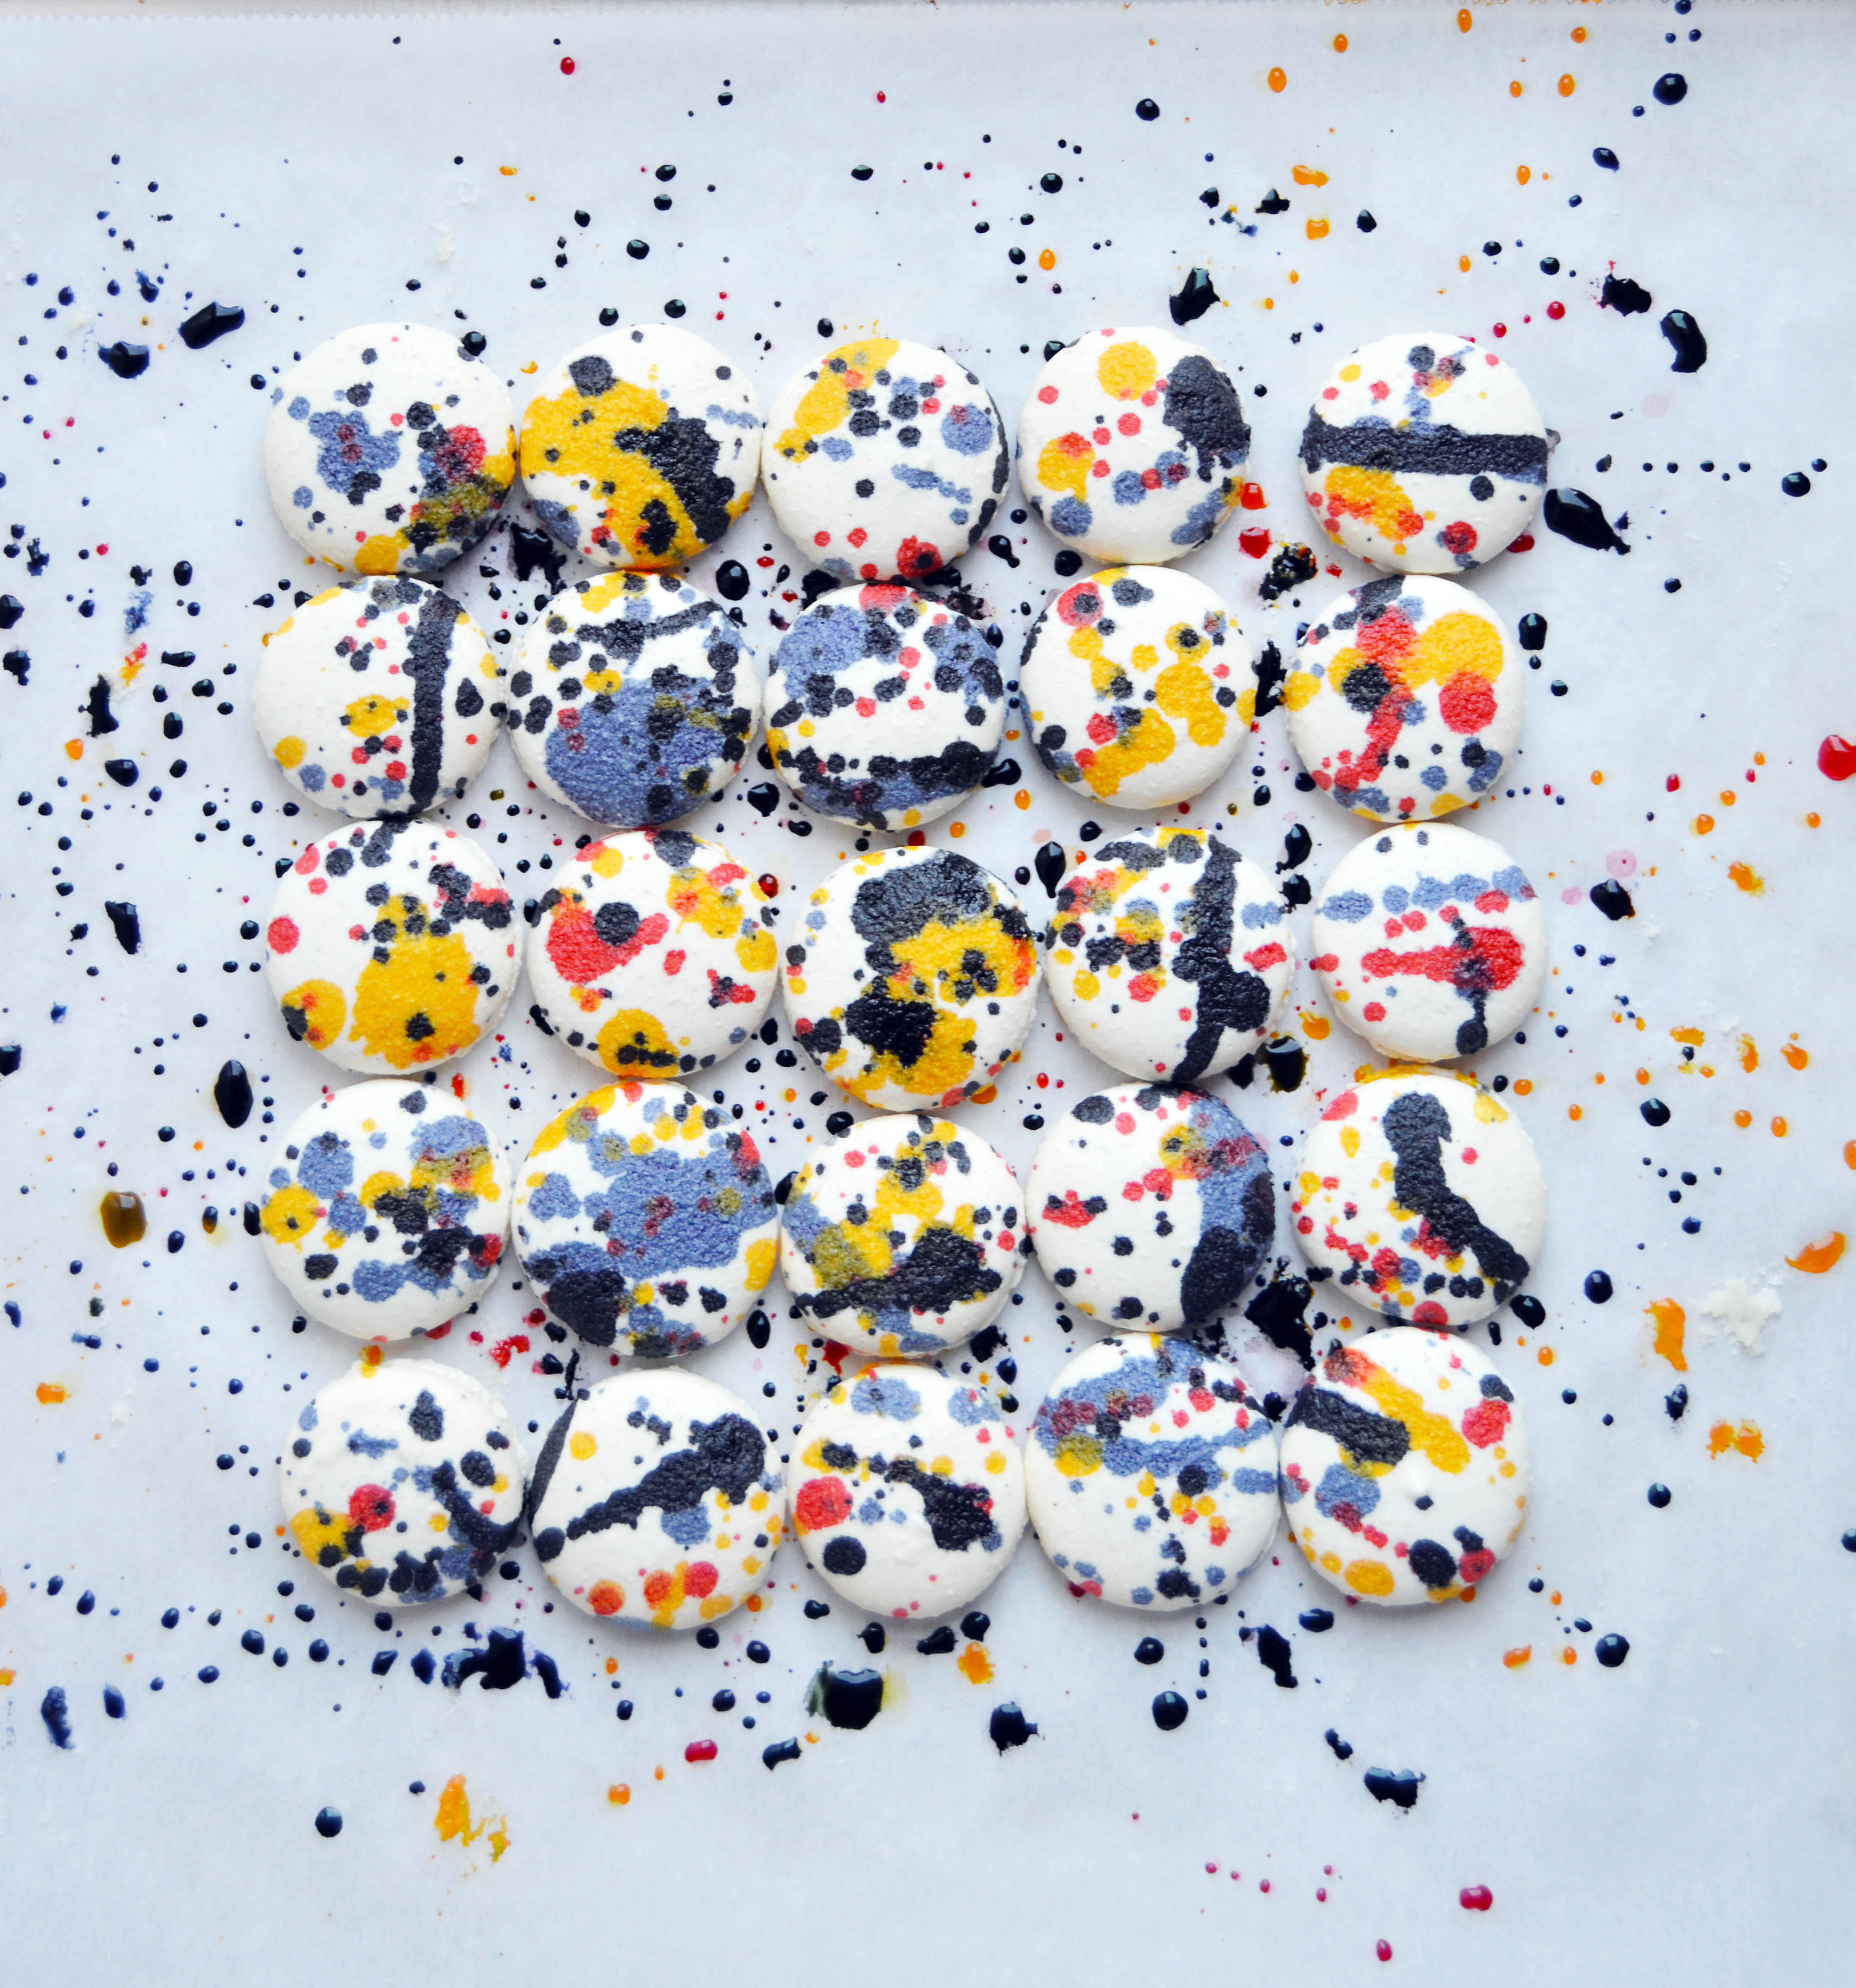
I’m a huge Hayao Miyazaki fan. I love the stories and character development in his films. What I appreciate the most are his strong feminine characters that often save themselves unlike so many of the Disney films I grew up with. Of course there are male protagonists, but they neither dominate nor undermine the heroine. Instead, they work in tandem with each other and both characters evolve and progress their personalities. One of my favorite films from Studio Ghibli is Spirited Away. Susuwatari (also known as Soot Sprites) are the minions of Kamaji, the boiler man. Small and furry looking, they are adorable in clusters and eat Konpeitō, which are star-shaped colorful Japanese candy. The plush with the mask is No Face who my sister deemed creepy and suggested I throw out. I think it’s adorable and I would never. Like I’ve mentioned before, we are two very different people.
soot sprite macaronThe black shells and the orange pumpkin cookie butter filling just beg these macarons to be made for Halloween. I’ve wanted to make these for October but I just ran out of time. You can always omit the black food coloring, colored sugar sprinkles and candy eyes and you would have a perfect pumpkin macaron for Thanksgiving. (As shown in the last photo of the post.) By the way, the pumpkin cookie butter filling is made with Trader Joe’s pumpkin pie spice cookie butter. (Can you tell I love Trader Joe’s yet? Hahaha Anyways…) It tastes exactly what the title says except I found that it wasn’t pumpkin-y enough. So I added pumpkin puree to the frosting base to up the pumpkin factor.
soot sprite macaronsIf you do decide to make it with the black food coloring and sugar sprinkles, I should warn you that these macarons WILL turn your mouth and teeth black. And if you have several of them, (this may be TMI but) you may or may not have green stool. Kind of like that black burger bun situation that Burger King had a month ago. It’s not harmful to your body, but I didn’t want to give anyone a surprise scare. Hahaha
pumpkin cookie butter macaronsIn other news, my favorite holiday of the year is creeping up on us. Thanksgiving is the absolute ultimate holiday for me and I’m looking forward to sharing some of my all-star recipes with you during this month!

Soot Sprite Macarons (Susuwatari Macarons)

You will need:
Black Sprinkle Macaron Shells (recipe below)
Pumpkin Cookie Butter Frosting (recipe below)
Candy Eyes
Black candy melts

Instructions:

  1. Sandwich two black macaron shells with pumpkin cookie butter frosting.
  2. Melt two black candy wafers in the microwave and use a toothpick to dab a small amount on the back of a candy eye to adhere to the macaron shell. (Before adhering the eyes, make sure that the pupils of the candy eyes are identical. Some pupils tend to be larger than others, giving your macarons an odd mismatched look if you are not careful.)
  3. Repeat the steps with the second candy eye.

Black Sprinkle Macaron Shells

212 g. almond meal
212 g. powdered sugar
172 g. egg whites, divided to 82 g. and 90 g (aged, if possible)
236 g. sugar
158 g. water
black gel food coloring (if you want regular pumpkin macarons, do not use this.)
black sugar crystals (if you want regular pumpkin macarons, do not use this.)

Instructions:

  1. Line two baking sheets with parchment paper or silicone mats.
  2. In the bowl of a food processor, add the almond meal and powdered sugar and pulse until thoroughly combined.
  3. Sift the mixture over a large mixing bowl, throwing out the lumps as they appear.  Add 82 g. of the egg whites and stir until you get a thick mixture.
  4. In a small pot attached with a candy thermometer, combine the sugar and water over medium heat and boil until the syrup reaches 200˚F.
  5. Once the syrup reaches 200˚F, start whipping the remaining 90 g. in the bowl of your stand mixer with the whisk attachment on medium speed until soft peaks are reached.
  6. Once the syrup reaches 248 ˚F, remove the pot off the burner and slowly pour the syrup down the side of the mixing bowl with the egg whites on medium speed.
  7. Once the egg whites are fully incorporated, increase the speed to medium high until egg whites form glossy, stiff peaks.
  8. Add in a drops of black gel food coloring until desired shade is achieved. (Skip this step if you want white macarons.)
  9. Mix a ⅓ of the egg white mix to the almond mixture and stir together until the batter is slightly lighter and less pasty.  From then on, fold in ⅓ of the egg white mixture at a time until the mixture “flows like magma”.  The mixture should be smooth and run thick ribbons off the spatula.
  10. With a pastry bag fitted with a ½ in. plain tip, pipe 1¼ – 1½ in. rounds.
  11. The piped batter may have peaks but should smooth away in a minute or two.
  12. On half of the macaron shells, generously sprinkle on black sugar crystals. (Skip this step if you want white macarons.)
  13. Let the batter stand until the tops of the macarons are dry to the touch, about 30 minutes to 1 hour.
  14. Preheat the oven to 325-350˚F.  If your oven tends to run hot go for 325˚F, if not then 350˚F.
  15. Lower the heat to from 350˚F to 300˚F. (If starting from 325˚F, lower to 275˚F.)
  16. Bake 10-12 minutes, until the feet are formed and the tops are smooth.  The macaron shell is done when you slightly wiggle it and it starts to come off of the parchment paper / silicone mat.
  17. Remove pan from oven and reheat oven to higher temperature for 10 minutes before baking the next tray, lowering the temperature when you start baking it.
  18. Continue until you bake all of the macaron shells.

Pumpkin Cookie Butter Frosting

Ingredients:

½ c. pumpkin puree
¾ c. whole milk
¼ c. flour
⅛ tsp. salt
8 oz. (2 sticks) unsalted butter, room temperature
½ c. sugar
½ c. pumpkin pie spice cookie butter

Instructions:

  1. In a small pot over medium heat, whisk pumpkin puree, milk, salt and flour until combined.
  2. Continuously whisk mixture until thickened to a pudding like consistency.
  3. Once thickened, strain through a mesh strainer into a bowl with a spatula to remove lumps.
  4. Place a piece of plastic wrap on top of the flour mixture (to prevent skin from forming) and put bowl into the fridge until fully cool.
  5. In a mixer bowl fitted with the whisk attachment, mix the sugar and butter on high speed until fluffy and pale about, 5-10 minutes.
  6. Add the chilled flour mixture and continue to whip on high speed until the sugar is completely dissolved and the mixture is no longer gritty, about 5-10 minutes.
  7. Add the pumpkin pie spice cookie butter and mix until combined.