Chocolate Covered Strawberry Cake

Chocolate Covered Strawberry Cake  3Is it the middle of February already?? I feel like February just started and here it is already nearing its end. As Valentine’s Day approaches, I can’t help but feel a little more love and happiness in the air. Maybe it’s all the hearts plastered every way I turn or people posting all things related to love on social media, but I’m digging the atmosphere. Yes, I know that you should show your love and affection to your significant other/ loved ones every day of the year but what’s the harm of celebrating that love?
Chocolate Covered Strawberry Cake  2I once had an ex-boyfriend who frequently bought me chocolate covered strawberries from Godiva. Not knowing how much they cost ($7 a piece!!), I used to eat them in one seating without much thought. I only found out how much they cost recently and boy, do I feel bad about not savoring them. But that was my first encounter with chocolate covered strawberries and it’s been one of my favorite flavor parings since.
Chocolate Covered Strawberry Cake  4
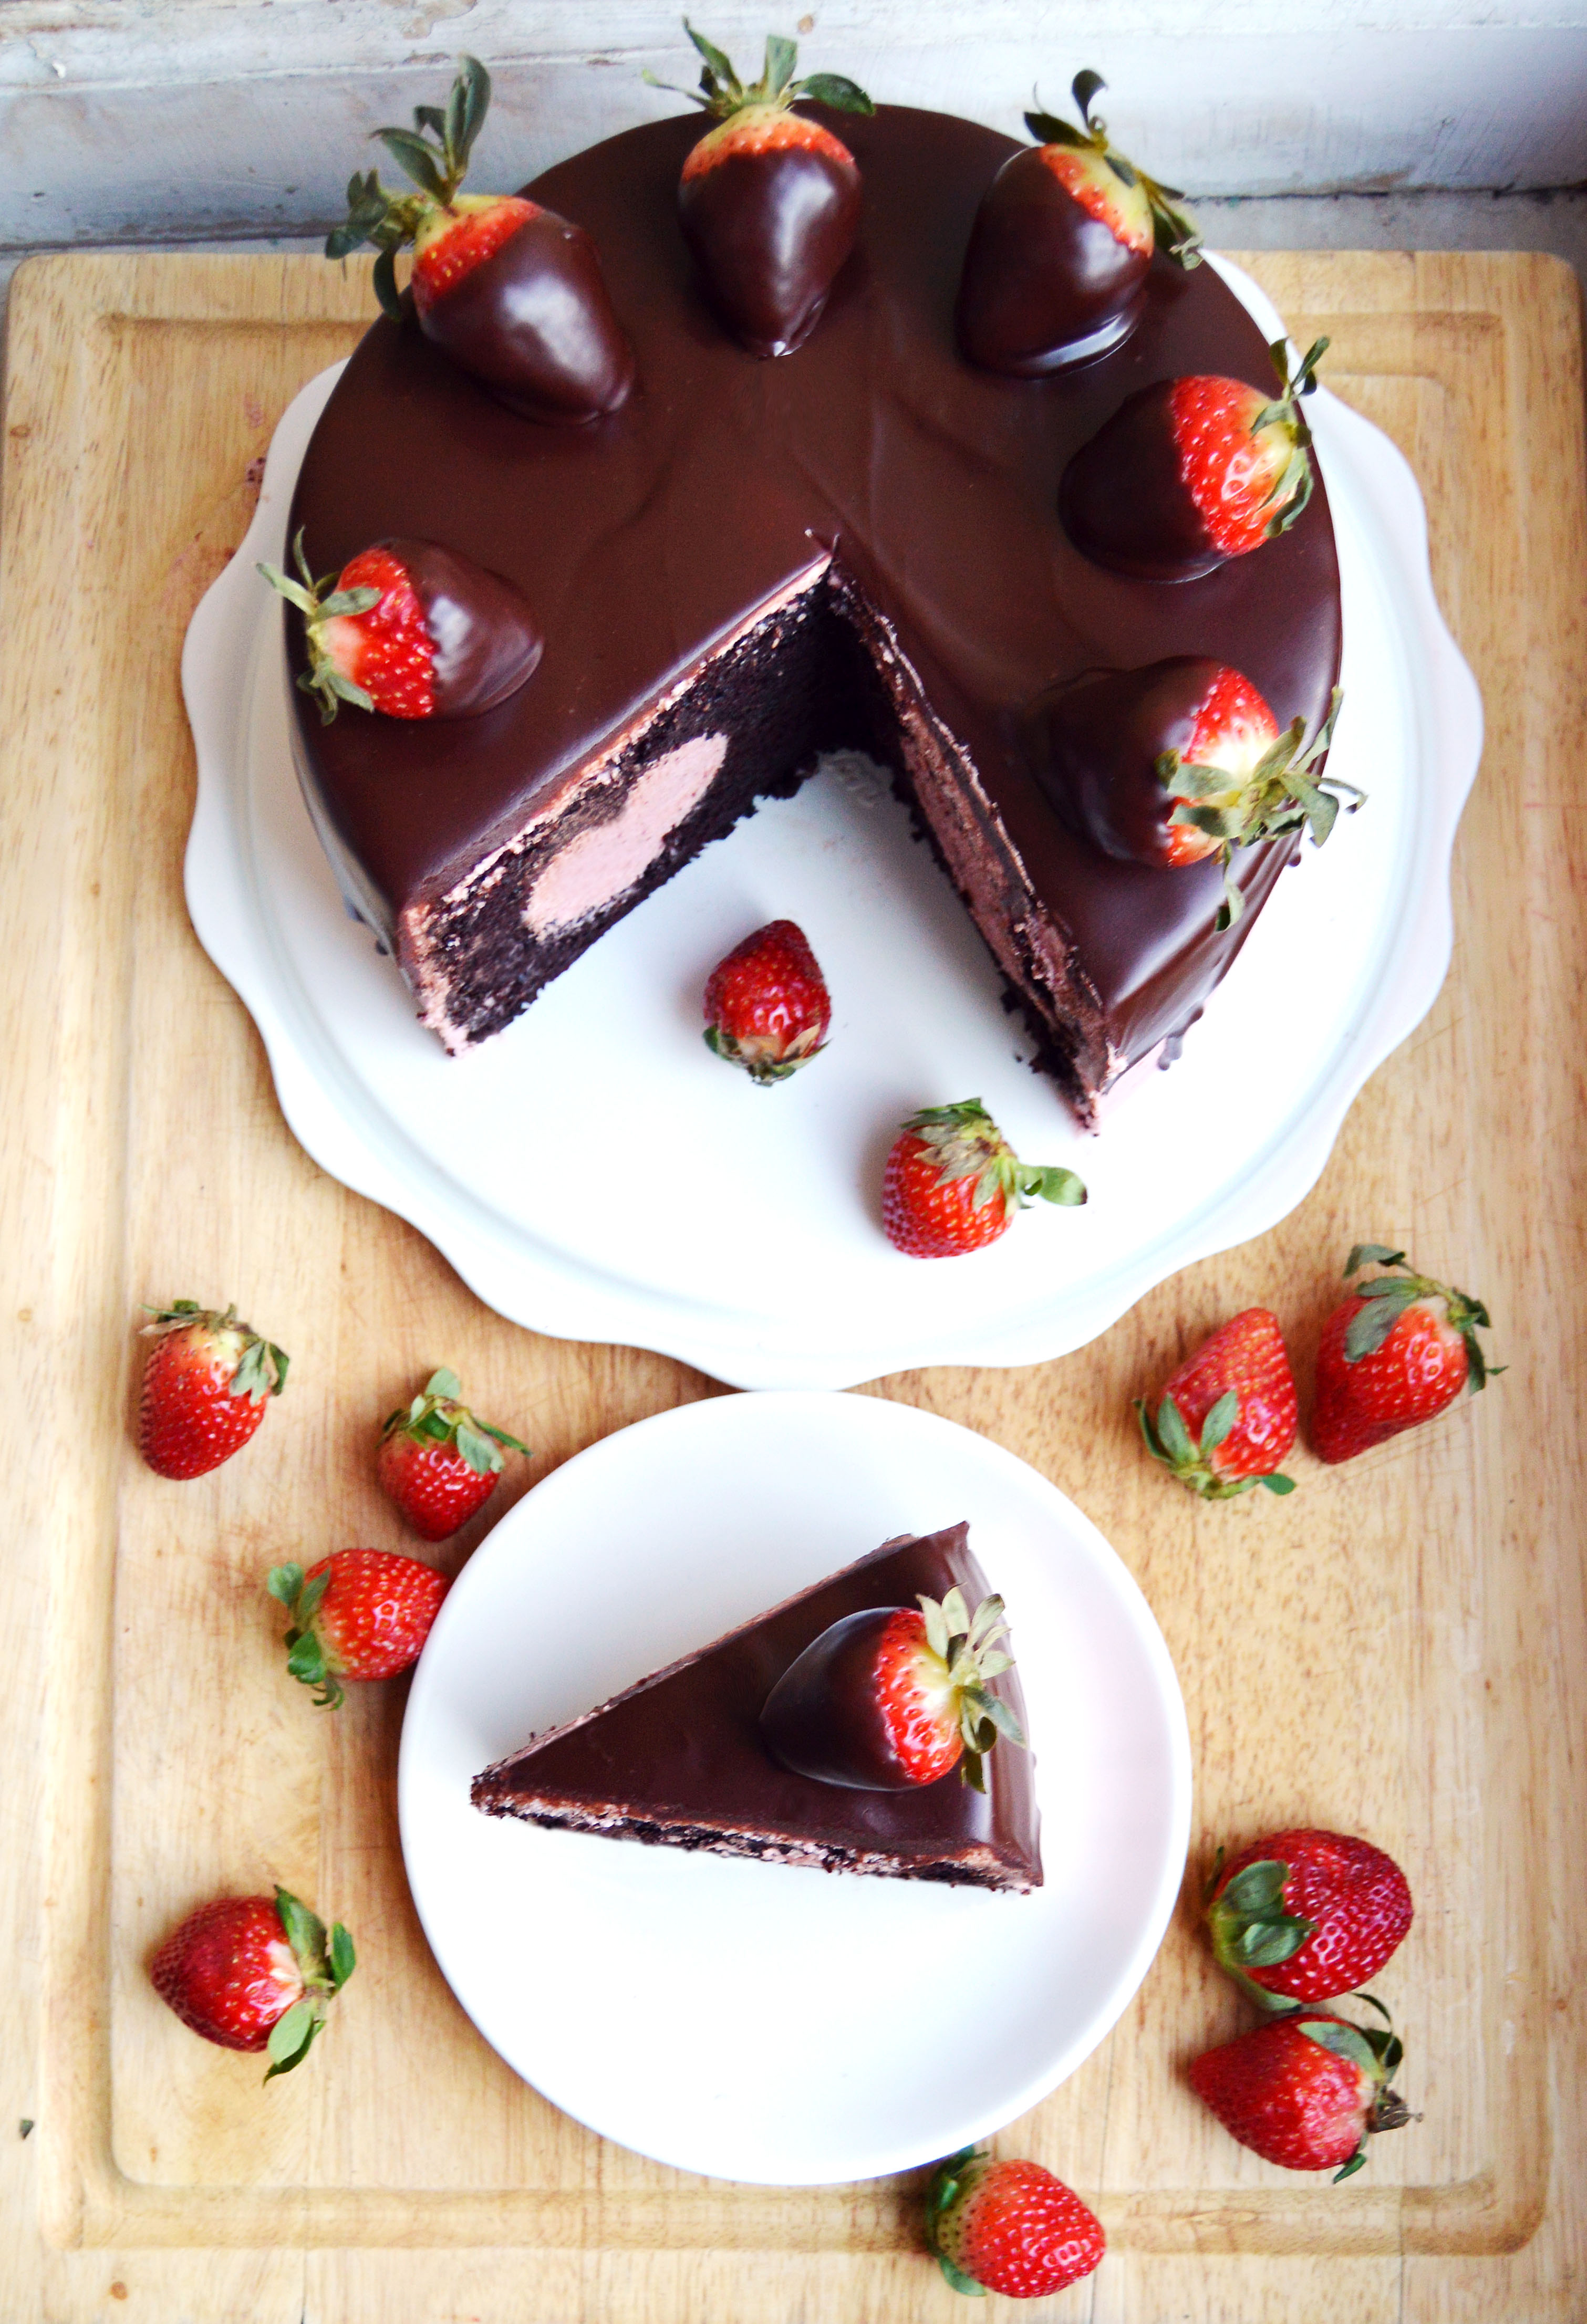
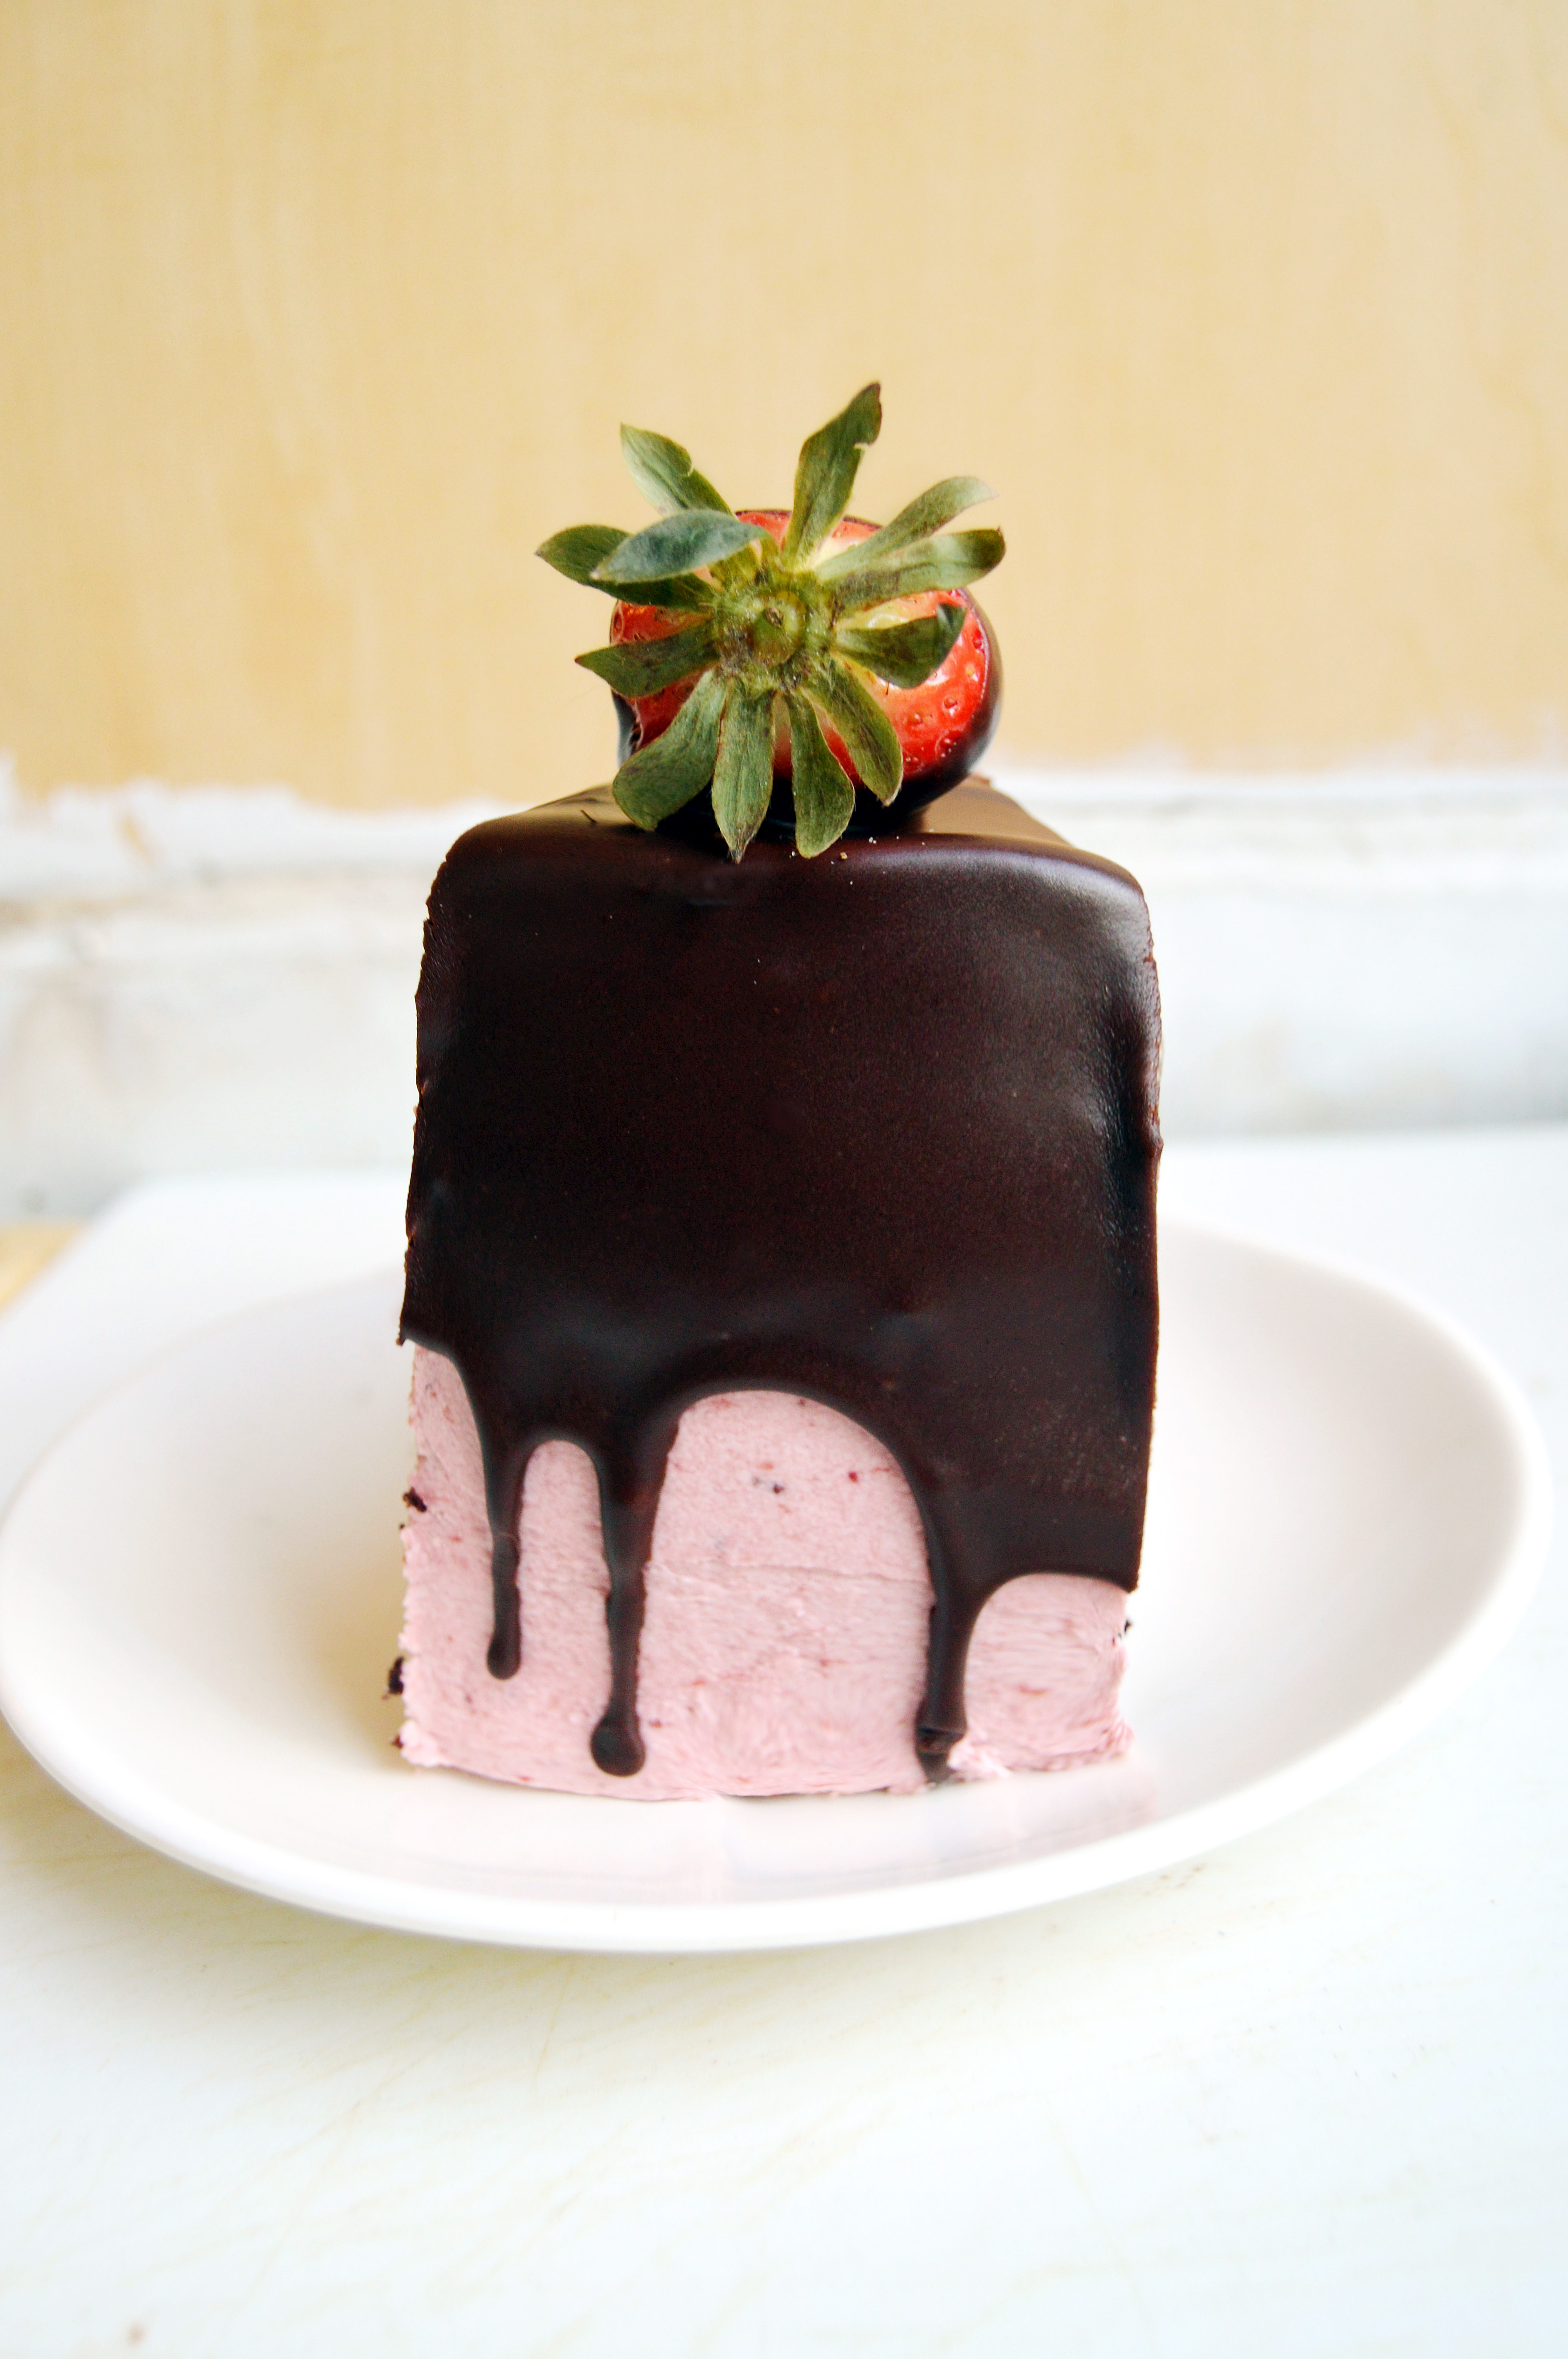
This cake is my spin on a chocolate covered strawberry. A rich dark chocolate cake is filled and frosted with fresh strawberry frosting and covered in a chocolate ganache and adorned with chocolate dipped strawberries. Because fresh strawberries in February are not the tastiest, I suggest buying frozen strawberries for the frosting to ensure full strawberry flavor. I happened to have this cake pan that I bought on clearance a year or two ago, and I thought it fit the theme perfectly. If you do not have the cake pan, you can always make the same cake sans the strawberry frosting heart in the middle. Talking about clearance, am I the only person that scours the holiday section at Target after every major holiday? I cannot resist the themed sprinkles and sparkling sugar at a deep discount. Sometimes, I’ll land on a real gem… like this cake pan at 75% off. It’s a guilty pleasure and I look forward to going to Target post February 14th. 😉
Chocolate Covered Strawberry Cake  1Chocolate Covered Strawberry Cake

Chocolate Cake

Ingredients:
1 ¾ c. all-purpose flour
2 c. sugar
¼ c. natural unsweetened cocoa powder
½ c. Dutch-process unsweetened cocoa powder
2 tsp. baking soda
1 tsp. baking powder
1. tsp. kosher salt
½ c. vegetable oil
2 extra-large eggs, room temperature
1 tsp. vanilla extract
1 c. strong, hot coffee

Instructions:

  1. Preheat oven to 350 degrees and grease and line 2 cake pans with parchment paper.
  2. In a stand mixer fitted with the paddle attachment, mix flour, sugar, both cocoa powders, baking soda, baking powder and salt until fully combined.
  3. In a separate bowl, whisk vegetable oil, eggs, and vanilla extract until combined.
  4. With the mixer speed on low, add the egg mixture to the flour mixture until combined.
  5. Turn off the mixer. With a spatula, scrape the sides of the bowl to fully incorporate the two mixtures.
  6. Turn the mixer on low and slowly add the hot coffee to the batter. Once added, raise the speed to medium until completely homogenous.
  7. Divide batter equally among the two cake pans and bake about 25-30 minutes. Checking at 20 minutes for doneness with a toothpick test.*
  8. Let stand for 5-10 minutes when done, then put onto a cooling rack to fully cool.

Strawberry Puree

Ingredients:
2 lbs of strawberries, smashed
1 tbsp. lemon juice

Instructions:

  1. In a small pot, cook strawberries and lemon juice on medium heat until mixture thickens and reduces 1/3-1/2 of the original volume, about 20-30 minutes.
  2. Once thickened, put in a bowl to cool and refrigerate.

Basic Vanilla Frosting

Ingredients:
2 c. whole milk
½ c. flour
¼ tsp. salt
1 1b. (4 sticks) unsalted butter, room temperature
2 c. sugar
1 tbsp. vanilla extract

Instructions:

  1. In a saucier pan, put milk, salt and flour and whisk until combined on medium heat.
  2. Continuously whisk mixture until thickened to a pudding like consistency.
  3. Once thickened, strain through a mesh strainer into a bowl with a spatula to remove lumps.
  4. Place a piece of plastic wrap on top of the flour mixture and put into the fridge until fully cool.
  5. In a mixer bowl fitted with the whisk attachment, mix the sugar and butter on high speed until fluffy and pale about, 5-10 minutes.
  6. Add the chilled flour mixture and continue to whip on high speed until the sugar is completely dissolved and the mixture is no longer gritty, about 5-10 minutes.
  7. Add the vanilla extract and mix until combined.

Strawberry Frosting

Ingredients:
1 batch of strawberry puree
1 batch of vanilla frosting

Instructions:

  1. Mix vanilla frosting with strawberry puree until the mixture turns strawberry pink and fluffy.

Chocolate Ganache

Ingredients:
8 oz. dark chocolate, chopped
¾ c. heavy whipping cream

Instructions:

  1. In a heatproof bowl, pour heavy cream on top of chocolate and microwave for one minute.
  2. Let stand 3 minutes and stir until combined.

Assembly

1 batch chocolate cake
1 batch strawberry frosting
1 batch chocolate ganache
6-8 strawberries, rinsed and dried

Instructions:

  1. Fill and frost chocolate cake with strawberry frosting.
  2. Chill in freezer for 15-20 minutes.
  3. Pour ¾ of chocolate ganache and use offset spatula to push ganache over the edge.
  4. Before the ganache sets completely, dip the strawberries in the remaining ganache and garnish the cake.

* Chocolate cake recipe adapted from Ina Garten.

Cookies and Cream Macarons

Cookies and Cream Macarons 1Another year has come and gone, and as predicted a slew of healthy dishes and diet how-tos flooded my newsfeed as soon as the new year started. I’m all for being healthy and starting with a blank slate, but what’s life without a little treat now and then? Personally, I feel like I’ve been indulging a little more than I should since January. Actually, I think I’ve been eating worse than I did during the holidays. Am I the only person who is at their heaviest from January to March? I’ll chalk it up to holiday blues… and not my obvious laziness. Talking about laziness, does anyone else still have their Christmas tree up? I keep putting that particular task off every week. I just know it’s going to stay up till February. Help.
Cookies and Cream Macarons 4You know what didn’t last though? These macarons. I made this ridiculously tall, four layered red velvet chocolate cookies and cream cake for my brother’s birthday and I happened to have a bit of the frosting leftover, and that is what sparked this macaron.  What makes this cookies and cream frosting different from the standard cookies and cream? It is made with cookies and cream cookie butter. I picked up a jar of this cookie butter from Trader Joe’s months ago but I still had more than half the jar left. Stirred into my go-to vanilla frosting and lots of Oreo cookie crumbs, it tastes just like an Oreo.
Cookies and Cream Macarons 2Do my photos look any different? Mr. L gifted me with a gorgeous Nikon D3200, and I’m hoping to get to learn how to shoot photos correctly with this thing. I’m having a tough time getting the right things to focus. Other than that, I’m ecstatic to start the new year with new equipment and fresh ideas. Here’s to a new year. 🙂
Cookies and Cream Macarons 3
Cookies and Cream Macarons

Basic French Macarons

Ingredients:
212 g. almond meal
212 g. powdered sugar
172 g. egg whites, divided to 82 g. and 90 g (aged, if possible)
236 g. sugar
158 g. water
6 Oreos, crushed into crumbs

Instructions:

  1. Line two baking sheets with parchment paper or silicone mats.
  2. In the bowl of a food processor, add the almond meal and powdered sugar and pulse until thoroughly combined.
  3. Sift the mixture over a large mixing bowl, throwing out the lumps as they appear.  Add 82 g. of the egg whites and stir until you get a thick mixture.
  4. In a small pot attached with a candy thermometer, combine the sugar and water over medium heat and boil until the syrup reaches 200˚F.
  5. Once the syrup reaches 200˚F, start whipping the remaining 90 g. in the bowl of your stand mixer with the whisk attachment on medium speed until soft peaks are reached.
  6. Once the syrup reaches 248 ˚F, remove the pot off the burner and slowly pour the syrup down the side of the mixing bowl with the egg whites on medium speed.
  7. Once the egg whites are fully incorporated, increase the speed to medium high until egg whites form glossy, stiff
  8. Mix a ⅓ of the egg white mix to the almond mixture and stir together until the batter is slightly lighter and less pasty.  From then on, fold in ⅓ of the egg white mixture at a time until the mixture “flows like magma”.  The mixture should be smooth and run thick ribbons off the spatula.
  9. With a pastry bag fitted with a ½ in. plain tip, pipe 1¼ – 1½ in. rounds.
  10. The piped batter may have peaks but should smooth away in a minute or two.  Take cookie crumbs and sprinkle onto tops of wet batter.
  11. Let the batter stand until the tops of the macarons are dry to the touch, about 30 minutes to 1 hour.
  12. Preheat the oven to 275-325˚F.  If your oven tends to run hot go for 275˚F, if not then 325˚F.
  13. Bake 10-13 minutes, until the feet are formed and the tops are smooth.  The batter is done when you slightly wiggle it and it starts to come off of the parchment paper / silicone mat.
  14. Let cool and fill.

Cookies and Cream Frosting

Ingredients:
½ c. whole milk
3 tbsp. flour
⅛ tsp. salt
4 oz. (1 stick) unsalted butter, room temperature
½ c. sugar
1 tsp. vanilla extract
¾  c. cookies and cream cookie butter
12 Oreo cookies, crushed into crumbs

Instructions:

  1. In a small pot over medium heat, whisk milk, salt and flour until combined.
  2. Continuously whisk mixture until thickened to a pudding like consistency.
  3. Once thickened, strain through a mesh strainer into a bowl with a spatula to remove lumps.
  4. Place a piece of plastic wrap on top of the flour mixture (to prevent skin from forming) and put bowl into the fridge until fully cool.
  5. In a mixer bowl fitted with the whisk attachment, mix the sugar and butter on high speed until fluffy and pale about, 5-10 minutes.
  6. Add the chilled flour mixture and continue to whip on high speed until the sugar is completely dissolved and the mixture is no longer gritty, about 5-10 minutes.
  7. Add the vanilla extract and cookie butter and mix until combined.
  8. Fold in Oreo cookie crumbs.

Pomegranate Coconut Marshmallows and Coconut White Hot Chocolate

Coconut White Hot Chocolate 1As a subscriber to Bon Appètit magazine, I fell in love with their section on holiday desserts in their newest issue. It was filled with such beautiful photographs (seriously, OMG how gorgeous is this cookie wreath?) and unexpected flavor pairings; I had to make something from it. The blood-orange marshmallows were calling my name and that’s where my journey started.
Pomegranate Coconut Marshmallows 1If you’ve never made homemade marshmallows before, I can only describe it as a springier, fluffier, less dense version of the store bought kind. Without the preservatives, the marshmallows melt in your mouth and it is best consumed as soon as possible. While I loved the idea of blood orange marshmallows, I just felt that pomegranates were more of a winter fruit so I substituted pomegranate juice for the blood orange juice and it worked out great. The problem was when I tried to make the coconut half of the marshmallow, it wouldn’t whip up fluffy like the pomegranate layer. I used the low fat coconut milk as the recipe stated and I tried it a second time, using less coconut milk and subbing water for the rest of the liquid stated but again, it did not puff up as it was supposed to.
Pomegranate Coconut Marshmallows 2My “spider-sense” tingled when I first read the recipe thinking that it was odd that there was any kind of fat in a marshmallow recipe. After all, a marshmallow is a stabilized meringue and fats are meringues’ number one enemy. So having two failed batches of coconut marshmallows, I just dumped it on top of the pomegranate layer and hoped for the best. It set alright and the coconut marshmallow was definitely denser than the pomegranate half, but tasty nonetheless.
Coconut White Hot Chocolate 2I had some coconut milk leftover so I decided to make it some white hot chocolate with it. Heat some coconut milk and low fat milk, add some white chocolate Lindt truffles and stir until it melts. You can blend it in a blender if you want some froth too. Top with whipped cream (I uh… whipped mine for a little too long hahaha) and some marshmallows and it’s a flavor bomb that is just rich enough for it to be indulgent but not heavy.
Pomegranate Coconut Marshmallows 3All in all, I think making marshmallows at home is a fun weekend project and people are always amazed when you make homemade candy.  As for packaging, you can always cut them out in fun shapes, or you can cut them into neat squares and put them into treat bags tied with a little ribbon.
Pomegranate Coconut Marshmallows 4Pomegranate Coconut Marshmallows and Coconut White Hot Chocolate

Pomegranate Coconut Marshmallows

Note: I will state the recipe as written by the original author with my adaptations. I’m going to chalk up my coconut layer not forming because my light coconut milk was not “light” enough. I bought it from Trader Joe’s.

Ingredients:

For the pomegranate layer:
3 ¼ tsp. unflavored powdered gelatin
¼ c. cold water
¾ c. sugar
½ c. 100% pomegranate juice
5 tbsp. light corn syrup, divided
red food coloring

For the coconut layer:
3 ¼ tsp. unflavored powdered gelatin
¼ c. cold water
¾ c. sugar
½ c. low-fat coconut milk
5 tbsp. light corn syrup, divided

Assembly:
powdered sugar

Instructions:

For the pomegranate layer:

  1. Spray a 13×9 in. baking pan with nonstick spray and line with parchment paper.
  2. In the bowl of a standing mixer with a whisk attachment, add the ice water and sprinkle the gelatin over it. Let gelatin bloom for 10 minutes.
  3. Meanwhile, in a small saucepan fitted with a candy thermometer, add the sugar, pomegranate juice, 2 tbsp. corn syrup and cook until the mixture hits 230˚F.
  4. Add the remaining 3 tbsp. corn syrup to the gelatin mixture.
  5. When the mixture hits 230˚F, turn on the mixer to high and slowly drizzle the pomegranate syrup down the side of the bowl.
  6. Beat until soft, fluffy peaks form and the bowl is cool to the touch, about 5 minutes.
  7. Beat in a few drops of red food coloring until you reach the color you desire.
  8. Quickly add the pomegranate mixture into the prepared pan and smooth with an offset spatula coated with nonstick spray. Cool.

For the coconut layer:

  1. In the bowl of a standing mixer with a whisk attachment, add the ice water and sprinkle the gelatin over it. Let gelatin bloom for 10 minutes.
  2. Meanwhile, in a small saucepan fitted with a candy thermometer, add the sugar, coconut milk, 2 tbsp. corn syrup and cook until the mixture hits 230˚F.
  3. Add the remaining 3 tbsp. corn syrup to the gelatin mixture.
  4. When the mixture hits 230˚F, turn on the mixer to high and slowly drizzle the coconut syrup down the side of the bowl.
  5. Beat until soft, fluffy peaks form and the bowl is cool to the touch, about 5 minutes.
  6. Quickly add the coconut mixture on top of the cooled pomegranate layer and smooth with an offset spatula coated with nonstick spray. Let set for 12 hours before unmolding.

Assembly:

  1. Dust a cutting board with powdered sugar and unmold the marshmallow slab on top of it.
  2. Dust with additional powdered sugar and cut marshmallows either with a cookie cutter or into 1-2 inch squares.
  3. Package as desired.

Coconut White Hot Chocolate

Ingredients:
⅓ c. low-fat coconut milk
⅔ c. low-fat milk
3 white chocolate Lindt truffles
whipped cream for garnish

Instructions:

  1. Heat coconut milk and milk together until hot.
  2. Stir in Lindt truffles and stir until melted.
  3. Optional: Blend in a blender for froth.
  4. Pour into mug, top with whipped cream, marshmallows and a Lindt truffle.

Marshmallow recipe adapted from Bon Appètit.


{Simple Sundays} Snowball Cookies

snowball cookiesHaving lived in New Jersey for most of my life, Christmas is synonymous with cold weather and snow. We don’t get a white Christmas often, but when we do that particular Christmas feels that much more special. Now I’m not saying you need snow to make Christmas special, but these little nuggets will make it seem like Jack Frost hit your house for the night.
Snowball Cookies 1It really couldn’t be easier. You toss in any kind of nut (I used walnuts) into a food processor or you can even crush it with a rolling pin, and process it until it becomes similar to corn meal. Then in a separate bowl you cream butter with sugar and vanilla extract and then you add your flour, ground nut, salt and nutmeg. I suggest grating fresh nutmeg. It really adds that extra special holiday flair. Dose it onto a cookie sheet and you don’t even have to roll them into balls if you don’t want to. Bake until pale brown and toss with powdered sugar when cool.
Snowball Cookies 2It looks like a snow dome or a half formed snowball. Kissed with some nutmeg and powdered sugar, It melts in your mouth but has a substantial bite that is characteristic of all nut cookies.  Enjoy! 🙂
snowball cookies 34
Snowball Cookies

Ingredients:

2 c. all-purpose flour
2 c. walnuts, almonds, or pecans (you can really use any nut you want)
¾ tsp. kosher salt
½ tsp. nutmeg
8 oz. unsalted butter, at room temp
⅓ c. sugar
2 tsp. vanilla extract
1 ½ c. powdered sugar

Instructions:

  1. Preheat the oven to 325˚F and line two baking sheets with parchment paper or silicone mat.
  2. In a food processor, pulse two cups of nuts until finely ground.
  3. In a separate bowl, mix flour, ground nut, kosher salt and nutmeg together.
  4. In a standing mixer fitted with a paddle attachment, cream butter and sugar until pale and fluffy.
  5. Add the vanilla extract and mix until homogenous.
  6. With the mixer on low, add the flour mixture and mix until just combined.
  7. Scoop out tablespoon sized portions of cookie dough and roll into balls.
  8. Bake 15-20 minutes until lightly golden. Let cool.
  9. Once cool, toss each cookie with powdered sugar (the more it is covered, the better) and consume.

Snowball cookie recipe adapted from the brown eyed baker.

Christmas Wreath Macarons

Christmas Wreath Macarons 1Am I the only person that thinks that Christmas snuck upon us this year? I feel like I was waiting forever for Thanksgiving and then BAM! Christmas is right around the corner. (Did anyone else think of this Friends’ scene when they read BAM?) I’ve been dreaming of these macarons since December started and I finally had a chance to bake them earlier this week.
Christmas Wreath Macarons 2Is it cold where you live? It’s been freezing in NJ and I am not used to working in a cooler kitchen. The weather must’ve been super dry because my macaron shells set before I was able to place my sprinkles, hence the little cracks in the shell where I tried to force each sprinkle in with a pair of tweezers (kitchen-use-only-tweezers). I have to admit I was getting quite frustrated with making them and then this happened:
Christmas Wreath Macarons 4Here are my attempts at his mug shots.
Christmas Wreath Macarons 5The thing is, Bear, my cat loves to watch me bake and prep food on the kitchen table. He demands to sit on his own chair and Petey (my other cat) was occupying Bear’s usual space. Fed up with watching from the floor, he decided to get up close and onto the table where the trays of macarons were drying. If you don’t know already, macaron batter is sticky and it took forever to get the green goo out of his tiny paws. Not to mention the trail of green batter on the floor he left when he ran away from me.
Christmas Wreath Macarons 3Despite my frustrations making this particular recipe, I think the macarons would make a cute addition to any cookie platter and add a bit of holiday flair. You can also change up the look of the macaron with different sprinkles. Just make sure you put them on before the shells dry out. If you don’t, they’ll just bounce off like hail on cement pavement.

Christmas Wreath Macarons

Ingredients:

212 g. almond meal
212 g. powdered sugar
172 g. egg whites, divided to 82 g. and 90 g (aged, if possible)
236 g. sugar
158 g. water
green gel food color
various sprinkles

Instructions:

  1. Line two baking sheets with parchment paper or silicone mats.
  2. In the bowl of a food processor, add the almond meal and powdered sugar and pulse until thoroughly combined.
  3. Sift the mixture over a large mixing bowl, throwing out the lumps as they appear. Add 82 g. of the egg whites and stir until you get a thick mixture.
  4. In a small pot attached with a candy thermometer, combine the sugar and water over medium heat and boil until the syrup reaches 200˚F.
  5. Once the syrup reaches 200˚F, start whipping the remaining 90 g. in the bowl of your stand mixer with the whisk attachment on medium speed until soft peaks are reached.
  6. Once the syrup reaches 248 degrees, remove the pot off the burner and slowly pour the syrup down the side of the mixing bowl with the egg whites on medium speed.
  7. Once the egg whites are fully incorporated, increase the speed to medium high until egg whites form glossy, stiff peaks. Add two drops of the green gel food color and mix until batter turns a bright shade of green.
  8. Mix a ⅓ of the egg white mix to the almond mixture and stir together until the batter is slightly lighter and less pasty. From then on, fold in ⅓ of the egg white mixture at a time until the mixture “flows like magma”.  The mixture should be smooth and run thick ribbons off the spatula.
  9. With a pastry bag fitted with a ¼ in. plain tip, pipe a ring of macaron batter leaving the hole in the center as wide as possible. (If you do not, it will close up when the macaron bakes.)
  10. Before the batter dries, place your sprinkles in the desired area.
  11. The piped batter may have peaks but should smooth away in a minute or two. Let the batter stand until the tops of the macaron batter are dry to the touch, about 30 mins to 1 hour.
  12. Preheat the oven to 275-325˚F. If your oven tends to run hot go for 275˚, if not then 325˚.
  13. Bake 10-13 minutes, until the feet are formed and the tops are smooth. The batter is done when you slightly wiggle it and it starts to come off of the parchment paper / silicone mat.
  14. Let cool and fill.

Basic Vanilla Frosting

Ingredients:
2 c. whole milk
½ c. flour
¼ tsp. salt
1 1b. (4 sticks) unsalted butter, room temperature
2 c. sugar
1 tbsp. vanilla extract

Instructions:

  1. In a saucier pan, put milk, salt and flour and whisk until combined on medium heat.
  2. Continuously whisk mixture until thickened to a pudding like consistency.
  3. Once thickened, strain through a mesh strainer into a bowl with a spatula to remove lumps.
  4. Place a piece of plastic wrap on top of the flour mixture and put into the fridge until fully cool.
  5. In a mixer bowl fitted with the whisk attachment, mix the sugar and butter on high speed until fluffy and pale about, 5-10 minutes.
  6. Add the chilled flour mixture and continue to whip on high speed until the sugar is completely dissolved and the mixture is no longer gritty, about 5-10 minutes.
  7. Add the vanilla extract and mix until combined.

*Basic macarons adapted from Bouchon Bakery by Thomas Keller, Sebastien Rouxel.

Star Wars Rebels Party

Star Wars Rebels PartyIt’s been a while. With Thanksgiving and prepping for Step 3’s, life has been hectic! I feel a mix of regret and sorrow that I missed out on all things fall for the blog. But, it has fast forwarded to December which means that the holidays are here and that translates to holiday goodies. But before we get started on all things Christmas, let’s get to the Rebels Party.

As someone who has watched the Star Wars movies exclusively, I was skeptical when the hype for Star Wars Rebels rose out of midair. But after watching one episode (which led to another and another…), I have to say that I’ve fallen in love with the characters and the story line. There is just the right mix of darkness and humor for all ages to enjoy.

So when Mr. L approached me about doing another Star Wars party, I couldn’t say no. (This is the second Star Wars themed party to be featured on the blog. The first one is linked here.)

We drew inspiration from Lothal, the planet where the rebels operate.  Lothal is apparently the name of a real city in India and one of the characters, Ezra, really reminds me of Aladdin. Coincidence?? I think not. Anyways, a bit of yellow turf, clay mountains and a modified Lego Space Needle, made a cute tablescape that was reminiscent of the real thing.

Star Wars Rebels Party LothalAs always, there was food with punny names.

Star Wars Rebels Party 2 Star Wars Rebels Party 1Inquisitortilla Chips with Dual Dip (Inquisitor Tortilla Chips with Dual Dip)
Star Wars Rebels Party 4 Star Wars Rebels Party 3Sa-Bean Burritos (Sabine Burritos)
Star Wars Rebels Party 522 Pickup-Cakes (22 Pickup Cupcakes)
Star Wars Rebels Party 8 Star Wars Rebels Party 6Chopper Salad
Star Wars Rebels Party 9“Zeb” Orrelios Oreos
Star Wars Rebels Party 11 Star Wars Rebels Party  10TIE Lettuce Wraps
Star Wars Rebels Party 13 Star Wars Rebels Party 12Kanan Lightsaber Kebabs
Star Wars Rebels Party 15 Star Wars Rebels Party 16Jogan Fruit Juice
Star Wars Rebels Party 17Hoth2O (A nod to the original series)
Star Wars Rebels Party 18The Entire Spread

It was really fun hanging out with friends, eating good food and watching the special broadcast of “Spark of Rebellion” with the extended scene. Everyone went home with a goodie bag filled with Star Wars themed candy and a figure. Of course I got the one figure I didn’t want, the imperial commander. Boo.

Cute Halloween Bat Cupcakes

Cute Halloween Bat CupcakesI know I said I would post about my Rebels Party next, but today is Halloween. And if I don’t share this with you now, I would have to wait a whole year to post this! I have a little cousin, J (wait, can I call her “Little J” from now on? A la Gossip girl??), who asks me to make cupcakes for her classroom parties every year. Last year I made these cauldron cupcakes, but it wasn’t an original idea of mine. This year I was bent on doing something unique, and of course every time I thought something was new, Google told me I was wrong. After a solid week of thinking about spiders, cats, ghosts, graveyards, pumpkins, candy corn, witches and other Halloween themed items, I came up with these really cute bat cupcakes.
Cute Halloween Bat Cupcakes 3Start by tinting vanilla frosting to a blue that is similar to the night sky and add some edible gold stars. The bats are made with Oreo truffles which are one of the easiest desserts you can make. You basically mix Oreos and cream cheese and you get these tasty nuggets of goodness. Plus, I used cookie dough Oreos which made them that much more awesome. Stick on some candy eyes, chocolate wings and chocolate covered candy pearls and you’ve got a bat. The moon in the background is made with yellow candy melts sprinkled with sanding sugar to make it glitter. By the way, I hurried my butt to get a few shots of these before the sun went down and that’s the reason I’m lacking more photo content. I love me some fall, but I do not love the short days… no siree.

Halloween Bat Cupcakes

Chocolate Cupcakes

Ingredients:

1 ¾ c. all-purpose flour
2 c. sugar
¼ c. natural unsweetened cocoa powder
½ c. Dutch-process unsweetened cocoa powder
2 tsp. baking soda
1 tsp. baking powder
1. tsp. kosher salt
½ c. vegetable oil
2 extra-large eggs, room temperature
1 tsp. vanilla extract
1 c. strong, hot coffee

Instructions:

  1. Preheat oven to 350 degrees and line 2 muffin pans with cupcake liners (24 cups in total).
  2. In a stand mixer fitted with the paddle attachment, mix flour, sugar, both cocoa powders, baking soda, baking powder and salt until fully combined.
  3. In a separate bowl, whisk vegetable oil, eggs, and vanilla extract until combined.
  4. With the mixer speed on low, add the egg mixture to the flour mixture until combined.
  5. Turn off the mixer. With a spatula, scrape the sides of the bowl to fully incorporate the two mixtures.
  6. Turn the mixer on low and slowly add the hot coffee to the batter. Once added, raise the speed to medium until completely homogenous.
  7. Fill cupcake liners with 2/3 full with batter and bake about 15-20 minutes. Checking at 13 minutes for doneness with a toothpick.
  8. Let stand for 5-10 minutes when done, then put onto a cooling rack to fully cool.

Night Sky Frosting

Ingredients:

2 c. whole milk
½ c. flour
¼ tsp. salt
1 1b. (4 sticks) unsalted butter, room temperature
2 c. sugar
1 tbsp. vanilla extract
royal blue gel food color
violet gel food color

Instructions:

  1. In a saucier pan, put milk, salt and flour and whisk until combined on medium heat.
  2. Continuously whisk mixture until thickened to a pudding like consistency.
  3. Once thickened, strain through a mesh strainer into a bowl with a spatula to remove lumps.
  4. Place a piece of plastic wrap on top of the flour mixture and put into the fridge until fully cool.
  5. In a mixer bowl fitted with the whisk attachment, mix the sugar and butter on high speed until fluffy and pale about, 5-10 minutes.
  6. Add the chilled flour mixture and continue to whip on high speed until the sugar is completely dissolved and the mixture is no longer gritty, about 5-10 minutes.
  7. Add the vanilla extract and mix until combined.
  8. Add blue and violet gel colors until desired color is reached.

Yellow Moons

Ingredients:

yellow candy melts
yellow sanding sugar

Instructions:

  1. Melt yellow candy melts and pour into a squeeze bottle.
  2. On a sheet pan lined with wax paper, draw and fill in 1 inch wide circles with the squeeze bottle.
  3. Sprinkle yellow sanding sugar while candy melt is still melted.
  4. Let set until use.

Oreo Truffle Bats

Ingredients:

36 Oreos
8 oz. package of cream cheese, softened
1 tsp. vanilla extract
black candy melts
black candy pearls
small candy eyeballs

Instructions:

  1. Put Oreos in a food processor and pulse until fine crumbs form.
  2. Add softened cream cheese and vanilla extract, and pulse until blended.
  3. Shape into 40 small balls onto a wax paper lined sheet pan and chill until firm.*
  4. Melt the black chocolate candy melt in a tall and narrow bowl or cup and dip chilled truffles using a fork. Let excess drip back into the bowl/cup.
  5. Let the chocolate on the truffle set until firm.
  6. Pour melted chocolate candy melt into a squeeze bottle.
  7. On a separate sheet pan lined with wax paper, draw wings with squeeze bottle. Set aside.
  8. While the wings set, use the black candy melt to adhere candy eyeballs onto the chocolate truffle.
  9. Take a black candy pearl, dip it into melted black candy melt and adhere onto top of the bat’s head. Let set.

Assembly

You will need:

chocolate cupcakes, baked and cooled
night sky frosting
yellow moons
truffle bats
edible gold star glitter
large open star decorating tip

Instructions:

  1. In a pastry bag fitted with a large open star decorating tip, fill with night sky frosting and frost a tall swirl on a chocolate cupcake.
  2. Sprinkle edible gold star glitter all around the sides.
  3. Add a yellow moon towards the back of the cupcake and place a truffle bat (without its wings) onto the center of the cupcake.
  4. Take two wings and position it next to the truffle bat.
  5. Enjoy!

*If mixture is too soft to shape into balls, spoon 40 small separate mounds on a wax paper lined sheet pan and chill.  Once chilled, you should be able to form them into balls.

Chocolate cake recipe adapted from Ina Garten.
Oreo truffle recipe adapted from Kraft.

Caramel Apple Monkey Bread

Caramel Apple Monkey Bread 1There are a few things that scream “autumn”. Pumpkins, apples, fall foliage, football and Thanksgiving are at the top of my list. A couple several weeks ago, I went apple picking with a group of friends and came home with a big ol’ bag of apples. Apples are notorious for lasting along time (as long as they are not bruised) and I have plans for the other ones I have in my fridge. But for now, I have this recipe for you.
Caramel Apple Monkey Bread 2 Caramel Apple Monkey Bread 3 Caramel Apple Monkey Bread 4If you’ve never had monkey bread, you’re missing out on some serious yum. If you took cinnamon rolls but made them bite sized and decided to glue them together with some cinnamon sugar, you’ve got monkey bread. Cut up some fresh apple chunks and stuff them in the sweet dough and you have fall in bread form.
Caramel Apple Monkey Bread 5I have to be honest. I’ve made and shot this recipe weeks ago and I started writing the first paragraph last week, but things became hectic and that’s as far as I got. But to be fair, I threw a Star Wars Rebels themed party and that kept me quite busy for a several days. I’m excited to share it with you on my next post!
Caramel Apple Monkey Bread  6Caramel Apple Monkey Bread

Ingredients:

1 ¼ c. milk
2 tsp. instant yeast
4 c. all-purpose flour
5 tbsp. sugar
1 tsp. salt
1 egg
5 tbsp. unsalted butter, melted
3 apples, peeled, cored and cut into small bits
1 ¼ c. firmly packed dark brown sugar
2 tsp. cinnamon
½ c. (1 stick) unsalted butter, melted and cooled

Instructions:

  1. Generously spray the inside of a 10 in. Bundt pan with nonstick cooking spray.
  2. In a small bowl, warm your milk, add the yeast and whisk to dissolve. (Do not warm it above 110˚F or you will kill the yeast).
  3. In the bowl of a standing mixer fitted with the paddle attachment, beat the flour, 5 tbsp. sugar, egg, and salt until combined.
  4. Slowly add in the milk mixture until combined. Add the 5 tbsp. melted butter and mix until the dough comes together.
  5. Replace the paddle attachment with the dough hook attachment. Continue to mix on medium speed until the dough becomes silky and tacky, but not sticky, about 8-10 minutes.
  6. Spray a large bowl with cooking spray. Cover the bowl with plastic wrap and let it rest in a warm area until the dough has doubled in size, approximately 1 hour.
  7. Use your clean hands to push down and deflate the dough. Roll out dough in a rough rectangle, ¼ in. thick. Spread 1/3 of apple bits onto half of the rolled out dough. (As pictured above)
  8. Fold dough in half and spread another 1/3 of apple bits on another half of the dough and fold once again in half to form a quarter of its original size. (As pictured above)
  9. Cut dough into 1 to 1 ½ inch pieces and roll the pieces into balls (apple pieces may stick out). Place the balls on the sheet pan.
  10. In a small bowl, stir together the sugar and cinnamon. Place the melted butter in a separate bowl.
  11. Dip one dough ball in the melted butter. Let the excess butter drip back into the bowl, roll the ball in the brown sugar mixture, and place it in the Bundt pan.
  12. Continue this process with each ball, until halfway where you will scatter the rest of the apple pieces.
  13. Wrap the Bundt pan tightly in plastic wrap and let rise in a warm area until the dough balls have doubled in size.
  14. Preheat the oven to 350 degrees F.
  15. Bake until the top layer is deep brown and the caramel coating begins to bubble around the edges, about 30 minutes.
  16. Cool the bread for 5 minutes, then turn it out directly onto a platter and serve warm. If you have any leftovers, reheat them in a 300 degree oven until warm to the touch.

Recipe adapted from Baked Explorations by Matt Lewis and Renato Poliafito.

Bánh Mì Quesadillas (Vietnamese Quesadillas)

Vietnamese Quesadillas 4I found something that has changed my life: cook-and-serve flour tortillas from TortillaLand. After reading this post about these tortillas, the first thing I did was do a quick search and found that the only Walmart that carried them were over 10 miles away. Now, I know 10 miles is nothing in other parts of the country, but for me? 10 miles is far, especially when there is a Walmart less than 4 miles away. I almost gave up on them, but I was haunted by their flaky, perfectly puffed up pictures and I had to have them. So I dragged my butt over to the Walmart and acquired a package of it. And as much as I wanted to have them right away, I couldn’t! I mean, yes, I could’ve tossed in a few well-chosen ingredients and called it a day, but these were special and I needed the final product to be as special as its base.
Vietnamese Quesadillas 3If you are not familiar with a bánh mì, it is a Vietnamese sandwich that is filled with meat, a mayo-based spread, cucumber, pickled carrots and daikon, cilantro, and chili peppers inside a baguette. If you’ve ever had a great bánh mì, you would know that it is an explosion of flavor and contrasting textures. In this spinoff, the mayo spread is replaced with mozzarella cheese, the bread with the tortilla and the meat with a Vietnamese fish-sauce shredded chicken.
Vietnamese Quesadillas 2Before I go on about the awesomeness of this quesadilla, I must warn you about this Vietnamese fish-sauce shredded chicken. It is a modified version of the famous Pok Pok’s wings. I’ve made the fried wings for this year’s Star Wars Day and it was the most delicious chicken wing I’ve ever put in my mouth (and I’ve had my fair share of fried chicken wings). The only downside is it will make your house smell like fish sauce. Now for some people, this might be a deal breaker but I swear to you, it is worth suffering a day of a fish sauce stink for it.
Vietnamese Quesadillas 1This is a minimum two-day project. You need a day to pickle the shredded daikon and carrots. It wouldn’t hurt to make the shredded chicken a day before either because it’s a little complicated than the average chicken recipe. But when you bite into that crispy flaky tortilla filled with warm melty cheese, garlicky chicken, tangy pickled vegetables and the crisp crunchy cucumber and jalapeño, it will make you say, “I can eat this every day of my life.” Because I did… every time I made it this week.
Vietnamese Quesadillas 2Bánh Mì Quesadillas (Vietnamese Quesadillas)

Pickled Daikon and Carrots

Ingredients:
1 large carrot
1 small daikon
2 tbsp. chopped fresh cilantro
½ c. vinegar
¼ c. sugar
½ c. water

Instructions:

  1. At least a day before making the quesadillas, grate the carrot and daikon over the large holes in a box grater.
  2. Heat vinegar, water and sugar together until sugar dissolves.
  3. Place carrot, daikon and cilantro in a heatproof bowl and pour the vinegar mixture over the vegetables.
  4. Once cooled, marinate in the refrigerator for at least 24 hours.

Vietnamese Fish-Sauce Shredded Chicken

Ingredients:
8 large cloves of garlic
½ tsp. kosher salt
¼ c. warm water
½ c. fish sauce
½ c. sugar
1 ½ lb. chicken, cooked and shredded

Instructions:

  1. Finely mince the garlic and place into a small bowl.
  2. Sprinkle salt over it and add warm water to the bowl and stir. Let rest for 5 minutes.
  3. Pour the garlic mixture over a sieve and push the garlic to extract as much juice as possible. Reserve the garlic juice and garlic bits separately.
  4. Stir fish sauce and sugar together with the garlic juice until sugar is dissolved.
  5. In a small pot, pour a few tablespoons of oil and heat until oil shimmers.
  6. Fry the reserved garlic bits until it turns golden brown and drain on a paper towel.
  7. Add the fish sauce mixture into the small pot and simmer until it becomes a thick sauce.
  8. Once thickened, pour over the shredded chicken and mix until completely covered.
  9. Add the fried garlic pieces and mix thoroughly.

Assembly

Ingredients:
pickled daikon and carrots
Vietnamese fish-sauce shredded chicken
seedless cucumbers, sliced into thin strips
mozzarella cheese, shredded
jalapeño, sliced thinly
flour tortillas*

Instructions:

  1. Heat a nonstick pan over medium heat.
  2. Toast the tortillas on both sides. (If using the cook and serve tortilla, cook the tortilla on both sides.)
  3. Spread mozzarella cheese evenly across a tortilla and melt.
  4. Once the cheese has melted, spread the shredded chicken over half of the tortilla.
  5. Layer the pickled daikon and carrots, followed by the cucumber and then the jalapeños.
  6. Fold tortilla in half and press down to secure the fillings.
  7. Remove from pan and cut into wedges.
  8. Enjoy

I highly recommend the cook-and-serve flour tortillas from TortillaLand.
** Picked daikon and carrot adapted from All Recipes.
*** Vietnamese fish-sauce shredded chicken adapted from Pok Pok by Andy Ricker.

Peaches and Cream Crêpe Cake

Crêpe Cake 6It’s been a while. Residency was kicking my butt and I ate too well for my birthday week and decided to go on a diet. Two weeks later, residency is still kicking my butt and the diet was a disaster. What happens when a food blogger decides to go on a diet? They lose content. Lesson learned. I won’t do it again. I promise.
Crêpe Cake 3Several weeks ago my good friend, H, brought two slices of crêpe cake from Lady M Confections. If you don’t know already, Lady M is a chain of cake boutiques that specialize in crêpe cakes. I never tried a crêpe cake before and was pleasantly surprised by the delicate layers and the light taste. But when H told me how much she paid, I was shocked at the price tag. $8 for a slice of cake?? As delicious it was, I could not justify that kind of cost and said I would never pay that that much for a slice of cake, ever.
Peaches and Cream Crêpe Cake 1Fast forward two weeks and as my birthday approached closer, I couldn’t help but think of that ridiculously expensive crêpe cake. Do I just bite the bullet and buy it or should I try it on my own? I’ve never attempted at making crêpes at home but it was my birthday, and I decided I would make one if I wanted to.
Crêpe Cake 2I know some people think making your own birthday cake is sad or depressing and until this year, I’ve been blessed with significant others that would buy me the cake of my desire. But you know what, making your own cake is better because you get exactly what you want and how you want it. Plus, if you make a mistake or mess up, you don’t feel guilty or pressured about ruining someone’s special day.
Crêpe Cake 4I had some fresh picked peaches when I went peach picking in August, so I decided to incorporate it into the cake. If I could redo this cake, I would make the crêpes thinner. As a novice, I was worried about it tearing and made them on the thicker side. In hindsight, it wasn’t necessary. So go thin if you decide to make it.
Crêpe Cake 5In the end, it was worth the effort and I suggest eating it immediately after caramelizing the sugar.  Because when you take a bite of the crisp bits of sugar with the light cake, you will be in heaven. Plus when you refrigerate it, the sugar melts and you get an odd syrup that may or may not pool all over your refrigerator shelf. (Yes, this happened. No, I was not fun cleaning it up.)

Peaches and Cream Crêpe Cake

For the Crêpes

Ingredients:
6 tbsp. butter
3 c. milk
6 large eggs
1 ½ c. all-purpose flour
7 tbsp. sugar
pinch kosher salt

Instructions

  1. Prepare the batter a day before you want to serve the cake.
  2. In a small saucepan, melt and brown the butter.
  3. In a separate saucepan, heat the milk and cool for 10 minutes. (Do not boil milk.)
  4. In a food processor, pulse eggs, flour, sugar and salt until fully combined.
  5. Add milk and butter and pulse until fully combined.
  6. Refrigerate batter for 8-24 hours.
  7. On the day of, bring the batter to room temperature.
  8. Heat a 6” nonstick pan and spray the pan with nonstick spray and wipe off.
  9. Spread 3 tbsp. of batter and swirl to cover the pan.
  10. Cook until the bottom begins to brown and flip the crêpe cook the other side until it sets.
  11. Repeat until all of the batter is used.

For the Pastry Cream

Ingredients:
2 c. milk
¼ c. sugar
2 egg yolks
1 egg
¼ c. cornstarch
¼ c. sugar
2 tbsp. unsalted butter
1 tsp. vanilla extract

Instructions:

  1. Prepare the pastry cream a day before you want to serve the cake.
  2. In a medium saucepan, bring milk and ¼ c. sugar to a boil.
  3. In another medium bowl, mix egg yolks, egg, cornstarch and ¼ c. sugar until a paste forms.
  4. Using a ladle, drizzle a ladleful of milk while continuously whisking the egg mixture. Continue to drizzle in hot milk a little at a time until you mix in ¾ of the milk.
  5. Take the egg milk mixture and pour it into the saucepan with the remaining milk.
  6. Cook the mixture while stirring constantly over medium heat until mixture is thickened and pudding like.
  7. Remove saucepan from heat and mix in butter and vanilla extract. Set aside.

To Assemble

Ingredients:
1 ½ c. heavy cream
3 tbsp. powdered sugar
2 tbsp. Kirsch
3 large very ripe peaches, cut into small bits
granulated or powdered sugar for garnish (optional)
sliced peaches for garnish (optional)

Instructions:

  1. Whip the heavy cream and powdered sugar until stiff peaks form.
  2. Fold in prepared pastry cream, Kirsch and peaches.
  3. Lay two crêpes on a cake plate. Using an offset spatula, spread a thin layer of peach pastry cream. Cover with a crêpe and repeat until all the crêpes are used. Save the best looking crêpe for the top.
  4. Chill for at least 2 hours to set.
  5. When ready to serve, you can:
    1. Dust the top with powdered sugar.
    2. Sprinkle the top with granulated sugar and caramelize with a blowtorch.
    3. Garnish the top with sliced peaches, sprinkle the top with granulated sugar and caramelize with a blowtorch.

Crepe Cake recipe adapted from NY Times.