Chocolate Banana Bread

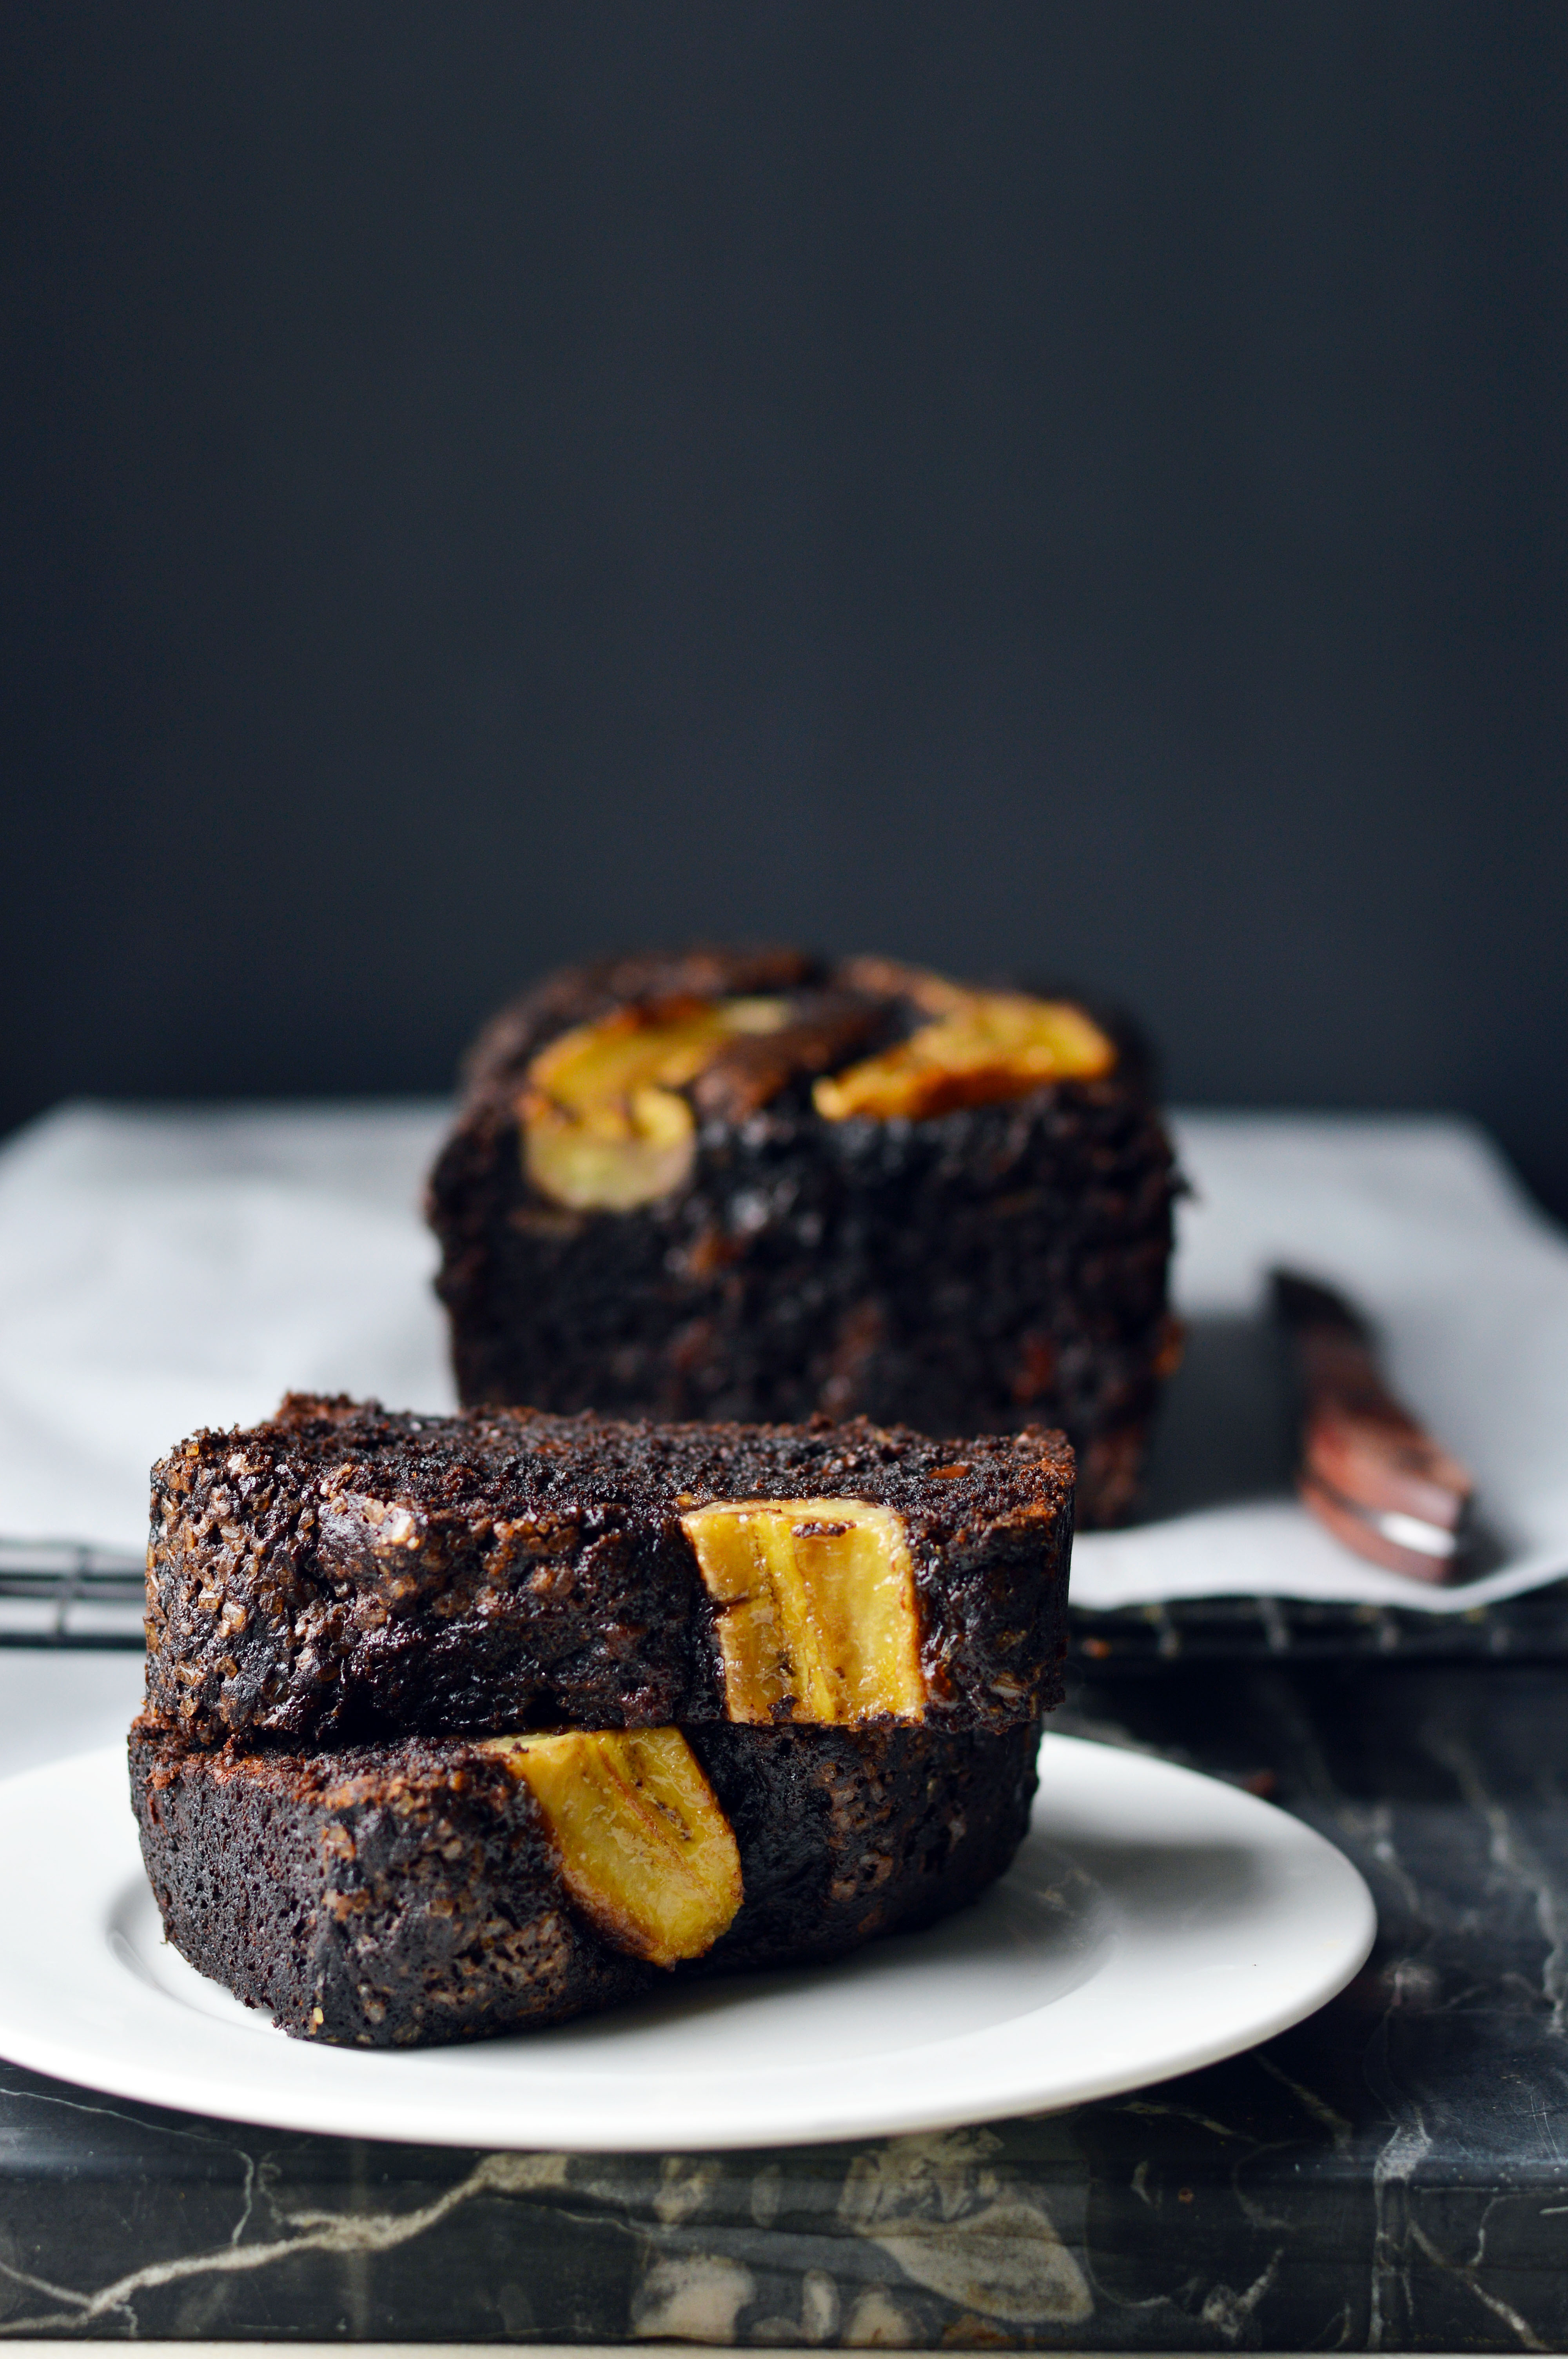
This bread is not healthy. I repeat, this bread is not healthy. Itโ€™s interesting how every time you have a fruit or a vegetable in the title of a recipe, it sounds like a healthier option. (Did you know that carrot cake at the Cheesecake Factory is one of their highest calorie count desserts? Iโ€™m telling you.. vegetables/fruits in a dessert is a lie!) Instead itโ€™s an indulgent, rich chocolate bread which is full of chocolate chips and banana flavor. I think the role of the banana here is not so much to provide banana flavor (which it does) but to give it a rich, moist crumb that is not heavy.
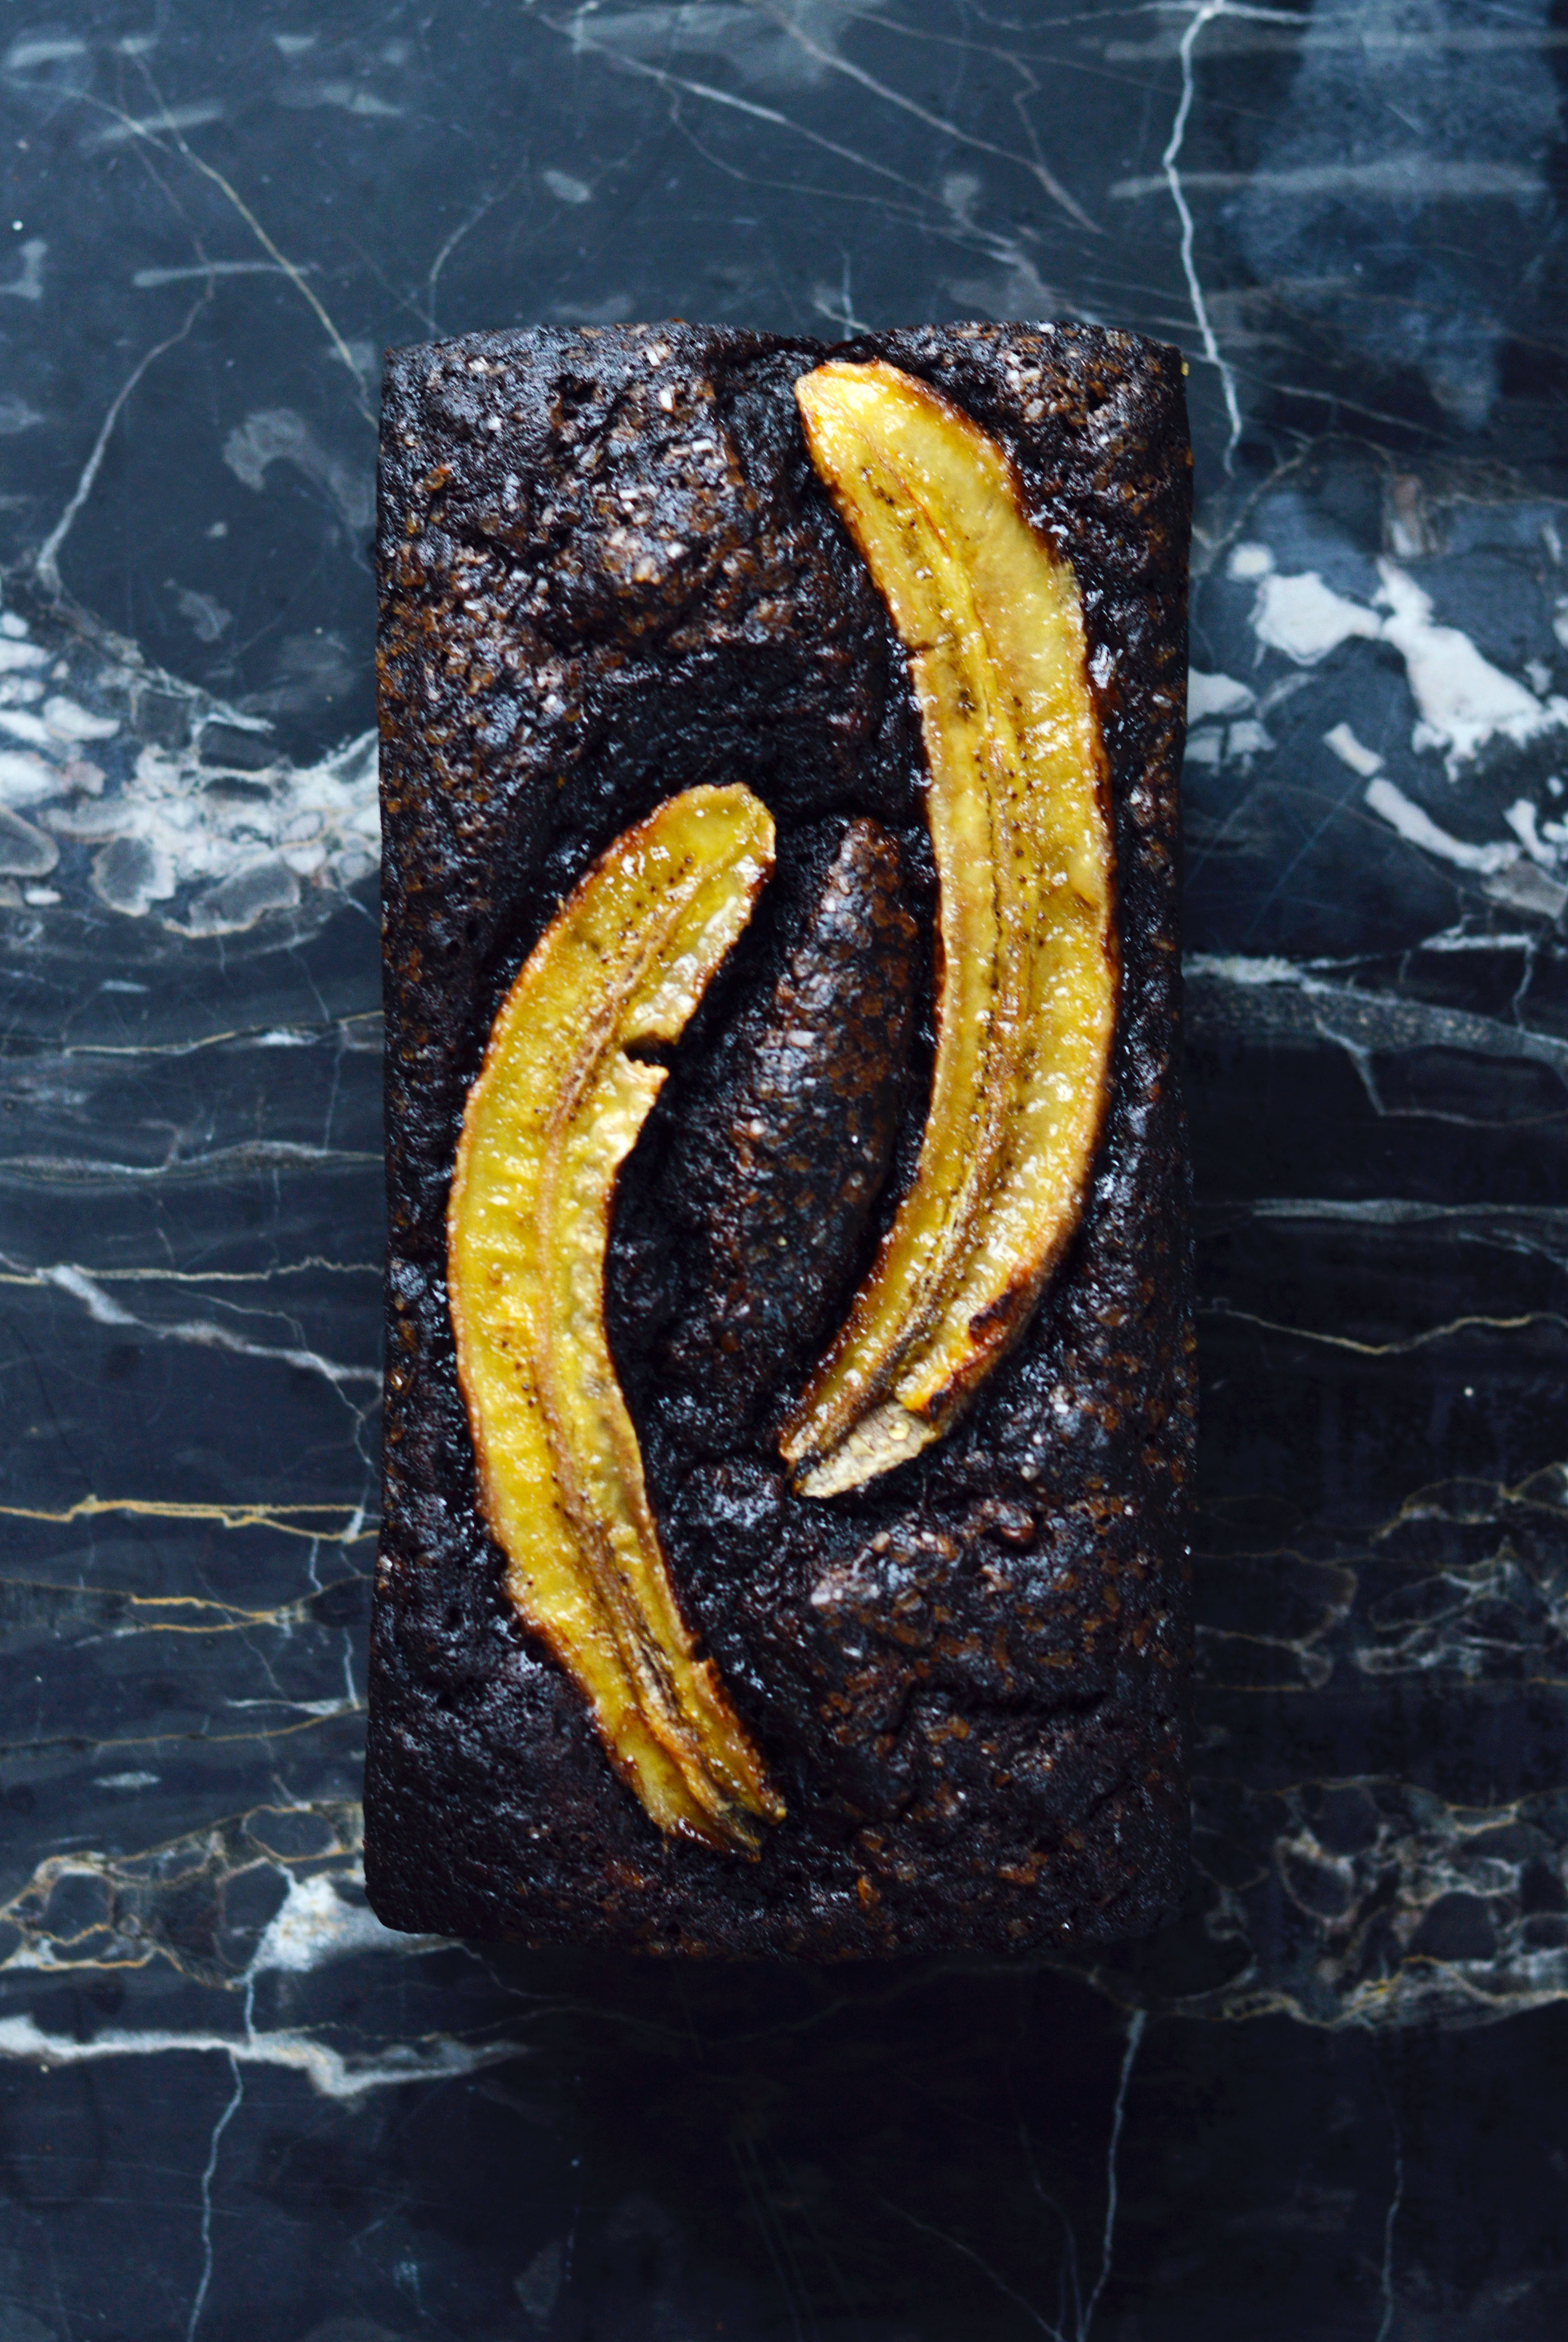
Iโ€™ve seen a lot of banana breads on Instagram that have the floating bananas on top and always wondered how it is done. And the interesting thing is, no one writes how it is done! Even recipes with the floating bananas donโ€™t mention the bananas on top of the loaf, they just mention putting the batter into the pan and bake. WHY?

Turns out, the bananas do not sink into the bread like I worried. But to keep it from turning color, a light brushing of fresh lemon juice will help it keep its pleasing yellow shade. Sprinkle the top with Sugar In The Raw (aka demerara sugar) and it will glisten with crunchy sugar crystals after it is baked.  It really is one of my favorite banana bread recipes and I think Iโ€™ll have a hard time turning back to my older one. On second thought, I might on the days I want to be a little โ€œhealthierโ€โ€ฆ that one uses half whole wheat flour. ๐Ÿ™‚

Chocolate Banana Bread

Ingredients:

1 c. all-purpose flour
ยฝ c. Dutch processed cocoa
1 tsp. baking soda
ยฝ tsp. kosher salt
3 large brown bananas (1 ยฝ c. mashed)
ยผ c. (4 tablespoons) unsalted butter, melted
ยผ c. vegetable oil
ยฝ c. packed light brown sugar
1 extra large egg (or large if you donโ€™t have extra large)
1 tsp. vanilla extract
ยพ c. chocolate chips
1 banana, ripe but not browned
a squeeze of fresh lemon juice
demerara sugar (sugar in the raw) for sprinkling on top of loaf

Instructions:

  1. Preheat your oven to 350หšF, grease and line your loaf pan with parchment paper. (I used this gorgeous pan and it is on sale!!)
  2. Sift flour, cocoa powder, baking soda and kosher salt in a medium bowl and set it aside.
  3. In the bowl of a standing mixer with the paddle attachment on medium speed, add the mashed bananas, melted butter, and oil and mix until combined.
  4. Add in the brown sugar, egg and vanilla and mix until smooth.
  5. Turn the mixer to the lowest setting and add in the flour mixture.
  6. While there are traces of flour in the batter, add the chocolate chips and mix just until combined.
  7. Pour batter into your prepared loaf pan.
  8. Slice your banana lengthwise and brush with fresh lemon juice
  9. Place it side by side on top of the batter.
  10. Sprinkle the demerara sugar all over the top and place into the oven.
  11. Bake banana bread for about 50-60 minutes, checking at 50 minutes to make sure you donโ€™t overbake your loaf.
  12. Stick a toothpick in the center of the loaf to check, making sure to check in a few places as skewering a chocolate chip would make you think the batter is undercooked.
  13. Remove pan from the oven and place on a cooling rack for about 15 minutes before removing the bread from the pan.
  14. Let cool and serve.

Recipe adapted from Two Peas and Their Pod.

Baymax Macarons

Iโ€™ve always been intimated by shaped macarons. If you look back on my archives, theyโ€™re mostly round with details added to them. But recently, I made Hello Kitty macarons and I learned that it is quite easy to do as long as you use a smaller piping tip. The key is understanding that macaron batter is not like frosting, it moves and doesnโ€™t make crisp lines without help.
As you know, I have made Baymax macarons before, but never posted a tutorial on it. So this time, I added tiny hands to make it a little more dimensional and fun. I think that if youโ€™ve made macaron batter before, then this is possibly the easiest shaped macaron you can do.
These were filled with black sesame frosting which was quite interesting, and have their own post coming up. But before I post that one,ย  I have an amazing chocolate banana bread recipe I want to share. So there is something to look forward to soon!

Baymax Macarons

You will need:

1 batch of basic macaron batter (recipe below)
frosting
edible black marker
wilton decorating tip, #2 (or any tiny round tip)
ยฝ inch round decorating tip

Instructions:

  1. Prepare two piping bags each fitted with the ยฝ inch round tip and the #2 tip.
  2. Divide โ…ž of the batter into the ยฝ inch round tip bag and โ…› of the batter into the #2 tip bag.
  3. On a baking sheet lined with a macaron template and parchment paper, pipe rounds of macarons as you usually would with the ยฝ inch round tip bag. (as shown in picture #1)
  4. Let the macarons set until dry, about 20 minutes. Then pipe tiny rounds on the bottom half of the macaron circles forming hands with the #2 tip bag. (as shown in picture #2)
  5. Bake macarons as usual. (as shown in picture #3)
  6. Once cool, find a match for each macaron sandwich. Sometimes the hands will not line up perfectly, that is okay.
  7. Using an edible marker, make two dots and a line in the middle forming Baymaxโ€™s face. (as shown in picture #4)
  8. Fill each half with frosting and sandwich together.
  9. Enjoy

Basic Macaron Batter

Ingredients:

212 g. almond meal (aka almond flour)
212 g. powdered sugar
172 g. egg whites, divided to 82 g. and 90 g (aged, if possible)
236 g. sugar
158 g. water

Instructions:

  1. Line two baking sheets with parchment paper or silicone mats.
  2. In the bowl of a food processor, add the almond meal and powdered sugar and pulse until thoroughly combined.
  3. Sift the mixture over a large mixing bowl, throwing out the lumps as they appear.ย  Add 82 g. of the egg whites and stir until you get a thick mixture.
  4. In a small pot attached with a candy thermometer, combine the sugar and water over medium heat and boil until the syrup reaches 200หšF.
  5. Once the syrup reaches 200หšF, start whipping the remaining 90 g. in the bowl of your stand mixer with the whisk attachment on medium speed until soft peaks are reached.
  6. Once the syrup reaches 248 หšF, remove the pot off the burner and slowly pour the syrup down the side of the mixing bowl with the egg whites on medium speed.
  7. Once the egg whites are fully incorporated, increase the speed to medium high until egg whites form glossy, stiff peaks.
  8. Mix a โ…“ of the egg white mix to the almond mixture and stir together until the batter is slightly lighter and less pasty.ย  From then on, fold in โ…“ of the egg white mixture at a time until the mixture โ€œflows like magmaโ€.ย  The mixture should be smooth and run thick ribbons off the spatula.
  9. With a pastry bag fitted with a ยฝ in. plain tip, pipe 1ยผ โ€“ 1ยฝ in. rounds.
  10. The piped batter may have peaks but should smooth away in a minute or two.
  11. Let the batter stand until the tops of the macarons are dry to the touch, about 30 minutes to 1 hour.
  12. Preheat the oven to 325-350หšF.ย  If your oven tends to run hot go for 325หšF, if not then 350หšF.
  13. Lower the heat to from 350หšF to 300หšF. (If starting from 325หšF, lower to 275หšF.)
  14. Bake 10-12 minutes, until the feet are formed and the tops are smooth.ย  The macaron shell is done when you slightly wiggle it and it starts to come off of the parchment paper / silicone mat.
  15. Remove pan from oven and reheat oven to higher temperature for 10 minutes before baking the next tray, lowering the temperature when you start baking it.
  16. Continue until you bake all of the macaron shells.


Cake Batter ร‰clairs

There is a bakery a few towns away that I absolutely love called Sook Pastry. In a way Iโ€™m glad itโ€™s not too nearby because I would frequent it more than necessary. There are many great baked goods that they offer, but my favorite is the awesome chocolate รจclairs. ย They are not too sweet or rich but are satisfyingly chocolaty with the perfect shell.I donโ€™t know at what point I became such a pastry snob. I remember eating boxes of Entenmannโ€™s chocolate รจclairs and being satisfied as a kid. But when I picked up a box for the nostalgia factor, it was horrifically disappointing. The too-squishy bland base, the lack of custard filling and the low quality chocolate topping made me wonder, โ€œWHY?!โ€ I guess I can argue that the costs of ingredients are higher and manufacturers have to cut down on quality in order to keep the costs low. Remember when they changed the recipe for the chewy chips ahoy? That was another sad day. Anyways, the point is, I guess Iโ€™d rather eat just one great รฉclair than a whole box full of them.
Turns out, baking a great รฉclair is not as easy as it looks. The hurdle is the choux dough base. Iโ€™ve made cream puffs (which are also made out of choux dough) many times before. Remember the croquembouche? I had trays and trays of cream puffs that time. The problem was it was not sturdy enough for an รฉclair. They would flatten and look sad, no matter what technique I tried (using the tines of a fork, using a star tipped frosting tip to pipe out the batter, letting the base cook in the oven longer to ensure dry interiorsโ€ฆ). So I went to google and did some research.
Luckily Ilan from the ironwhisk already did the research and created a great choux paste tutorial for รจclairs. My only gripe with recipe was that it produced a shell that was too salty. Even when I waived the salt in the filling, the saltiness was overpowering. I suggest cutting the salt in half to ensure a better balanced รฉclair.
I originally baked this for my third blog anniversary, and thatโ€™s why there are so many decorative sprinkles that scream โ€œcelebration!โ€ hahaha I know, Iโ€™m approaching the fourth anniversary around the corner and Iโ€™m posting this now. Smh. Please, feel free to use any type of sprinkle, sanding sugar, sugar pearls, and nonpareils that you might have. My sprinkles container is over capacity and I am now resorting to ziplock freezer bags to hold the rest of them. I may have a hoarding problem with them, but they were perfect for this post in particular.
To go with the โ€œcelebrationโ€ theme, I also made the filling cake batter flavored because what better way to celebrate than with cake? A few spoonful of cake mix gives it that flavor. I rarely use boxed cake mix and only use it to give it a โ€œcake batterโ€ flavor to something. So I usually have a ton of it leftover. I always feel bad tossing it out. There must be a better way out there hahaha But I figure, if you do bake boxed cake often, then this should be a staple in your pantry.

Cake Batter ร‰clairs

For the Choux Base:

Ingredients:

75 g. water
75 g. milk
75 g. butter
5 g. sugar
2.5 g. salt (about ยฝ tsp. best to use the tsp for such small measurements)
100 g. bread flour, sifted
150 g. eggs (about 3 large eggs), room temperature and lightly beaten
Powdered sugar, for dusting

Instructions:

  1. In a medium saucepan over medium heat, stir water, milk, butter, sugar and salt and bring to a boil.
  2. Remove the pot from the heat once the mixture reaches a boil, and add all the flour at once.
  3. Stir vigorously with a wooden spoon until a film on the bottom of the pan forms, about two minutes. The dough should be 170หšF (75 หšC). Do not scrape the film into the dough.
  4. In the bowl of a standing mixer fitted with the paddle attachment, add the dough and mix on low for about a minute and thirty seconds or until the dough cools down to 140หšF (60หšC).
  5. Add half the eggs on low, until combined. Then add the remaining eggs slowly until combined and a smooth dough forms.
  6. Preheat the oven to 350หšF (180หšF) and line a sheet pan with parchment paper. You can dab a bit of the dough onto the bottom corners of the parchment paper to keep it in place while you pipe out the รฉclairs.
  7. Prepare a pastry bag (or a gallon sized freezer zip lock bag) with a ยฝ in. star tip with as many small teeth as possible.
  8. Pipe the รจclairs about 5 inches long, 1 inch wide andย  2 inches apart.
  9. Dust with powdered sugar.
  10. Bake for about 35-40 minutes until the pastry is dark golden brown.
  11. Remove the tray from the oven and carefully slit the bottom of each choux with a paring knife to let the steam escape.
  12. Cool completely.

For the Cake Batter Pastry Cream

Ingredients:

2 c. whole milk
ยฝ c. sugar, divided
2 egg yolks
1 large egg
ยผ c. cornstarch
2 tbsp. butter
1 tsp. vanilla extract
3 tbsp. vanilla cake mix
sprinkles (optional)

Instructions:

  1. In a pot, heat whole milk and ยผ c. sugar and bring to a simmer.
  2. While the milk heats, mix egg yolks, egg, cornstarch and ยผ c. sugar in a medium bowl.
  3. When the milk is hot, use a ladle to slowly drizzle hot milk into the egg mixture while whisking to prevent curdling.
  4. Once all of the milk is introduced into the egg mixture, return all of it back into the pot.
    Bring the mixture in the pot to a boil while whisking. When it is thick, remove the pot off the heat.
  5. Add in the butter and vanilla. Once the butter is completely mixed in, add the cake mix. Move mixture to a bowl and place a piece of plastic wrap directly against the pastry cream (to prevent a skin from forming). Chill completely, about 2-3 hours, before using.
  6. If adding sprinkles, add to the pastry cream after fully chilled.

Vanilla Glaze

Ingredients:
1 ยฝ c. powdered sugar
2 ยฝ tbsp. milk
โ…› tsp. salt
ยผ tsp. vanilla extract
1 tbsp. butter

Instructions:

  1. In a microwave safe bowl, melt the butter.
  2. Add the rest of the ingredients and mix.

Assemble the ร‰clairs:

  1. Flip the cooled choux pastry upside down and fill with cake batter pastry cream using a pastry bag fitted with a small round tip.
  2. Dip the รฉclairs in the glaze using your fingers to wipe away the excess on the sides to ensure a neat presentation.
  3. Sprinkle with whatever decoration you want, or go simple and forgo the decoration.

Choux pastry recipe adapted from Iron Whisk.
Pastry cream and glaze recipe adapted from All Recipes.

Red Velvet Strawberry Rose Cake

Happy Valentineโ€™s Day! As someone who loves all things pink and feminine, Valentineโ€™s Day dรฉcor is right up my alley. This cake was inspired by Ron Ben Israelโ€™s rose cake which Iโ€™ve been obsessed with as soon as I laid my eyes on it. It was always on my โ€œto-tryโ€ list but I never got the chance to take on the challenge. Recently, there was a blog post by NYC Cake Girl who used to work with Ron Ben Israel with a how-to on the very cake I loved. The amount of work and the detail work was perfection (as always), and I knew I simply didnโ€™t have the time (and possibly even the skill) to recreate the cake. So I created this cake which looks similar and uses real rose petals.
As for the cake itself, I used half of my giant doughnut cake pan instead of baking a round cake and carving it into a dome like the tutorial. A similar effect could be produced with a shallow bundt cake, but I think the smooth exterior of the doughnut pan really makes things easier. The cake flavor is red velvet (because it is THE cake of Valentine โ€™s Day), and is layered on the inside with fresh strawberries and vanilla frosting. I know I know, I almost felt like it was sacrilege not to use cream cheese frosting, but I didnโ€™t have cream cheese in the fridge so, vanilla it is. Please feel free to use cream cheese frosting if you prefer it.
I picked a bouquet of flowers that varied in shades of pink in hopes of making an ombre effect. However, once the petals were stripped from the flowers, they kind of ended up being the same color. I saved the lightest rose for the center though. Although in hindsight, I think I shouldโ€™ve just picked the flower that had the least blemishes. You essentially layer the petals one by one in alternating layers around the cake to form a giant rose. It is a bit time consuming and is not completely symmetrical like the fondant petals from the original cake. But, I think it kind of gives it a homemade vibe that people can appreciate.I went a little heavy with the pictures because it was SO STUNNING. Likeโ€ฆ the photos canโ€™t do it justice. I loved even how the slices had petals on them fanning out the back, like a very fancy cape or headdress. I can almost guarantee that you will get โ€œwowsโ€ and surprised looks when you bring this cake. It wonโ€™t disappoint.
I hope all of you got some sort of recognition of love this Valentineโ€™s Day. If not, I baked this cake for you. ๐Ÿ˜‰

Red Velvet Strawberry Rose Cake

You will need:

1 batch red velvet cake, baked in a dome shape (recipe below)
1 batch vanilla frosting (recipe below)
About ยฝ pint strawberries, sliced horizontally (enough to cover the area of the cake twice)
1 dozen roses (pesticide-free)

Instructions:

  1. Slice the red velvet cake in half (horizontally), and smooth a thin layer of vanilla frosting.
  2. Layer it with fresh strawberry slices and repeat layer with vanilla frosting and fresh strawberries using frosting to fill in any gaps. (shown in picture #2)
  3. Place the top half of the cake onto the frosting layer and crumb coat the entire cake with a thin layer of frosting. (shown in picture #3)
  4. Put cake in freezer for about 10-15 minutes until the frosting is set and then remove from fridge and give it a full coating. (shown in picture #4)
  5. Pick the flower you will be using as your center flower. Trim and place it in the center of the cake. (shown in picture #5)
  6. Get a few petals and fill in the gaps around the hole. (shown in picture #6)
  7. Now start layering the bottom part of the cake by pressing the petals into the frosting of the cake. Try to press the bottom edge of the petal only. (shown in picture #7)
  8. Try to use the largest petals you have for the bottom layer and go all around the cake. (shown in picture #8)
  9. Layer the next row of petals around the cake. (shown in picture #9)
  10. Try to alternate the position of the petals. As in, try to place the petal of the next layer between two petals of the bottom layer. (shown in picture #10)
  11. Repeat until you get to the center of the cake, try to use smaller petals as you get to the top of the cake. I had to replace some of the lighter petals because the lower petals turned out to be too pink to get a more seamless look. (shown in picture #11)
  12. Get ready to stun the room. ๐Ÿ˜‰

Red Velvet Cake

Ingredients

1 ยฝ cups all-purpose flour
1 ยฝ cups cake flour
3 tablespoons unsweetened cocoa powder
ยพ tsp. salt
3 large eggs, at room temperature
ยพ (1 ยฝ sticks) cup butter, at room temperature
2 ยผ cups granulated white sugar
2 tsp. vanilla extract
1 ounce bottle of red food coloring (2 Tablespoons)
1 ยผ cups buttermilk
1 ยฝ teaspoons baking soda
1 ยฝ teaspoons vinegar

Directions:

  1. Preheat oven to 350ยฐF, spray either your bundt pan or the top half of your giant doughnut cake pan with nonstick spray. (I highly suggest using either pam for baking or bakerโ€™s joy for extra insurance of โ€œnonstickageโ€.)
  2. In a medium bowl, whisk together flour, cocoa powder and salt. Set aside.
  3. In the bowl of a standing mixer, beat butter on medium speed for 30 seconds.
  4. Add sugar and vanilla, and beat until combined.
  5. Add eggs one at a time on medium speed.
  6. Lower speed to low and add in food coloring.
  7. Add โ…“ of flour mixture to the egg mixture on low and add ยฝ of the buttermilk.
  8. Repeat with โ…“ flour mix and the rest of the buttermilk.
  9. Finish mixing with the rest of the flour mixture. Mix until just combined.
  10. Stir together baking soda and vinegar in a small bowl. Add to cake batter and beat just until combined.
  11. Fill cake pan until โ…” full, bake 30-40 minutes or until a cake tester comes out clean.
  12. Cool pan on rack for about 15-20 minutes. Try to use a small spatula around the edges to ensure a clean removal. Remove cake from pan.
  13. Let cool completely.

Vanilla Frosting

Ingredients:

1 c. whole milk
ยผ c. flour
ยผ tsp. salt
8 oz. (2 sticks) unsalted butter, room temperature
1 c. sugar
2 tsp. vanilla extract

Instructions:

  1. In a saucier pan, put milk, salt and flour and whisk until combined on medium heat.
  2. Continuously whisk mixture until thickened to a pudding like consistency.
  3. Once thickened, strain through a mesh strainer into a bowl with a spatula to remove lumps.
  4. Place a piece of plastic wrap on top of the flour mixture and put into the fridge until fully cool.
  5. In a mixer bowl fitted with the whisk attachment, mix the sugar and butter on high speed until fluffy and pale about, 5-10 minutes.
  6. Add the chilled flour mixture and continue to whip on high speed until the sugar is completely dissolved and the mixture is no longer gritty, about 5-10 minutes.
  7. Add vanilla extract and mix until combined.


Weekday Update // Currently Loving

Valentineโ€™s Day is coming and Iโ€™ve got hues of red and pink on the brain. Funnily enough, I donโ€™t own many red colored clothing. I think maybe itโ€™s because they tend to be statement pieces. But there are so many cute options this season and I kinda want everything.

  1. Self Portrait 3D Floral Azaelea Dress in Tomato Red โ€“ Iโ€™ve always loved self-portraitโ€™s famous azaelea dress, but I prefer this version with the additional details.
  2. Sรฉzane Jack Sneakers in Nude โ€“ Love the shape of the shoe with the clean lines and the blush color is just perfect.
  3. YSL Touche ร‰clat Pen in Dazzling Lights โ€“ Iโ€™ve tried all the โ€œdupesโ€ and nothing comes close to this miracle in a tube. It makes me look instantly awake and alert. I just wish it wasnโ€™t so pricey. Sometimes I turn an extra click by accident and I feel like Iโ€™m wasting money. Hahaha J Worth every penny and I adore the festive packaging on this version.
  4. Waitress the Broadway Musical โ€“ Saw this the past week and I just about died fangirling over Jason Mraz on the inside. If you know me personally, you would know that Iโ€™ve been a big fan since high school. I met him after the show after waiting in the cold for an hour. But being the introvert that I am, just stood there quietly while he signed my Playbill. We made eye contact though, and Mr. H kept coaxing me to take a selfie with him, which we kinda did at the end but I have that oh-so-awkward smile that I always have when Iโ€™m not 100% comfortable so Iโ€™ll just keep it to myself. Unfortunately, Jason wonโ€™t be performing after the 11th of February, but itโ€™s just as worth watching for Sara Bareilles. So talented!
  5. H&M Short Chiffon Dress โ€“ Iโ€™m a fan of the ruffled shoulder details and the ruffled skirt. The polka dots are also a chic detail.
  6. Sรฉzane Line Blouse in Red Poppy โ€“ How beautiful is the lace pattern on this shirt? Plus, that flattering square neck in the back makes this just about the most romantic top.
  7. Candy Corpseโ€™ Hot Hams Pin โ€“ Because Calcifer is one of my favorite Miyazaki characters and this pin is so stinking cute.


{Simple Sundays} Everything Bagel Sweet Potatoes AKA Aimee Songโ€™s Sweet Potatoes

If youโ€™ve been reading my blog for a while now, you would know how much I love sweet potatoes. (As evidenced here, here and here.) I love the soft texture it takes on when it is roasted well and the flavor, to me, is as comforting as chicken noodle soup. So when one of my favorite bloggers posted a video about โ€œperfect sweet potatoesโ€, I had to give it a try.
Well, it was quite delicious and nearly perfect! I just tweaked it a little by adding salt and omitting the freshly chopped garlic. (If you love garlic, or are in a garlicky mood, mince a few cloves of garlic and add it to the seasoning stage.)
Aimeeโ€™s way of roasting the sweet potatoes gives it a crisp exterior and a smooth and buttery interior, and the addition of the โ€œeverything but the bagelโ€ seasoning gives a savory edge to the sweetness of the sweet potato. Weโ€™ve been making these a lot in our house lately because it is Whole 30 friendly. My sister has been on the whole 30 diet and turns out no sugar, alcohol, grains, legumes, soy, and dairy really cuts down the things that you are allowed to eat. But this has been the sweet-savory snack that has been helping her stay on track.
You can watch the video of Aimee making it here.

Everything Bagel Sweet Potatoes

Ingredients:

3-4 medium sized sweet potatoes (use organic potatoes if you are eating the skin)
avocado oil (or any high smoke point oil)
everything but the bagel seasoning (I got mine at trader joeโ€™s but you can technically make your own)
kosher salt
3-4 cloves of garlic, minced (optional)

Instructions:

  1. Preheat oven to 400หšF and line a baking sheet with aluminum foil (shiny side down).
  2. Thoroughly wash your sweet potatoes. Trim both ends and cut lengthwise.
  3. Coat the sweet potatoes with avocado oil, and place on baking sheet cut-side down.
  4. Roast sweet potatoes 15-20 minutes or until golden brown.
  5. Remove sweet potatoes from oven; flip sweet potatoes so they are cut-side up.
  6. Sprinkle with kosher salt, bagel seasoning, and garlic (if using).
  7. Move baking sheet back into the oven and roast 10-15 minutes more.
  8. Turn off oven and let sweet potatoes sit in oven for an additional 10-15 minutes.
  9. Enjoy!

Recipe adapted from Song of Style.

Ranunculus Cake with Sweet Potato Pastry Cream

Iโ€™ve been kind of obsessed with flower everything on my cakes these days. Real or buttercream, I love them all. I actually made this cake back in May, and by the time I got to editing photos it was the peak of summer.ย  And because the filling is sweet potato pastry cream, it just didnโ€™t go with the season. But now that it is on the cusp of fall, I feel like itโ€™s appropriate to post this. (Although, personally, this is my favorite pastry cream of all time and I love it any time of the year.)
The star of this cake is the sweet potato, but not the orange fleshed kind but the purple skinned, yellow fleshed kind. This type of sweet potato is popular in Korean desserts and tastes similar to a roasted chestnut. In the past, Iโ€™ve also featured this type of sweet potato in this post: Mini Green Tea Cake.
If youโ€™ve never made pastry cream before, my advice for you is to go slow with pouring the hot milk into the egg mixture, as in a slow drizzle, not a pour. You want to avoid curdling at all costs. But if you do it right, man oh man is it worth it. Gone are the days of powdered mixes. You will never look back. Fill it between your favorite vanilla cake and watch the compliments roll.
As for the decoration, Iโ€™ve always loved ranunculus and decided to try to pipe it. It is easier than It looks but is quite time consuming to pipe each flower, especially since they have so many petals. Here are the steps to pipe the flower:

  1. Cut out many squares of parchment or wax paper. You will use one square per flower. (I usually cut mine around 3×3 inches.)
  2. With a flower nail in your hand, pipe a small amount of frosting onto the center of it. (As shown in Photo 2.)
  3. Place a piece of parchment paper on top of the frosting. (As shown in Photo 3.)
  4. Using a small round tip (wilton #2 or #3), pipe a small amount of green frosting in the center of the flower nail in a round, circular shape. (As shown in Photo 4.)
  5. In a piping bag filled with light green frosting and fitted with a petal tip with the wider side facing the flower nail (wilton #102, or larger pending on the size of the flower you want to pipe), pipe a square around the circle, overlapping each other on the ends. (As shown in Photo 5.)
  6. In a piping bag filled with light pink frosting and fitted with a petal tip with the wider side facing the flower nail (wilton #104, or larger pending on the size of the flower you want to pipe), pipe 5 dashes around the light green square overlapping the ends. (As shown in Photo 6.)
  7. Using the same piping bag, pipe 6 dashes around the pink circle. You want to show a little bit of the circle beforehand to create an illusion of overlapping petals. (As shown in Photo 7.)
  8. Continue piping dashes along the outer edge of the flower, increasing the number of dashes by 1 until you reach the size of the flower you desire. (As shown in Photo 8.)

I hope you try it soon! I know it’s been a while I’ve missed you!

Sweet Potato Pastry Cream

Ingredients:

3 medium sized Korean sweet potatoes, roasted and peeled.
2 c. whole milk
ยฝ c. sugar, divided
2 egg yolks
1 egg, large
ยผ c. cornstarch
a pinch of kosher salt
2 tbsp. unsalted butter
1 tsp. vanilla extract

Instructions:

  1. In a food processor, mix the sweet potatoes until a smooth puree forms. Set aside.
  2. In a medium saucepan, whisk the milk and ยผ c. of sugar and heat until the milk boils.
  3. While the milk heats, grab a medium bowl and whisk together the egg yolks, egg, ยผ c. sugar, cornstarch and the salt until smooth.
  4. Once the milk is heated, slowly drizzle in the milk mixture into the egg mixture with one hand while whisking the egg mixture with the other. Once the milk is completely incorporated into the egg mix, return the entire mixture into the saucepan.
  5. Heat the saucepan while whisking until the mixture becomes thickened like pudding.
  6. Take it off the heat and stir in the butter and vanilla extract.
  7. Mix the sweet potato with the pastry cream until homogenous.
  8. Place a piece of plastic wrap directly onto the pastry cream and refrigerate until cool and set. (about 4 hours, or overnight)

Weekday Update

Hold your horses, Halloween candy is already in stores. As much as I love the transition of summer to fall, itโ€™s just too early! Here are some of my favorite things this summer:

  1. This embroidered v-neck dress. I love the ruffle detail around the waist and the flattering cut. Eat as much as you want, your belly wonโ€™t show. ๐Ÿ˜‰
  2. How cute is this eyelet top? The bows on the shoulder lets you adjust the length and is so on-trend.
  3. The perfect summer blue skirt will give even your simplest white shirt a romantic twist.
  4. This primer is admittedly a luxe buy, but worth every penny. I usually donโ€™t bother with primer but this is holy grail status. It doesnโ€™t make me break out, or dry out my already dry skin, and makes foundation go on super smooth. No pilling or patchiness here! Plus, the refreshing cucumber scent makes it a treat to put on in the morning.
  5. Love the different stripes on this shirt. Plus, the round zipper gives it a retro twist.
  6. Iโ€™ve been eyeing these loafers for so long. The sling back detail keeps it from being basic and the design is so classic.
  7. Warm weather stirs up my wanderlust and Iโ€™m in love with these suitcases. They come in many colors but the navy is my favorite.

How are you spending your summer? Any favorites you want to share with me?


*I am not sponsored or paid to share my picks with you. Just sharing what I’ve been loving lately.

The Best Edible Cookie Dough

Iโ€™ve been in a motivational slump lately. Creative juices are at their all-time low, and laziness has taken over my life. Itโ€™s not like I donโ€™t have content to share with you, but parking myself in front of the computer and writing a post seemed so pointless and boring I just didnโ€™t have the heart to write. Anyway, Iโ€™m working on moving past the slump and onto a more productive track.
These mini cupcakes are vanilla cupcakes that I made from leftover wedding cake batter (a post on that soon) and are topped with a scoop of (what I think) is the best cookie dough, homemade magic shell and flaky salt. While all the parts of the cupcake are delicious, the star of this particular recipe is the cookie dough. What I think makes this cookie dough better others is a key step: toasting the flour.
Did you know that ingesting raw flour can cause foodborne illnesses such as E.coli and Salmonella? I know. I was surprised too. Toasting the flour not only makes it safe to consume, but it also gives the cookie dough a delicious nutty flavor that cuts down the sweetness of the cookie dough too.
Other than toasting the flour, you would need some great quality chocolate chips. Artisan Kettle happened to send me some bags to work with, and they were delicious. Iโ€™ve really tried about every brand of chocolate out there, and for the price point, theyโ€™re hard to beat. Bonus, theyโ€™re organic, fair-trade and gluten free. Itโ€™s simple to make and so so easy. I happened to make the cupcakes because I had them on hand, but you can always just make a jar of cookie dough and store it in the fridge for a cold scoop able treat.

The Best Edible Cookie Dough

Recipe for cake can be found here:ย Strawberry Ombre Cake

Ingredients:

ยพ c. all-purpose flour
ยฝ c. butter, softened
โ…“ c. sugar
2 tbsp. heavy cream
ยฝ tsp. kosher salt
ยฝ c. semi-sweet chocolate chips
ยฝ c. milk chocolate chips

Instructions:

  1. Preheat oven to 325หšF. Line a small sheet pan with aluminum foil.
  2. Spread flour evenly on the sheet pan and toast in oven for about 10 minutes, or until the flour is lightly browned and smells nutty.
  3. 5 minutes into baking, stir the flour to toast it evenly.
  4. Remove and cool flour before use, about 10 minutes.
  5. In a medium bowl with an electric mixer, cream butter and sugar until light and fluffy, about 3-4 minutes.
  6. Add the sugar, cream and salt and mix until combined.
  7. Add flour and mix until combined.
  8. Fold in chocolate chips. Either scoop on top of mini cupcakes or store in fridge for easy snacking.

Recipe adapted from espresso and cream.

Lucky Charms Churros & Real Pistachio Pudding

Itโ€™s almost St. Patrickโ€™s Day and Iโ€™m part of a virtual St. Patrickโ€™s Day Party! If there was one word to describe the holiday for me, it would be: green. When it comes to desserts there arenโ€™t many green colored options, and I decided to do something with pistachios. Iโ€™ve made pistachio flavored cupcakes before but I used jello pudding mix which gave it an artificial taste. Iโ€™m not knocking on pistachio pudding mix; Iโ€™ve actually grown to like that artificial pistachio flavor. Much like how Iโ€™ve grown to love maraschino cherries.
The pistachio flavor of the pudding isnโ€™t assertive. If I had to describe the flavor, I would say itโ€™s very similar to the Hรคagen-Dazs pistachio ice cream only in pudding form, especially once itโ€™s topped with a dollop of whipped cream. Itโ€™s dreamy and luscious, and pale green in color.
And because I wanted to add lucky charms into the whole thing, I made some lucky charms churros. Funny thing is they look entirely different from now I imagined them. I wanted them to have lots of marshmallows and cereal pieces stuck on them. Unfortunately, when I did put whole pieces of the cereal onto the churros, they looked chunky and unappealing. So I crushed them and stuck them on there, similar to sprinkles. A little more whimsical, but it doesnโ€™t really scream โ€œlucky charmsโ€. Oh well.
The churros btw, are delicious. Theyโ€™re crisp on the outside and chewy on the inside. Donโ€™t get scared and take them out of the oil too early or youโ€™ll end up with doughy insides. Now excuse me while I oogle at these awesome dishes that everyone else contributed to our partyโ€ฆ Youโ€™re of course, welcome and encouraged to check them out too. ๐Ÿ˜‰

Baileys Chocolate Caramel Tarts โ€“ Sugarhero
Bangers and Mash with Guiness Onion GravyThe Beach House Kitchen
Black Lentil Roasted Broccoli Shepard’s Pie – Calizona
Boozy Irish Coffee Milkshake with Baileys Caramel DrizzleMeg is Well
Chocolate Stout No-Churn Ice Cream with Homemade Toffee CrumbleCiao Chow Bambina
Colcannon Irish Mashed PotatoesKeviniscooking
Get Charmed By Double Spice Chocolate CookiesThe Sweet Nerd
Guinness Irish Stew Mini Pot PiesThe Road to Honey
Irish Spice BagSeasons & Suppers
Pork Chops with an Irish Whiskey SauceSalt & Lavender
Raspberry Chocolate Milk Porter Pudding ShootersBeer Girl Cooks
Shepherd’s Pie {with Guinness Lamb & Horseradish Mash}Girl Heart Food
Sour Apple Tequila Cocktail – The Lucky Shamrock – No Spoon Necessary
St. Patrick’s Lemon Cucumber Martini With Fresh BasilBeyond Mere Sustenance
Traditional Irish Soda Bread with Orange ButterWhat Should I Make For…
Vegan Mint Chocolate BarkSalted Plains

Lucky Charms Churros & Real Pistachio Pudding

For the Pistachio Paste

Ingredients:
ยฝ c salted pistachios, shelled
โ…“ c. sugar
2 tbsp. water

Instructions:

  1. In the bowl of a food processor, pulse pistachios until finely ground.
  2. Add sugar and water and continue to blend until smooth.

For the Pistachio Pudding
Makes about 4 ramekins

Ingredients:
1 batch pistachio paste (recipe above)
2 c. whole milk
2 egg yolks
โ…“ c. sugar
2 tbsp. corn starch
pinch of salt
1 tsp. vanilla extract
2 tbsp. unsalted butter
ยฝ c. heavy whipping cream
1 tbsp. powdered sugar
a handful pistachios, chopped

Instructions:

  1. In a small pot, whisk pistachio paste and milk together and heat until simmering.
  2. While the pistachio milk comes to a simmer, whisk egg yolks, sugar, cornstarch and salt in a small bowl to form a smooth paste.
  3. Slowly whisk in the hot pistachio milk by the ladleful into the egg mixture until you use up half of the pistachio milk.
  4. Add the rest of the egg mixture back into the pot and whisk on medium heat until pudding is thickened.
  5. Remove pot from heat and whisk in butter and vanilla extract until smooth.
  6. Spoon pudding into ramekins, and wrap with plastic wrap and push the plastic onto the surface so it doesnโ€™t form a skin.
  7. Refrigerate 4 hours or overnight.
  8. Before serving, whip heavy cream and powdered sugar together until stiff peaks form, place a dollop of whipped cream on top and garnish with chopped pistachios.

For the Lucky Charms Churros

For the churros

Ingredients:
ยฝ c. sugar
1 ยฝ tsp. cinnamon
1 c. water
1 ยฝ tbsp. sugar
2 tbsp. vegetable oil
ยฝ tsp. salt
1 c. all-purpose flour
2 qt. vegetable oil (for frying)
vanilla glaze (recipe below)
about 1 cup of crushed lucky charms cereal (with mostly marshmallows; less cereal)

Instructions:

  1. In a shallow bowl, combine ยฝ c. sugar and cinnamon and set aside.
  2. In a small saucepan over medium heat, whisk water, sugar, 2 tbsp. vegetable oil, and salt together and bring to a boil.
  3. Once the mixture is boiling, turn off the heat, add in the flour and stir with a wooden spoon until a ball of dough forms.
  4. In a large heavy pot clipped with a candy thermometer, heat the vegetable oil until 375 degrees.
  5. While the oil heats, transfer the dough into a piping bag fitted with a large star tip. The dough is dense and tough to push through the piping bag so use a heavy-duty bag.
  6. On a sheet pan lined with parchment paper, pipe the length of the churros you would like and cut it off with either a sharp knife or scissors until you use up the dough.
  7. Once the oil is heated, slowly place the churro dough into the hot oil. Do not drop the dough into the oil for it will splatter. Place about 3-4 pieces and fry until golden brown, about 2-4 minutes.
  8. Lightly shake off the excess oil, and place the cooked churros onto a plate lined with paper towels.
  9. Drain churros for two minutes and then toss in the cinnamon sugar.
  10. Repeat with the remaining churro dough.
  11. Once the churros are cool, drizzle the top half of the churros with the vanilla glaze and dip into the crushed marshmallows.

Vanilla Glaze

Ingredients:
1 c. powdered sugar
1 ยฝ tbsp. milk
ยผ tsp. vanilla extract

Instructions:

  1. Whisk all three ingredients until smooth.
  2. Let stand for a few minutes to thicken.

Recipe for the pudding adapted from Joy the Baker.
Recipe for churros adapted from Just a Taste.
Recipe for glaze adapted from Taste of Home.