
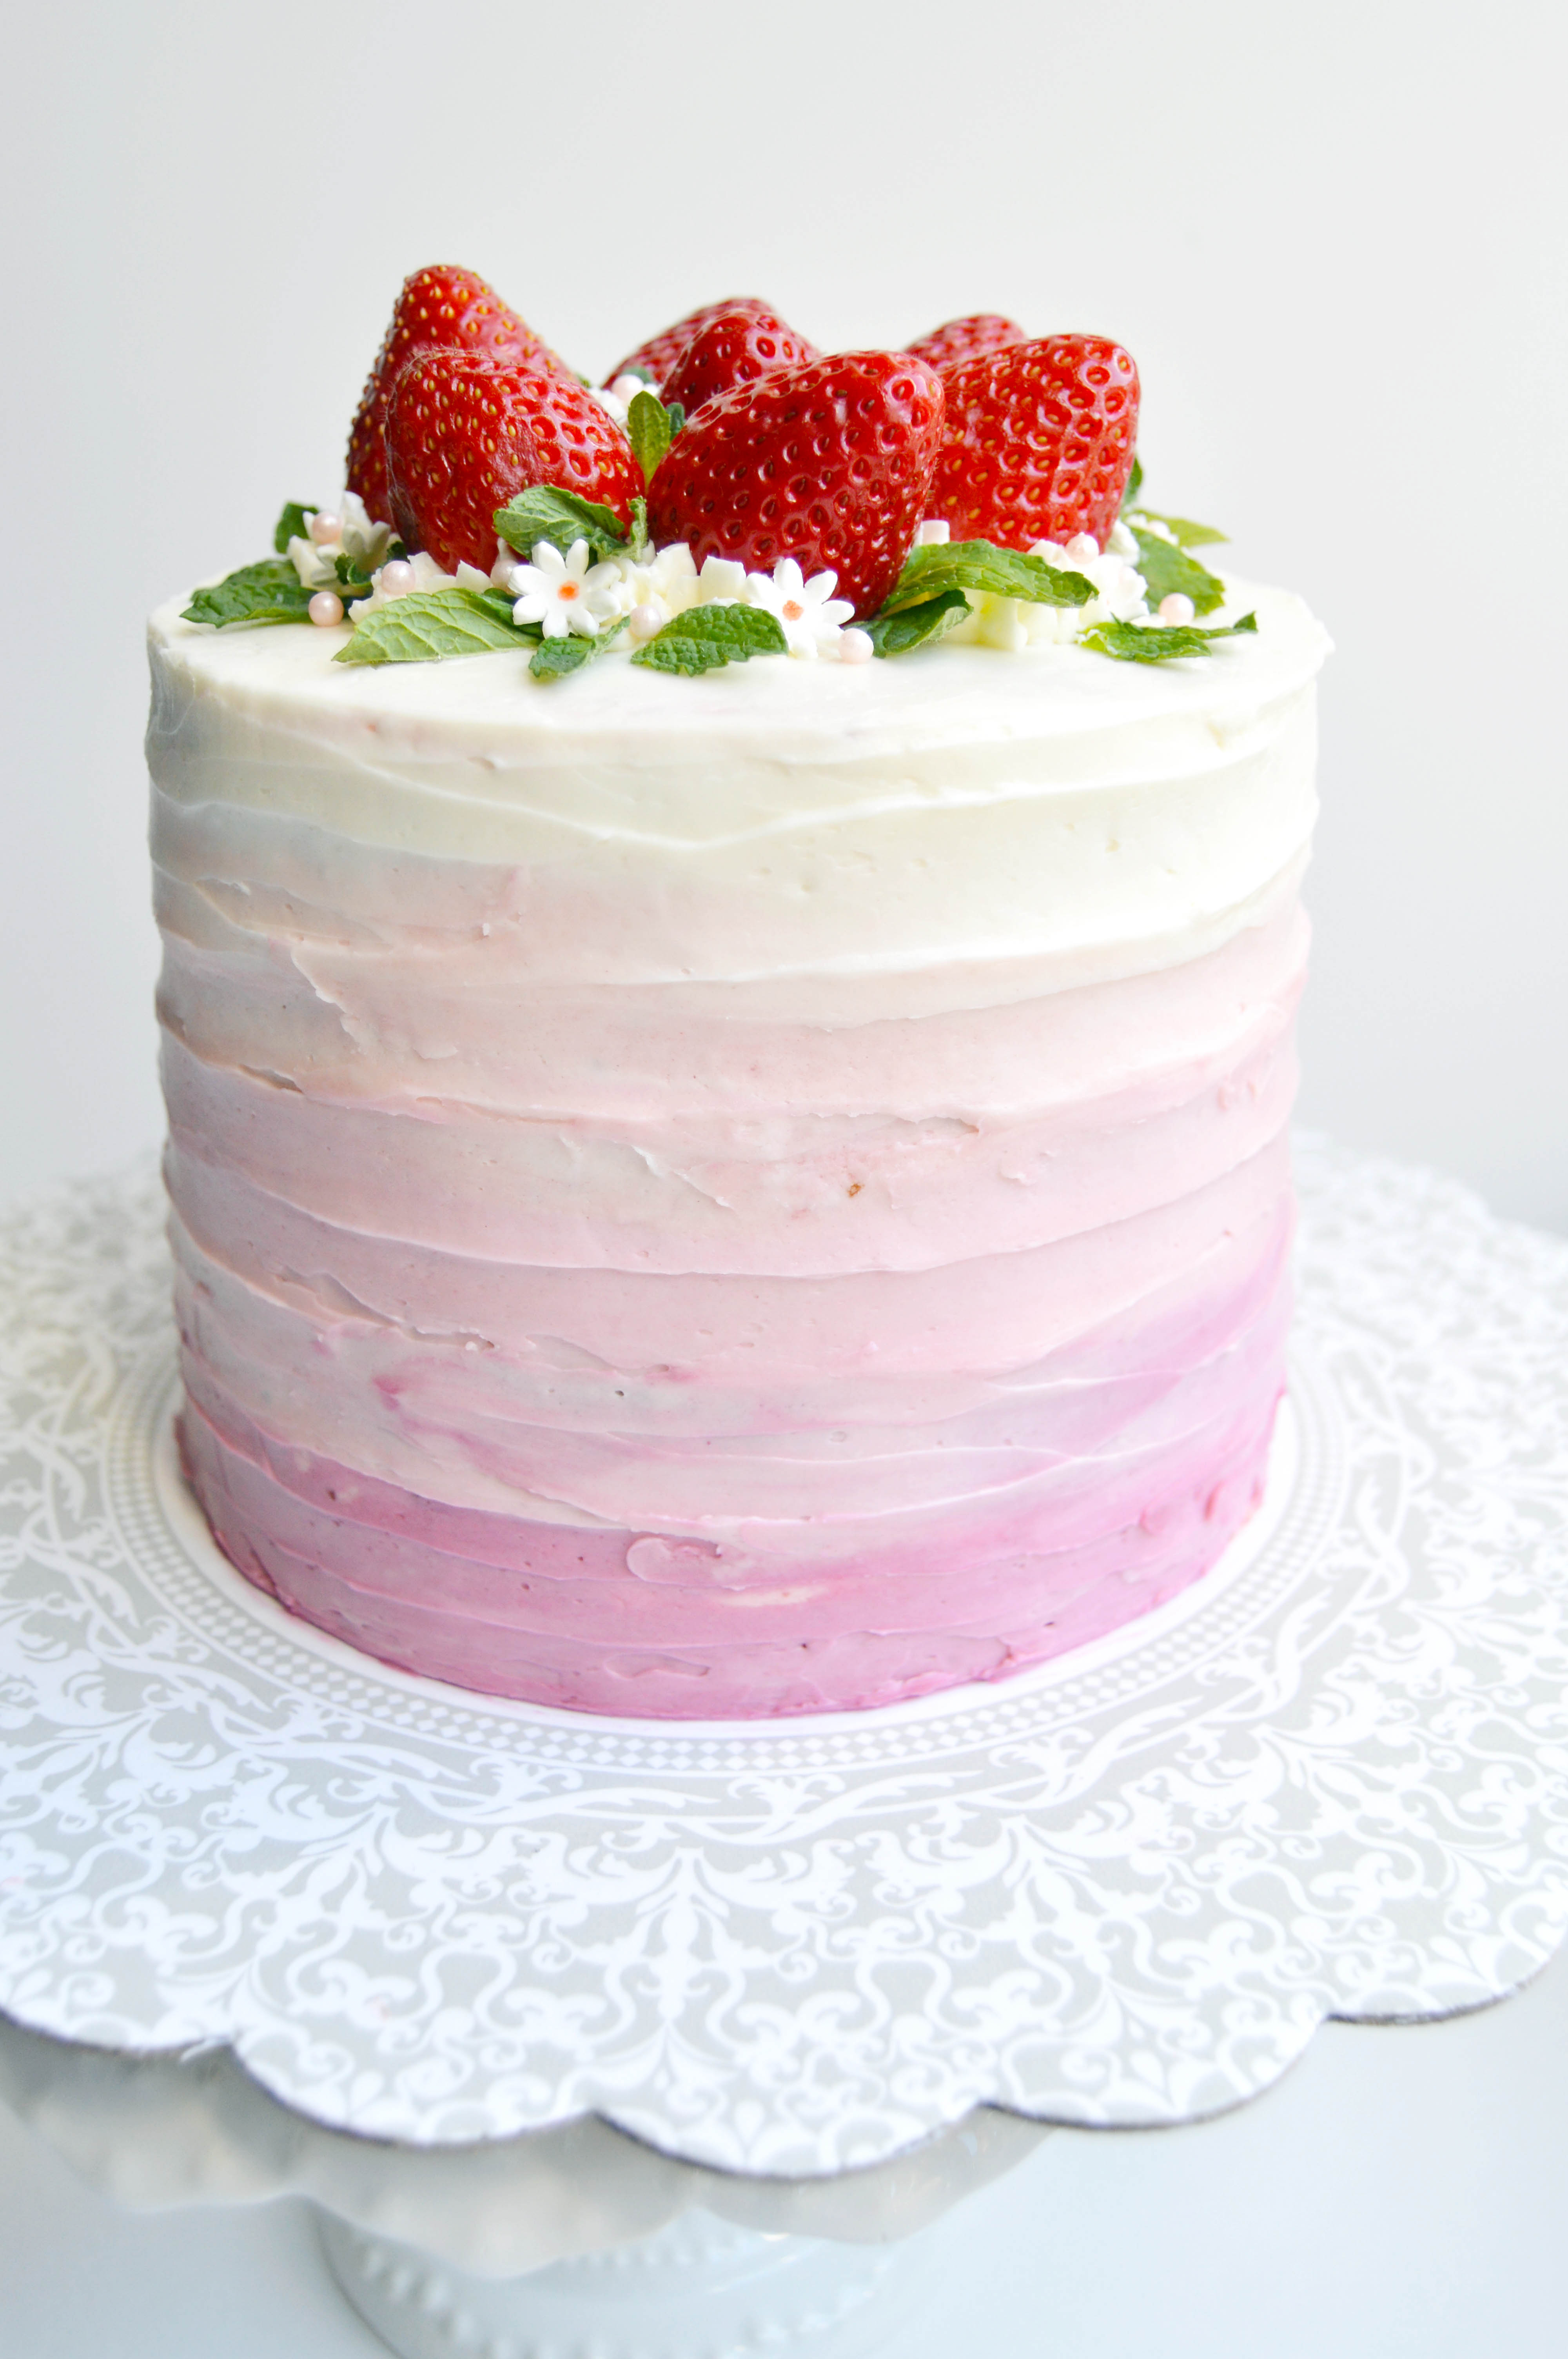
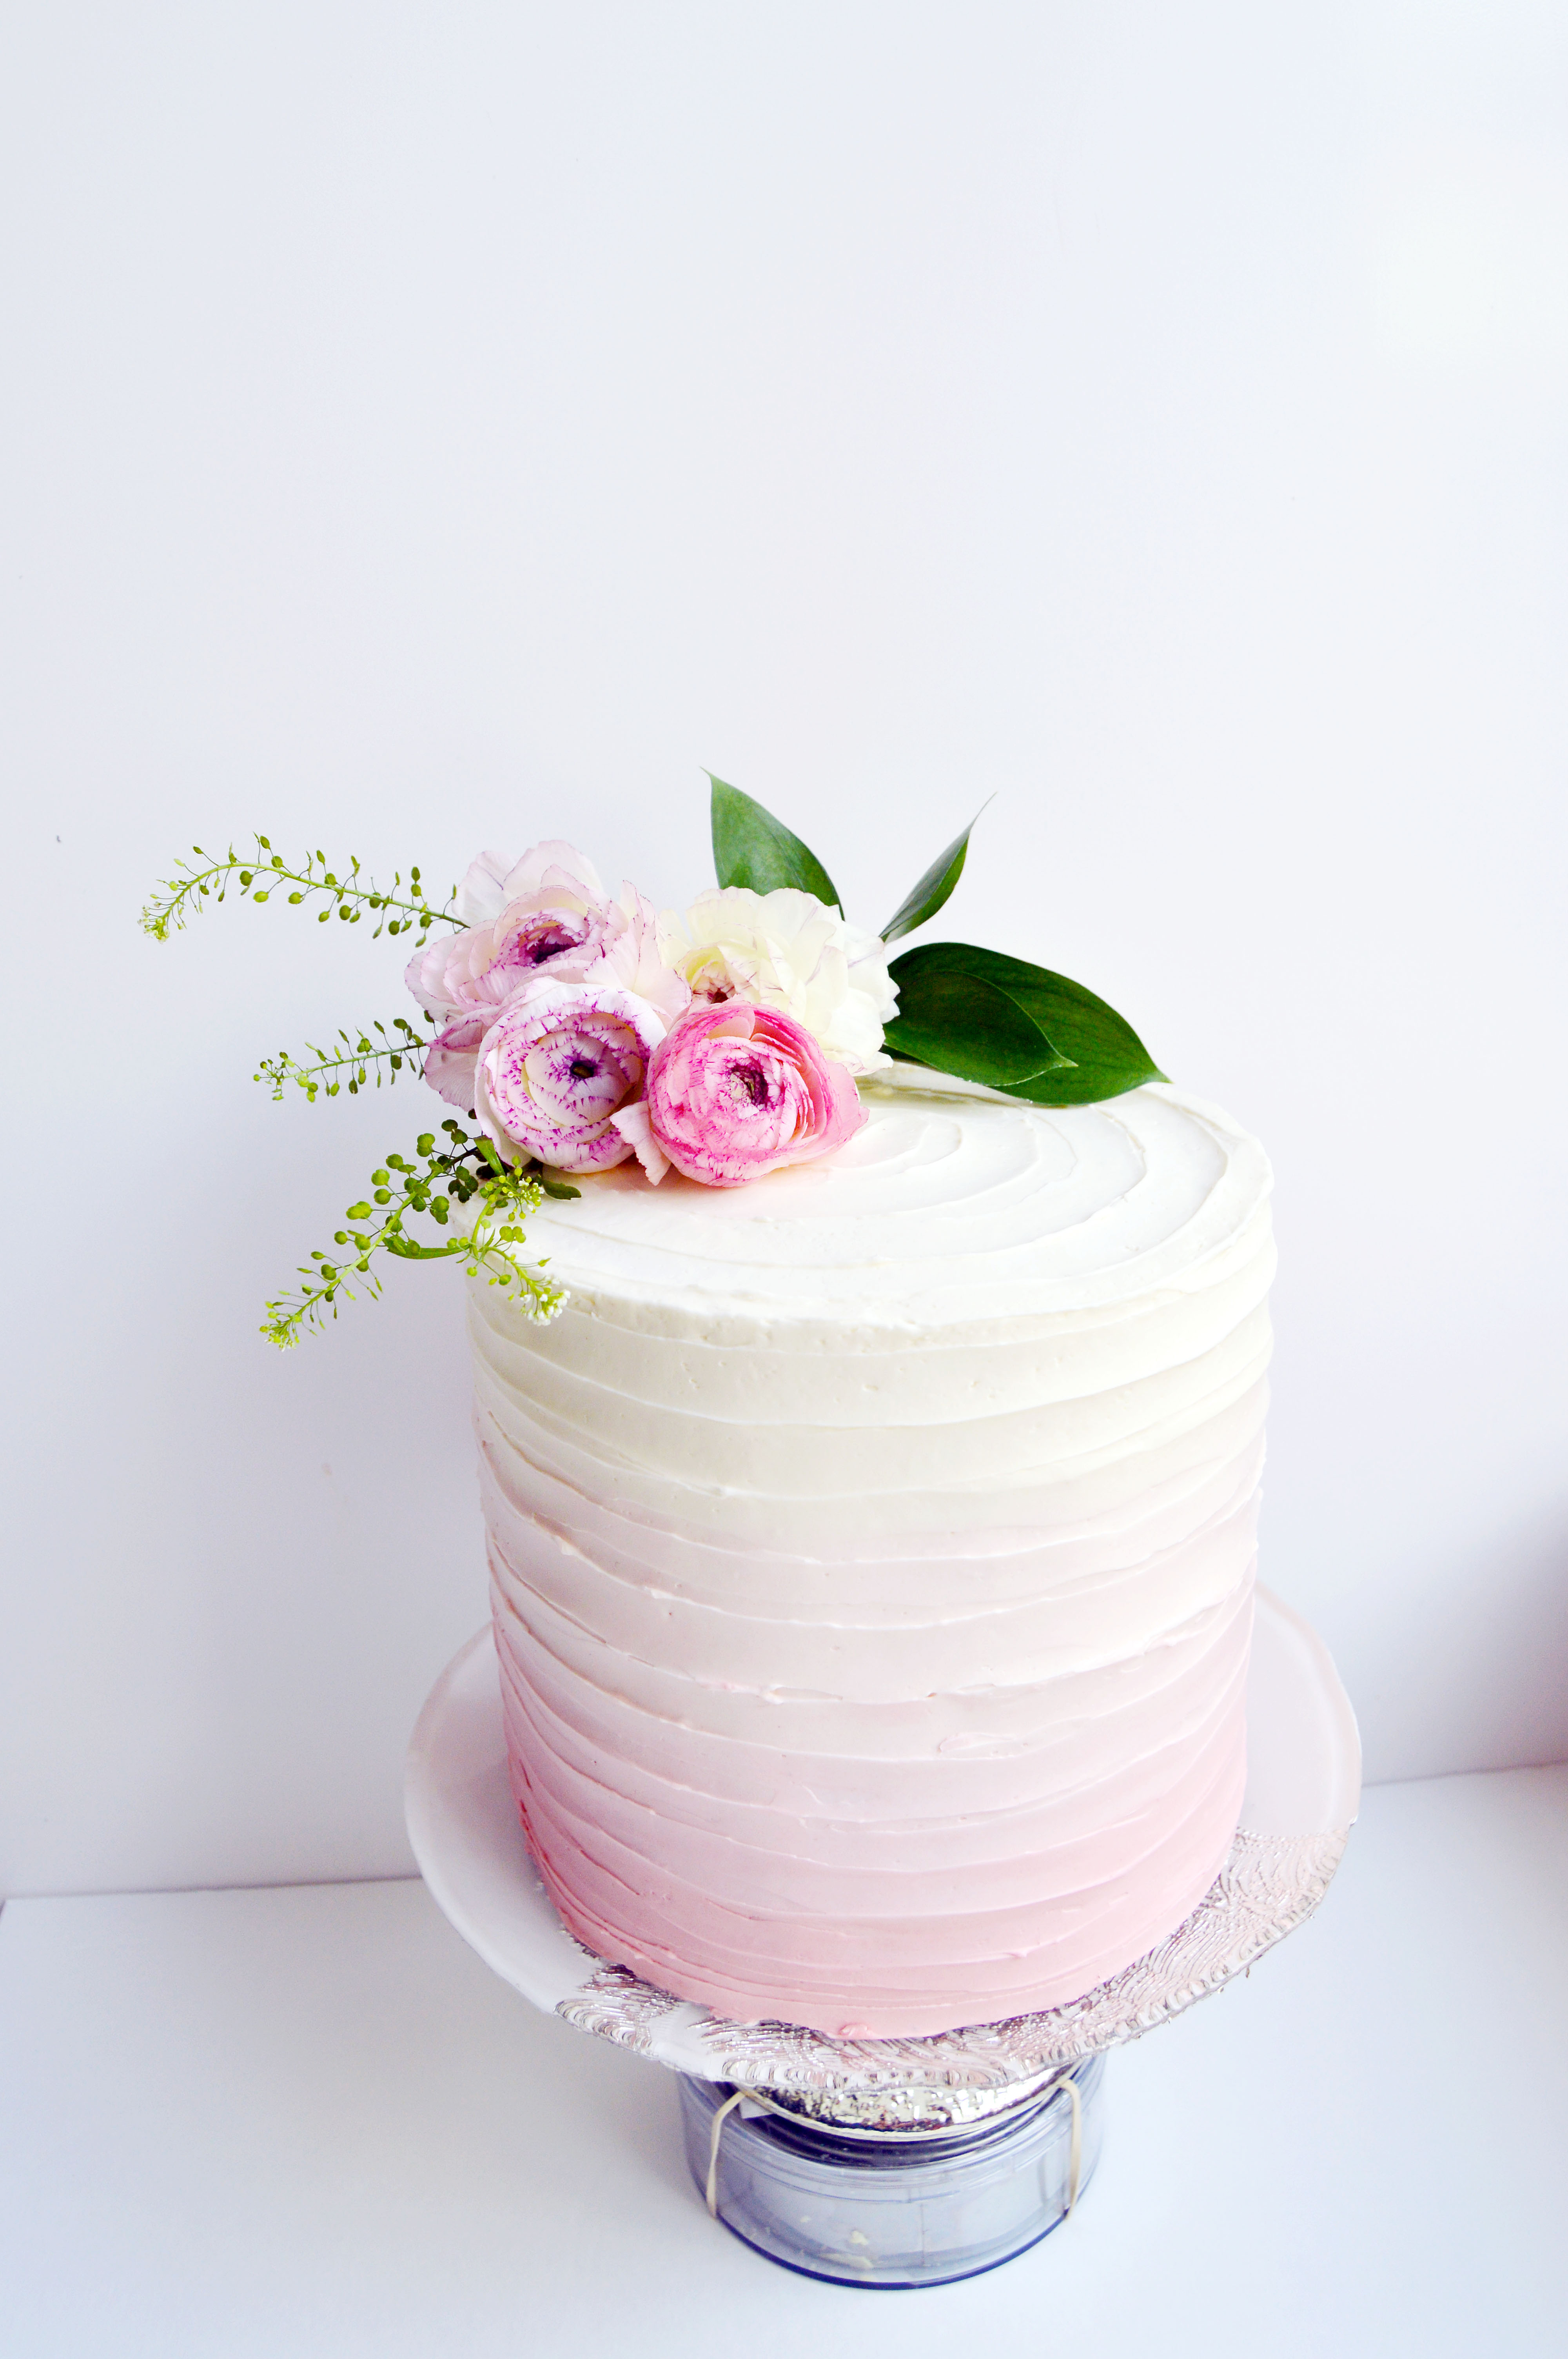
 The first day of spring came with snow in Jersey this week. I feel like I should be surprised, but I’m really not. The weather has been pretty off-kilter this year. Remember when it was 60 degrees during Christmas? This cake reminds me of springtime with its bold strawberries and fresh mint leaves. Decorated with tiny white fondant and frosting flowers and a few pink pearls, it is feminine and floral too.
 The secret to amazing strawberry frosting is to use fresh strawberries and cook it down until it becomes thickened. It is similar to making jam, except you are boiling down just strawberries, a squeeze of lemon and a splash of water. Add this mixture to your standard frosting, and you’ll have the freshest, strawberry-est tasting frosting ever.
 When I make a strawberry layer cake, I tend to add a layer of fresh strawberries to up the fruit flavor. You just need to remember to slice your strawberries thinly to keep the cake layers intact. If you don’t, it might compromise the structural integrity of the cake and the layers might slide off of one another.
Strawberry Ombré Cake
Makes one 6-inch cake
You will need:
1 batch of vanilla buttermilk cake (recipe below)
1 batch of strawberry frosting (recipe below)
½ pint fresh strawberries, divided (7 small strawberries left whole, the rest sliced thinly)
1 batch swiss meringue buttercream (recipe below)
pink gel food coloring
fresh mint leaves
pink edible pearls
white mini fondant flowers
Instructions:
- Frost the top of one layer of vanilla cake with strawberry frosting.
- Put one layer of sliced strawberries on top of the strawberry frosting.
- Repeat with the remaining layers of vanilla cake.
- Use the remaining strawberry frosting to crumb coat the entire cake.
- Let cake set in freezer for 5-10 minutes. Until the crumb coat is set.
- Reserve three tablespoons of swiss meringue buttercream in a bow.
- Evenly divide the rest of swiss meringue buttercream into 4 bowls.
- Leave one batch white and color the other 3 batches in different shades of pink.
- Fill an icing bag fitted with a very large round tip with the white swiss meringue buttercream.
- Remove the cake from the freezer.
- Ice the cake from the top with the white swiss meringue buttercream, moving slowly down.
- Once the white frosting runs out, add the light pink swiss meringue buttercream to the same bag and continue moving downwards.
- Once the light pink frosting runs out, add the darker pink swiss meringue buttercream to the same bag and continue frost down the cake until you get to the bottom of the cake. (The cake will look bulky and messy. This is normal.)
- Using a flat spatula, start going around the cake and smoothing out the sides.
- As you move around the cake and start removing frosting, an ombré pattern will appear.
- Once the cake is relatively smooth, take a small offset spatula and using a light pressure, start moving the offset spatula in a circular pattern around the cake to create soft ridges.
- Top the cake with the whole strawberries with the leaves removed. Do not cut the strawberries. They will release their juices if they are cut.
- Fill a piping bag fitted with a small closed star tip with the reserved 3 tablespoons of buttercream frosting.
- Fill any gaps between the strawberries with the frosting.
- Take the mint leaves and arrange it around the strawberries as desired.
- Make tiny buttercream flowers with the closed star tip by squeezing the bag and releasing it in one spot. Place one pear at the center of these flowers.
- Fill the rest of the gaps with tiny white fondant flowers.
Vanilla Buttermilk Cake
Ingredients:
2 c. cake flour
1⅓ c. sugar
¾ tbsp. baking powder
¼ tsp. salt
¾ c. buttermilk, divided
6 oz. unsalted butter, room temperature
3 eggs, room temperature
1 ½ egg yolks
1 ½ tsp. vanilla extract
Instructions:
- Preheat the oven to 350˚F and line four 6-inch cake pans with parchment paper.
- In a bowl of a standing mixer with the paddle attachment, add flour, sugar, baking powder, and salt. Mix until combined.
- On low speed, add ½ c. buttermilk and butter and mix until combined.
- In a separate bowl, whisk eggs, egg yolks, ¼ c. buttermilk, and vanilla extract until homogeneous.
- On low speed, slowly add the egg mixture to the flour mixture.
- Increase speed to medium, and mix until combined.
- Evenly divide cake batter into the four cake pans.
- Bake about 20-25 minutes until cake is done or until a toothpick inserted into the center comes out clean.
- Let cool in pan for 10 minutes, and then move onto a cooling rack until completely cool.
Strawberry Frosting (for the filling)
Ingredients:
1 c. whole milk
¼ c. flour
¼ tsp. salt
8 oz. (2 sticks) unsalted butter, room temperature
1 c. sugar
strawberry puree (recipe below)
Instructions:
- In a saucier pan, put milk, salt and flour and whisk until combined on medium heat.
- Continuously whisk mixture until thickened to a pudding like consistency.
- Once thickened, strain through a mesh strainer into a bowl with a spatula to remove lumps.
- Place a piece of plastic wrap on top of the flour mixture and put into the fridge until fully cool.
- In a mixer bowl fitted with the whisk attachment, mix the sugar and butter on high speed until fluffy and pale about, 5-10 minutes.
- Add the chilled flour mixture and continue to whip on high speed until the sugar is completely dissolved and the mixture is no longer gritty, about 5-10 minutes.
- Add ¾ of the strawberry puree and mix until combined. Taste and see if it needs the rest.
- If it needs more strawberry flavor, add in the rest of the strawberry puree and mix until combined.
Strawberry Puree
Ingredients:
¾ pint of strawberries, hulled and cut in halves
2-3 tsp. lemon juice, freshly squeezed
1 tbsp. water
Instructions:
- In a small pot, cook strawberries, lemon juice and water on medium heat.
- Use a potato smasher to smash the strawberries while cooking to get an even consistency.
- Cook strawberries for 5-10 minutes until thickened.
- Once thickened, put in a bowl to cool and refrigerate.
Swiss Meringue Buttercream (for the outside)
Ingredients:
1 c. sugar
4 large egg whites
3 sticks unsalted butter
1 tsp. vanilla extract
Instructions:
- Simmer an inch of water in a medium pot.
- In the bowl of a standing mixer, whisk egg whites and sugar together.
- Place the bowl over the pot of simmering water and whisk the egg white and sugar mixture continuously until the mixture becomes lighter and no longer grainy.
- Remove the bowl from the pot and transfer the bowl into the mixer fitted with a whisk attachment.
- Mix on high until mixture becomes white and fluffy, and cool (check for this by seeing if the outside of the bowl is cool to the touch).
- Add in vanilla extract and butter one stick at a time until a silky smooth frosting forms.


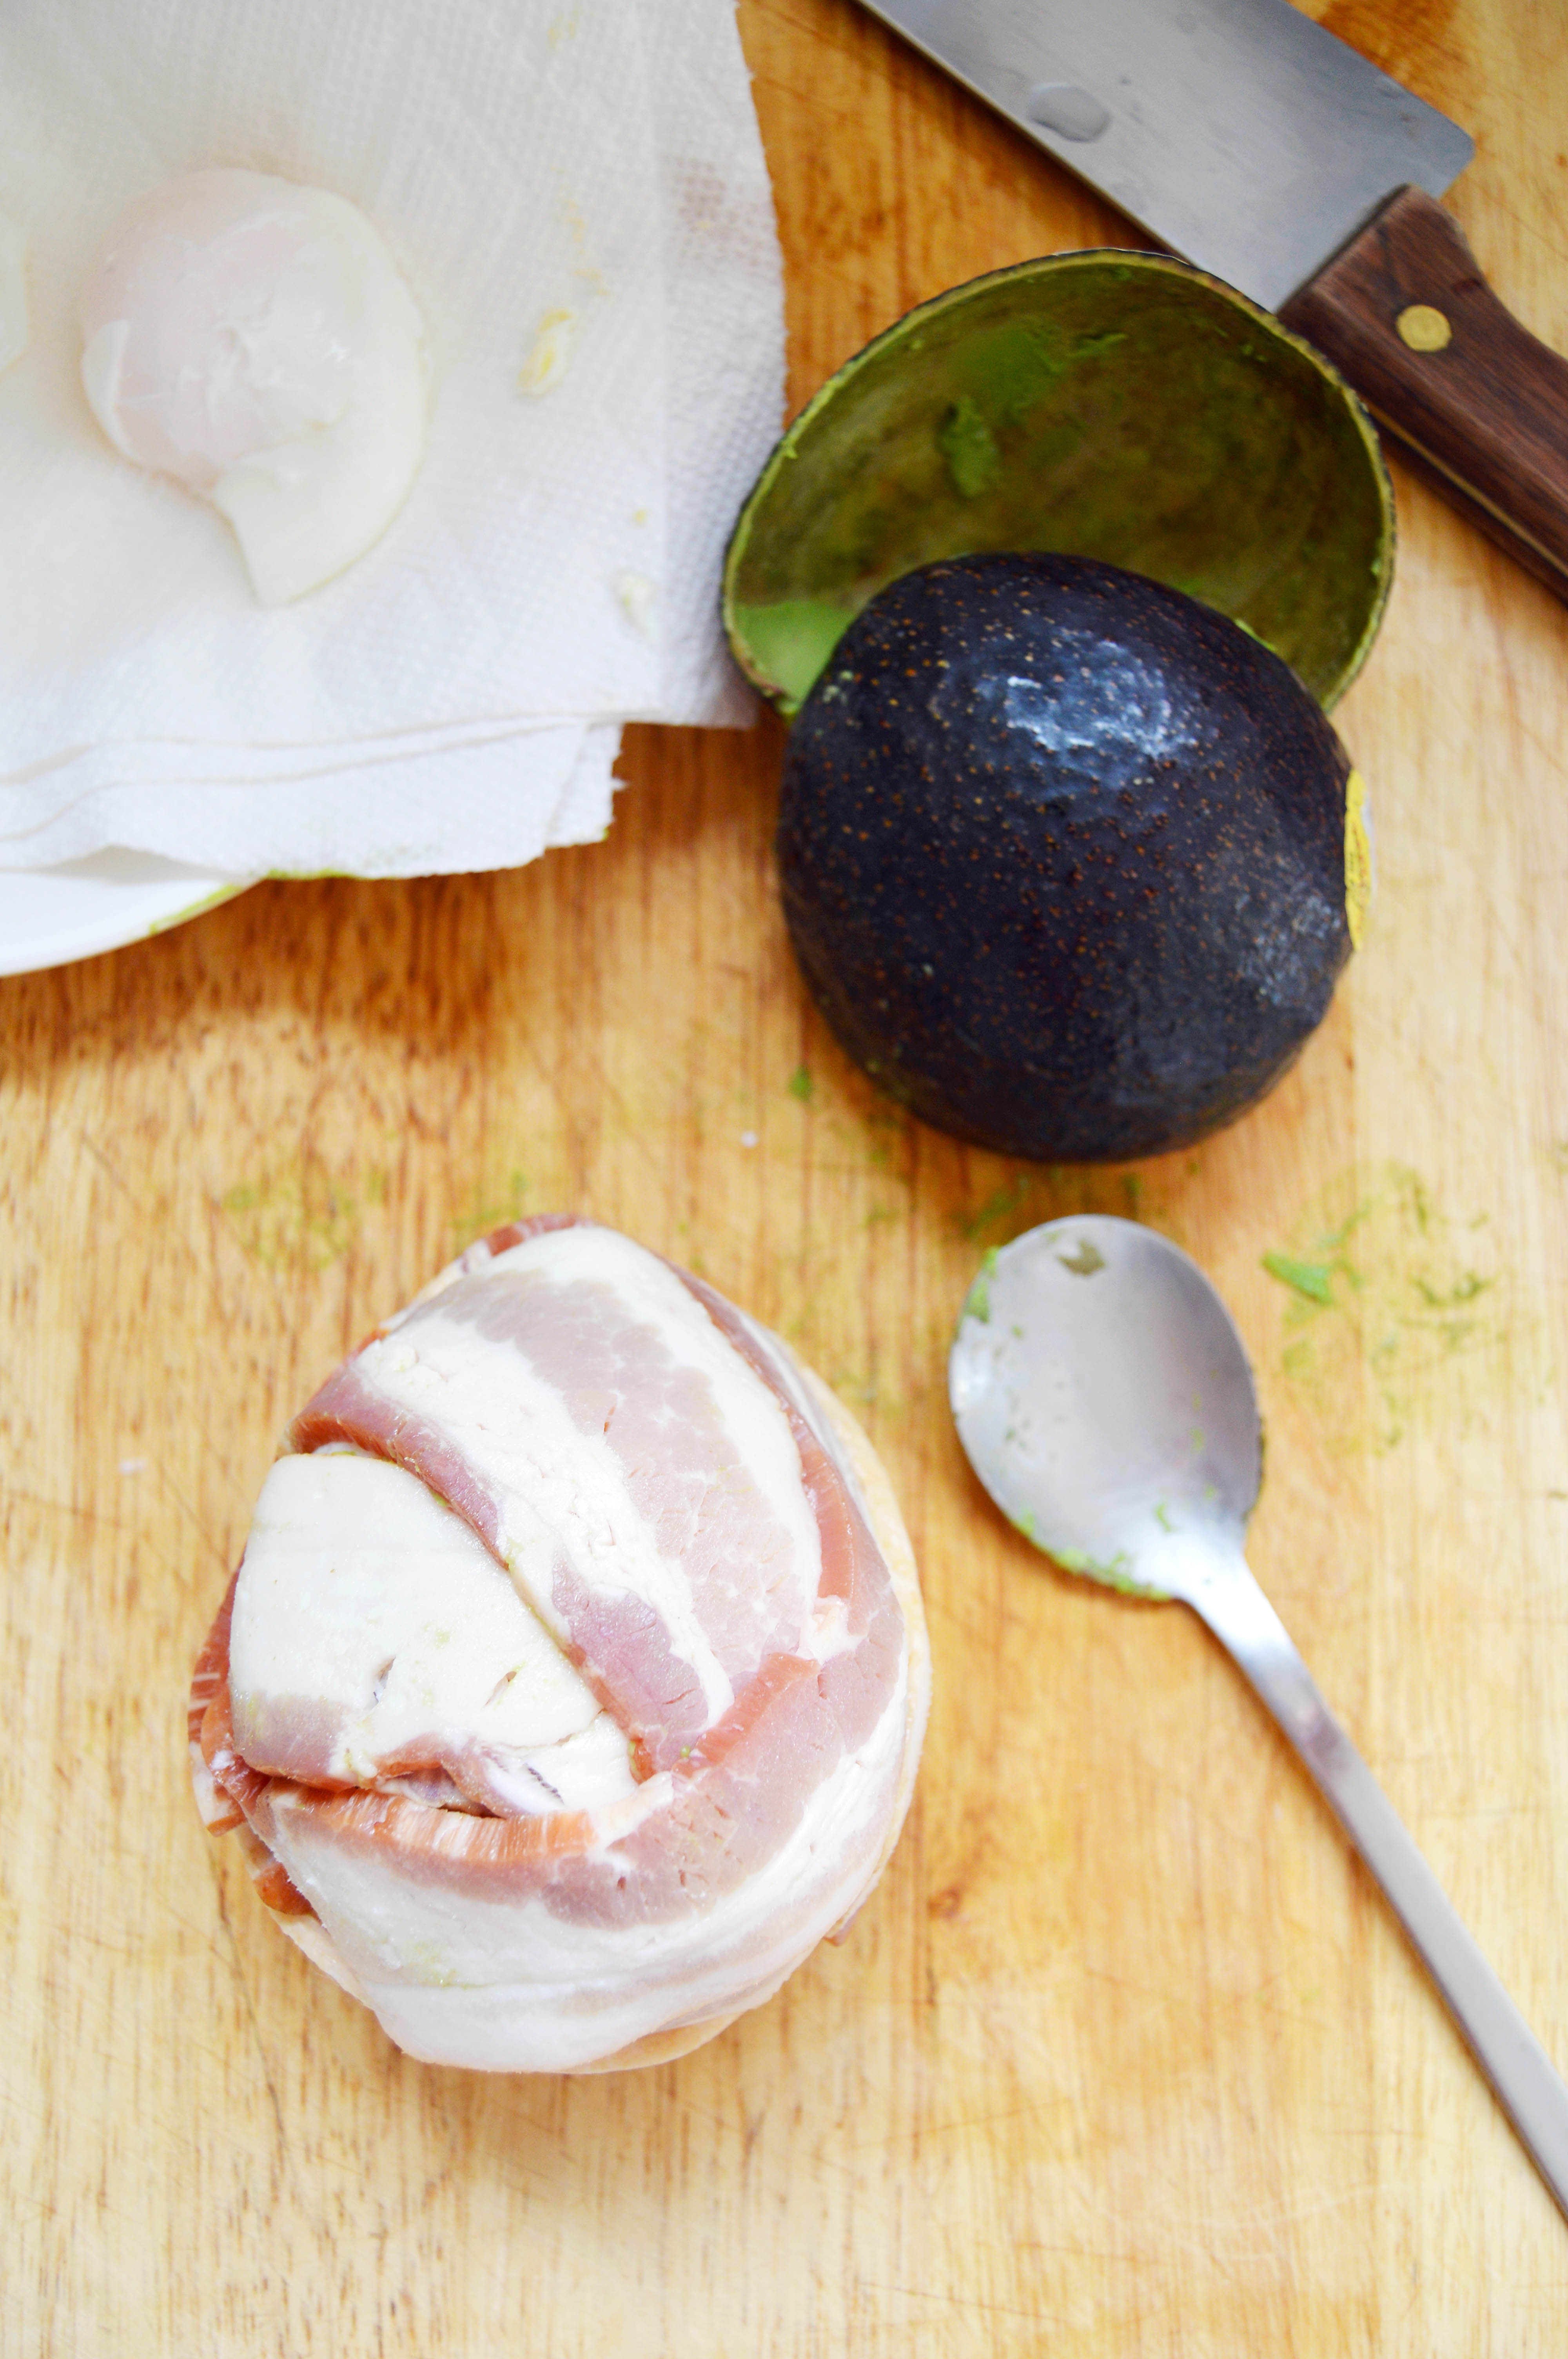

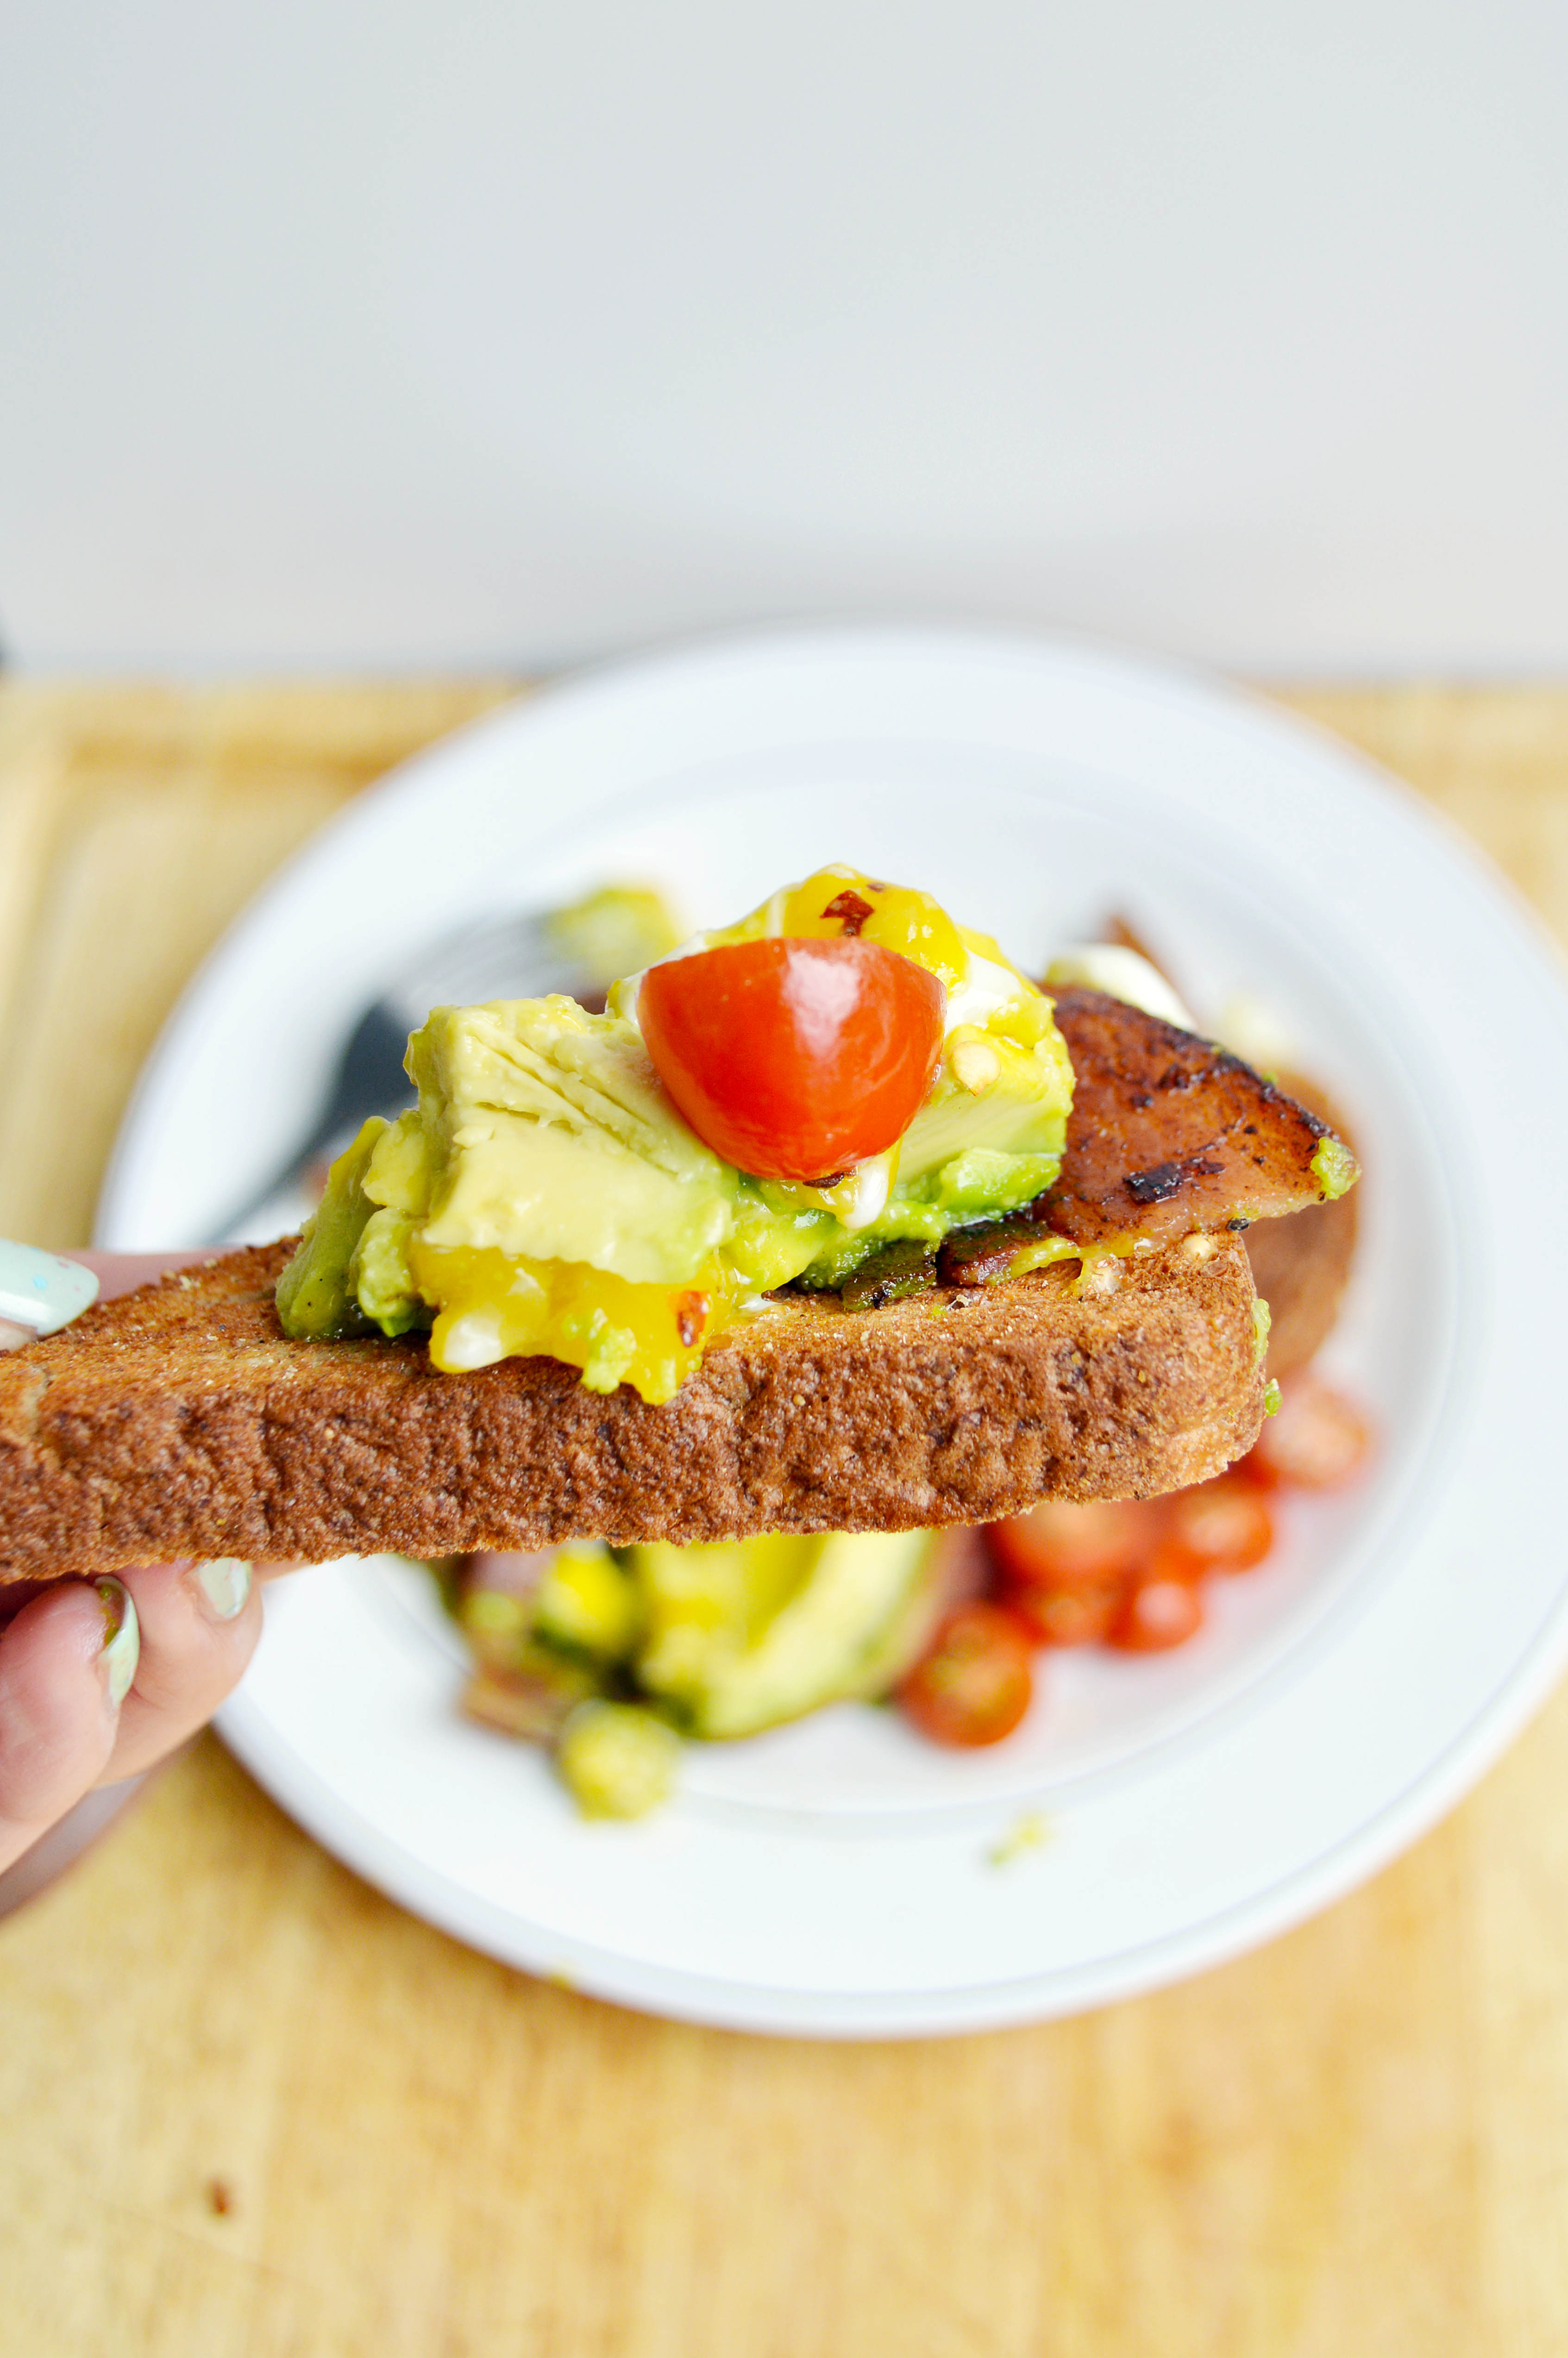
 Bacon Avocado Egg


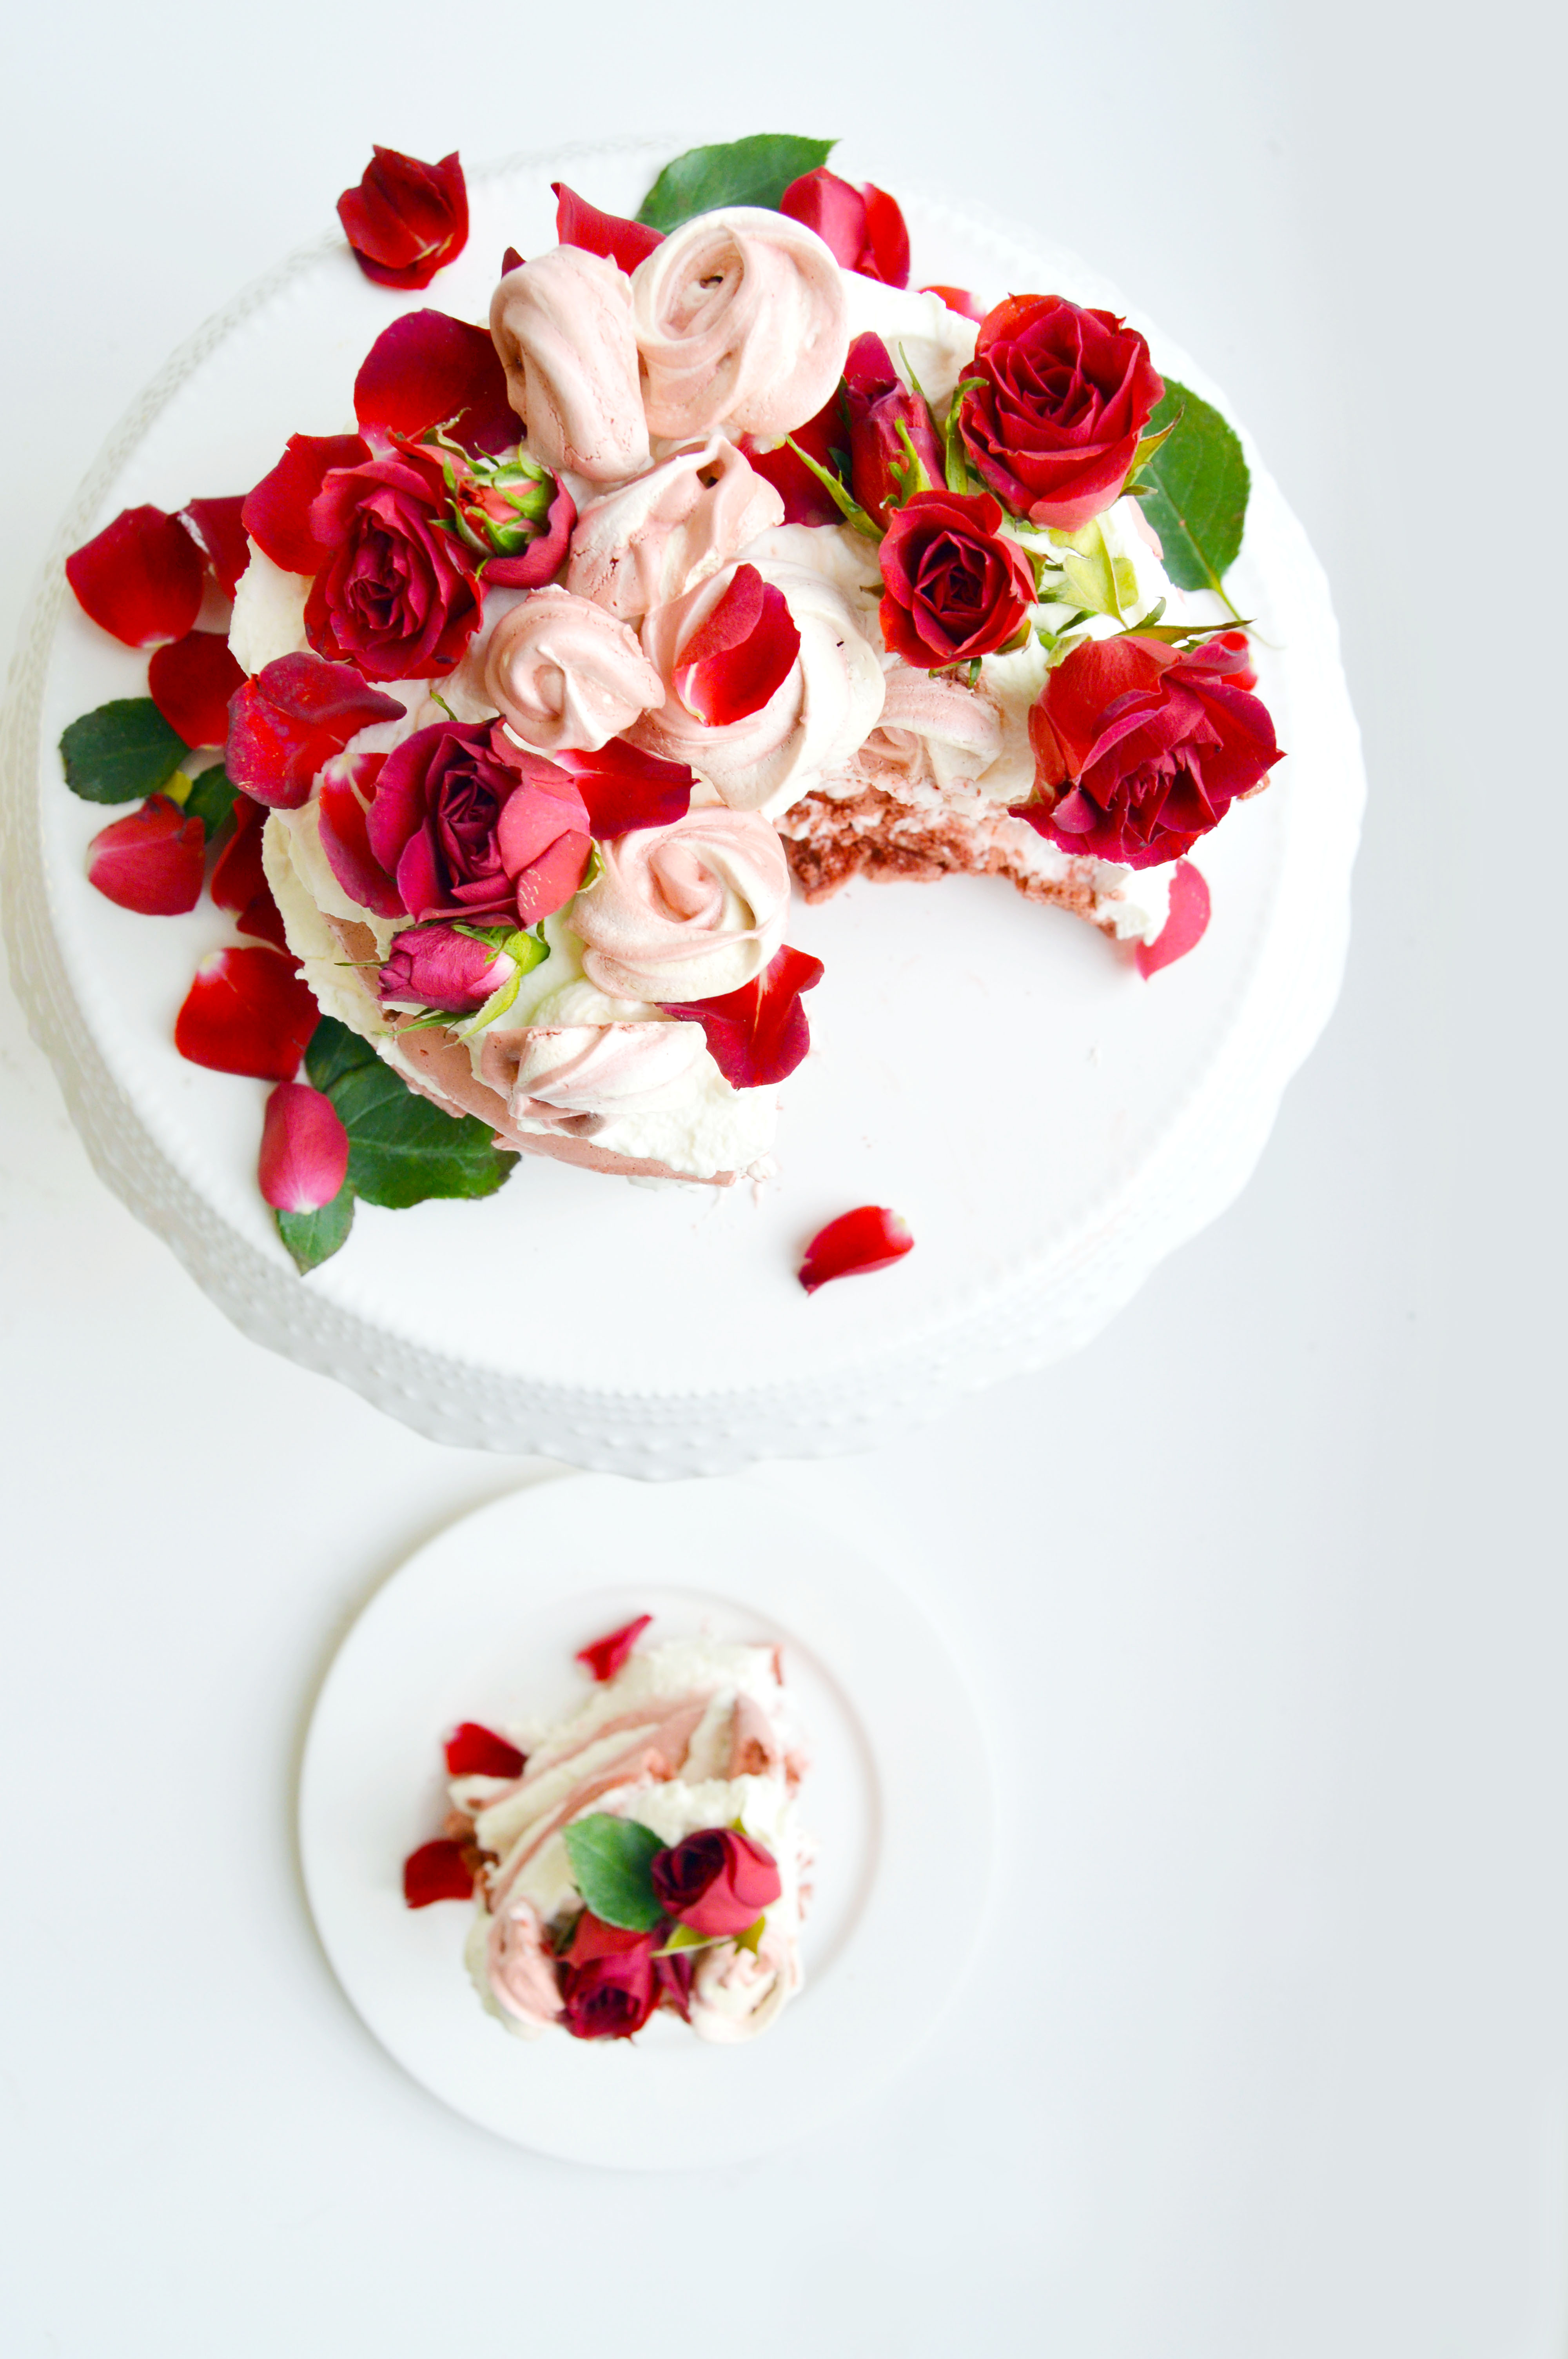


 This may be the most romantic cake I’ve made. (


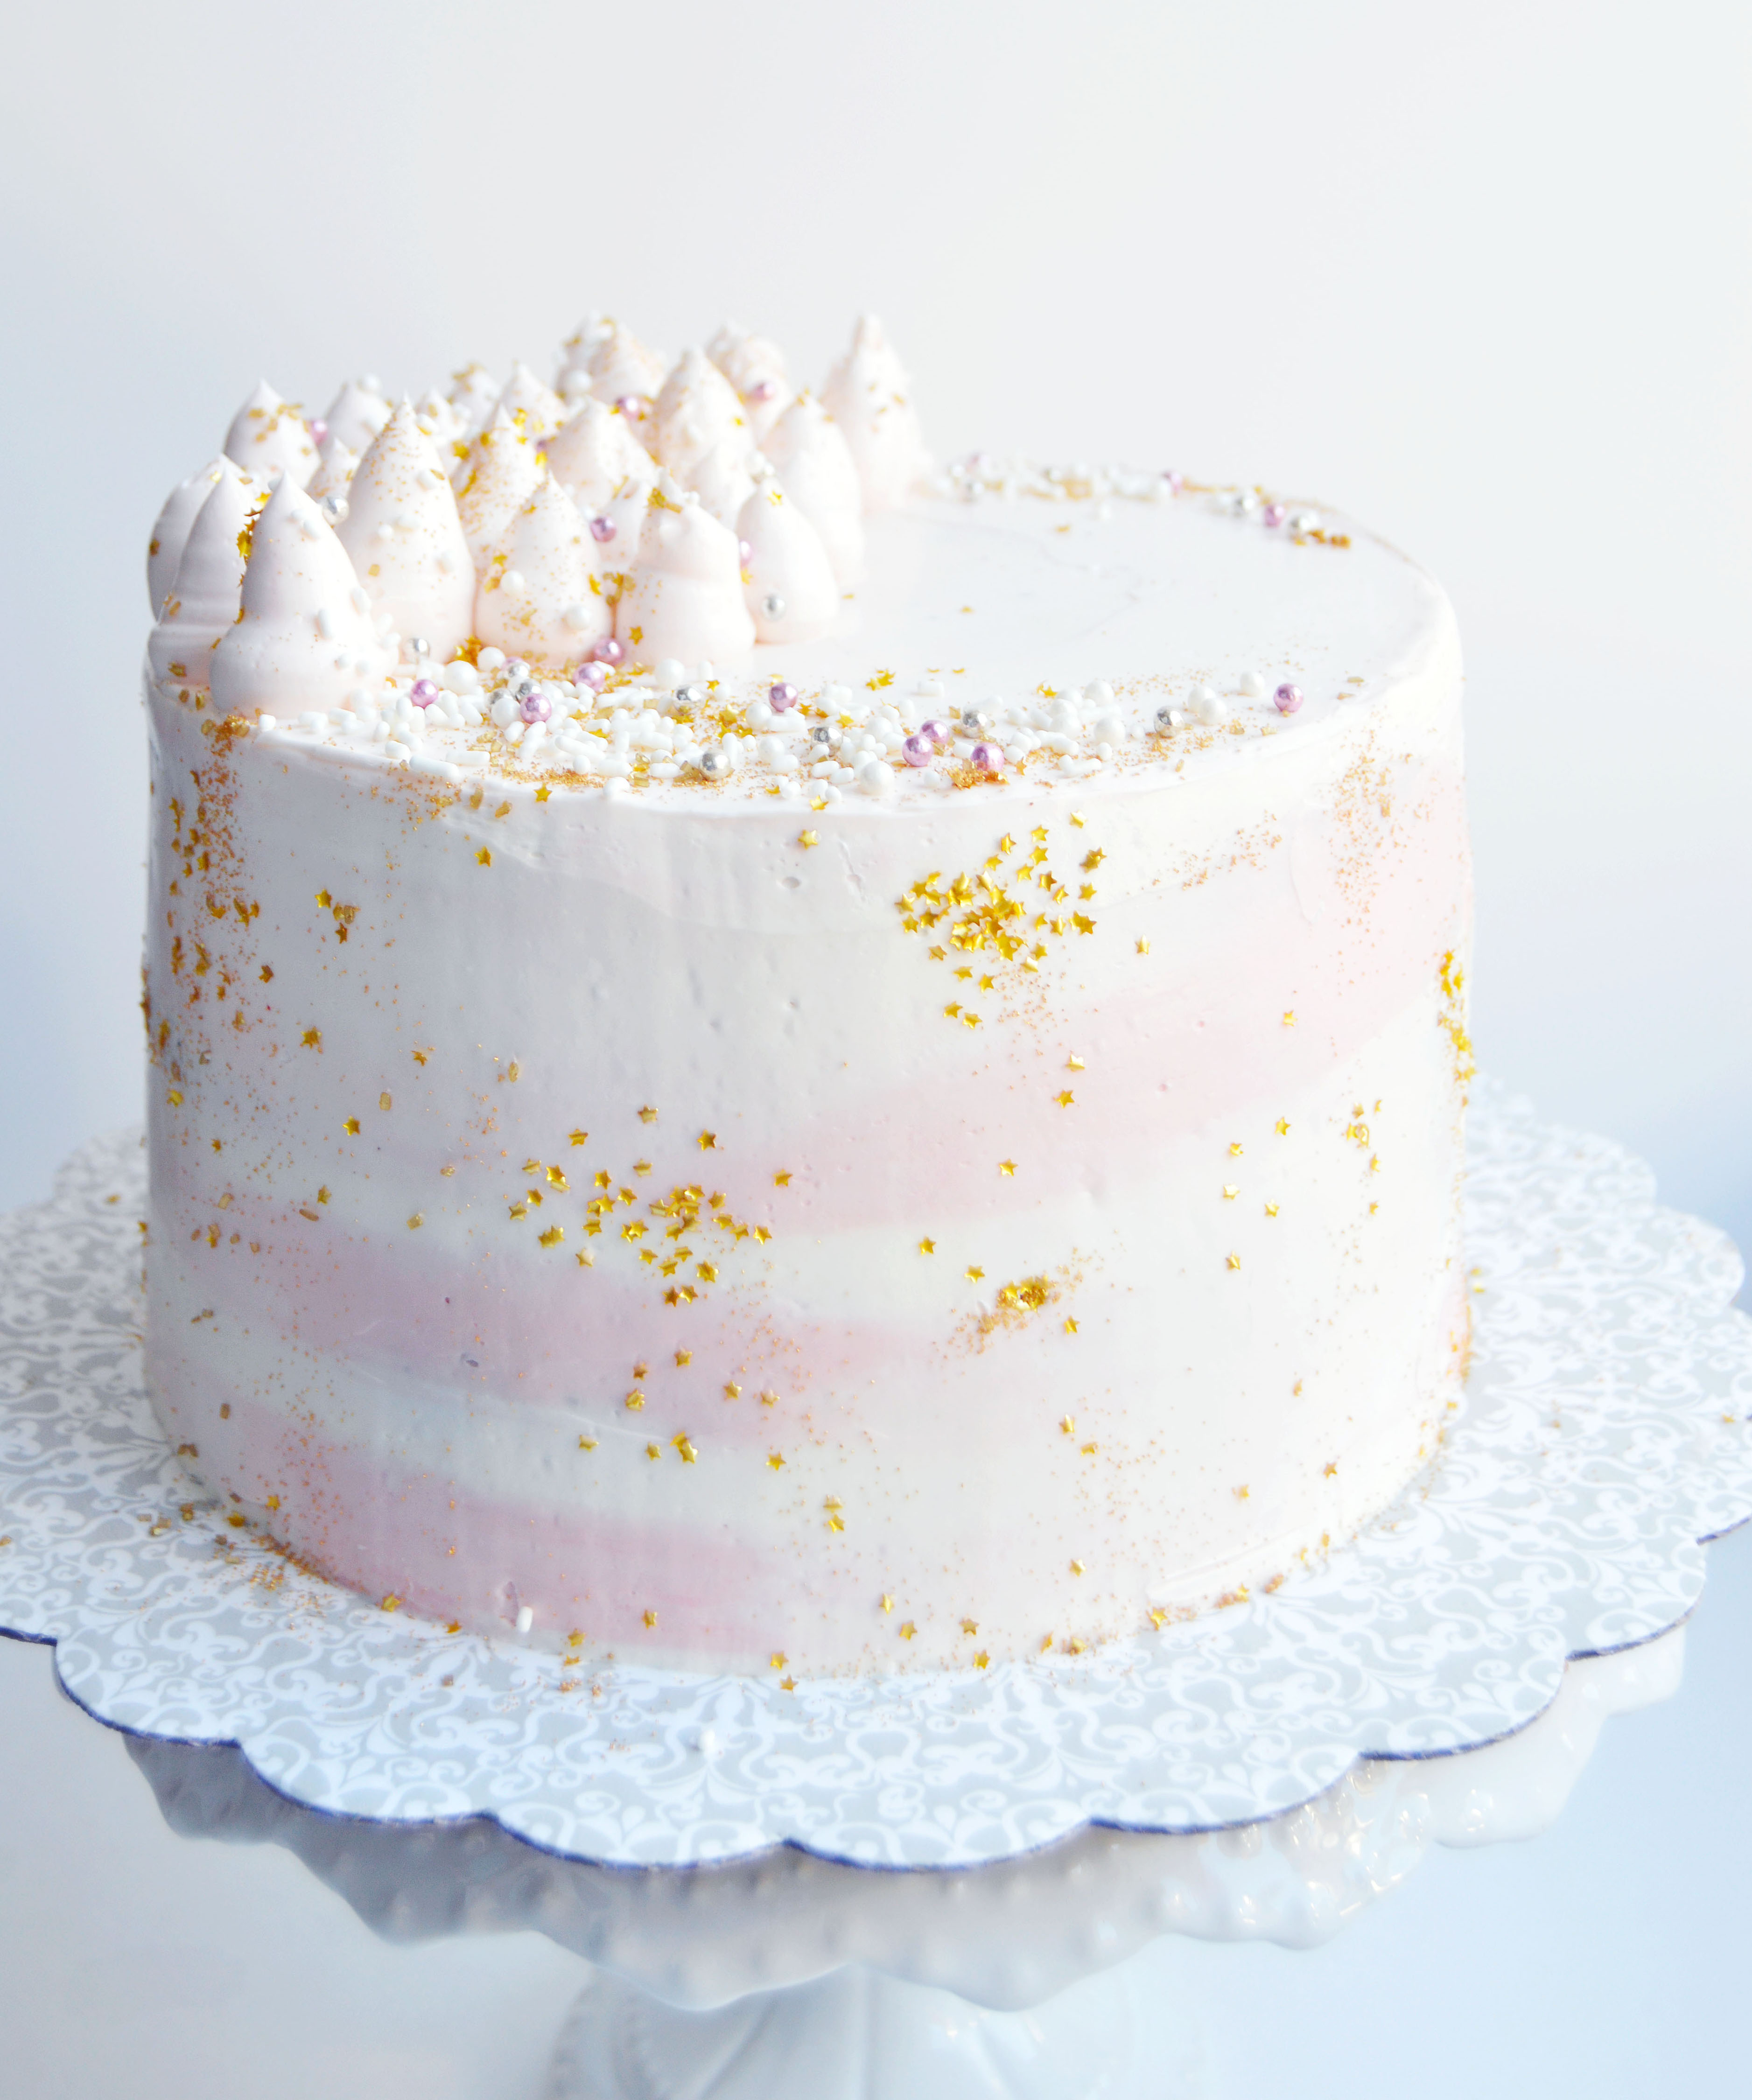
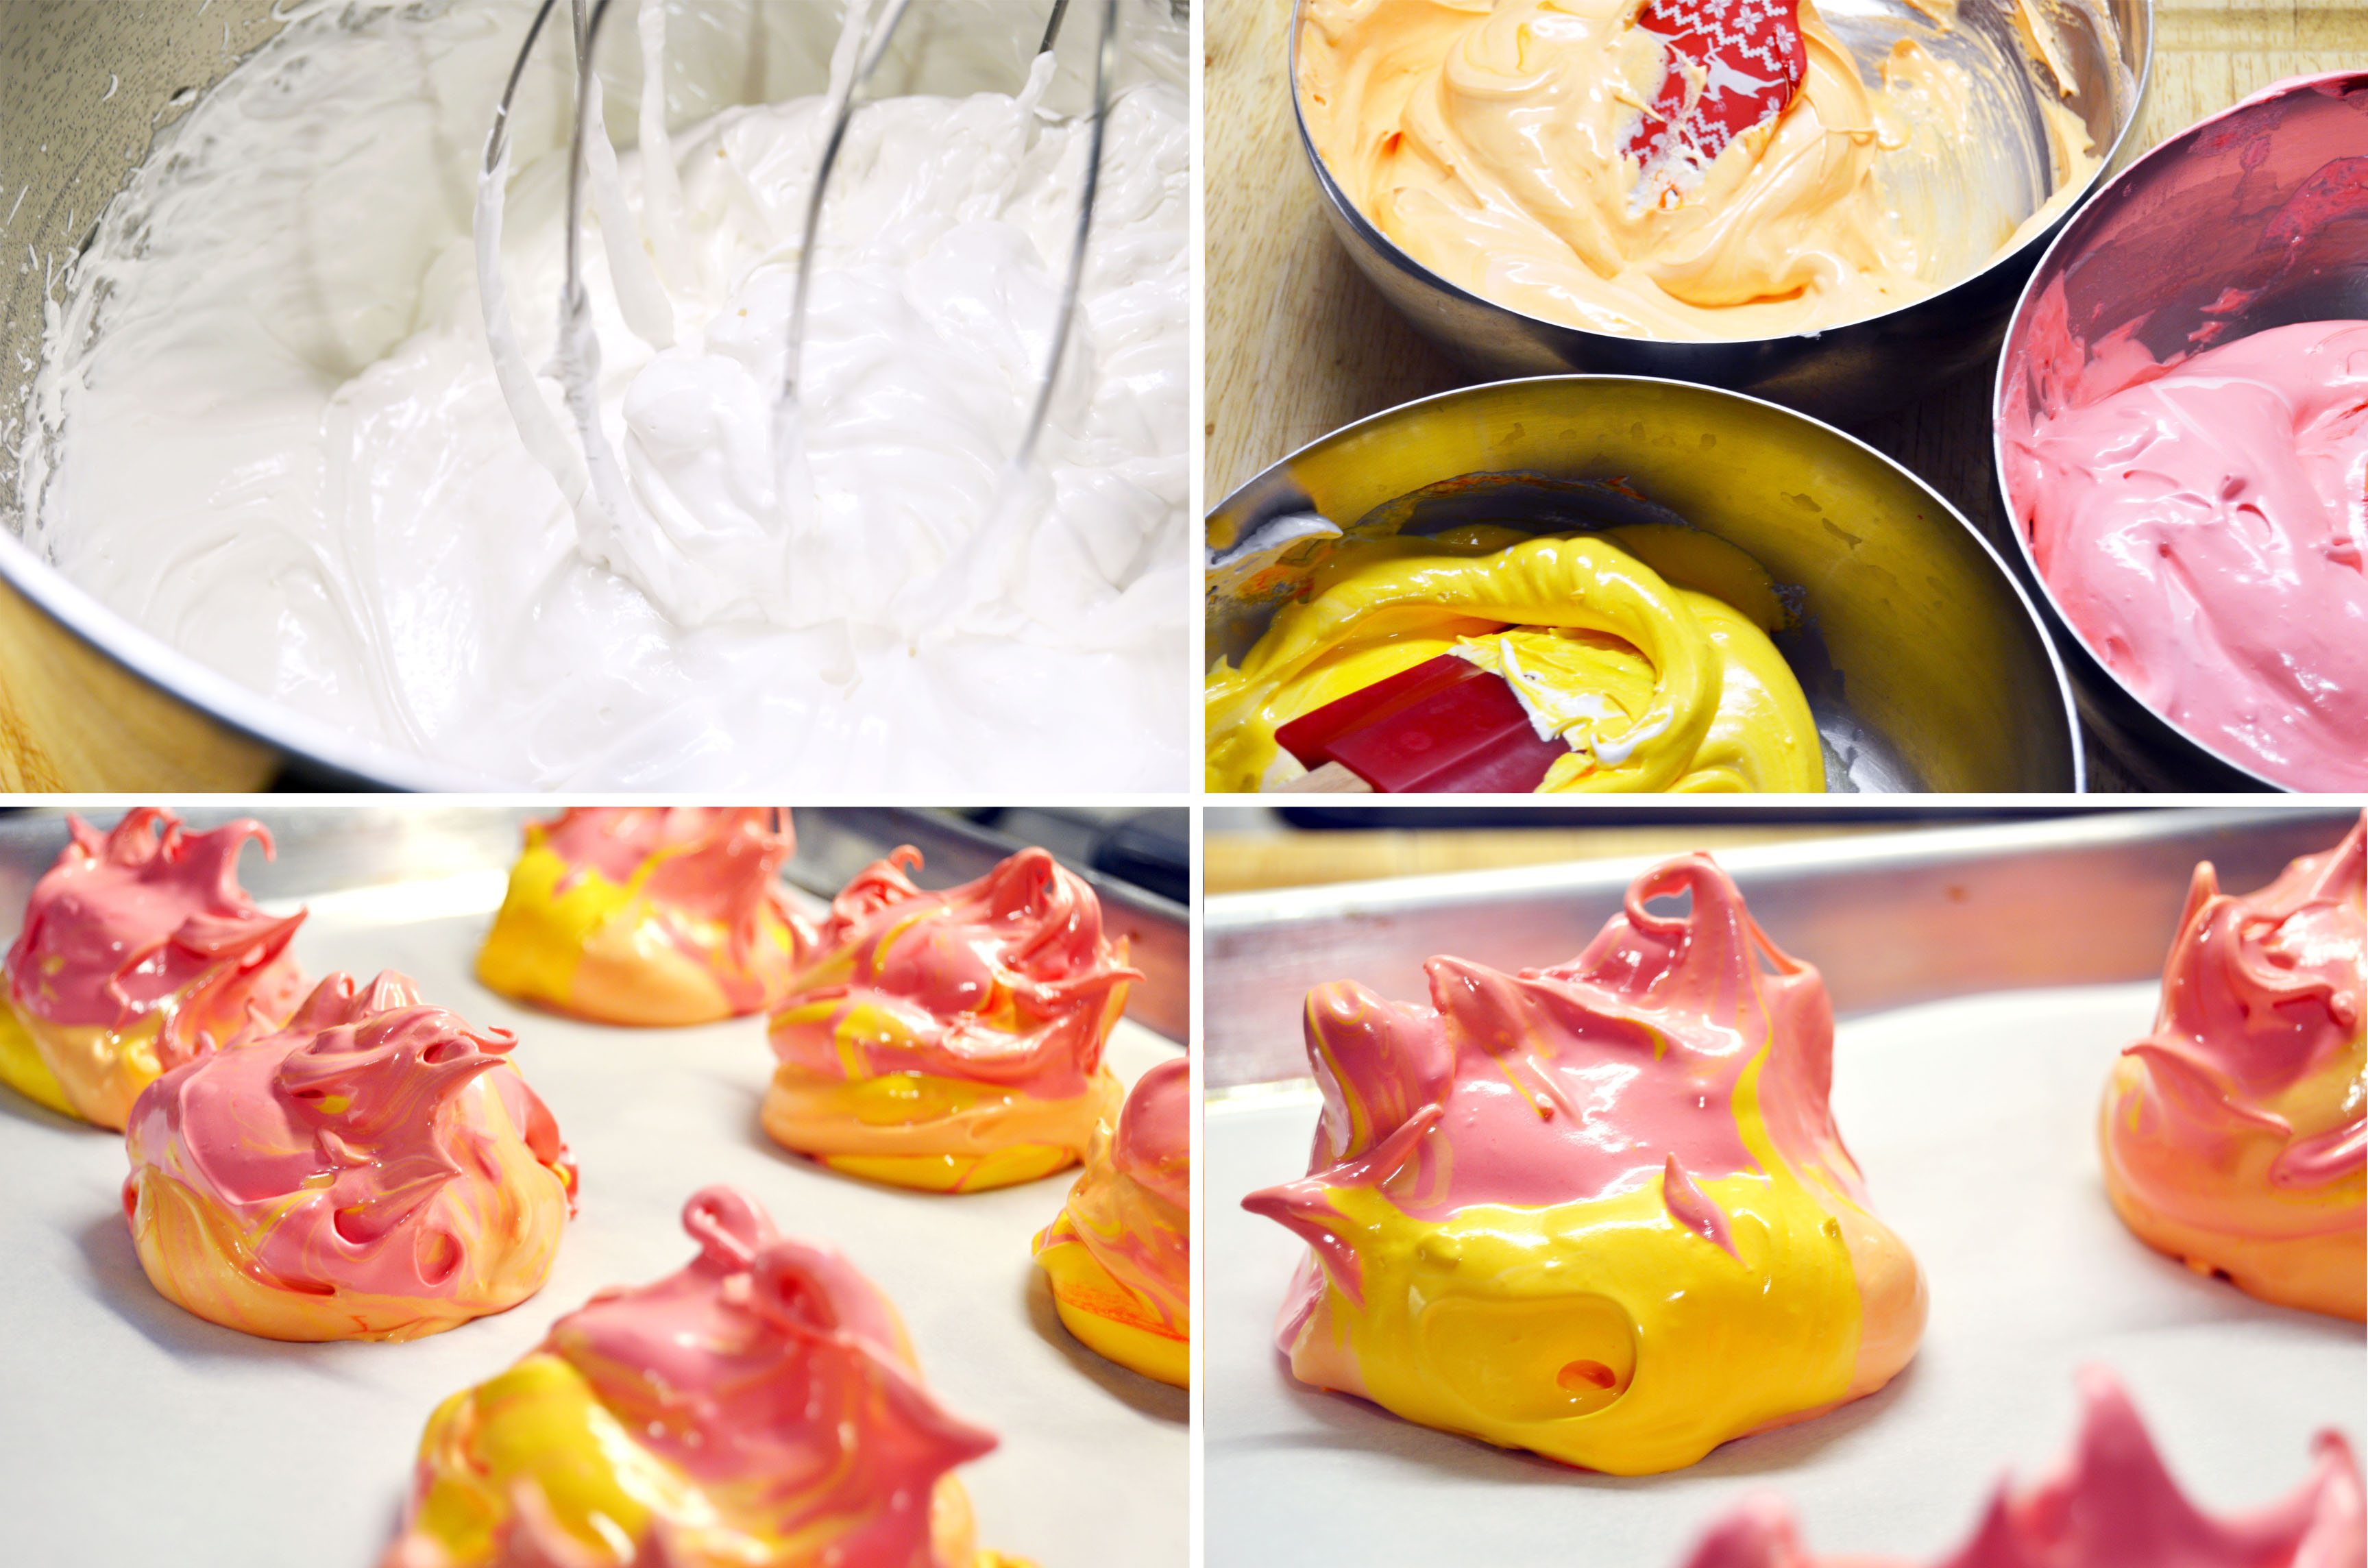
 The meringue recipe I’m sharing is delicious and can be flavored with different extract or add-ins, but this time I chose to keep it simple by tinting it in different colors and shaping it so it has a flame-like body. Stirring the gel food coloring does deflate the meringue a bit and spooning it onto the parchment paper in layered dollops seems to produce a few cracks in the meringue. This is just a theory because I’ve made this recipe before and it produces very white, no-crack meringues when piped into little shapes.
 I wanted the meringues to be super vibrant, but this is as bright as I could get them without compromising the structure of the meringue batter. As for the inside of the meringue, the color is much more vibrant on the inside and I am in love with it. Color and small crack issues aside, the meringues are melt-in-your-mouth crisp and has a wonderful marshmallow-y chewy interior. It’s love at


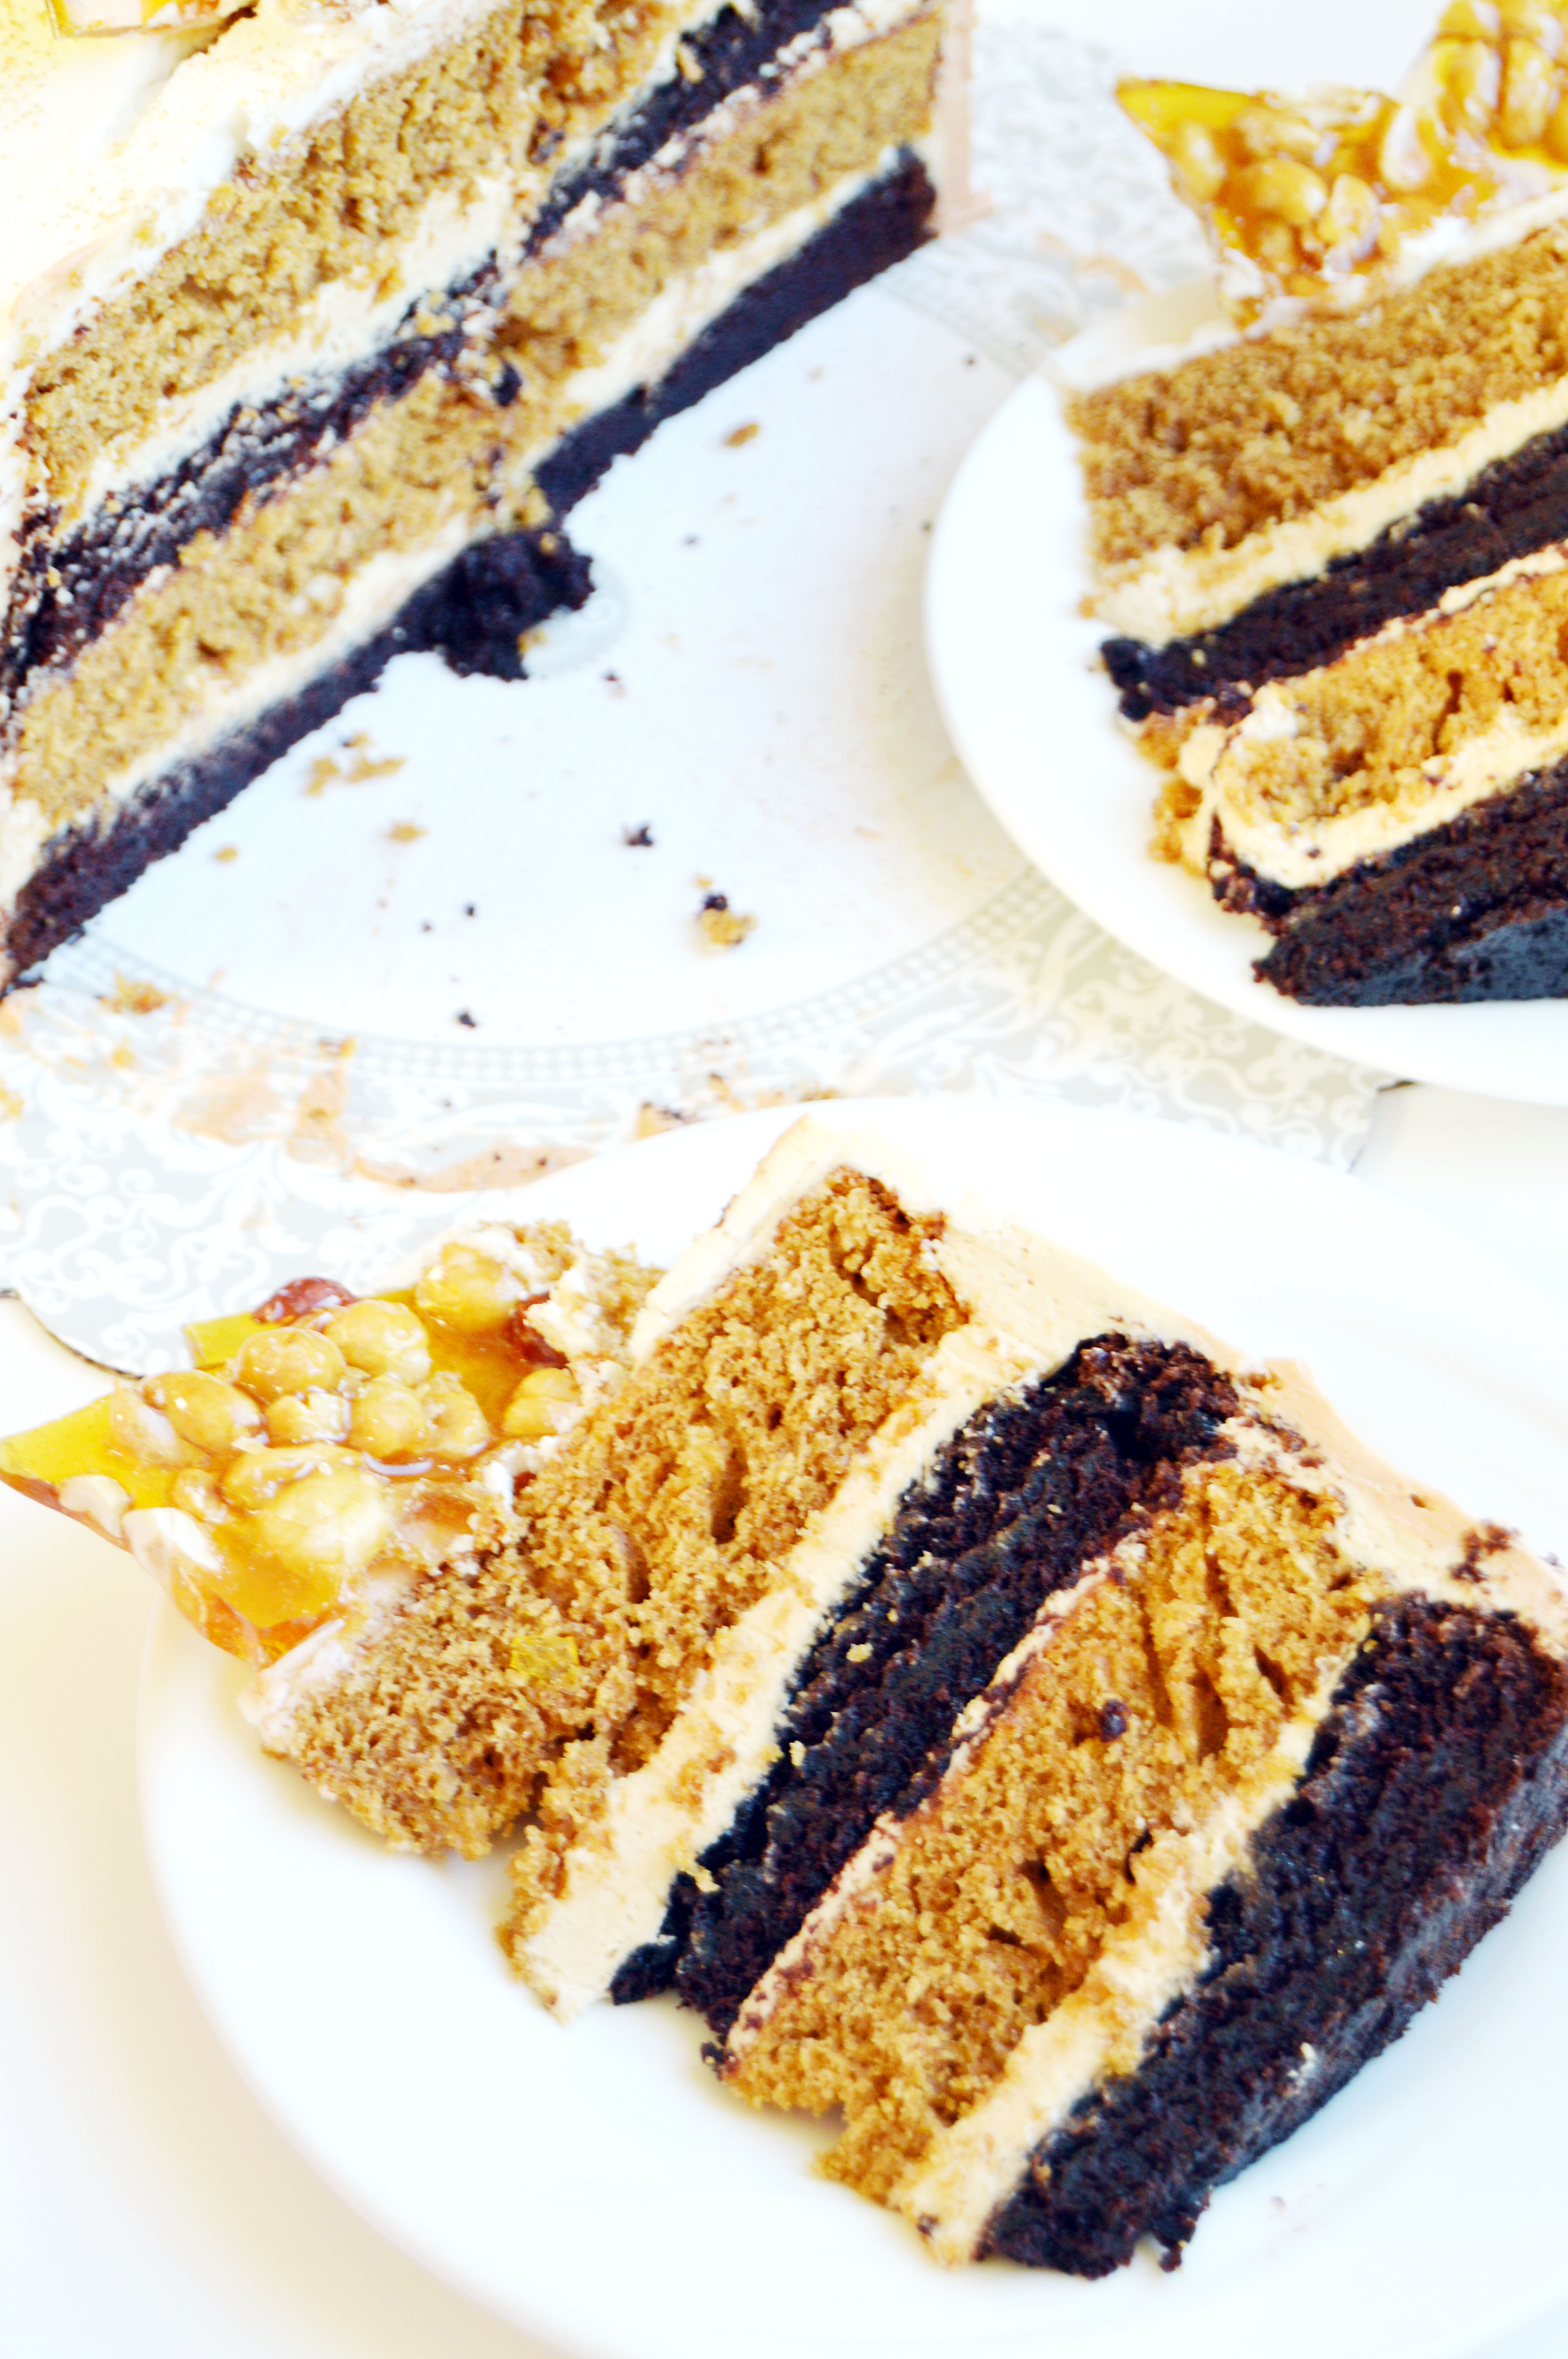
 When looking at the recipe, you might wonder why I made two different types of frosting. After years of baking, I realized that as much as I love the texture and flavor of boiled frosting, it does not ice as smoothly as Swiss meringue buttercream. So, these days I make two types of frosting for one cake. Is it a pain in the butt? Yes, but the flavor and the presentation are so worth it.
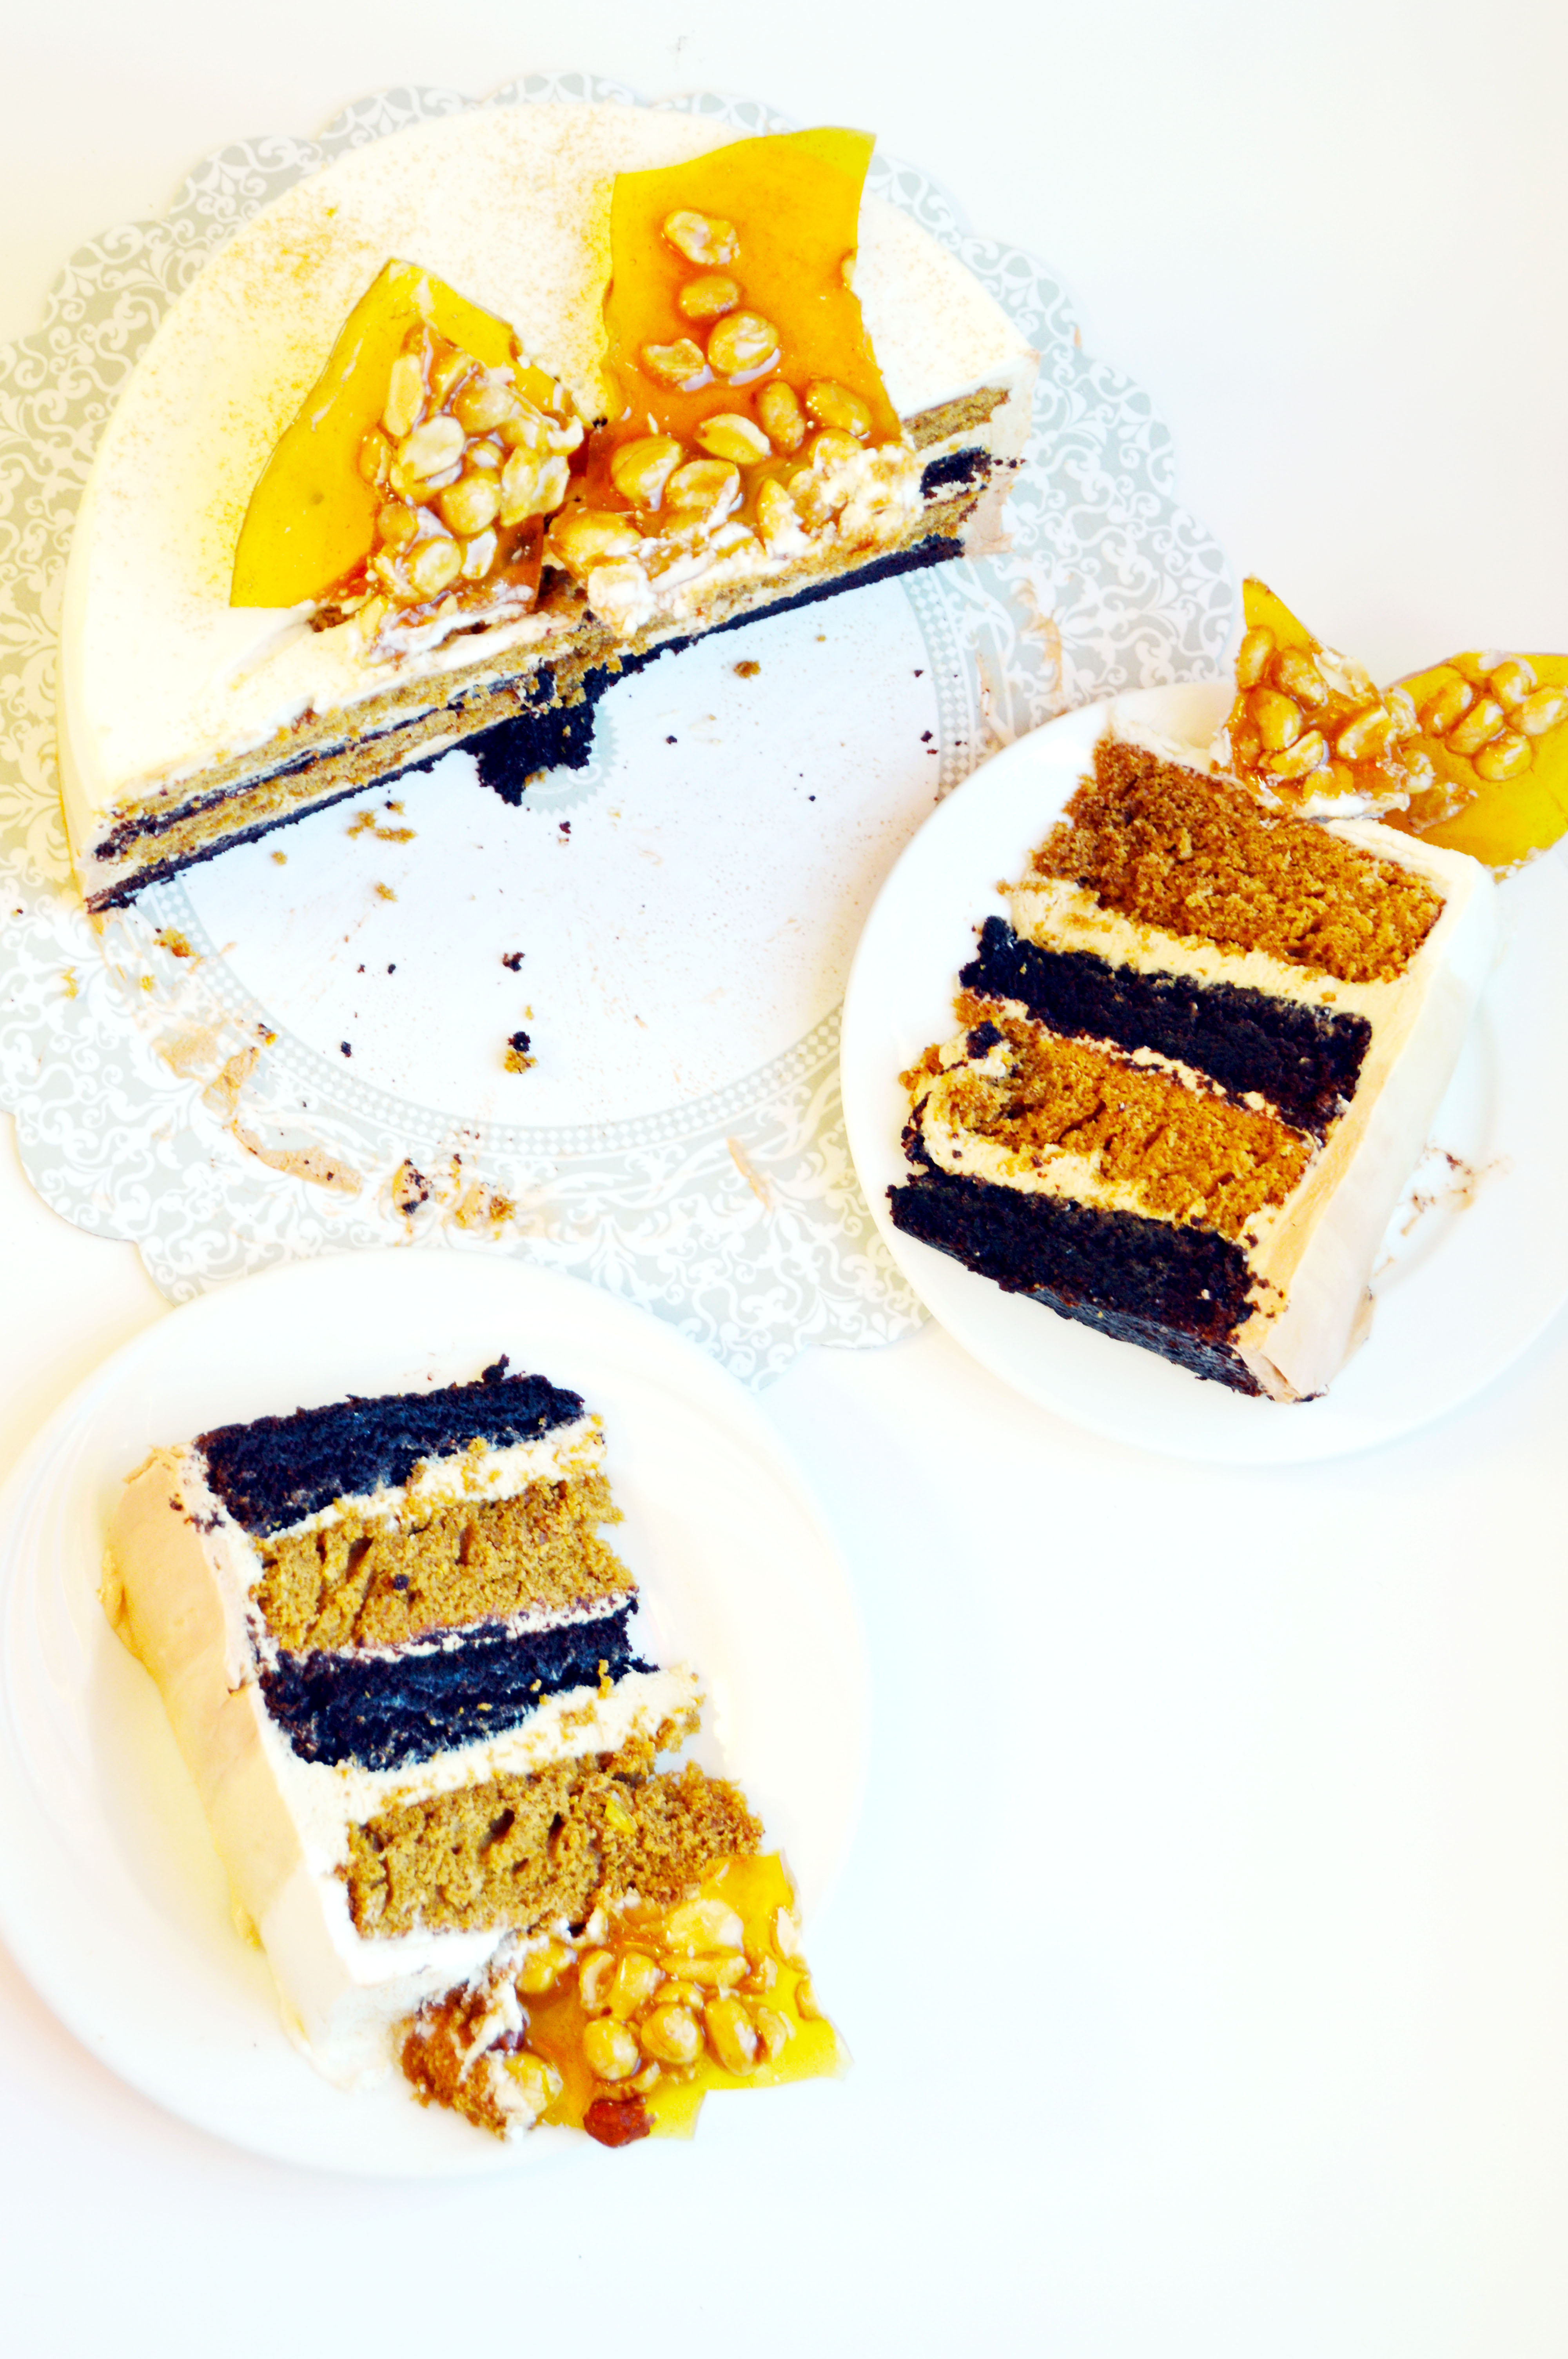


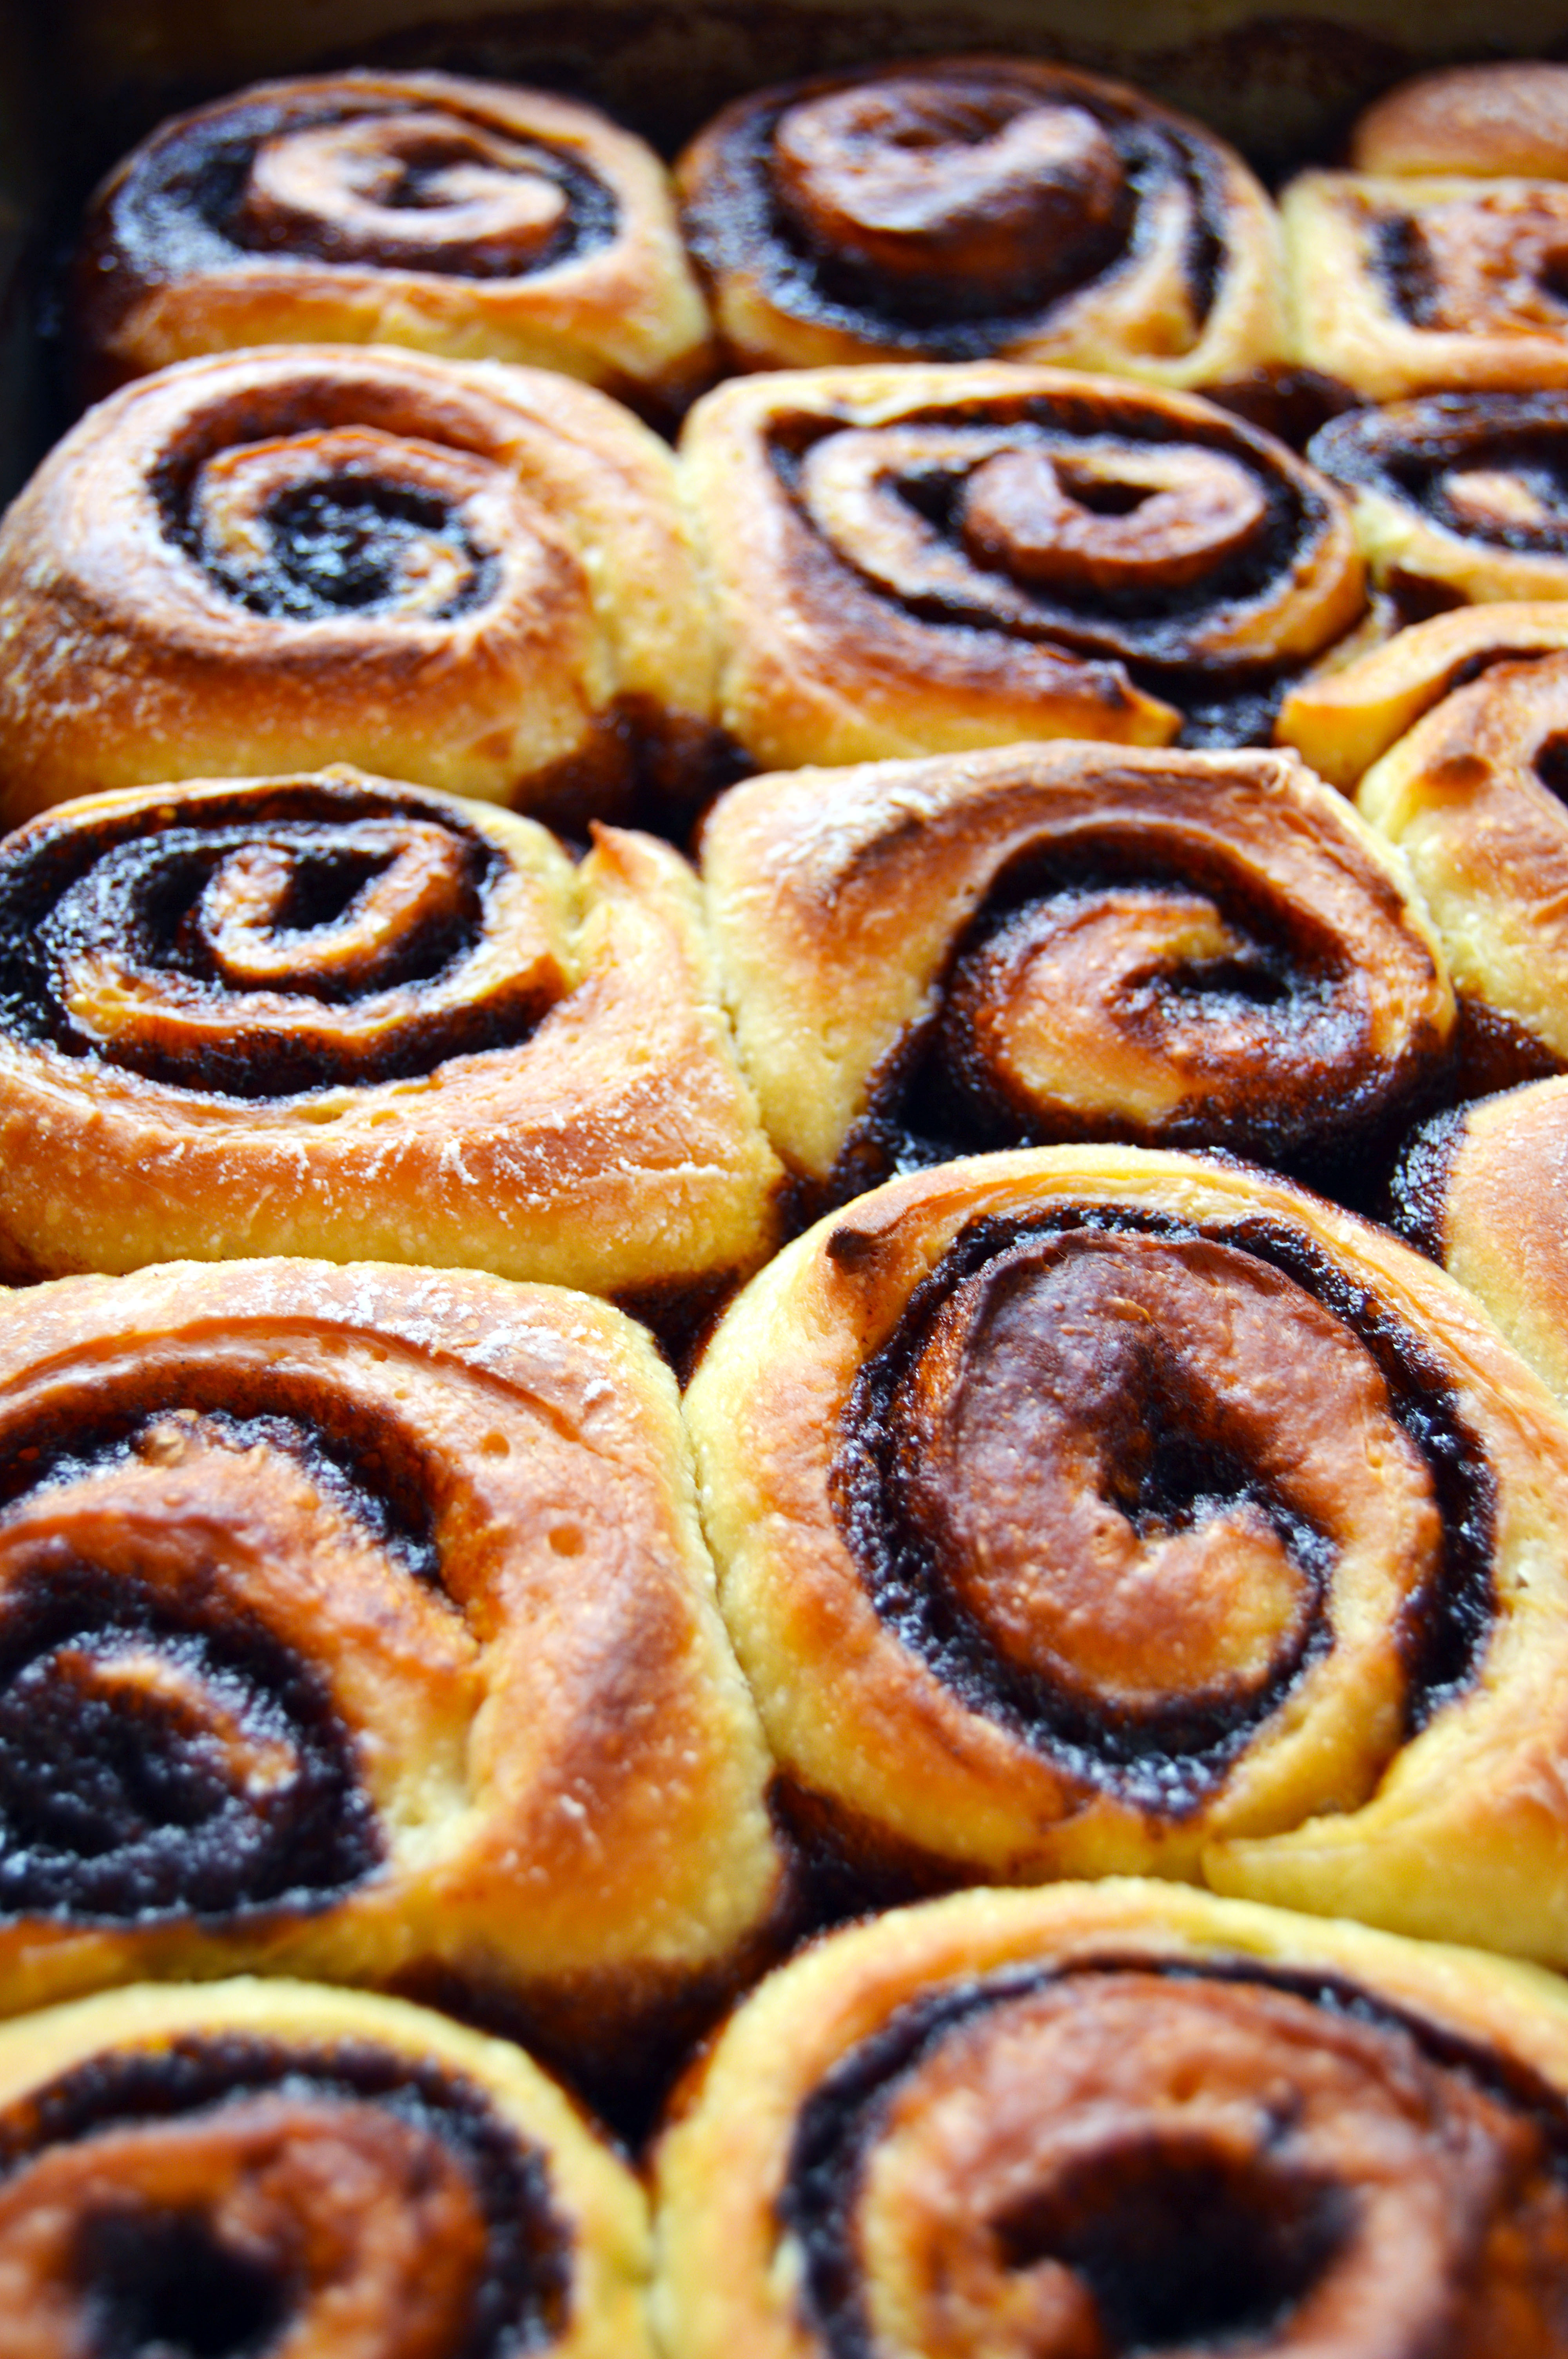
 Cinnamon rolls are definitely not an on-the-whim kind of treat. But if you do decide to make it, I can imagine it being part of an awesome Christmas morning breakfast.

 It’s December! I can’t believe that it’s already more than a week into December and Christmas is fast approaching. No, I haven’t done my holiday shopping yet but I can already envision the empty bank account as I think about the things I have to buy. But the Christmas tree is up and I’m glad I got that done at least.
 When December rolls around, cookies seem to be extra popular to bake. I’ve never done cookie exchanges or made cookie platters but I think it’s always fun to see people enjoy the things you make in the kitchen. These green tea white chocolate sugar cookies are extra tender and soft. The white chocolate in the batter softens the taste of green tea, which can come across as bitter to some people. But the green tea flavor is still bold and you might not even notice the white chocolate.
 I put a dollop of royal icing on mine, because I made a whole batch to decorate the same cookies that were cut into Christmas tree shapes. But I didn’t realize that the royal icing wouldn’t stick onto the cookies because of the coating of green tea sugar. I had to force it onto the domed cookies by squeezing it straight onto the cookie and hoping it would stay. So, if you are planning on decorating these, you can skip the green tea sugar coating (ah, but that sugar is so delicious though!!).

