Funfetti Ooey Gooey Butter Cake

Sometimes the universe aligns to bring something new and that’s how this funfetti ooey gooey butter cake was born. I happened to see a recipe for a plush confetti cake and a gooey butter cake at the same time and I was sold. I needed to have both asap.

The confetti cake portion is vegan (!) and becomes borderline too moist (very similar to a tres leches cake) with the gooey butter topping. The almond-vanilla scented cake was a happy accident as the original recipe called for ⅛ th of a teaspoon of almond extract. My hand unexpectedly had a nervous tremor (probably from trying to measure out a tiny fraction) and I put a bit more, I’m guessing ½ – 1 teaspoon. The end result is an almond-vanilla scented cake that I think cuts the cloying sweetness of most gooey butter cakes. 

It feeds a crowd and is a perfect cake to bake for celebrations. I baked to celebrate me (yay!) on my birthday. 🙂

Funfetti Ooey Gooey Butter Cake

Ingredients:

For the Funfetti Cake Layer:

1 ½ c. all-purpose flour
⅗ c. granulated sugar
1 ½ tsp. baking powder
½ tsp. kosher salt (I use diamond kosher)
1 c. unsweetened non-dairy milk
⅓ c. vegetable oil
2 tbsp. fresh lemon juice
½ tbsp. vanilla extract
½ – 1 tsp. almond extract
⅓ c. rainbow sprinkles

For the Ooey Gooey Layer:

8 oz. cream cheese, room temperature
4 oz. butter, room temperature
12 oz. powdered sugar, plus more for garnish
¼ tsp. kosher salt
2 large eggs
2 egg yolks
2 tablespoons vanilla extract

Instructions:

  1. Preheat the oven to 350℉. Grease and line a 9×13-inch baking pan with parchment paper.
  2. Prepare the ingredients for the funfetti cake. In a large mixing bowl, whisk together the flour, sugar, baking powder and salt. Set aside.
  3. In a large measuring cup (I like that it has a spout) or a medium bowl, whisk together the non-dairy milk, oil, lemon juice, vanilla and almond extract. Set aside.*
  4. Start the ooey gooey layer. In the bowl of a stand mixer fitted with a paddle attachment, combine the cream cheese, butter and salt. Mix on medium speed until combined.
  5. Turn the speed to low and add the powdered sugar in slowly to minimize the sugar dust.
  6. Once all of the powdered sugar is incorporated, turn up the speed to medium-high and mix until the mixture is fluffy, about 8-10 minutes.
  7. In a small bowl, whisk together the eggs, egg yolks and vanilla extract.
  8. Turn the speed of the stand mixer to low and add the egg mixture to the sugar mixture. Mix until combined. Set aside.
  9. Assemble the funfetti cake. Pour the milk mixture over the flour mixture and mix until just combined.
  10. Fold in the rainbow sprinkles.
  11. Pour the funfetti cake batter over the prepared 9×13-inch baking pan. Spread evenly.
  12. Use a spatula to evenly dollop the gooey layer over the cake batter. Smooth evenly.
  13. Bake the cake about 35-45 minutes, until the top layer is toasted golden brown and the cake is cooked through.
  14. Let the cake cool completely before dusting with powdered sugar and serving.*

I delay combining the funfetti cake ingredients to prevent the baking powder from reacting prematurely.

I prefer to serve the cake cold (it helps the cake keep its shape) with hot, unsweetened black coffee.

Red Velvet Strawberry Rose Cake

Happy Valentine’s Day! As someone who loves all things pink and feminine, Valentine’s Day décor is right up my alley. This cake was inspired by Ron Ben Israel’s rose cake which I’ve been obsessed with as soon as I laid my eyes on it. It was always on my “to-try” list but I never got the chance to take on the challenge. Recently, there was a blog post by NYC Cake Girl who used to work with Ron Ben Israel with a how-to on the very cake I loved. The amount of work and the detail work was perfection (as always), and I knew I simply didn’t have the time (and possibly even the skill) to recreate the cake. So I created this cake which looks similar and uses real rose petals.
As for the cake itself, I used half of my giant doughnut cake pan instead of baking a round cake and carving it into a dome like the tutorial. A similar effect could be produced with a shallow bundt cake, but I think the smooth exterior of the doughnut pan really makes things easier. The cake flavor is red velvet (because it is THE cake of Valentine ’s Day), and is layered on the inside with fresh strawberries and vanilla frosting. I know I know, I almost felt like it was sacrilege not to use cream cheese frosting, but I didn’t have cream cheese in the fridge so, vanilla it is. Please feel free to use cream cheese frosting if you prefer it.
I picked a bouquet of flowers that varied in shades of pink in hopes of making an ombre effect. However, once the petals were stripped from the flowers, they kind of ended up being the same color. I saved the lightest rose for the center though. Although in hindsight, I think I should’ve just picked the flower that had the least blemishes. You essentially layer the petals one by one in alternating layers around the cake to form a giant rose. It is a bit time consuming and is not completely symmetrical like the fondant petals from the original cake. But, I think it kind of gives it a homemade vibe that people can appreciate.I went a little heavy with the pictures because it was SO STUNNING. Like… the photos can’t do it justice. I loved even how the slices had petals on them fanning out the back, like a very fancy cape or headdress. I can almost guarantee that you will get “wows” and surprised looks when you bring this cake. It won’t disappoint.
I hope all of you got some sort of recognition of love this Valentine’s Day. If not, I baked this cake for you. 😉

Red Velvet Strawberry Rose Cake

You will need:

1 batch red velvet cake, baked in a dome shape (recipe below)
1 batch vanilla frosting (recipe below)
About ½ pint strawberries, sliced horizontally (enough to cover the area of the cake twice)
1 dozen roses (pesticide-free)

Instructions:

  1. Slice the red velvet cake in half (horizontally), and smooth a thin layer of vanilla frosting.
  2. Layer it with fresh strawberry slices and repeat layer with vanilla frosting and fresh strawberries using frosting to fill in any gaps. (shown in picture #2)
  3. Place the top half of the cake onto the frosting layer and crumb coat the entire cake with a thin layer of frosting. (shown in picture #3)
  4. Put cake in freezer for about 10-15 minutes until the frosting is set and then remove from fridge and give it a full coating. (shown in picture #4)
  5. Pick the flower you will be using as your center flower. Trim and place it in the center of the cake. (shown in picture #5)
  6. Get a few petals and fill in the gaps around the hole. (shown in picture #6)
  7. Now start layering the bottom part of the cake by pressing the petals into the frosting of the cake. Try to press the bottom edge of the petal only. (shown in picture #7)
  8. Try to use the largest petals you have for the bottom layer and go all around the cake. (shown in picture #8)
  9. Layer the next row of petals around the cake. (shown in picture #9)
  10. Try to alternate the position of the petals. As in, try to place the petal of the next layer between two petals of the bottom layer. (shown in picture #10)
  11. Repeat until you get to the center of the cake, try to use smaller petals as you get to the top of the cake. I had to replace some of the lighter petals because the lower petals turned out to be too pink to get a more seamless look. (shown in picture #11)
  12. Get ready to stun the room. 😉

Red Velvet Cake

Ingredients

1 ½ cups all-purpose flour
1 ½ cups cake flour
3 tablespoons unsweetened cocoa powder
¾ tsp. salt
3 large eggs, at room temperature
¾ (1 ½ sticks) cup butter, at room temperature
2 ¼ cups granulated white sugar
2 tsp. vanilla extract
1 ounce bottle of red food coloring (2 Tablespoons)
1 ¼ cups buttermilk
1 ½ teaspoons baking soda
1 ½ teaspoons vinegar

Directions:

  1. Preheat oven to 350°F, spray either your bundt pan or the top half of your giant doughnut cake pan with nonstick spray. (I highly suggest using either pam for baking or baker’s joy for extra insurance of “nonstickage”.)
  2. In a medium bowl, whisk together flour, cocoa powder and salt. Set aside.
  3. In the bowl of a standing mixer, beat butter on medium speed for 30 seconds.
  4. Add sugar and vanilla, and beat until combined.
  5. Add eggs one at a time on medium speed.
  6. Lower speed to low and add in food coloring.
  7. Add ⅓ of flour mixture to the egg mixture on low and add ½ of the buttermilk.
  8. Repeat with ⅓ flour mix and the rest of the buttermilk.
  9. Finish mixing with the rest of the flour mixture. Mix until just combined.
  10. Stir together baking soda and vinegar in a small bowl. Add to cake batter and beat just until combined.
  11. Fill cake pan until ⅔ full, bake 30-40 minutes or until a cake tester comes out clean.
  12. Cool pan on rack for about 15-20 minutes. Try to use a small spatula around the edges to ensure a clean removal. Remove cake from pan.
  13. Let cool completely.

Vanilla Frosting

Ingredients:

1 c. whole milk
¼ c. flour
¼ tsp. salt
8 oz. (2 sticks) unsalted butter, room temperature
1 c. sugar
2 tsp. vanilla extract

Instructions:

  1. In a saucier pan, put milk, salt and flour and whisk until combined on medium heat.
  2. Continuously whisk mixture until thickened to a pudding like consistency.
  3. Once thickened, strain through a mesh strainer into a bowl with a spatula to remove lumps.
  4. Place a piece of plastic wrap on top of the flour mixture and put into the fridge until fully cool.
  5. In a mixer bowl fitted with the whisk attachment, mix the sugar and butter on high speed until fluffy and pale about, 5-10 minutes.
  6. Add the chilled flour mixture and continue to whip on high speed until the sugar is completely dissolved and the mixture is no longer gritty, about 5-10 minutes.
  7. Add vanilla extract and mix until combined.


Crème Brûlée Cake

Happy New Year! I say this knowing that it already passed 3 weeks since the beginning of 2018. What better way to start a new year than with cake? Admittedly, I made this cake last year, but that doesn’t make it any less delicious!One of my favorite things to do with dessert is trying different versions of an already established dessert. This time it was crème brulee. Did you guys see this video of a dessert shop that specializes in crème brulees? I just want to dip my spoon into every crispy crackly shell that they advertise. I think that’s one of the great things about it, you can add your spin to just about whatever you want.
As usual, I went out of my way to get the best crème brulee cake that I could make. It is filled with crisp sugar shards, caramelized white chocolate ganache and pastry cream. But the one thing I didn’t prepare for was the pastry cream being absorbed by the cake. I highly recommend you eat this cake sooner than later to fully enjoy all the components.Most of the parts of the cake are things I’ve made before, but the caramelized white chocolate was a new technique for me. You essentially bake very good white chocolate on low heat while stirring to transform it into a complex caramel flavor. I first read about it on David Lebovitz’s blog years ago, but never had the chance to make it. Why did it take so long? Well, one of the biggest factors was the cost of the chocolate. Valrhona Ivoire white chocolate is very pricey! I would be extremely sad if it failed. Luckily, I still had some in stock from baking the ultimate mocha cake.So what does caramelized white chocolate taste like? Kind of like dulce de leche but less sweet and a little more milky. Is it worth the trouble? I’m 50/50 on it. I don’t know if I want to use my precious Valrhona on it again. The answer would be definitely if I had a cheaper option to use. (David says not to use the cheap supermarket chocolate.)Aesthetically, there are two parts that love about the cake. The first being the amazing cake topper made by my friend, Carmiña of Sohnmade. Just look at the details on it! The tiny fork and spoon and the cupcake just kill me. I know cake toppers are super popular these days because they jazz up any cake, but I’ve rarely seen one that has so many details. And of course, because she is multi-talented, she also throws wonderful events and does a whole assortment of custom décor. I highly recommend her. The other part that I love is the sugar shards of the cake. I love the stained glass effect it gives off and I can imagine  making different colored ones and doing actual, edible stained glass work. The ones in the recipe have a similar flavor of the crisp sugar shell of crème brulee because you cook sugar until it gets that toasty taste. Win-win.

Crème Brulee Cake
Makes one 6-inch cake

You will need:
1 batch caramelized white chocolate ganache (recipe below)
1 batch vanilla pastry cream (recipe below)
1 batch vanilla buttermilk cake (recipe below)
1 batch vanilla swiss meringue frosting (recipe below)
1 batch sugar shards (recipe below)

Instructions:

  • On a cake board, place one layer of vanilla cake and using an offset spatula, spread a layer of ganache. (picture #1 in photo above)
  • In a piping bag fitted with a plain tip, fill it with some vanilla frosting. Pipe a dam around the outer edge of the cake. This will keep the cream from spilling out of the sides. (picture #2 in photo above)
  • Use an offset spatula to fill with pastry cream. (picture #3 in photo above)
  • Top with small sugar shards. Note: The sugar shards will dissolve over time. It is best to eat sooner than later to experience the full textural effect. (picture #4 in photo above)
  • Repeat the sequence twice, ending with a layer of cake.
  • Cover the cake with a thin layer of vanilla frosting and freeze to firm.
  • Cover the cake fully with vanilla frosting, smoothing out the sides and top as well as you can.
  • Decorate the top and sides with sugar shards.

Caramelized White Chocolate Ganache

Ingredients:
12 oz. highest quality white chocolate you can get your hands on
Pinch of kosher salt
6 – 8 oz. heavy cream

Instructions:

  1. Preheat the oven to 250˚F and line a baking sheet with parchment paper.
  2. Chop the white chocolate into pieces and evenly distribute over baking sheet.
  3. Place in oven for 10 minutes.
  4. Remove and stir with a spatula. (The mixture will look lumpy and chalky for a while. Picture #1, #2, #3 in photo above)
  5. Place it back into the oven in 10 minute intervals until chocolate is smooth and caramelized. (picture #4 in photo above)
  6. At this point, if there are small lumps in the chocolate, use a fine mesh strainer and strain. (It will be messy, but worth it.)
  7. Heat the chocolate with 6 oz. heavy cream in the microwave for 1-2 minutes and stir. Let cool.
  8. If the mixture is too thick, add the other 1-2 oz. of heavy cream to thin out. The mixture should be thick enough to spread onto cake but not flow off of it, like nutella.

Vanilla Pastry Cream

Ingredients:

2 c. whole milk
½ c. sugar, divided
2 egg yolks
1 large egg
¼ c. cornstarch
2 tbsp. butter
1 tsp. vanilla extract (or if you really want to go fancy, vanilla paste)

Instructions:

  1. In a pot, heat whole milk and ¼ c. sugar and bring to a simmer.
  2. While the milk heats, mix egg yolks, egg, cornstarch and ¼ c. sugar in a medium bowl.
  3. When the milk is hot, use a ladle to slowly drizzle hot milk into the egg mixture while whisking to prevent curdling.
  4. Once all of the milk is introduced into the egg mixture, return all of it back into the pot.
  5. Bring the mixture in the pot to a boil while whisking. When it is thick, remove the pot off the heat.
  6. Add in the butter and vanilla. Once the butter is completely mixed in, move to a bowl and place a piece of plastic wrap directly against the pastry cream (to prevent a skin from forming). Chill completely, about 2-3 hours, before using.

Vanilla Buttermilk Cake

3 c. cake flour
2 c. sugar
1 tbsp. baking powder
¼ tsp. kosher salt
1¼ c. buttermilk, divided
8 oz. unsalted butter, room temperature
4 eggs, room temperature
2 egg yolks
2 tsp. vanilla extract

Instructions:

  1. Preheat the oven to 350˚F and grease and line four 6-inch cake pans with parchment paper.
  2. In a bowl of a standing mixer with the paddle attachment, add flour, sugar, baking powder, and salt. Mix until combined.
  3. On low speed, add 1 c. buttermilk and butter and mix until combined.
  4. In a separate bowl, whisk eggs, egg yolks, ¼ c. buttermilk, and vanilla extract until homogenous.
  5. On low speed, slowly add the egg mixture to the flour mixture.
  6. Increase speed to medium, and mix until combined.
  7. Evenly divide cake batter into the four cake pans.
  8. Bake about 20-25 minutes until cake is done or until a toothpick inserted into the center comes out clean.
  9. Let cool in pan for 10 minutes, and then move onto a cooling rack until completely cool.

Vanilla Swiss Meringue Buttercream

Ingredients:
300 g. (1½ cups) sugar
6 large egg whites
2.66 c. (4 sticks) unsalted butter
2 tsp. vanilla extract
1 pinch kosher salt (I use Diamond Crystal)

Instructions:

  1. Bring a small pot filled with about an inch of water to a simmer.
  2. In a bowl of a standing mixer, whisk the egg whites, sugar, and salt together.
  3. Place the bowl on top of the pot and whisk continuously until the mixture becomes slightly foamy and you cannot feel the grittiness of the sugar, about 5-8 minutes. The mixture will be hot. Be careful.
  4. Move the bowl to the standing mixer fitted with the whisk attachment and whip the egg mixture until the bowl feels cool to the touch.
  5. Add in the butter, and continue to whip until a smooth buttercream forms.
  6. Add in the vanilla extract and continue to whip until incorporated.

Sugar Shards

Ingredients:
3 c. sugar
½ c. water

Instructions:

  1. Line two baking sheets with parchment paper.
  2. In a small pot over medium heat, stir water and sugar together until the sugar dissolves. Stop stirring.
  3. Let the sugar cook until it turns into a caramel color.
  4. Pour out the sugar onto the prepared pans.
  5. Tilt the pans to spread the liquid sugar.
  6. Once the sugar is cooled, break them into shards for decorative use and smaller pieces for the inside of the cake.

Caramelized white chocolate recipe adapted from David Lebovitz.
Pastry cream recipe adapted from All Recipes.
Vanilla buttermilk cake recipe adapted from Sky High Cakes.
Sugar shard recipe and cake inspired by The Cake Blog.
Cake topper by Sohnmade.

Ranunculus Cake with Sweet Potato Pastry Cream

I’ve been kind of obsessed with flower everything on my cakes these days. Real or buttercream, I love them all. I actually made this cake back in May, and by the time I got to editing photos it was the peak of summer.  And because the filling is sweet potato pastry cream, it just didn’t go with the season. But now that it is on the cusp of fall, I feel like it’s appropriate to post this. (Although, personally, this is my favorite pastry cream of all time and I love it any time of the year.)
The star of this cake is the sweet potato, but not the orange fleshed kind but the purple skinned, yellow fleshed kind. This type of sweet potato is popular in Korean desserts and tastes similar to a roasted chestnut. In the past, I’ve also featured this type of sweet potato in this post: Mini Green Tea Cake.
If you’ve never made pastry cream before, my advice for you is to go slow with pouring the hot milk into the egg mixture, as in a slow drizzle, not a pour. You want to avoid curdling at all costs. But if you do it right, man oh man is it worth it. Gone are the days of powdered mixes. You will never look back. Fill it between your favorite vanilla cake and watch the compliments roll.
As for the decoration, I’ve always loved ranunculus and decided to try to pipe it. It is easier than It looks but is quite time consuming to pipe each flower, especially since they have so many petals. Here are the steps to pipe the flower:

  1. Cut out many squares of parchment or wax paper. You will use one square per flower. (I usually cut mine around 3×3 inches.)
  2. With a flower nail in your hand, pipe a small amount of frosting onto the center of it. (As shown in Photo 2.)
  3. Place a piece of parchment paper on top of the frosting. (As shown in Photo 3.)
  4. Using a small round tip (wilton #2 or #3), pipe a small amount of green frosting in the center of the flower nail in a round, circular shape. (As shown in Photo 4.)
  5. In a piping bag filled with light green frosting and fitted with a petal tip with the wider side facing the flower nail (wilton #102, or larger pending on the size of the flower you want to pipe), pipe a square around the circle, overlapping each other on the ends. (As shown in Photo 5.)
  6. In a piping bag filled with light pink frosting and fitted with a petal tip with the wider side facing the flower nail (wilton #104, or larger pending on the size of the flower you want to pipe), pipe 5 dashes around the light green square overlapping the ends. (As shown in Photo 6.)
  7. Using the same piping bag, pipe 6 dashes around the pink circle. You want to show a little bit of the circle beforehand to create an illusion of overlapping petals. (As shown in Photo 7.)
  8. Continue piping dashes along the outer edge of the flower, increasing the number of dashes by 1 until you reach the size of the flower you desire. (As shown in Photo 8.)

I hope you try it soon! I know it’s been a while I’ve missed you!

Sweet Potato Pastry Cream

Ingredients:

3 medium sized Korean sweet potatoes, roasted and peeled.
2 c. whole milk
½ c. sugar, divided
2 egg yolks
1 egg, large
¼ c. cornstarch
a pinch of kosher salt
2 tbsp. unsalted butter
1 tsp. vanilla extract

Instructions:

  1. In a food processor, mix the sweet potatoes until a smooth puree forms. Set aside.
  2. In a medium saucepan, whisk the milk and ¼ c. of sugar and heat until the milk boils.
  3. While the milk heats, grab a medium bowl and whisk together the egg yolks, egg, ¼ c. sugar, cornstarch and the salt until smooth.
  4. Once the milk is heated, slowly drizzle in the milk mixture into the egg mixture with one hand while whisking the egg mixture with the other. Once the milk is completely incorporated into the egg mix, return the entire mixture into the saucepan.
  5. Heat the saucepan while whisking until the mixture becomes thickened like pudding.
  6. Take it off the heat and stir in the butter and vanilla extract.
  7. Mix the sweet potato with the pastry cream until homogenous.
  8. Place a piece of plastic wrap directly onto the pastry cream and refrigerate until cool and set. (about 4 hours, or overnight)

Gold Pineapple Cake with (Real) Pineapple Buttercream

gold pineappleThis year of blogging seems to be a year of making things that are out of my comfort zone, like the blueberry cruffins or the croquembouche. I used to steer away from projects that looked too difficult or time consuming, but this year I feel like the challenge just spurs me on. When I first saw this gold pineapple cake from adorn cakes, I thought it would be just something I would bookmark and never look back on. But when someone special to you loves pineapples, you make the prettiest pineapple cake that you can. (Seriously, he loves pineapples. One of the first things he ever said to me was, ” I love pineapples.” Kinda strange, I know.)
gold gum paste leavespineapple leavesI would gladly sit here and name off all the steps on the how-to on making this cake, but Aleta already did such a great job, that I’m just going to share the links with you.
YouTube link on how to build the outside of the cake.
Facebook link on how she made the top of the pineapple.gold leavestiny cakeHere are some things I’ve noted while making this cake:

  1. It is time consuming. You need at least two days for this project. You will need one full day to shape, cut, wire, dry out and paint the leaves. It is probably a safe bet to bake the cake the day before too.
  2. Aleta uses modeling chocolate for her cake and so I ordered some. I’ve never worked with modeling chocolate before, and now I understand that it is a very soft medium. If I were to ever tackle this project again, I would use 50% (maybe even 25%) modeling chocolate and the rest fondant.
  3. I made a very small cake. A cake size that I usually use to make smash cakes and I nearly used the entire 2 g. jar of gold powder.
  4. A manicure scissor is really useful for cutting the tiny triangles on the cake.
  5. If you don’t have the green molding tool that is used on the video, just take your bladed molding tool and make three small lines in each pineapple diamond. It will mimic the effect pretty well

modeling chocolate cakegolden pineappleYes, the outside of the cake is important but what about the inside? I couldn’t have a pineapple cake that didn’t have a pineapple filling, so I filled it with a pineapple frosting. I’m a firm believer in using real fruit in all of my fruit flavored frosting so, the pineapple was a challenge. As you know, pineapples are juicy and I could not risk a runny frosting for a cake that required a lot of time sitting at room temperature. So, I solved my problem by using freeze dried pineapples.
golden pineapple cakegold pineappleFreeze dried fruit is an ingenious way to incorporate real fruit into your frosting without increasing the liquid content. I ordered my bag off of amazon and used the whole thing for the 4 inch cake. The resulting frosting had a pineapple tang and complemented the vanilla cake well. It was an expensive cake to make with the modeling chocolate, pineapples, gumpaste, and some extra tools I needed to buy, but well worth the effort. I mean look at it, it’s SO. GOLD.
gold pineapple fondant cakeReal Pineapple Buttercream
For a 4-in. cake

Ingredients:

¼ c. sugar
1 large egg white
6 tbsp. unsalted butter
1.5 oz. freeze dried pineapple

Instructions:

  1. Put dried pineapple chunks into a dry blender, and blend until a very fine powder forms. Set aside.
  2. Bring a small pot filled with about 1 inch of water to a simmer.
  3. Whisk egg white and sugar together in the bowl of your standing mixer.
  4. Place the bowl on top of the small pot and continue whisking the egg whites until you cannot feel the granules between your fingers.
  5. Move the bowl to the standing mixer fitted with a whisk attachment and whip until the mixture becomes fluffy and doubles in size.
  6. Add the butter and continue whipping until a smooth buttercream forms.
  7. Add in ¾ of the pineapple powder and mix until well combined.
  8. Taste and add the rest of the powder if desired.

Buttercream recipe adapted from smitten kitchen.

Paw Patrol Cake (A How-To Guide)

paw patrol cakeI rarely ever take cake orders in the summer, not since the cake fiasco of 2015. On a hot summer day, I made a two-tiered cake with an assortment of fondant animals that took hours to create. It was too large to refrigerate so we had it sitting at room temperature until it was ready to be delivered. Right when we were about to move it, there was a strange buckling around the edge of the cake. We kept calm and moved it to the car, which even after having the AC on for 30 minutes was not cool, but warm. During the 30-minute ride to our destination, the buckling worsened and the fondant pieces started to warp with the frosting. By the time we got there, the cake looked like the Michelin Man’s arm. It sucked that all my hours of work went down the drain, but it was even worse that I ruined someone’s event. That’s the thing about cakes; they are usually the centerpieces of celebrations and can make or break a party. Since then, I’ve turned down any requests for a cake in the summer. Not because I didn’t want to do it, but more so because I was worried about ruining someone else’s big day.
paw patrol cakeWhen my sister approached me about making a cake, my gut reaction was, “No.” After hearing my reasons, she said that it didn’t matter if the cake was perfect and that her friends were just grateful that I would do it. Knowing that perfection wasn’t what they were after took a load off my back, but that didn’t mean that I would try any less.
how to make paw patrol logo
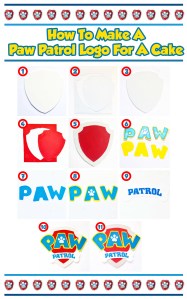
There is a very popular Pinterest picture of a dog bone shaped Paw Patrol cake (this was the photo I was asked to recreate), but it has no information on the dimensions and how to put it together. And after scouring the internet for information, I decided to make a guide on how to put a cake like this together. Like many of my projects, it is not very difficult, but it is time consuming. I think the overall effect is worth it and even more worth it to see the smiles on kids’ faces.
how to make a paw patrol cakeInstead of using fondant for all of the Paw Patrol logo, I used Wilton’s sugar sheets. It is much more stable for hot and humid weather and it’s great for crisp edges. It is important to have a fresh Xacto knife blade. You want the edges to be super crisp. Almost like you printed the logo onto the cake. I did make a fondant base for the logo so that the logo would not be flat against the cake like paper. Other than that, it’s making a lot of paw prints, which looks simple but it ends up taking more time than anticipated because for every paw print there are 4 parts to be made. This cake has approximately 50 paw prints.
paw patrol cake The most difficult part about the cake part is covering the cake with frosting. There are many circles and lines and it took a while to get the crisp edges. But then again, it might be because I’m a novice at frosting untraditional cake shapes. I’m not complaining, it’s always fun to stretch beyond my comfort zone and try new things.

Paw Patrol Cake

For the Paw Patrol Logo:

You will need:

white fondant
wilton’s sugar sheets in white, red, blue, yellow and silver
silver pearl dust
xacto knife
scissors
water
vodka
small paintbrush (food use only)
paw patrol logo, cut out of paper
paw patrol outer stencil, cut out of paper
paw patrol inner stencil, cut out of paper

Instructions,

  1. Roll out the fondant to ¼ inch thickness and place the paw patrol outer stencil on top of it. Using the xacto knife, cut out the fondant to the shape of the shield. (As shown in picture #1)
  2. Place the outer stencil on top of a silver sugar sheet and cut out a piece of the sugar sheet large enough for the stencil. Peel off the plastic backing. Cut out the shape of the outer stencil with the xacto knife. (As shown in picture #2)
  3. Using the paintbrush, paint a small amount of water on top of the white fondant and stick the silver sugar sheet cutout on top of it. (As shown in picture #3)
  4. Place the inner stencil on top of a red sugar sheet and cut out a piece of the sugar sheet large enough for the stencil. Peel off the plastic backing, Cut out the shape of the inner stencil with the xacto knife. (As shown in picture #4)
  5. Using the paintbrush, paint a small amount of water on top of the silver sugar sheet and stick the red sugar sheet cutout on top of it. (As shown in picture #5)
  6. Cut out the “PAW” from the paw patrol logo, remembering to keep the yellow border. (As shown in picture #6)
  7. Place the “PAW” letters on top of a yellow sugar sheet and cut out a piece of the sugar sheet large enough for the letters. Peel off the plastic backing. Cut out the “PAW” with the xacto knife. (As shown in picture #7)
  8. Cut out the yellow border of the “PAW” from the paw patrol logo.
  9. Place the “PAW” letters on top of a blue sugar sheet and cut out a piece of the sugar sheet large enough for the letters. Peel off the plastic backing. Cut out the “PAW” with the xacto knife.
  10. Using the paintbrush, paint a small amount of water on the back of the blue “PAW” and stick it onto the yellow “PAW”. (As shown in picture #8)
  11. Cut out the white paw in the middle of the “A” from the paw patrol logo.
  12. Place the paw print on top of a white sugar sheet and cut out a piece of the sugar sheet large enough for the paw print. Peel off the plastic backing. Cut out the paw print with the xacto knife.
  13. Using the paintbrush, paint a small amount of water on the back of the paw print and stick it onto the middle of the “A”. (As shown in picture #8)
  14. Cut out the white bone from the paw patrol logo.
  15. Place the bone on top of a white sugar sheet and cut out a piece of the sugar sheet large enough for the bone. Peel off the plastic backing. Cut out the bone with the xacto knife.
  16. Place the bone on top of a blue sugar sheet and cut out a piece of the sugar sheet large enough for the bone. Peel off the plastic backing. Cut out the “PATROL” letters with the xacto knife.
  17. Using the paintbrush, paint a small amount of water on the back of the blue letters and stick it onto the white bone. (As shown in picture #9)
  18. Center the “PAW” onto the shield and make sure you know where you want to place it before painting a small amount of water on the back of the letters to place it onto the shield. (As shown in picture #10)
  19. Center the white patrol bone under the “PAW” and make sure you know where you want to place it before painting a small amount of water on the back of the bone to place it onto the shield. (As shown in picture #10)
  20. Mix a small amount of vodka with the silver dust to create a thick silver paint. Brush the silver on the silver shield border to give it a metallic look. Let dry. (As shown in picture #11)

For the Bone Shaped Cake

You will need:

2 batches of vanilla buttermilk cake (recipe below)
1 batch of chocolate frosting (recipe below)
1 batch of vanilla swiss meringue frosting (recipe below)
fondant paw prints (optional)

Instructions:

  1. Cut all the 6-inch cake layers in half. Cut one of the halves into quarters.
  2. Cut a 2 inch strip from both of the 9×13 cake layers. You want to cut the width side of the cake (the long side, not the short side). You will be left with two 7×13 cake layers.
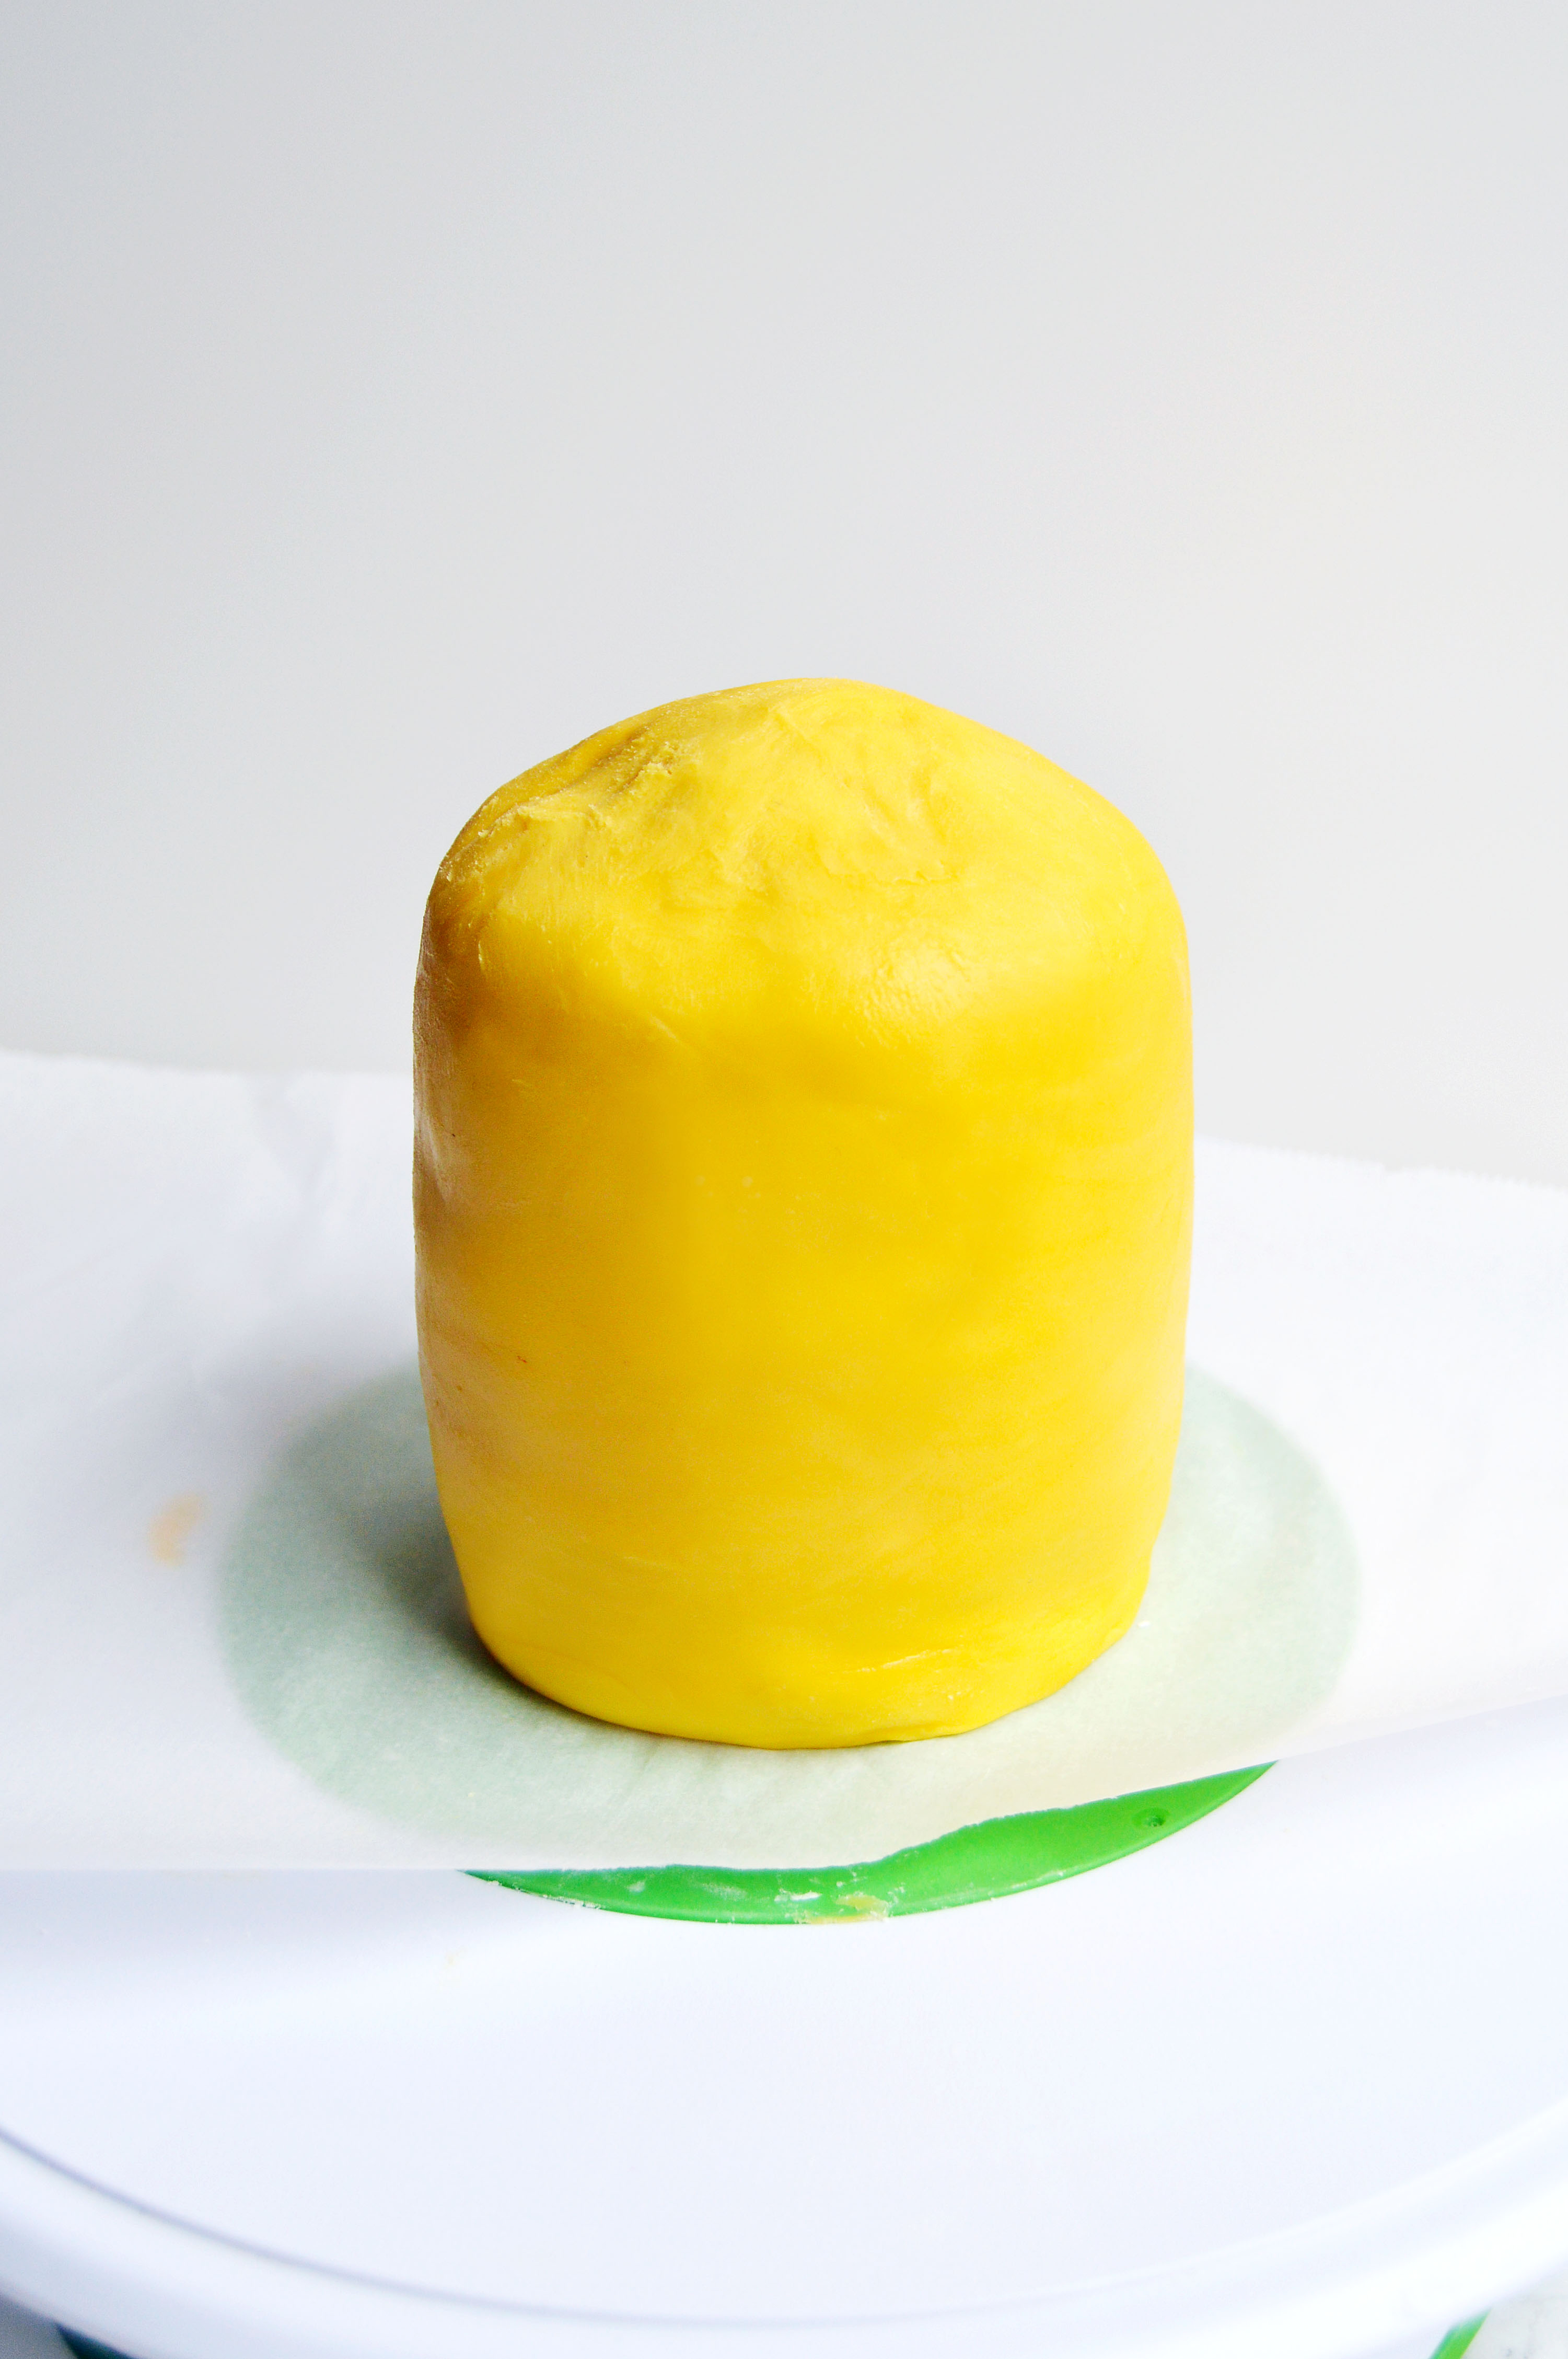
  3. Center one 7×13 cake layer on top of a sheet cake sized cake board. (As shown in picture #1)
  4. Use ¾ of each 6-inch cake layer on three corners to form the circular part of the dog bone. Use three ¼ sections left from the 6-inch cake layer to form the fourth corner of the dogbone. (As shown in picture #1)
  5. Spread a generous layer of the chocolate frosting.
  6. Repeat the same method to the second layer of the cake. (As shown in picture #2)
  7. Crumb coat with the remaining chocolate frosting, remembering to fill in any gaps between the 7×13 cake layer and the 6-inch cake layers. (As shown in picture #3)
  8. Let the cake set in the freezer for about 10 minutes.
  9. Remove the cake from the freezer and spread one layer of the vanilla frosting. Trying to cover up the chocolate as well as you can.
  10. Let the cake set in freezer for about 10 minutes.
  11. Remove the cake from the freezer and smooth on the second layer of vanilla frosting. Try to make it as smooth as you possibly can. This will be your final layer. (As shown in picture #4)
  12. Place the Paw Patrol logo in the center. If you made fondant paw prints, now is the time to place it on the cake. (As shown in picture #5)

Vanilla Buttermilk Cake
(This will make three 6-inch round layers and one 9×13 layer. You will need two batches of this.)

Ingredients:

450 g. cake flour
500 g. sugar
1 tbsp + 1 tsp. baking powder
¾ tsp. kosher salt
5 whole eggs, room temperature
3 egg yolks, room temperature
1 ¼  + ⅓ c. buttermilk, room temperature
1 tbsp. vanilla extract
1 ¼ c. (two and a half sticks) unsalted butter, room temperature

Instructions:

  1. Preheat the oven to 350°F. Prepare one 9×13 baking pan and three 6-inch round cake pans for baking by spraying them with nonstick spray and lining the bottom with parchment paper.
  2. In the bowl of a standing mixer fitted with the paddle attachment, mix the flour, sugar, baking powder and kosher salt on low speed.
  3. Add in the butter and 1 ¼ c. buttermilk into the flour mixture on low speed. Scrape down the side of the bowl.
  4. In a large cup with a spout, mix the eggs, egg yolks, ⅓ buttermilk and vanilla extract with a whisk. Slowly add the egg mixture into the flour mixture.
  5. Scrape down the side of the bowl and mix on low speed again until well combined.
  6. Divide the batter evenly amongst the four pans, making sure that the three 6-in pans are even.
  7. Bake about 15-20 minutes until cake is golden brown or a toothpick inserted comes out clean. The 6-inch cake pans and the 9×13 pan will have different cook times. Make sure you check both to make sure one doesn’t overbake.

Chocolate Frosting

Ingredients:
9 oz. good quality dark chocolate, melted and cooled (The darker the better. Emphasis on good quality.)
400 g. confectioner’s sugar
2 tbsp. unsweetened cocoa powder
¼ tsp. kosher salt
½ c. heavy cream
1 tbsp. vanilla extract

Instructions:

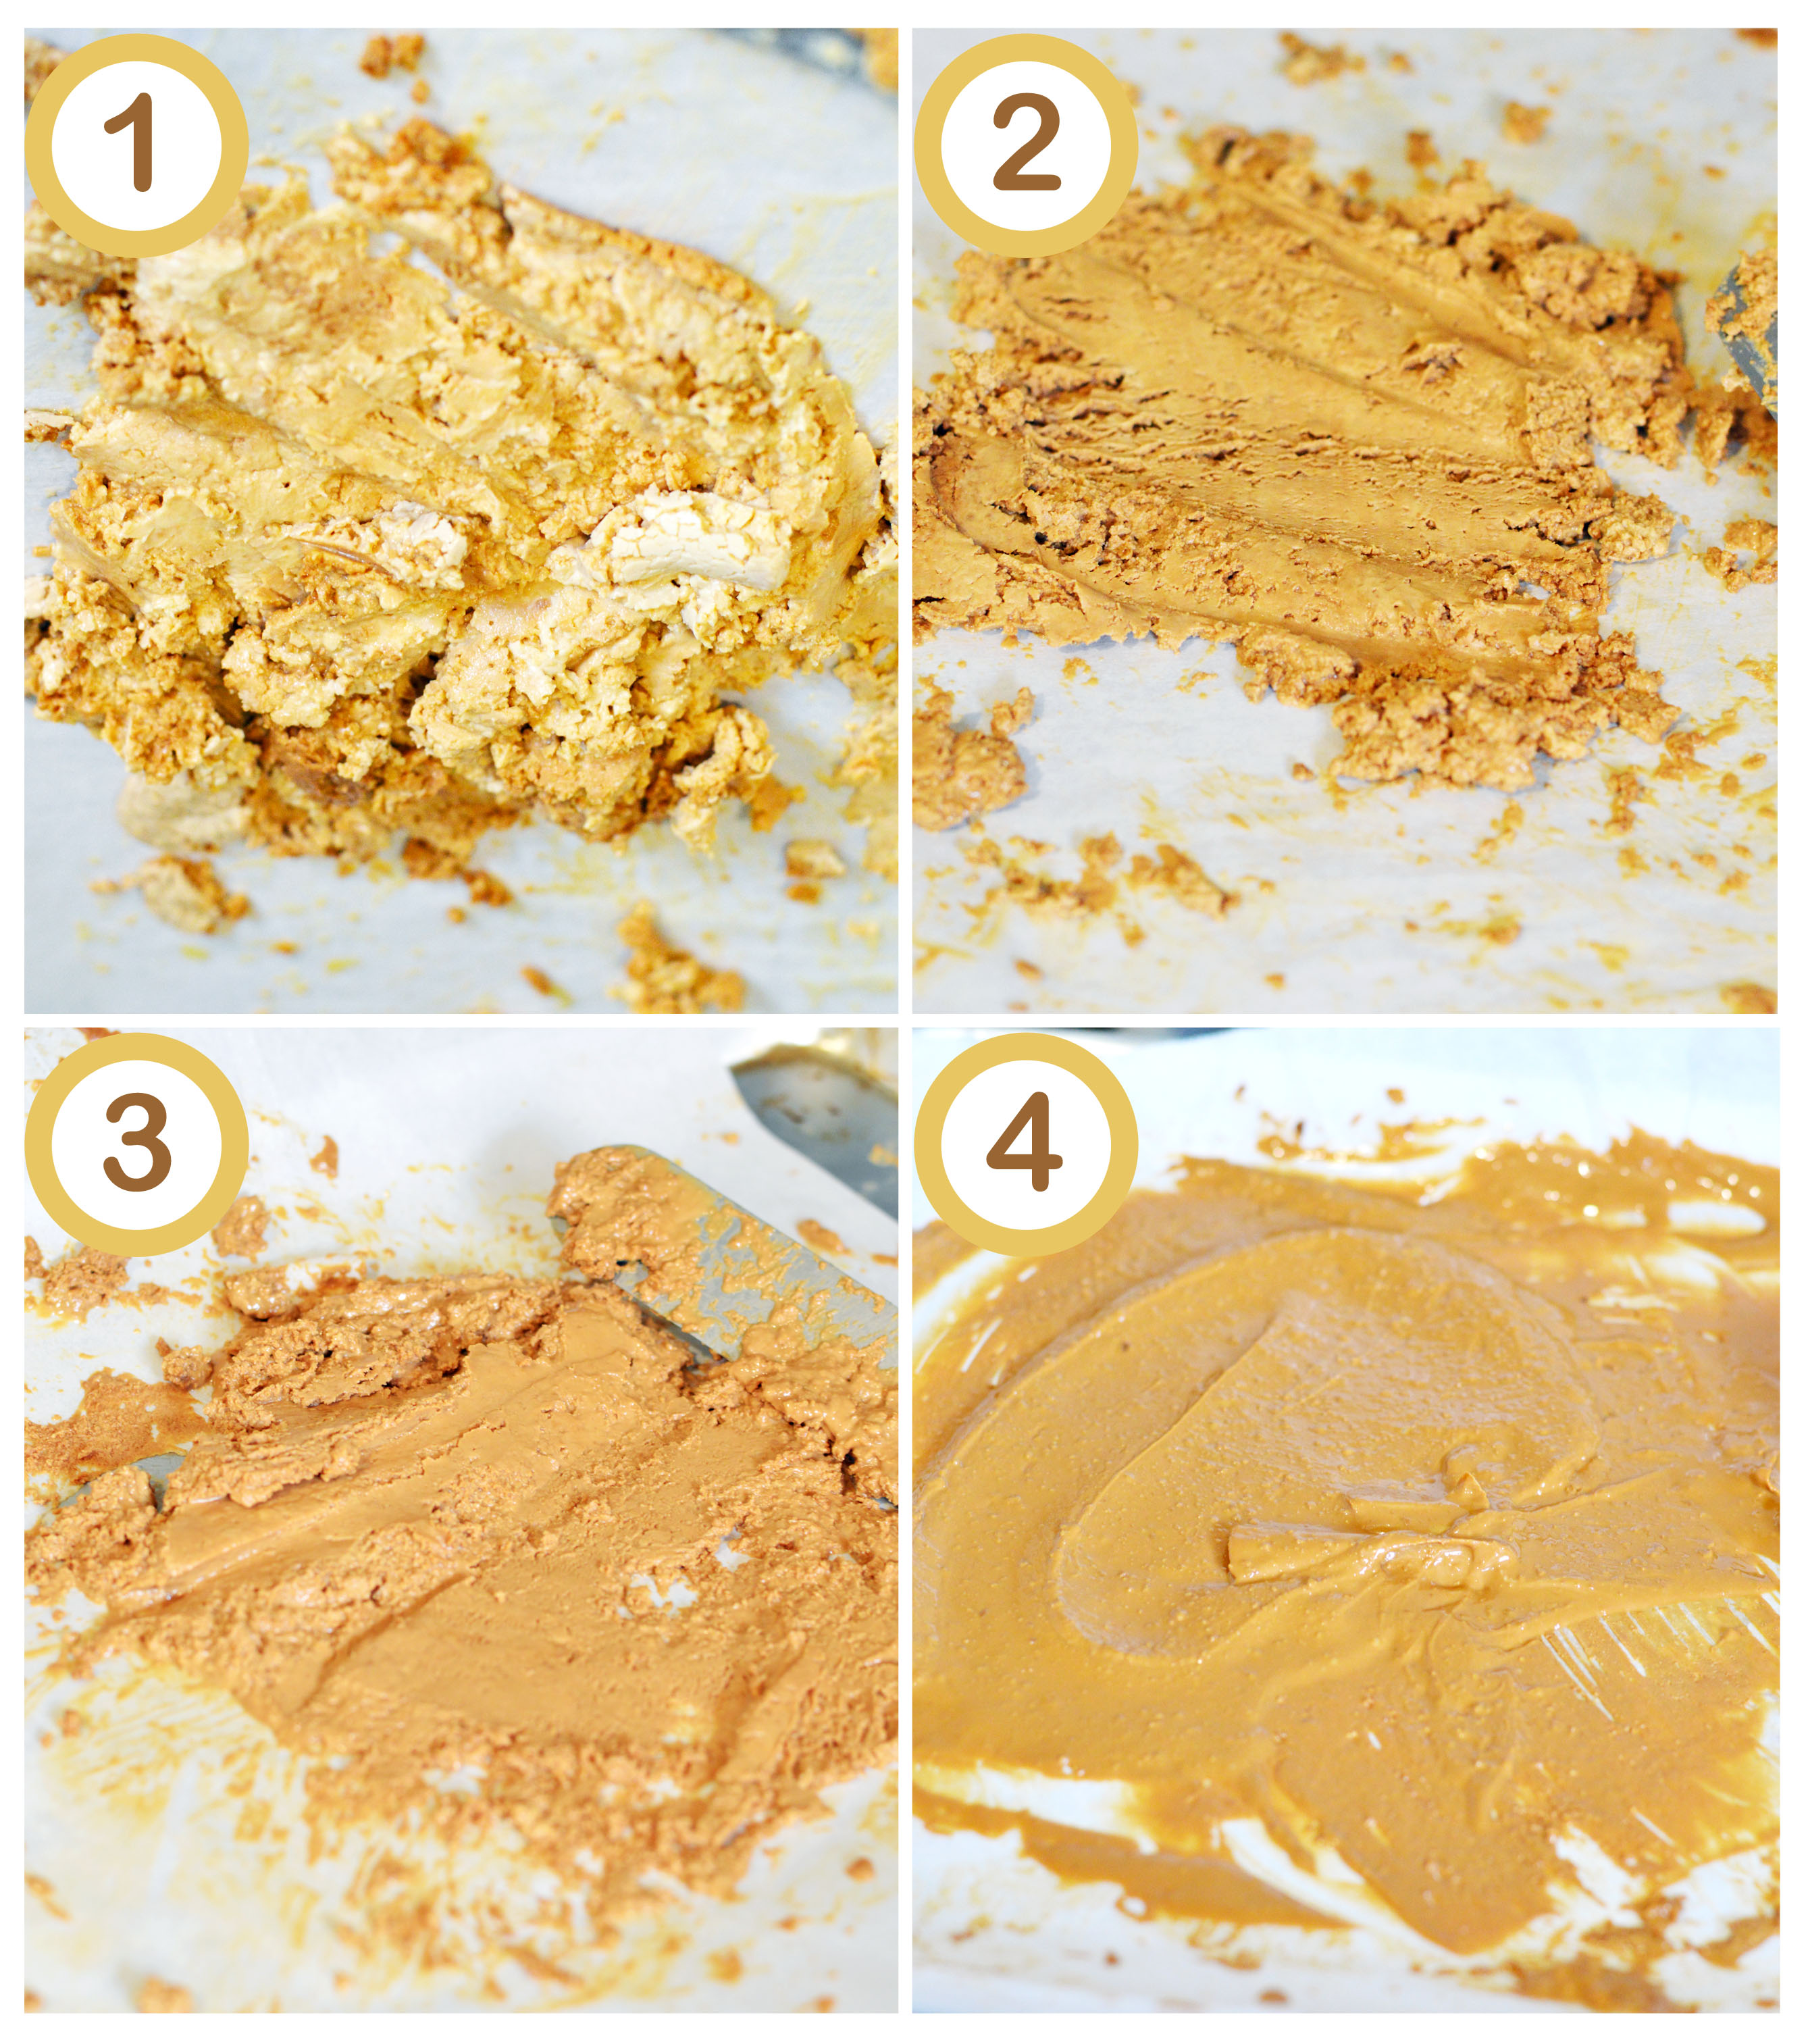
  1. Place all the ingredients in the food processor and pulse a few times before processing it until the frosting is smooth.
  2. Put the whole bowl in the freezer until the frosting sets. Similar to a ganache, the frosting will become more firm and easier to handle after about 10-15 minutes in the freezer.

Vanilla Swiss Meringue Buttercream

Ingredients:
400 g. sugar
8 large egg whites
3 ¼ c. (6 ½ sticks) unsalted butter
1 tbsp. vanilla extract
¼ tsp. kosher salt

Instructions:

  1. Bring a small pot filled with about an inch of water to a simmer.
  2. In a bowl of a standing mixer, whisk the egg whites, sugar, and salt together.
  3. Place the bowl on top of the pot and whisk continuously until the mixture becomes slightly foamy and you cannot feel the grittiness of the sugar, about 5-8 minutes. The mixture will be hot. Be careful.
  4. Move the bowl to the standing mixer fitted with the whisk attachment and whip the egg mixture until the bowl feels cool to the touch.
  5. Add in the butter, and continue to whip until a smooth buttercream forms.
  6. Add in the vanilla extract and continue to whip until incorporated.

Cake and chocolate frosting adapted from sweetapolita.
Swiss meringue frosting adapted from the smitten kitchen.

Giant Macaron Ice Cream Sandwich Cake

Giant Macaron Ice Cream Sandwich CakeYou guys, I’m obsessed with the tv show, ”Girls”. That is the reason why this post is so late. All of my free time has been going to binge watching this show. If you’ve never watched it, I would describe it as “Friends” and “Sex and the City” put together except it doesn’t have the laugh track and is somehow more real and dark and relatable and freaking awesome. Before the show, I always wondered why they casted Adam Driver as Kylo Ren in “Star Wars: The Force Awakens”. But after watching this show, I realized that the man can act. I love his character, Adam, in “Girls” because he’s SO weird and so honest. I always find weird people fascinating, and this is probably why he is so intriguing to me.
Giant Macaron Ice Cream Sandwich CakeI originally wanted to post this before Memorial Day because to me, Memorial Day is the green light of the year to start eating ice cream again. I know, I know… True die-hard fans of ice cream always say that you can have ice cream any day of the year, but when I’m freezing and my fingertips feel like ice, ingesting something that is as just cold is unpleasant to me. But Memorial Day has now passed and this needs to be shared with the internet community as soon as possible.
Giant Macaron Ice Cream Sandwich CakeMacaron ice cream sandwiches are just like regular ice cream sandwiches but instead of cookies, you use macaron shells. Since my sister’s birthday was coming up, and she loves ice cream, coffee and only the shells of macarons (not so much the filling, which I never understood) I figured that this was the perfect cake for her. Filled with layers of homemade crunchies, Ben and Jerry’s coffee coffee buzz buzz buzz (my sister’s favorite ice cream), and layered with two giant macaron shells, it’s chocolaty, cold, and smooth with crunchy and chewy textural differences from the macaron shells and the crunchies.
Giant Macaron Ice Cream Sandwich CakeI did make a pattern for the top macaron shell by drawing streaks of gel food coloring on the inside of my piping bag, but it’s not necessary for the cake. Basically, if you made macaron shells before, it’s pretty much the same thing except that you are making two giant shells. You will have leftover batter which you can use to make regular sized macaron shells. You should also take caution and remember that the batter will spread a bit. I didn’t think of this possibility, which made my macaron shells a little larger than I wanted, but in hindsight, it gave me enough room to cover the outside with cool whip, which helped give it a super smooth outside and keep the ice cream from leaking and hold its shape.
Giant Macaron Ice Cream Sandwich Cake
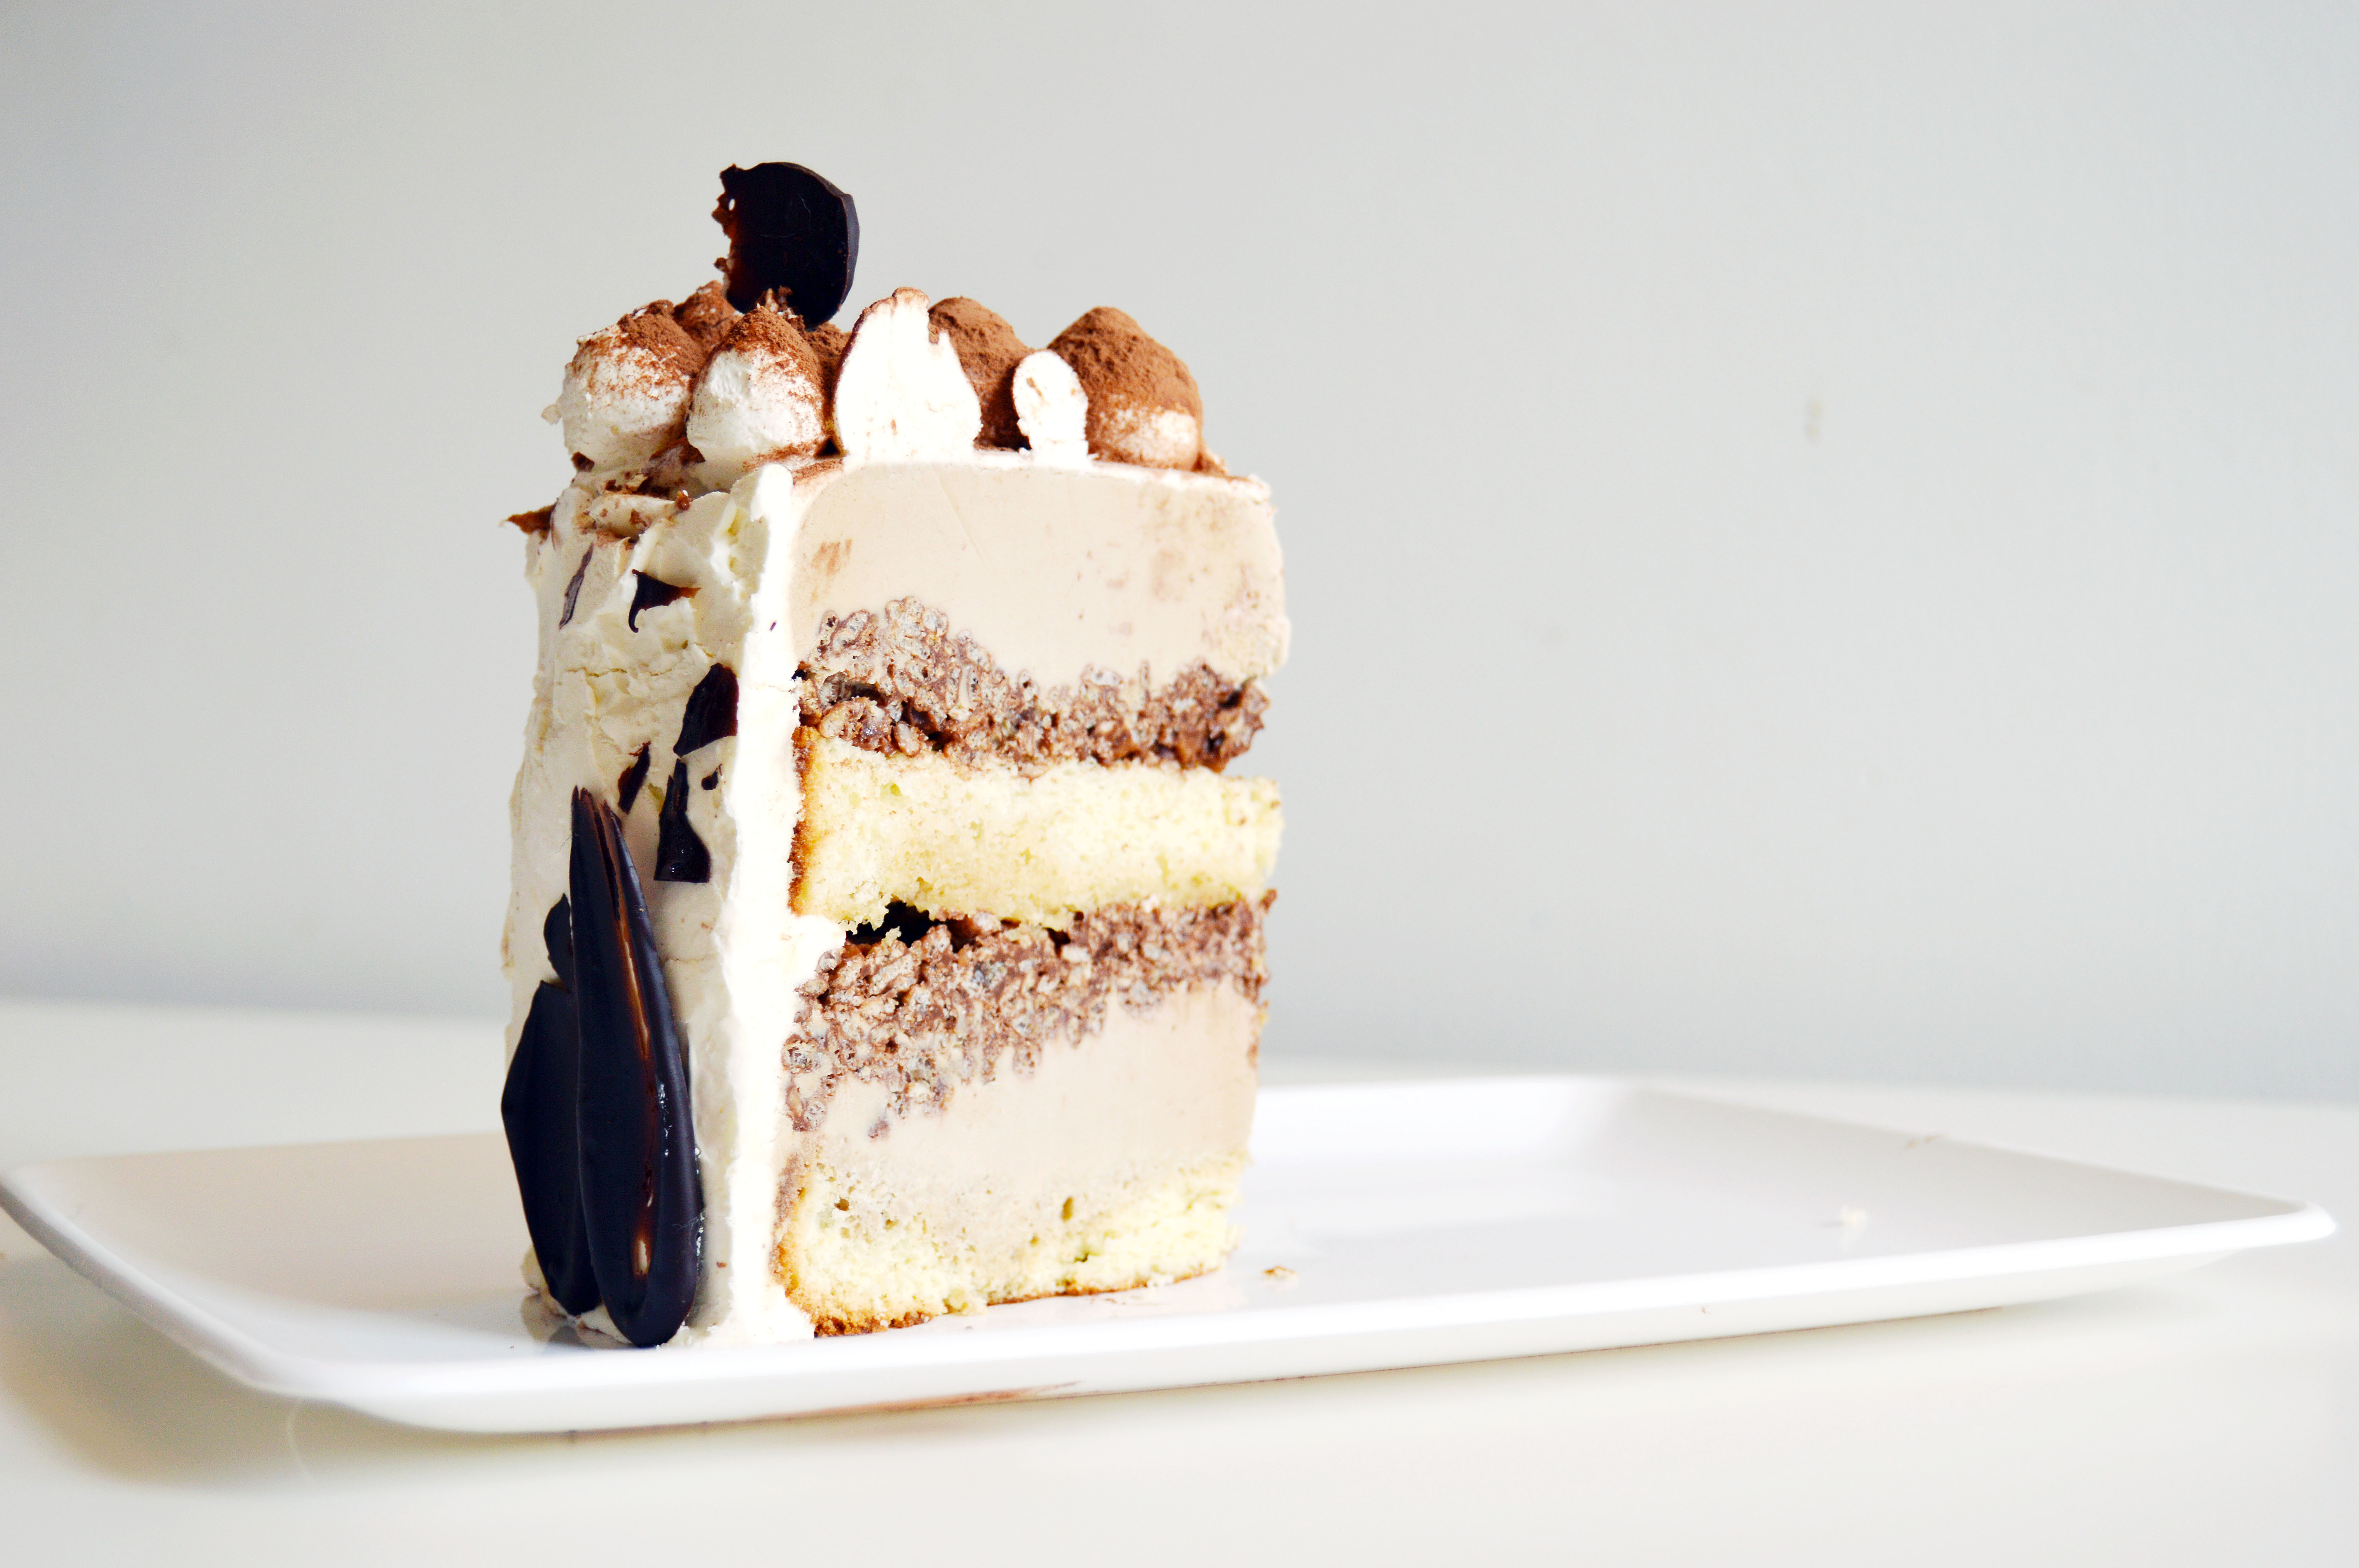
It is so worth the time. If you like macarons and ice cream, this is the cake for you. The best part? You can totally customize this by coloring the macaron shell and changing up the ice cream flavors.
Giant Macaron Ice Cream Sandwich CakeNot really feeling this ice cream cake? Here are some of my previous ice cream cake recipes:

The Ultimate Oreo Ice Cream Cake with Homemade Crunchies
Tiramisu Crunch Ice Cream Cake

Giant Macaron Ice Cream Sandwich Cake

You will need:

Two 8-inch macaron shells (recipe below)
4 pints of Ben and Jerry’s coffee coffee buzz buzz buzz, softened
1 batch of homemade crunchies (recipe below)
cool whip

Instructions

  1. Try to prep the ice cream cake a day before you want to serve it. You want the ice cream layer to be as firm as possible.
  2. In an 8-inch cake pan with high sides (at least 3-inches), use plastic wrap to line the bottom and the sides, letting it overhang over the pan.
  3. Spread a third of the homemade crunchies on the bottom, then layer 2 pints of the ice cream on top.
  4. Layer another third of the crunchies on top of the ice cream, and then layer the other 2 pints of ice cream, finally topping the top with the last third of the crunchies.
  5. Wrap the cling film over the top of the ice cream cake and place in the freezer. Freeze until firm, preferably overnight.
  6. When you are ready to assemble your ice cream cake, place one macaron shell, flat-side facing up on a cake stand.
  7. Remove the cake pan from the freezer and slide the ice cream layer out and place it on top of the macaron shell.
  8. Place the other macaron shell, domed side facing up on top of the ice cream layer.
  9. Use the cool whip around the ice cream layer to smooth the cake trying not to get it on the macaron shell. You want it to have smooth sides and look like an even ice cream sandwich.
  10. Place back in the freezer for at least two hours, or until cool whip is firm to the touch.
  11. The colder the ice cream cake is, the cleaner the cuts you will make.

Giant Macaron Shells

Ingredients:
212 g. almond meal
212 g. powdered sugar
172 g. egg whites, divided to 82 g. and 90 g
236 g. sugar
158 g. water
brown food color

Instructions:

  1. On a parchment paper that is the size of a baking sheet, draw an 8 inch circle with a pencil. Repeat with another parchment paper.
  2. Line two baking sheets with the parchment paper, pencil side down.
  3. In the bowl of a food processor, add the almond meal and powdered sugar and pulse until thoroughly combined.
  4. Sift the mixture over a large mixing bowl, throwing out the lumps as they appear.  Add 82 g. of the egg whites and stir until you get a thick mixture.
  5. Add the brown food coloring to the almond paste to get the color you desire.
  6. In a small pot attached with a candy thermometer, combine the sugar and water over medium heat and boil until the syrup reaches 200˚F.
  7. Once the syrup reaches 200˚F, start whipping the remaining 90 g. in the bowl of your stand mixer with the whisk attachment on medium speed until soft peaks are reached.
  8. Once the syrup reaches 248 degrees, remove the pot off the burner and slowly pour the syrup down the side of the mixing bowl with the egg whites on medium speed.
  9. Once the egg whites are fully incorporated, increase the speed to medium high until egg whites form glossy, stiff peaks
  10. Mix a ⅓ of the egg white mix to the almond mixture and stir together until the batter is slightly lighter and less pasty.  From then on, fold in ⅓ of the egg white mixture at a time until the mixture “flows like magma”.  The mixture should be smooth and run thick ribbons off the spatula.
  11. In a pastry bag fitted with the largest plain piping tip that you have, paint about 8 vertical lines along the inside of the piping bag using a clean food-use-only paintbrush and the brown food gel color.
  12. Fill the piping bag with the macaron batter.
  13. Pipe the batter onto the parchment paper in a tight spiral pattern until you get to the edge of the 8-inch circle that you drew. You should have a concentric circle pattern of brown circles. Take a toothpick and draw lines into the center through the brown circles to create a pattern. This will be the top macaron shell.
  14. Fill the piping bag with more batter and pipe another large circle. There may or may not be a pattern here because you already piped out the first circle. If there isn’t, there is no need to stress because this will be the bottom shell.
  15. If there is leftover batter, feel free to pipe out some normal sized macarons for later use.
  16. The piped batter may have peaks but should smooth away in a minute or two.  Let the batter stand until the tops of the macaron batter are dry to the touch, about 30 mins to 1 hour.
  17. Preheat the oven to 350˚F.
  18. Once you place the macarons in the oven, reduce the heat to 275˚F. Bake 15-18 minutes for the large shells, 10-13 for the small shells, until the feet are formed and the tops are smooth.
  19. Once you remove the macarons, reheat the oven to 350˚F for ten minutes before baking another pan of macarons at 275˚F.
  20. Let cool and fill.

Homemade Crunchies

Ingredients:
30 Oreo cookies
1 – 7.25 oz. bottle of Magic Shell ice cream topping

Instructions:

  1. Using a food processor, Crush Oreos into even crumbs.
  2. In a medium bowl, mix cookie crumbs and ice cream topping until each crumb is well coated.
  3. Reserve for later use.

*Homemade crunchies recipe from Our Best Bites.

Tiramisu Crunch Ice Cream Cake

Tiramisu Crunch Ice Cream Cake 1I made this cake for my sister’s birthday last week. As far as sisters go, my sister and I are as different as night and day. We don’t look alike, with the exception that we both share freckles. Growing up, I would be pale from staying in and reading books while she would be as tan as can be from playing outside. She loves the color black while I love white. She is loud and I am quiet. She prefers vegetables, while I prefer steak. She likes things simple and casual while I cannot get enough frills and bows. She favors pants in comparison to my preference to dresses. She is also not partial to desserts whereas I cannot live without them (as evidenced by this blog). I always tell people that whatever she is good at, I lack it and whatever I am good at, she lacks it.
Tiramisu Ice Cream Cake 3I love creating cakes and I look forward to baking one for all of my family members on their special day. But my sister does not like cake. HOW?! As someone whose life (or a good part of their life) revolves around frosting, and sugar and flour, it is hard to understand someone who does not like cake. So every year on her birthday, I resort to an ice cream cake. Because let’s face it, who doesn’t like ice cream?
Tiramisu Crunch Ice Cream Cake 2Tiramisu was one of my least favorite desserts because I used to rarely drink coffee. If anything, I loved it for the mascarpone cream. (Ah, mascarpone cream… everything you touch becomes a magical milky confection.) But ever since I gave up diet coke, I’ve been leaning towards coffee for my caffeine fix and I’ve managed to fall in love with the bitter brew. My sister’s preferred choice of drink has always been coffee, so tiramisu was a no-brainer when it came to a flavor choice.
layoutI have to say, this cake ranks as one of the best cakes to come out of my kitchen. It features layers of coffee ice cream sandwiched between coffee syrup soaked sponge cake, chocolate almond crispies (!!!), and is covered by a blanket of mascarpone whipped cream and adorned with dark chocolate accents and cocoa powder. I know. It sounds like it is too much work and it is true that there are many components to the cake. However, each part is simple to make!
mascarpone cream I always use high quality ice cream when it comes to ice cream cakes. It is important to have the lower air content so that the ice cream stays firmer, longer. I used Haagen-Dazs in mine. The sponge cake is a standard sponge cake that is divided in half. The coffee syrup is nothing more than a mix of sugar and dark brewed coffee. The chocolate almond crispies provide a crunch and a textural contrast to the smooth ice cream and cake. To make it, you simply stir chocolate almond spread with Rice Krispies cereal until it is evenly coated. The mascarpone whipped cream is a mix of vanilla extract, powdered sugar, mascarpone, and cool whip. I am not a fan of cool whip, but when it comes to ice cream cakes, I think it is superior in terms of spreadability and stability. To make the chocolate accents, simply melt some chocolate and using a small offset spatula, drag a dollop of chocolate over parchment paper and repeat until you have as many pieces as you need. They will not all look uniform, but I think that’s what makes it look slightly “rustic”.
Tiramisu Ice Cream Cake 4
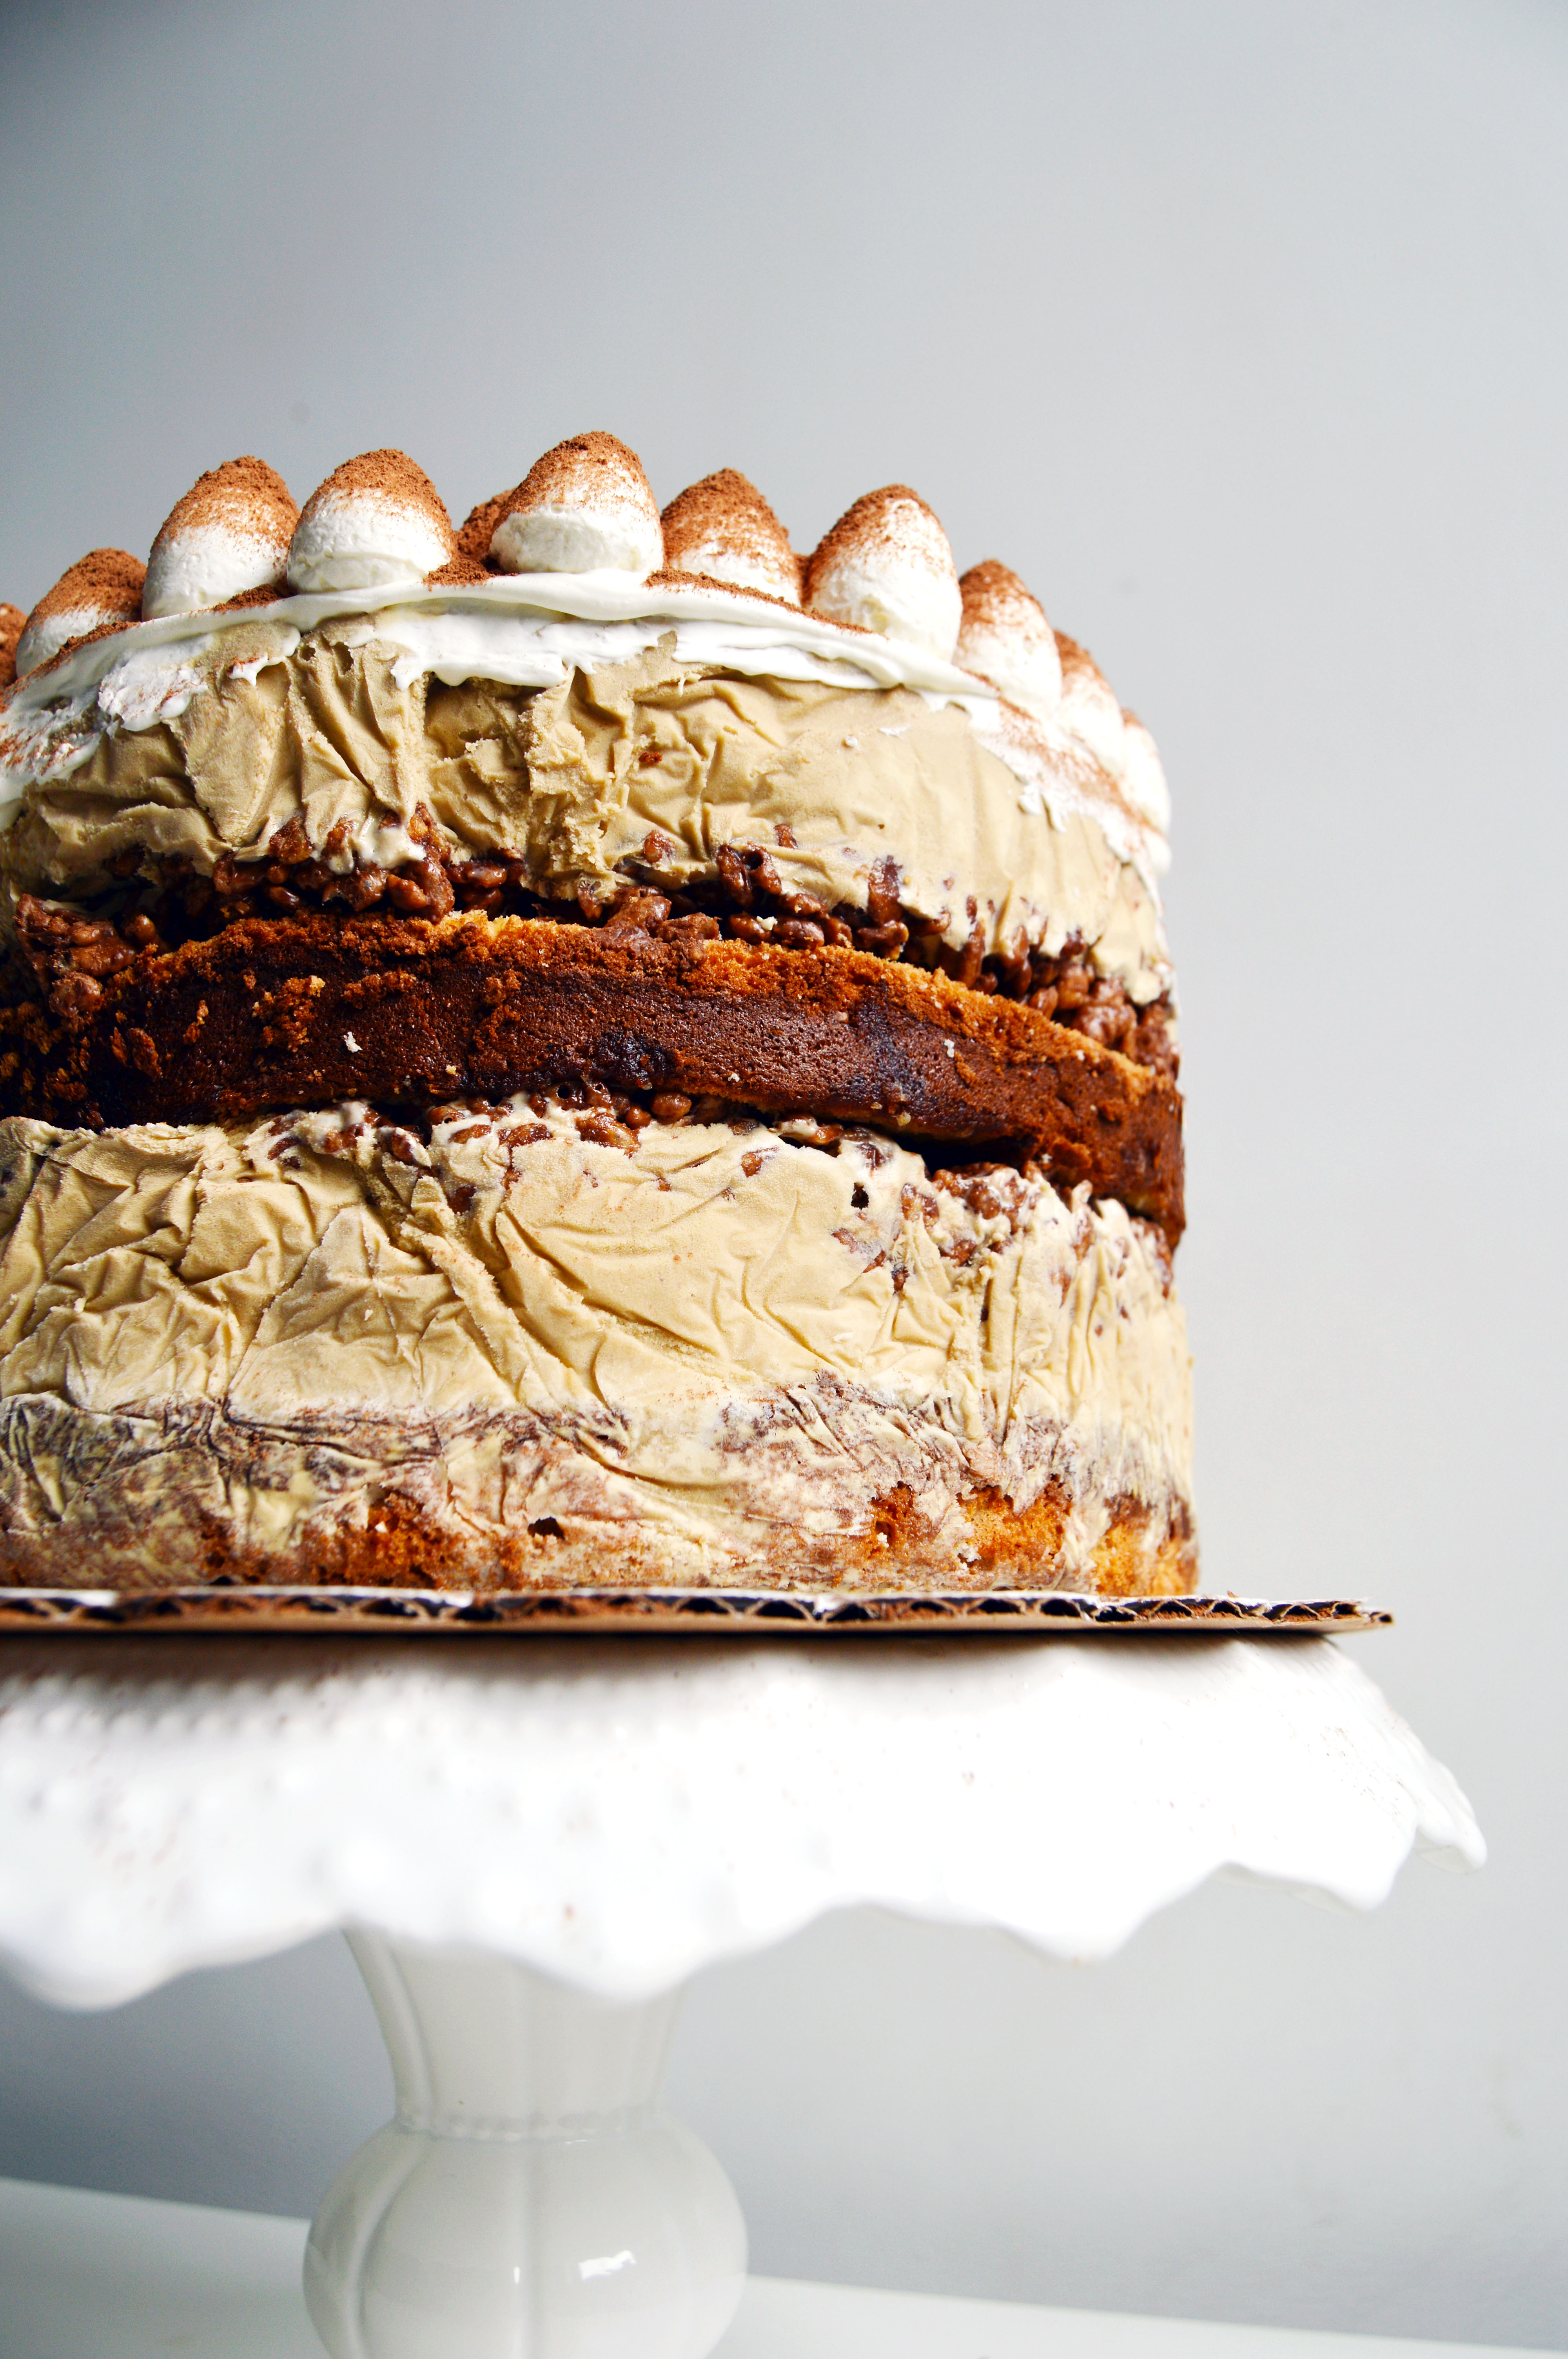
I understand if you are a little overwhelmed by it. But trust me, it is worth every minute you spend making it. 😉

Tiramisu Crunch Ice Cream Cake

Ingredients:

56 oz. premium coffee ice cream, softened
sponge cake, halved horizontally (recipe below)
coffee simple syrup (recipe below)
chocolate almond crispies (recipe below)
whipped mascarpone cream (recipe below)
dark chocolate, melted (for garnish)
cocoa powder (for garnish)

Instructions:

  1. Line two 8-inch cake pans that are 3 inches deep with a double layer of plastic wrap that overhangs over the cake pan.
  2. In one of the cake pans, place one half of the sponge cake and brush liberally with coffee syrup. (You do not want to soak the cake, but put enough of it that it is moist.)
  3. Layer 28 oz. of coffee ice cream over the cake base, smooth so that the coffee base is as smooth as you can get it.
  4. Place pan in freezer for about 10 minutes.
  5. Meanwhile, make the chocolate almond crispies.
  6. Get half of the chocolate almond crispies and layer it over the ice cream, flattening it with an offset spatula to make it as flat, even and smooth as possible.
  7. Wrap the overhanging plastic wrap over the cake pan and place in freezer until completely frozen, preferably overnight.
  8. In the second lined cake pan, smooth 28 oz. of coffee ice cream with offset spatula evenly.
  9. Chill in freezer for 10 minutes.
  10. Layer the remaining chocolate almond crispies over the coffee ice cream.
  11. Place the second half of the sponge cake and brush liberally with coffee simple syrup.
  12. Wrap the overhanging plastic wrap over the cake pan and place in freezer until completely frozen, preferably overnight.
  13. On a cake board you are planning to serve, carefully unmold the first cake pan you put together by lifting the plastic wrap off of the pan and unwrapping it completely.
  14. Take the second cake pan and unmold it, and place on top of the first cake pan layer with the sponge cake layer facing downwards. Apply pressure to fuse the two layers together.
  15. Place in freezer to harden for about 20-30 minutes.
  16. Meanwhile, make the whipped mascarpone cream.
  17. Remove frozen cake from freezer and frost the outside of the cake with ¾ of the whipped mascarpone cream.
  18. Place cake back in the freezer and put the remaining whipped mascarpone cream in a piping bag with a plain large round tip.
  19. Remove cake from freezer and use the piping bag to place decorative dollops of cream over the top of the cake by making even vertical rows of cream.
  20. Using a mesh strainer, liberally dust the top of the cake with cocoa powder. The cocoa powder will dust the surface of the cake board too, carefully use a wet paper towel to clean the cake board off.
  21. Place cake back in the freezer.
  22. While cake is freezing, make decorative chocolate pieces.
  23. Line two baking sheets with parchment paper.
  24. Using a small offset spatula, drag dollops of dark chocolate to create a streak. Use larger dollops for the bottom and smaller dollops for the top. Place in refrigerator to set for 5-10 minutes.
  25. When set, remove the cake from the freezer and decorate the bottom of the cake with the longer chocolate pieces and the top of the cake with the smaller chocolate pieces.
  26. Refrigerate until ready to serve.

Vanilla Sponge Cake

Ingredients:

½ c. all-purpose flour
½ c. cornstarch
4 large eggs, separated
1 tsp. vanilla extract
¾ c. sugar, divided
pinch of salt

Instructions:

  1. Preheat oven to 350˚F and grease the inside of an 8 inch baking pan with nonstick spray.
  2. In a small bowl, sift together flour and cornstarch.
  3. In the bowl of a standing mixer fitted with the whisk attachment, beat the egg yolks, vanilla extract, and ½ c. sugar on high until thick and pale.
  4. Transfer mixture into a large bowl.
  5. Thoroughly wash and dry mixing bowl and whisk attachment.
  6. In a clean bowl of a standing mixer fitted with the whisk attachment, beat egg whites and salt until soft peaks form.
  7. Slowly incorporate the remaining ¼ c. of sugar into the egg whites and mix until whites are stiff and glossy.
  8. Fold egg whites into the egg yolk mixture in three additions.
  9. Fold in flour mixture
  10. Transfer batter into the prepared cake pan.
  11. Bake 30-40 minutes or until a cake tester inserted into the center of the cake comes out clean.
  12. Cool cake on a wire rack until ready for use.

Coffee Simple Syrup

Ingredients:

½ c. strong, dark coffee
¼ c. sugar

Instructions:

  1. Heat coffee and sugar together until sugar is completely dissolved.
  2. Cool until ready for use.

Chocolate Almond Crispies

Ingredients:

3 c. Rice Krispies Cereal
1 c. chocolate almond spread (I used this one from Trader Joe’s)

Instructions:

  1. Heat chocolate almond spread until easily pourable.
  2. In a large bowl, mix chocolate almond spread and cereal until cereal is evenly coated.
  3. Cool mixture until ready for use.

Whipped Mascarpone Cream

Ingredients:

12 oz. Cool Whip (thawed)
1 lb. mascarpone cheese
3 tbsp. powdered sugar
1 tsp. vanilla extract

Instructions:

  1. In a large bowl, whip Cool Whip and half of mascarpone cheese until smooth with an electric hand mixer.
  2. Add the remaining half of the Cool Whip and mix until incorporated. Do not over whip.
  3. Add powdered sugar and vanilla extract and whip until homogeneous.

* Vanilla Sponge Cake recipe from Martha Stewart.

Rose Cake

rose cake 2This weekend was crazy busy for the Park family.  We had a graduation, Mother’s Day and my dad’s birthday lined up 3 days in a row.  We ended up celebrating Mother’s day and my dad’s birthday in one go, and I tried to think of a birthday cake that would serve both occasions.  I suppose the mauve color of the cake was a little too feminine for a man’s birthday, but my mom didn’t get any flowers for Mother’s day so I hope this made up for it a bit.
Rose cake 1Like many celebration cakes, this cake takes a long time to decorate but isn’t necessarily challenging.  What takes the most time is rolling out the petals and chilling the petals in between steps.  I wanted to use 100% modeling chocolate for the cake, but something went wrong during the process and I had to add about 30% fondant to make it useable.  Do not fight the weather, as soon as your modeling chocolate/fondant starts to lose its shape, stop and chill it in the freezer.  This will save you a lot of frustration and heartache down the line.
rose cake 3It does have a certain eye opening charm and it’s very flexible in terms of the variation of celebrations and colors.  An all-around crowd pleaser.
rose cake 4Rose Cake
You Will Need:
14 oz of modeling chocolate or a mixture of fondant and modeling chocolate
1 batch of vanilla buttercream
1 8” cake, layered and filled
a set of round cookie cutters 
round ended fondant tool

Instructions:

  1. Frost your cake with vanilla frosting into a dome shape.*  (Pic 1)
  2. Mold a 1½ in. cone with modeling chocolate and place in center of the cake. (Pic 2)
  3. From this point on, the modeling chocolate will be rolled out to 1/8-1/16 in. thickness.
  4. With your 1.75 in. round cutter, cut out 2 pieces of modeling chocolate and mold it to a petal shape using a round ended fondant tool.
  5. Wrap the cone with the 2 petals with some buttercream, overlapping each other to form a bud. (Pic 3 and 4)
  6. With your 1.75 in. round cutter, cut out 3 pieces of modeling chocolate and mold it to a petal shape using a round ended fondant tool.
  7. Wrap the bud with the 3 petals with some buttercream, overlapping each other at the edges. (Pic 5 and 6)
  8. With your 2.25 in. round cutter, cut out 5 pieces of modeling chocolate and mold it to a petal shape using a round ended fondant tool.
  9. Wrap the bud with the 5 petals with some buttercream, overlapping each other at the edges. (Pic 7 and 8)
  10. With your 2.5 in. round cutter, cut out 5 pieces of modeling chocolate and mold it to a petal shape using a round ended fondant tool.
  11. Wrap the bud with the 5 petals with some buttercream, overlapping each other at the edges. (Pic 9 and 10)
  12. With your 2.75 in. round cutter, cut out 5 pieces of modeling chocolate and mold it to a petal shape using a round ended fondant tool.
  13. Wrap the bud with the 5 petals with some buttercream, overlapping each other at the edges. (Pic 11 and 12)
  14. With your 3 in. round cutter, cut out 5 pieces of modeling chocolate and mold it to a petal shape using a round ended fondant tool.
  15. Wrap the bud with the 5 petals with some buttercream, overlapping each other at the edges. (Pic 13)
  16. With your 3.25 in. round cutter, cut out 7 pieces of modeling chocolate and mold it to a petal shape using a round ended fondant tool.
  17. Wrap the bud with the 7 petals with some buttercream, overlapping each other at the edges. (Pic 15)
  18. Cut 2-3 in. wide strips of molding chocolate and curl the edges with a straw, about 8-13 pieces.
  19. Chill in the freezer to set, about 1-3 minutes.
  20. Use some frosting to wrap the cake with the strips, overlapping at the edges and curled edge pointing up.  (Pic 16)

* This is what I did.  In hindsight, you could do the regular sharp corners, it shouldn’t make a difference.

Sofia the First Doll Cake

sofia the first doll cake 1There are many things that make birthdays special: friends, family, presents, food… the list goes on.  My favorite part of a birthday is the cake.  I’m not sure what the exact reason is.  It may be because it’s the centerpiece of a celebration or because it foreshadows the inevitable sweet ending of a party or simply because I love cake.
sofia the first doll cake 3I did not have many birthday parties when I was little, but I do remember seeing many beautiful cakes at American bakeries wishing I would have one for my birthday.  I always ended up getting a Korean cake.  By Korean cake, I mean a simple sponge cake filled with whipped cream and fruit and a simple decoration on top.  (I have to say, Korean bakeries have stepped up their decorating game since I was a little kid.) Many a day did I wish for the sugary sweet American buttercream counterpart but it just didn’t happen.  So that’s why when it’s someone’s birthday I try to make it special the only way I know how, with cake.
sofia the first doll cake 4Andy’s niece LOVES Sofia the First, along with Minnie Mouse and Max & Ruby.  I’ve always wanted to try my hand at doll cakes so the present was twofold: the cake and the doll in one.

steps 2If you’ve never made doll cakes before, I’ll tell you that it’s definitely more time consuming than a layer cake but the reaction you get makes it worth the trouble.  When we walked in the door, the first thing she screamed was “Sofia!!” and asked to hold it thinking it was a real doll.  We were successful keeping her hands off until the end when the urge was too great and she made a grab for it. 🙂
sofia the first doll cake 5

Sophia the First Doll Cake

You will need:
Purple Fondant
White Fondant
White Buttercream
White Sugar Pearls
4 layers of 6” round cake
Purple Food Marker
Isomalt (optional)
Small Gem Mold (optional)

Instructions:

  1. Cut out holes in the cake layers so that it would fit your doll.  I used this doll.
  2. Prep your doll by tying its hair up, taking off the dress, and wrapping the doll with plastic wrap.
  3. Roll out a piece of purple fondant and drape around the doll adhering it with either a very thin layer of buttercream or water. (As shown above.)
  4. Frost and layer the cake layers and place your doll inside.
  5. Mold the cake into a dress shape by cutting it along the top in a rounded shape.
  6. Frost the cake smoothly up to below the waist of the doll.  (As shown above.)
  7. Roll out a piece of white fondant and cut out a 2-3 in. strip.  Drape it around the bottom of the dress to form the underskirt of the dress. (As shown above.)
  8. Roll out a piece of purple fondant and cut out a ¼ in. strip.  Adhere the purple strip over the white fondant with either buttercream or water to form the stripe around the underskirt. (As shown above.)
  9. Roll out a large piece of purple fondant (about 10 in. in height) and cut out scalloped shapes along the bottom.  Drape right below the waist of the doll connecting the two ends together in the back. (As shown above.)
  10. Roll out two more pieces of fondant in a semi-circle shape and drape around each side of the doll to create the top layer of her dress. (As shown above.)
  11.  Roll and cut a thin ribbon of fondant and wrap around the waist to meld the top and bottom together.
  12. With the purple marker, draw two lines and a loop design on the front of her dress. (As shown above.)
  13. Adhere pearls along the neckline and the purple stripes. (As shown above.)
  14. Adhere pearls along the top layer of the dress. (As shown above.)
  15. Optional: If you have time, you can continue the pearl all across the back of the dress.  I did not so I opted to continue it with a white ribbon made of white fondant.
  16. Adhere pearls all along the top and bottom skirt of the dress
  17. For the circular pattern along the bottom of the dress you can either:
    1. Cut out the pattern with the fondant and adhere it.
    2. Make white teardrop jewels with a small gem mold with either sugar or isomalt. This gives it an interesting 3D effect to the dress.  You can cut out the triangular shapes with fondant and adhere it.
  18. If you have time, you can fancy the dress up in the back with more pearls and sugar jewels. (As shown above.)
  19. Optional: You can also paint the crown with silver paint and bling it out with little purple gems like I did above.  It makes the cake look a little more expensive and detailed. (As shown above.)