Lucky Charms Churros & Real Pistachio Pudding

It’s almost St. Patrick’s Day and I’m part of a virtual St. Patrick’s Day Party! If there was one word to describe the holiday for me, it would be: green. When it comes to desserts there aren’t many green colored options, and I decided to do something with pistachios. I’ve made pistachio flavored cupcakes before but I used jello pudding mix which gave it an artificial taste. I’m not knocking on pistachio pudding mix; I’ve actually grown to like that artificial pistachio flavor. Much like how I’ve grown to love maraschino cherries.
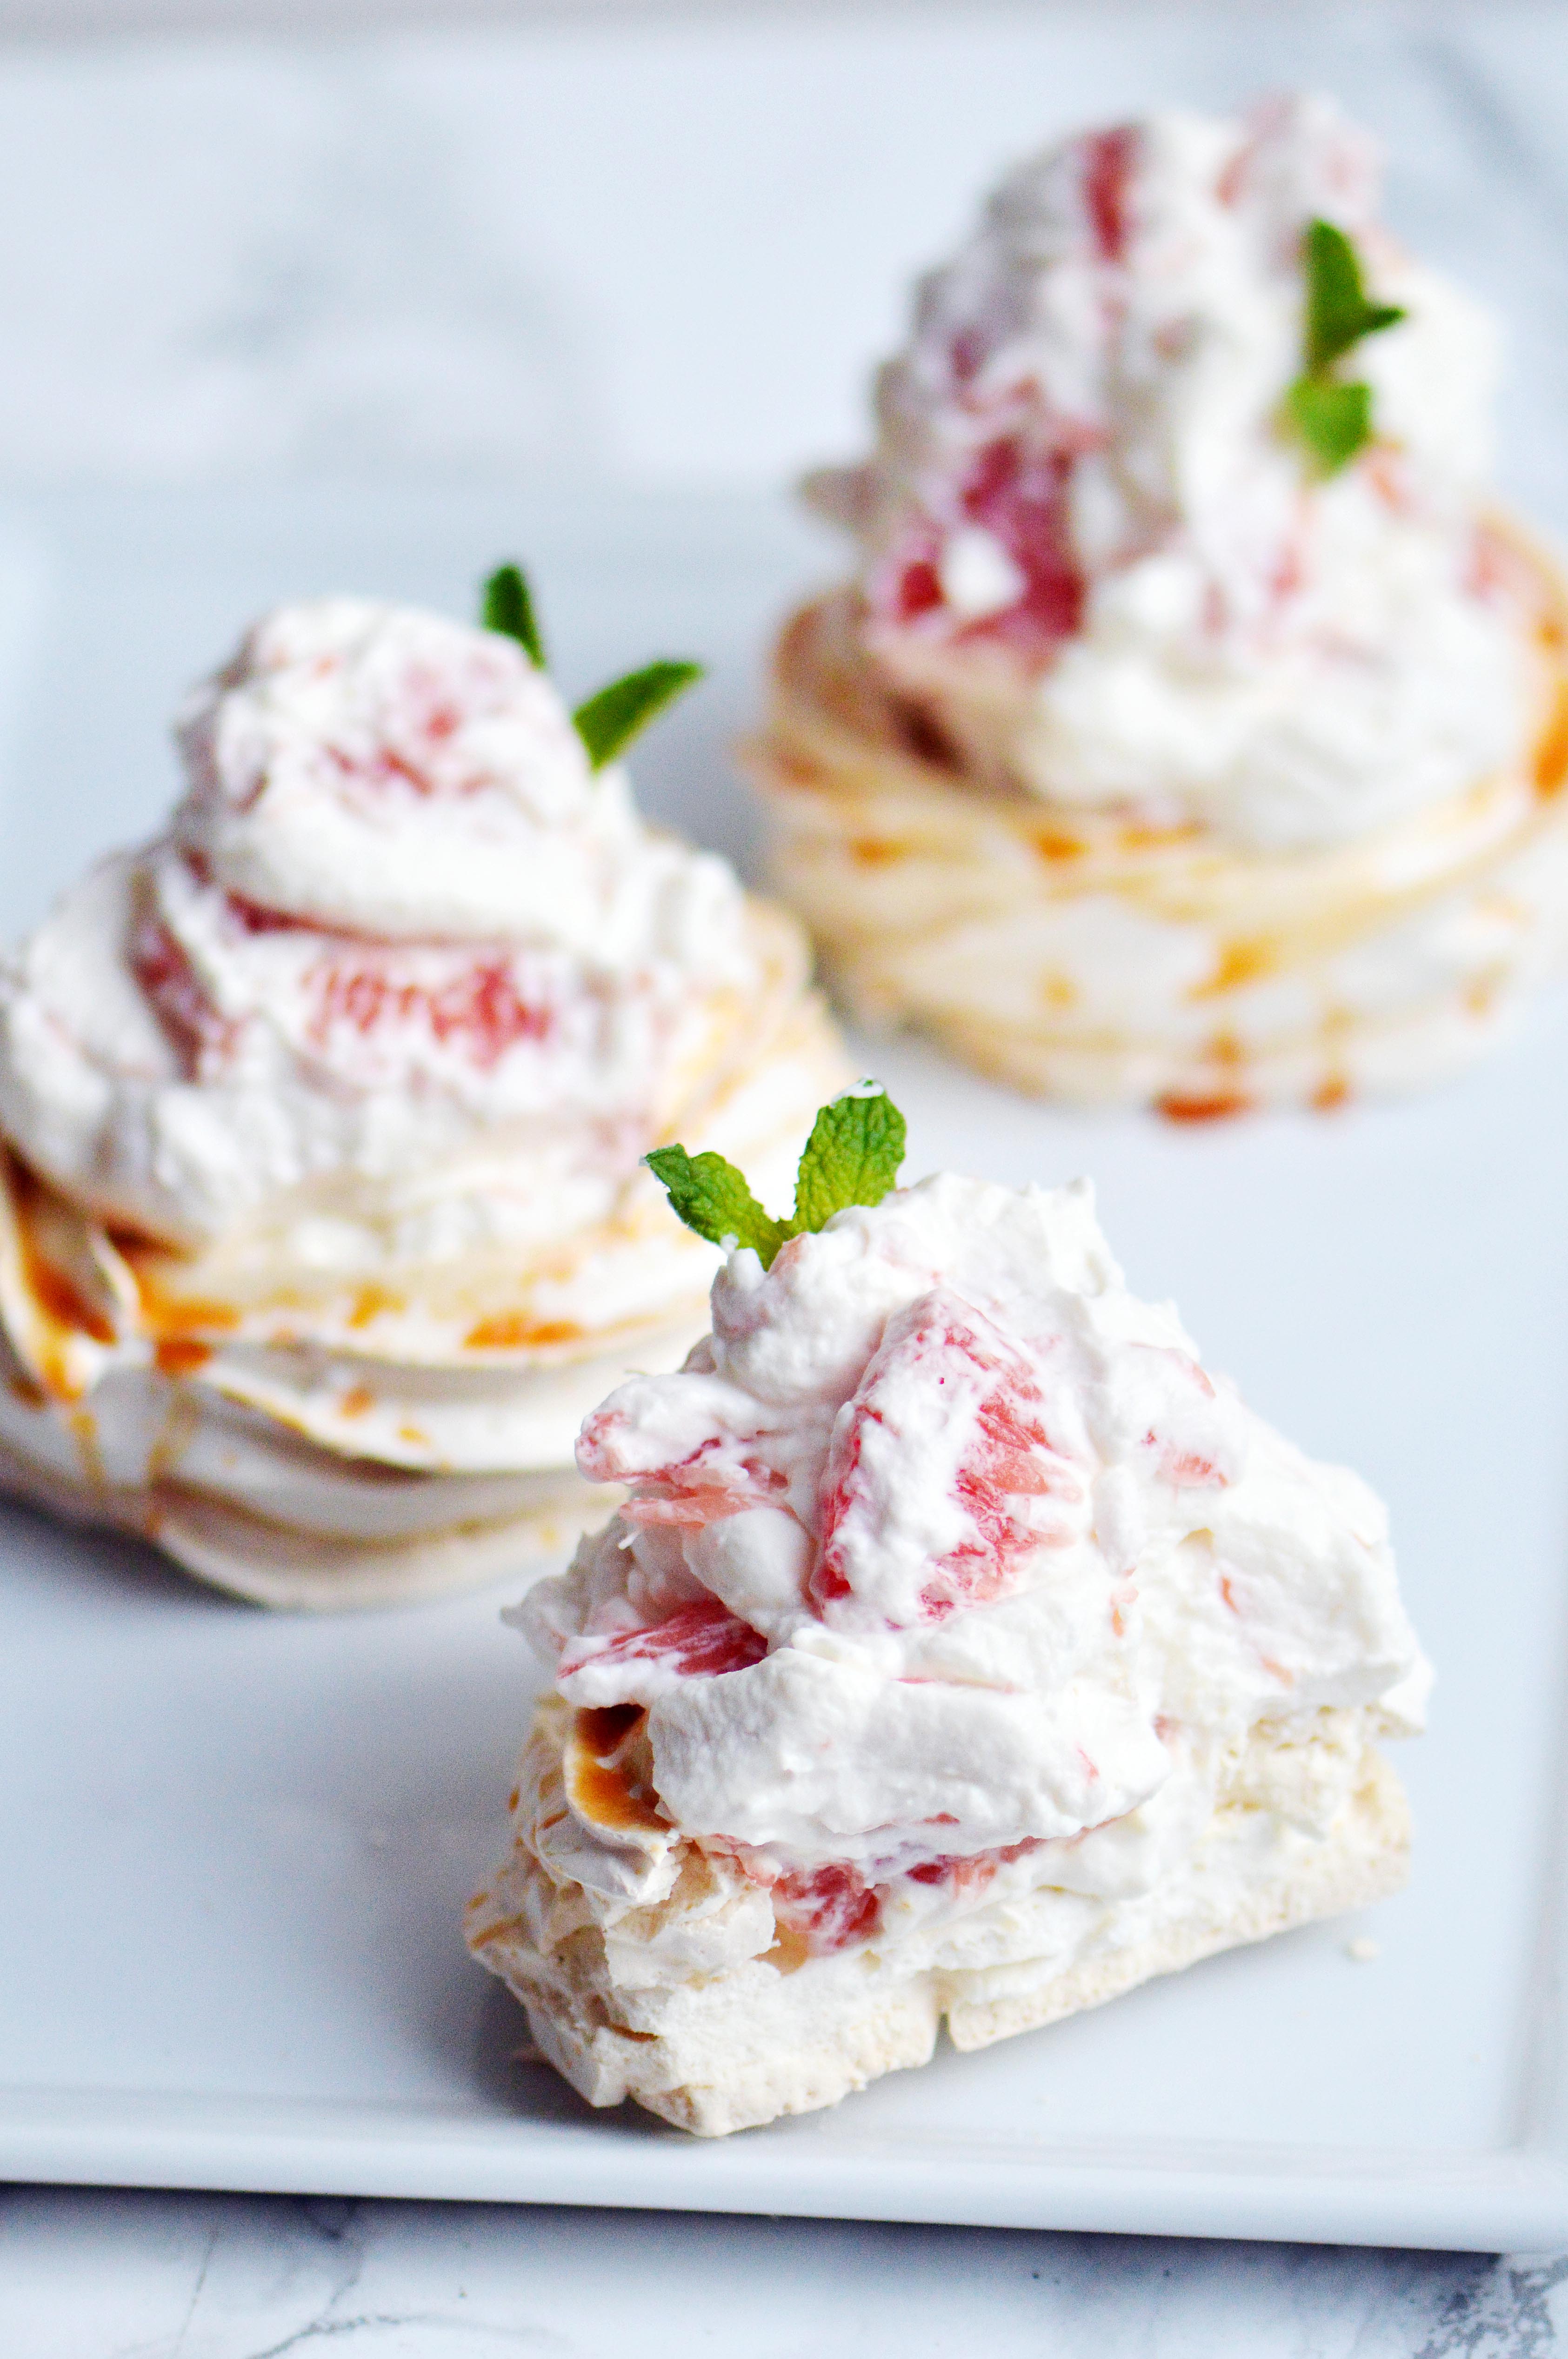
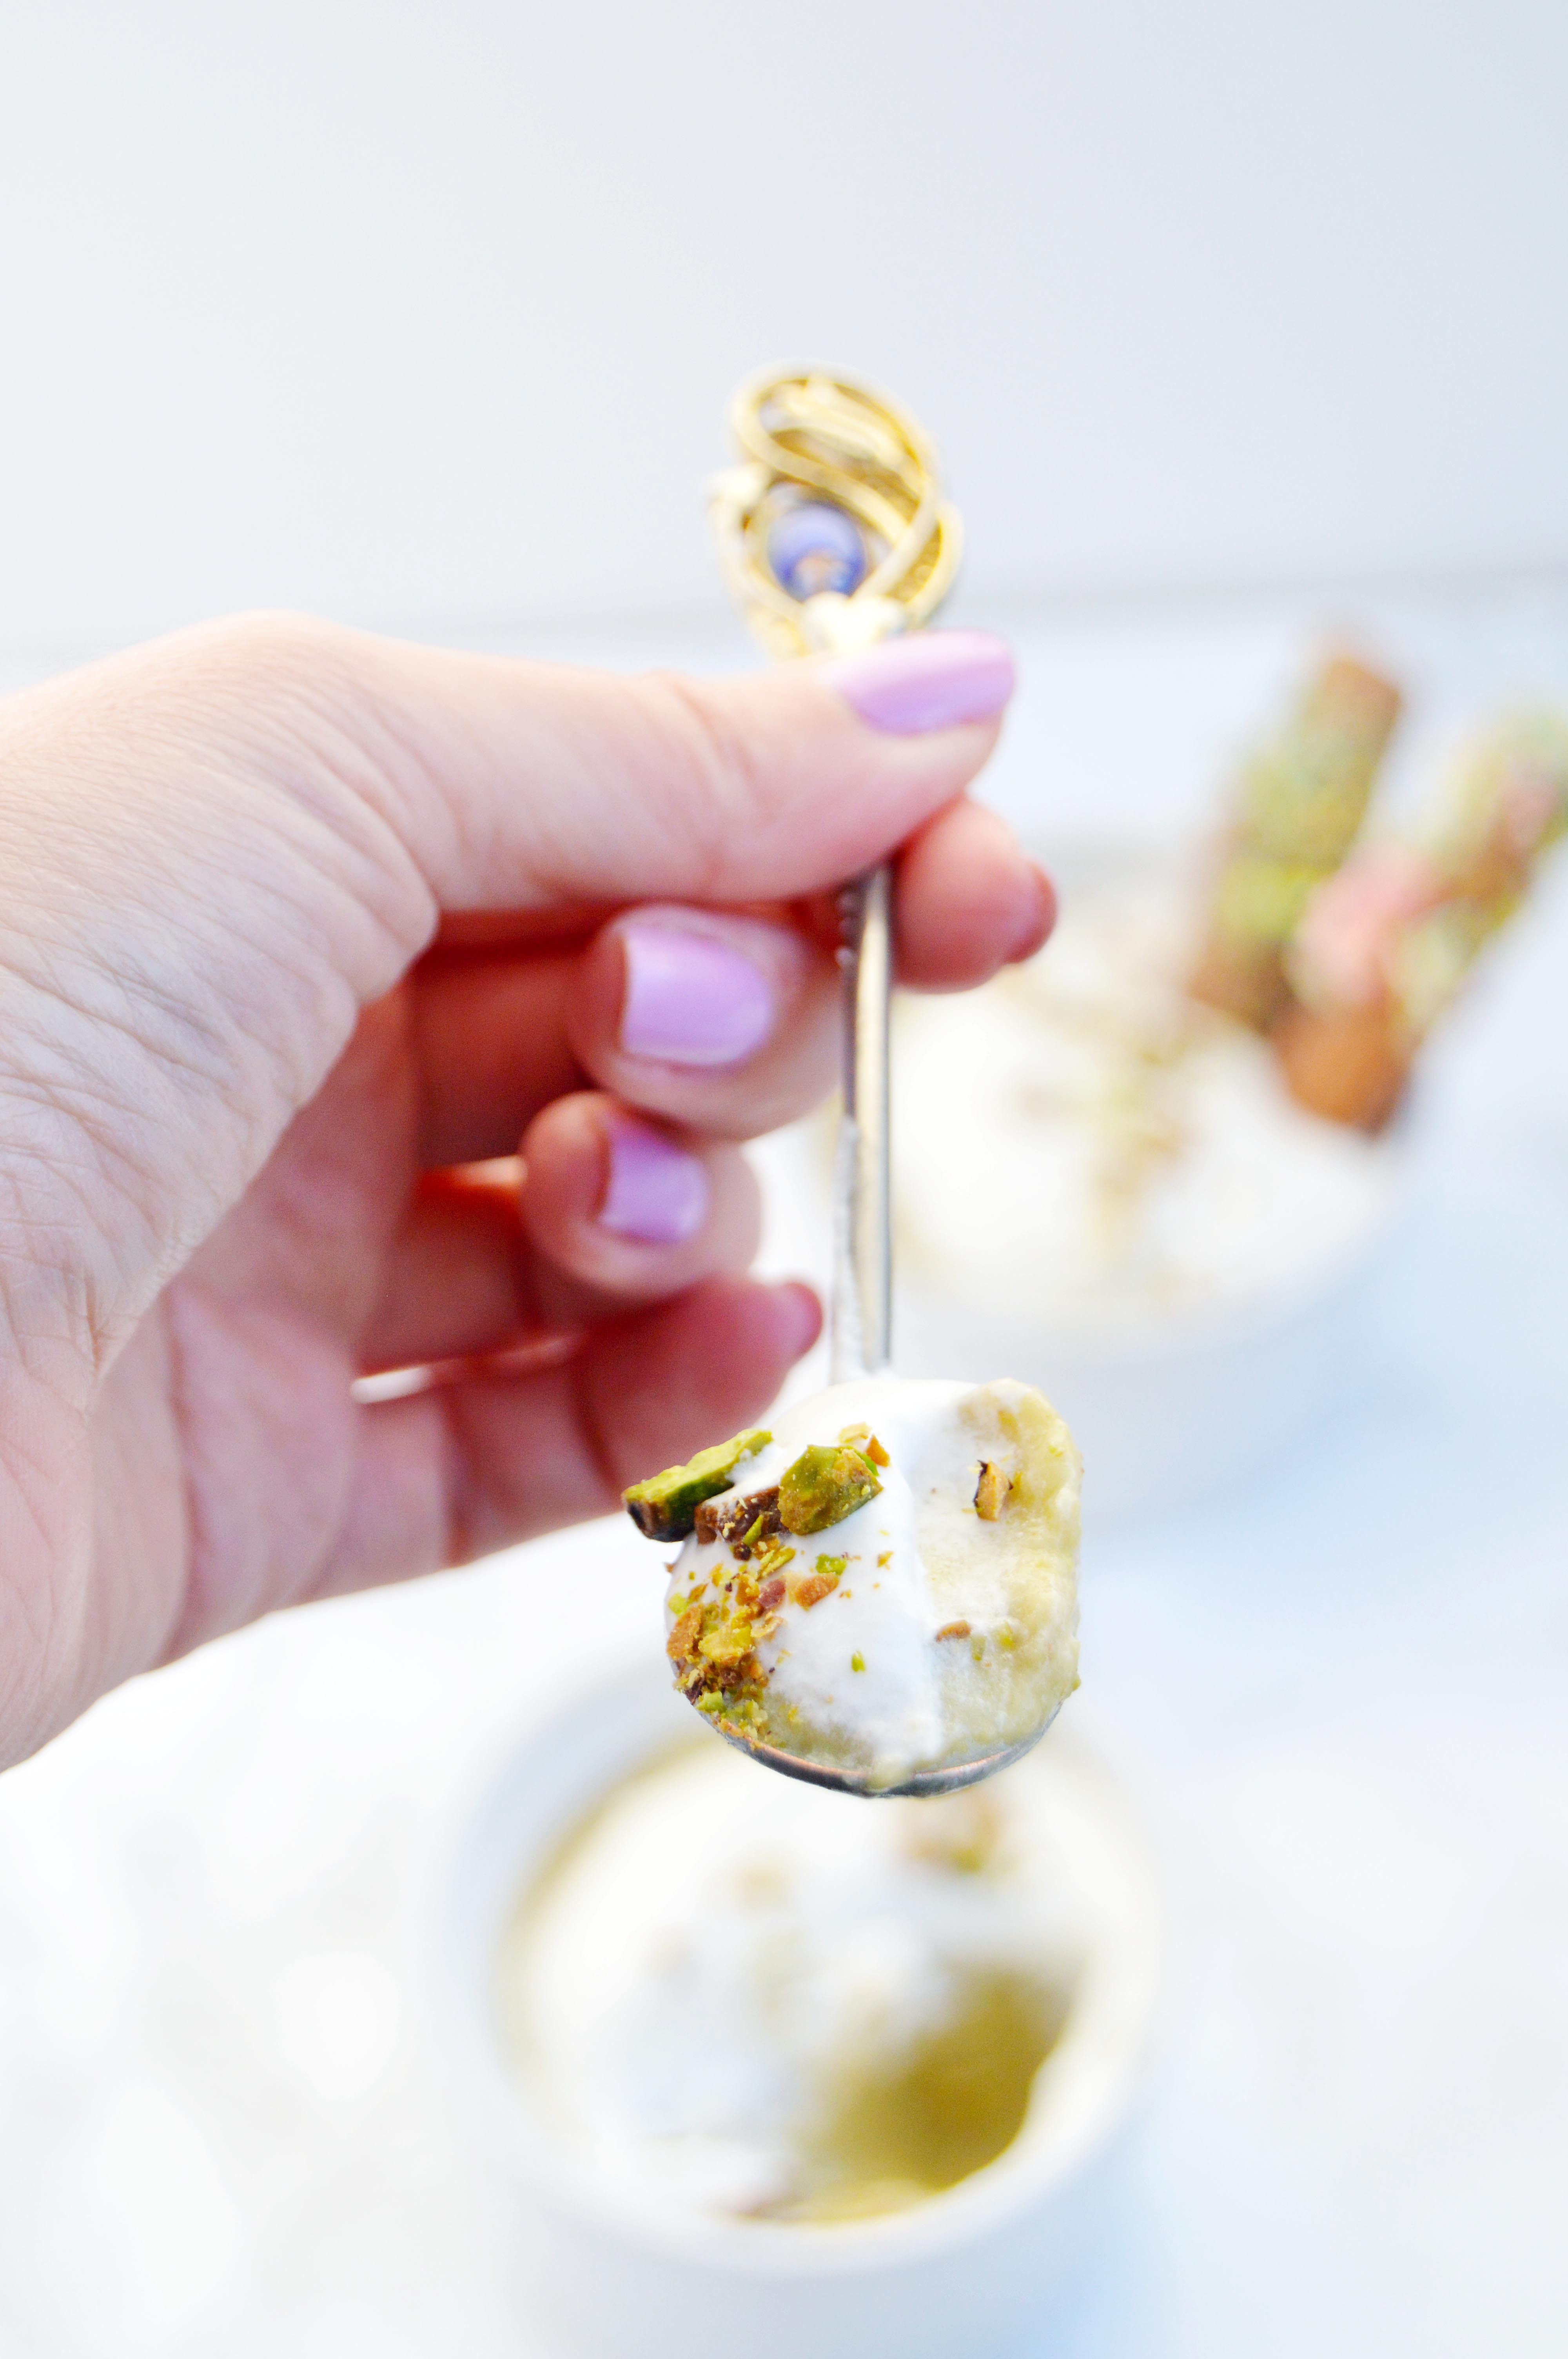
The pistachio flavor of the pudding isn’t assertive. If I had to describe the flavor, I would say it’s very similar to the Häagen-Dazs pistachio ice cream only in pudding form, especially once it’s topped with a dollop of whipped cream. It’s dreamy and luscious, and pale green in color.
And because I wanted to add lucky charms into the whole thing, I made some lucky charms churros. Funny thing is they look entirely different from now I imagined them. I wanted them to have lots of marshmallows and cereal pieces stuck on them. Unfortunately, when I did put whole pieces of the cereal onto the churros, they looked chunky and unappealing. So I crushed them and stuck them on there, similar to sprinkles. A little more whimsical, but it doesn’t really scream “lucky charms”. Oh well.
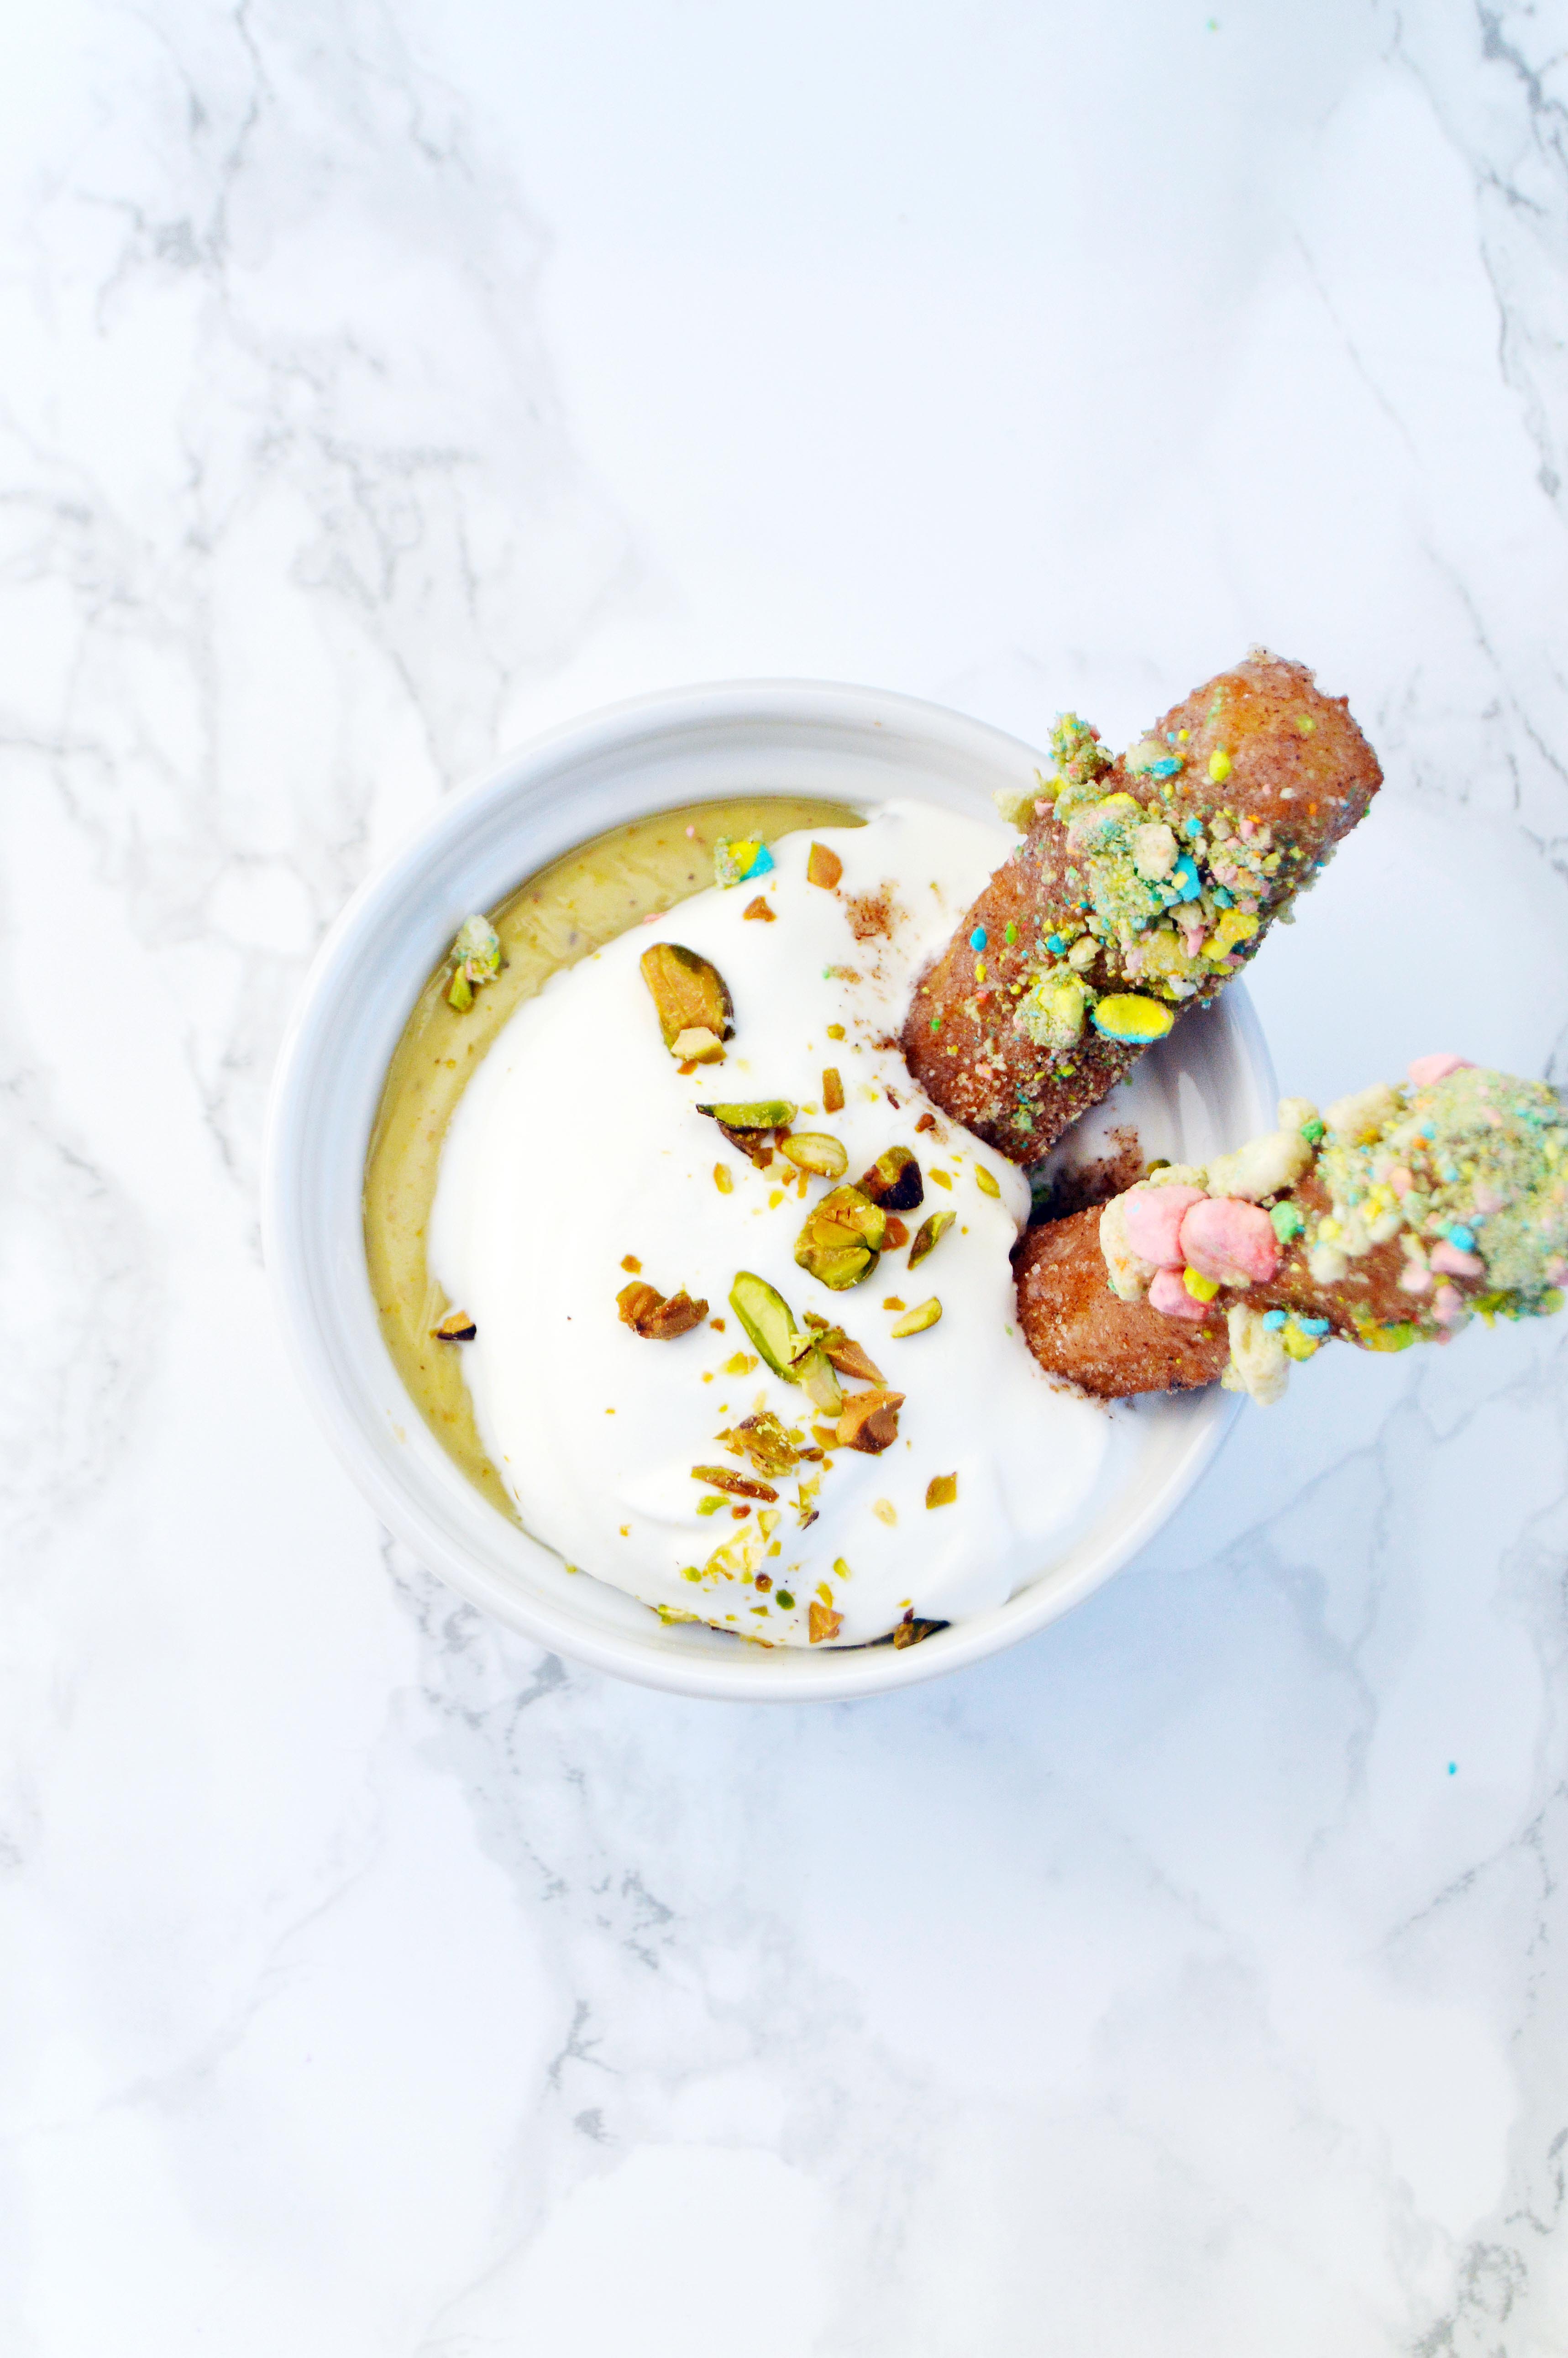
The churros btw, are delicious. They’re crisp on the outside and chewy on the inside. Don’t get scared and take them out of the oil too early or you’ll end up with doughy insides. Now excuse me while I oogle at these awesome dishes that everyone else contributed to our party… You’re of course, welcome and encouraged to check them out too. 😉

Baileys Chocolate Caramel Tarts Sugarhero
Bangers and Mash with Guiness Onion GravyThe Beach House Kitchen
Black Lentil Roasted Broccoli Shepard’s Pie – Calizona
Boozy Irish Coffee Milkshake with Baileys Caramel DrizzleMeg is Well
Chocolate Stout No-Churn Ice Cream with Homemade Toffee CrumbleCiao Chow Bambina
Colcannon Irish Mashed PotatoesKeviniscooking
Get Charmed By Double Spice Chocolate CookiesThe Sweet Nerd
Guinness Irish Stew Mini Pot PiesThe Road to Honey
Irish Spice BagSeasons & Suppers
Pork Chops with an Irish Whiskey SauceSalt & Lavender
Raspberry Chocolate Milk Porter Pudding ShootersBeer Girl Cooks
Shepherd’s Pie {with Guinness Lamb & Horseradish Mash}Girl Heart Food
Sour Apple Tequila Cocktail – The Lucky Shamrock – No Spoon Necessary
St. Patrick’s Lemon Cucumber Martini With Fresh BasilBeyond Mere Sustenance
Traditional Irish Soda Bread with Orange ButterWhat Should I Make For…
Vegan Mint Chocolate BarkSalted Plains

Lucky Charms Churros & Real Pistachio Pudding

For the Pistachio Paste

Ingredients:
½ c salted pistachios, shelled
⅓ c. sugar
2 tbsp. water

Instructions:

  1. In the bowl of a food processor, pulse pistachios until finely ground.
  2. Add sugar and water and continue to blend until smooth.

For the Pistachio Pudding
Makes about 4 ramekins

Ingredients:
1 batch pistachio paste (recipe above)
2 c. whole milk
2 egg yolks
⅓ c. sugar
2 tbsp. corn starch
pinch of salt
1 tsp. vanilla extract
2 tbsp. unsalted butter
½ c. heavy whipping cream
1 tbsp. powdered sugar
a handful pistachios, chopped

Instructions:

  1. In a small pot, whisk pistachio paste and milk together and heat until simmering.
  2. While the pistachio milk comes to a simmer, whisk egg yolks, sugar, cornstarch and salt in a small bowl to form a smooth paste.
  3. Slowly whisk in the hot pistachio milk by the ladleful into the egg mixture until you use up half of the pistachio milk.
  4. Add the rest of the egg mixture back into the pot and whisk on medium heat until pudding is thickened.
  5. Remove pot from heat and whisk in butter and vanilla extract until smooth.
  6. Spoon pudding into ramekins, and wrap with plastic wrap and push the plastic onto the surface so it doesn’t form a skin.
  7. Refrigerate 4 hours or overnight.
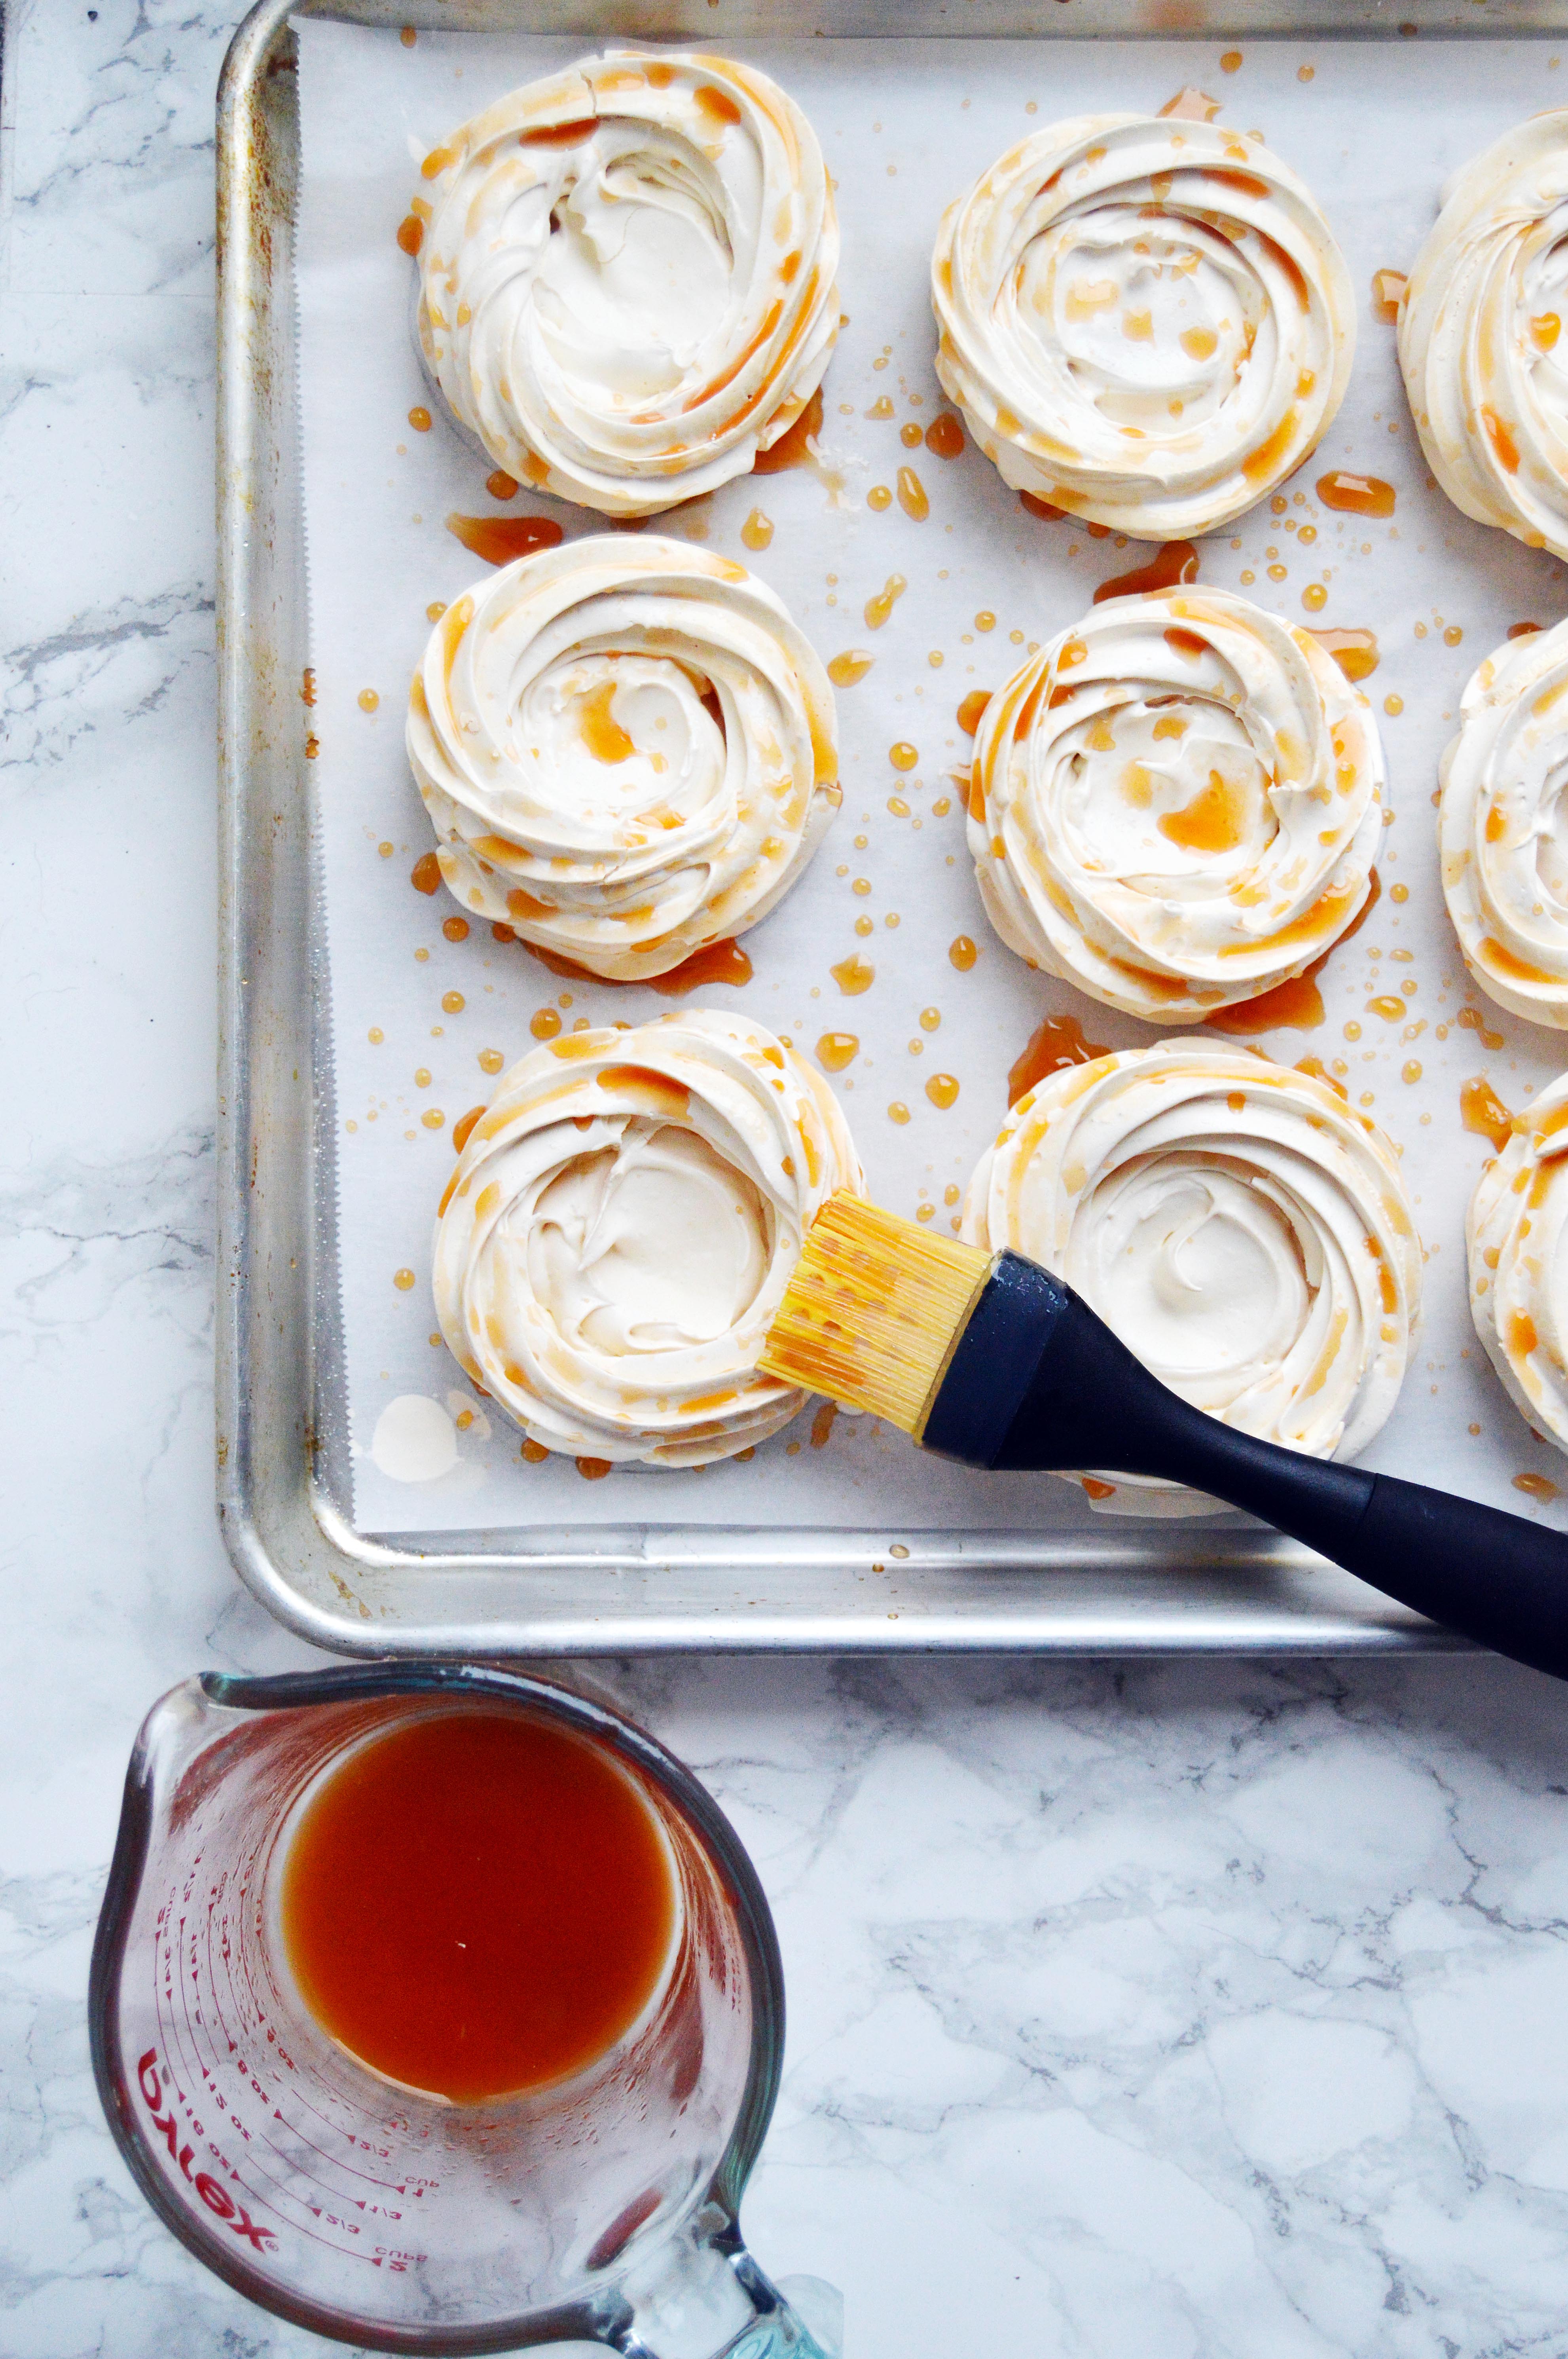
  8. Before serving, whip heavy cream and powdered sugar together until stiff peaks form, place a dollop of whipped cream on top and garnish with chopped pistachios.

For the Lucky Charms Churros

For the churros

Ingredients:
½ c. sugar
1 ½ tsp. cinnamon
1 c. water
1 ½ tbsp. sugar
2 tbsp. vegetable oil
½ tsp. salt
1 c. all-purpose flour
2 qt. vegetable oil (for frying)
vanilla glaze (recipe below)
about 1 cup of crushed lucky charms cereal (with mostly marshmallows; less cereal)

Instructions:

  1. In a shallow bowl, combine ½ c. sugar and cinnamon and set aside.
  2. In a small saucepan over medium heat, whisk water, sugar, 2 tbsp. vegetable oil, and salt together and bring to a boil.
  3. Once the mixture is boiling, turn off the heat, add in the flour and stir with a wooden spoon until a ball of dough forms.
  4. In a large heavy pot clipped with a candy thermometer, heat the vegetable oil until 375 degrees.
  5. While the oil heats, transfer the dough into a piping bag fitted with a large star tip. The dough is dense and tough to push through the piping bag so use a heavy-duty bag.
  6. On a sheet pan lined with parchment paper, pipe the length of the churros you would like and cut it off with either a sharp knife or scissors until you use up the dough.
  7. Once the oil is heated, slowly place the churro dough into the hot oil. Do not drop the dough into the oil for it will splatter. Place about 3-4 pieces and fry until golden brown, about 2-4 minutes.
  8. Lightly shake off the excess oil, and place the cooked churros onto a plate lined with paper towels.
  9. Drain churros for two minutes and then toss in the cinnamon sugar.
  10. Repeat with the remaining churro dough.
  11. Once the churros are cool, drizzle the top half of the churros with the vanilla glaze and dip into the crushed marshmallows.

Vanilla Glaze

Ingredients:
1 c. powdered sugar
1 ½ tbsp. milk
¼ tsp. vanilla extract

Instructions:

  1. Whisk all three ingredients until smooth.
  2. Let stand for a few minutes to thicken.

Recipe for the pudding adapted from Joy the Baker.
Recipe for churros adapted from Just a Taste.
Recipe for glaze adapted from Taste of Home.

Okinawan Sweet Potato Macarons

Okinawan Sweet Potato MacaronsThere isn’t much that I remember about living in Seoul, South Korea as a little girl. But one memory that lingers after all these years is how the streets were perfumed with the scent of roasted sweet potatoes in the winter. I don’t know how it is now, but back then the streets were filled with carts that sold perfectly roasted sweet potatoes. Roasted Korean sweet potatoes are very different from their American counterpart. They are insanely sweet and the flavor is chestnut-like. And unlike American sweet potatoes, they don’t get watery. Instead, they are more fibrous and hold their shape when peeled. For many years, I’ve tried to recapture that memory by roasting Korean sweet potatoes in my oven. The smell was spot on, but I couldn’t get that same roasted taste that I remembered.
Okinawan Sweet Potato MacaronsThere is a Korean market that I stop by for snacks when I’m at my local Laundromat. If you stop by in the colder months, there is a small machine that churns out roasted sweet potatoes and the whole store smells has that warm roasty toasty smell. Anyways, after having one that was properly roasted, I became obsessed with trying to recreate it at home and scoured the internet on how to do it. I finally came upon a blog that featured this pot and after finding it in a Korean supermarket (It’s so much cheaper. I got it for less than $20 because it was on sale), I gave it a try and I finally reached sweet potato nirvana. Tip: The instructions say to roast on medium heat for 20-30 minutes but I found that roasting for about an hour on low heat produces the best results.
Okinawan Sweet Potato MacaronsArmed with my new roasting pot, I wanted to feature sweet potatoes differently and made these macarons. Purple sweet potatoes are just as sweet but not as flavorful as their yellow cousins. However, I couldn’t resist their beautiful purple flesh. I suppose I could’ve made the frosting a vibrant purple by adding a little food dye, but I wanted you to be able to see what it would look like without it. The best part about the frosting is that it takes just one stick of butter and about ¾ cup of powdered sugar (which just might be perfect for filling cakes for babies since you are using minimal sugar).
Okinawan Sweet Potato MacaronsCan you tell that I originally made these for Valentine’s Day? The purple ombre effect is easy to achieve by using an edible food color spray can. They’re easy enough to find on amazon. You want to be careful to be light handed or you will end up spraying the entire macaron purple. This is especially true if your spray can is new. There are so many options out there, I feel like you have a rainbow at your fingertips and it’s an easy way to spruce up a plain macaron.
Okinawan Sweet Potato MacaronsEven if you don’t decorate it, they’re definitely worth giving a try and best eaten within two days. Since the frosting has low butter/sugar content, it will turn your macarons soggy as the days go by.

Okinawan Sweet Potato Macarons

For the macaron shells:

Ingredients:
212 g. almond meal
212 g. powdered sugar
172 g. egg whites, divided to 82 g. and 90 g
236 g. sugar
158 g. water
purple edible spray paint
heart sprinkles
white pearl sprinkles

Instructions:

  1. Line two baking sheets with parchment paper or silicone mats.
  2. In the bowl of a food processor, add the almond meal and powdered sugar and pulse until thoroughly combined.
  3. Sift the mixture over a large mixing bowl, throwing out the lumps as they appear.  Add 82 g. of the egg whites and stir until you get a thick mixture.
  4. In a small pot attached with a candy thermometer, combine the sugar and water over medium heat and boil until the syrup reaches 200˚F.
  5. Once the syrup reaches 200˚F, start whipping the remaining 90 g. in the bowl of your stand mixer with the whisk attachment on medium speed until soft peaks are reached.
  6. Once the syrup reaches 248 degrees, remove the pot off the burner and slowly pour the syrup down the side of the mixing bowl with the egg whites on medium speed.
  7. Once the egg whites are fully incorporated, increase the speed to medium high until egg whites form glossy, stiff peaks
  8. Mix ⅓ of the egg white mix to the almond mixture and stir together until the batter is slightly lighter and less pasty.  From then on, fold in ⅓ of the egg white mixture twice until the mixture “flows like magma”.  The mixture should be smooth and run thick ribbons off the spatula.
  9. Fill batter in a pastry bag fitted with a ½ in. plain tip.
  10. The piped batter may have peaks but should smooth away in a minute or two. Sprinkle the top of the macaron batter with the pearl and heart sprinkles. Let the batter stand until the tops of the macaron batter are dry to the touch, about 30 mins to 1 hour.
  11. Preheat the oven to 350˚F.
  12. Once you place the macarons in the oven, reduce the heat to 300˚F. Bake 10-13 minutes, until the feet are formed and the tops are smooth.  The macarons are done when you slightly wiggle them and they start to come off of the parchment paper / silicone mat.
  13. Once you remove the macarons, reheat the oven to 350˚F for ten minutes before baking another pan of macarons at 300˚F.
  14. Once the shells are cool, spray one side of the macarons lightly about 7 inches away from the surface. Fill with frosting.

Okinawan Sweet Potato Frosting

Ingredients:
1 ½ lb Okinawan sweet potatoes, roasted (about 3 medium potatoes)
4 oz. (one stick) unsalted butter
¾ – 1 c. powdered sugar

Instructions:

  1. Peel the outer skin of the sweet potatoes and put them the food processor.
  2. Puree the sweet potatoes until very smooth and silky. Set aside.
  3. In a bowl of a standing mixer fitted with the whisk attachment, whip the butter until light and fluffy.
  4. Add in ¾ c. of the powdered sugar and the sweet potato puree and whip until a smooth frosting forms. If not sweet enough, add the remaining ¼ c. powdered sugar and whip until smooth. Fill the macarons.

The Best Mocha Cake

The Best Mocha CakeI rarely ever call anything the “best” because I know there is something out there that’s better. But I’m telling you, this cake is very, very good. Most of the cakes on this website are cakes that I’ve made for my family’s birthday celebrations, and they’ve tasted every single one of them. The good and bad thing about family members is that they are your biggest critics. They’re not too polite to say everything is good when it’s not, and aren’t afraid to tell you that your previous work was better. So when my brother said that it’s one of the best cakes I’ve ever made and requested the same one for this next birthday, I knew it was a winner.
The Best Mocha CakeThis isn’t your average layer cake where you glue rounds of the same flavored cake with some frosting and call it a day. It’s complex and flavorful. With 5 different layers and a jelly glaze, it’s definitely a labor of love. I’m telling you, even I was worn out after putting this cake together, but oh man was it worth it. It’s rich, soft, buttery, light, crunchy and silky at the same time. You can’t mistake the coffee or the chocolate and one doesn’t overpower the other. They’re perfectly balanced.
The Best Mocha CakeFirst, you have a chocolate cookie crust, then a mocha cake: followed by a coffee ganache and then chocolate crunchies with a coffee mousse on top. The whole thing is covered in a coffee mirror glaze that’s very glossy and jelly-like. I’ve never made a mirror glaze before, but I have to say I’m not impressed by the flavor. Please, feel free to peel it off before consuming your cake.
The Best Mocha CakeYou want to make sure to use the very best white chocolate for the coffee ganache. I feel if you use the waxy cheap white chocolate, the balance of the cake will be off. This is the time to pull out the valrhona or the guittard and savor every bite of it.
The Best Mocha CakeThe Best Mocha Cake
Makes one 9-inch cake

*Because there are so many components to this cake, I’ll put the ingredients and the instructions for each layer. I don’t want you to have to keep scrolling up for each ingredient. Note that each layer is layered in the same 9-inch springform pan.

For the Oreo Crust:

Ingredients:
25 Oreo cookies, crushed
5 tbsp. unsalted butter, melted

Instructions:

  1. Preheat the oven to 350˚F.
  2. Spray a 9-inch springform pan with nonstick spray and line the bottom with parchment paper.
  3. Stir the cookie crumbs and melted butter in a bowl.
  4. Press the evenly crumbs into the bottom of the springform pan.
  5. Bake the crust for 8 minutes and cool completely before moving onto the next layer.

For the Mocha Cake:

Ingredients:
½ c. strong coffee, room temp
1 ½ tsp. espresso powder
½ c. whole milk
1 tsp. vanilla extract
1 ⅓ c. all-purpose flour
⅓ c. unsweetened cocoa powder
1 tsp. baking powder
½ tsp. baking soda
¼ tsp. salt
½ c. unsalted butter, room temp
½ c. granulated sugar
⅓ c. light brown sugar

Instructions:

  1. Preheat oven to 350˚F.
  2. In a measuring cup, whisk coffee, espresso powder, milk and vanilla extract together. Set aside.
  3. In a medium bowl, whisk flour, cocoa powder, baking powder, baking soda and salt together. Set aside.
  4. In the bowl of a standing mixer fitted with a paddle, beat the butter and the granulated and light brown sugar together until light and fluffy.
  5. Turn the mixer on low and add in a third of the flour mixture followed by half of the coffee mixture. Repeat with another third of the flour followed by the remaining coffee mixture. End with the last third of the coffee mixture.
  6. Pour about ¾ of the cake batter onto the cookie crust and bake for about 20-25 minutes until the cake is set. Let cool.
  7. *You can bake a few cupcakes with the remaining cake batter to taste test.

For the Coffee Ganache:

Ingredients:
120 ml. heavy cream
180 g. white chocolate
2 tsp. espresso powder
1 tsp. coffee emulsion

Instructions:

  1. In a microwave safe bowl, heat heavy cream and white chocolate for one minute. Whisk mixture together until it becomes homogenous. If the white chocolate did not fully melt, microwave at intervals of 30 seconds until melted.
  2. Add in espresso powder and coffee emulsion and whisk.
  3. Pour onto the mocha cake layer and put cake in fridge to set the ganache. About 30 minutes to an hour.

For the Espresso Chocolate Crunchies:

Ingredients:
10 Oreo cookies
¾ bottle of magic shell
2 tsp. espresso powder

Instructions:

  1. Pulse the oreo cookies in a processor until fine crumbs form.
  2. In a medium bowl, mix ¾ of a bottle of magic shell with the oreo crumbs until thoroughly combined.
  3. Smooth on a layer of crunchies over the chilled coffee ganache.
  4. Evenly sprinkle the 2 tsp of espresso powder over the crunchies.
  5. Chill until the crunchies set, about 15-20 minutes in the freezer or an hour in the refrigerator.

For the Espresso Mousse:

Ingredients:
1 tsp. unflavored gelatin
1 tbsp. water
1 c. heavy cream
2 tbsp. powdered sugar
2 tsp. espresso powder
1 tsp. coffee emulsion

Instructions:

  1. In a small bowl, mix gelatin with water and set aside to hydrate.
  2. Beat the heavy cream until soft peaks form.
  3. Heat the gelatin mixture in the microwave in 10 second increments until melted.
  4. Add in the powdered sugar to the heavy cream and once it is mixed in, add in the gelatin slowly.
  5. Whip until semi-stiff peaks form. Add in the espresso powder and the coffee emulsion.
  6. Whip until stiff peaks form.
  7. Lay a smooth layer of the espresso cream on top of the crunchies using an offset spatula.
  8. If desired, you may use the remaining ¼ of the magic shell from the above recipe and smooth it over on top of the mousse to create a smoother top for the cake.
  9. Chill in the refrigerator until firm, about an hour.

For the Espresso Mirror Glaze:

Ingredients:
1 ¼ c. water, divided
3 tsp. unflavored gelatin
1 ¾ c. granulated sugar
1 tbsp. espresso powder
1 tsp. coffee emulsion
white chocolate (for decoration)
gold leaf/ gold flakes (for decoration)
gold sanding sugar (for decoration)
silver dragees (for decoration)

Instructions:

  1. In a medium bowl, mix ¼ c. water with 3 tsp. gelatin and set aside for 5 minutes.
  2. Add 1 cup of hot water to the gelatin mixture and whisk until gelatin has dissolved.
  3. Add in sugar, espresso powder and coffee emulsion and whisk until smooth.
  4. Once mixture is thickened and cooled, about 20-25 minutes (it should be viscous, I didn’t wait long enough and it wasn’t as thick as I would’ve liked), remove the cake from the refrigerator and unmold from the springpan.
  5. Place cake on top of wire rack with a sheet pan on the bottom.
  6. Pour the gelatin mixture evenly over the cake and let it set. This is a messy move, you will have leftover gelatin all over the bottom of the sheet pan. There is no saving it, just let it go.
  7. While the cake sets, melt about ¼ c. white chocolate in piping bag with a tiny hole cut at the end. Drizzle over one side of the cake in straight lines.
  8. Sprinkle the gold sanding sugar and silver dragees over the same side.
  9. Add the gold leaf.
  10. Chill in fridge until ready to serve.

Oreo crust recipe adapted from Crazy For Crust.
Mocha cake recipe adapted from Brown Eyed Baker.

Grapefruit Pavlova with Grapefruit Mousse

Grapefruit Pavlova with Grapefruit MousseI’m feeling the post-holiday blues. I can’t motivate myself to go to the gym. I don’t want to leave the house and face the cold. Now that I finally put the Christmas tree away, there is a sizeable vacant spot in my apartment. The cats loved to spend time on the tree skirt and when it was gone, they sat on the bare floor with a confused look wondering why their butts were so cold. In my heart, I know that this is just one step towards warmer weather and one month closer to Disney World/Universal. (I’m going in May! I’ve never been! I’m excited to wear the Minnie headband, eat a dole whip, take a photo in front of the castle, have all the butterbeer, and visit Hogwarts.) But that seems forever away. Bah humbug.
Grapefruit MousseThere is something about the bright hues of citruses that lifts the spirits. Are there any types of fruit that are more refreshing? I think it’s ironic that they are at their peak season when the weather is so cold. I crave citrus fruits the most in the summer when the weather is hot and humid. The sharp acidity and mellow sweetness is the perfect answer to beat the weather. But I can’t argue that they’re the juiciest during the winter and I wanted to make the most of it when I saw the recipe for a grapefruit mousse in a magazine.
baked pavlovaGrapefruit MousseThe truth is whipped cream and any type of fruit will guarantee you a win and this recipe doesn’t disappoint. The lightly sweetened whipped cream goes well with the tart juiciness of the grapefruit. I love the contrast of the dark pink against the white.
Grapefruit PavlovaAs for the meringues, I took a cue from use real butter, and boiled down the grapefruit juice until it became syrupy. Then I brushed the syrup onto the baked meringues and let them sit in warm oven until completely dry. This way you get sparks of citrusy tartness with each bite of the sweet meringue. It’s delightful.
Grapefruit Pavlova with Grapefruit MousseLooking back on the pictures makes my heart a little lighter. After all, how can we enjoy the warmth without having braved the cold? (Meh. In hindsight, I still think I could go without the cold, but I definitely appreciate it more after winter.)Grapefruit Mousse

Grapefruit Pavlova with Grapefruit Mousse
Makes about 6-8 mini pavlovas

For the Grapefruit Pavlova:

Ingredients:

300 g. superfine sugar
150 g. egg whites, room temperature
1 pinch cream of tartar
3 large grapefruit
1 tbsp. sugar
grapefruit mousse
mint, for garnish (optional)

Instructions:

  1. Preheat oven to 400˚F and line a rimmed baking sheet with parchment paper.
  2. Spread sugar in an even layer over parchment.
  3. In the bowl of a standing mixer fitted with the whisk attachment, add the egg whites and the cream of tartar.
  4. Place sugar into the oven and bake until the edges of the sugar begins to melt but not brown, about 5 minutes.
  5. Once the sugar begins to melt, turn the mixer onto high.
  6. Remove baking sheet from the oven and the eggs whites should be foamy.
  7. Turn the mixer to medium high and slowly pour the hot sugar from the parchment paper into egg whites.
  8. Once all the sugar is added, turn the mixer onto high and mix until stiff, shiny peaks form.
  9. Reduce oven to lowest setting 140˚F.
  10. Line a baking sheet with parchment paper. With a pencil, draw 4 inch circles on the parchment paper, leaving a 1 inch border on each side. Flip the parchment paper over. The circles will be your guide lines for the meringues.
  11. Fit a medium open star piping tip into a piping bag and pipe little meringue cups starting from the center onto the edge of the circle. Once you get to the edge of the drawn circle, pipe one more layer of meringue on the outer edge, forming a bowl shape.
  12. Once you piped all the meringues, take a spoon and make an indentation in the center of each circle, deepening the bow.
  13. Bake the baking sheet with the 4-inch circles for 1- 1.5 hours until they are crisp and sound hollow when tapped.
  14. While the meringue is baking, peel and section the grapefruit.
  15. Reserve the sectioned grapefruit for the grapefruit mousse.
  16. Squeeze the juice of the remaining grapefruit husk to get approximately 1 cup of grapefruit juice.
  17. In a small pot on medium heat, simmer the grapefruit juice until about ¼ cup of the grapefruit juice remains. Set aside.
  18. Remove the baked meringues from the oven and using a basting brush, brush specks of grapefruit concentrate all over the meringues making sure not to over saturate the meringues (as in, do not paint it too generously or you it will lose its crispness).
  19. Place the meringues back into the oven.
  20. Turn off the oven and let it dry out for about an hour until the grapefruit concentrate is dried onto the meringue.
  21. If you are not yet ready to decorate the meringues, places the meringues into a zip lock bag until ready for use.
  22. If you are ready to fill the meringues, use a medium or large disher to scoop out round mounds of the grapefruit mousse into the meringue cups.
  23. Garnish with the smallest mint leaves if desired.

Grapefruit Mousse

Ingredients:

Sectioned grapefruit reserved from the grapefruit pavlova (above)
3 tbsp. turbinado sugar
1 c. cold heavy cream
1 tbsp. confectioner’s sugar
Instructions:

  1. Line a sheet pan with parchment paper. Line the sectioned grapefruit on the parchment paper in rows.
  2. Take a paper towel and dab the grapefruit to get rid of excess juices.
  3. Sprinkle turbinado sugar on the grapefruit.
  4. Take a kitchen torch and caramelize the sugar on each grapefruit section. (Alternatively, you can broil the grapefruit for 5 minutes in the oven.)
  5. Whip the heavy cream and sugar together until you reach firm peaks.
  6. Fold in the caramelized grapefruit.

Grapefruit meringue recipe adapted from Use Real Butter.
Grapefruit mousse recipe adapted from The Family Circle.

Cranberry White Chocolate Fudge Cookies

Cranberry White Chocolate Fudge CookiesIt seems like Friendsgiving is kind of a big deal this year, which makes me kind of wish I thought of hosting one. I used to have a Thanksgiving potluck with my church members after Thanksgiving and it was always such a great time. And giving thanks for what we have…twice? It makes you appreciate it even more. Even if you aren’t going to a Friendsgiving, holiday potlucks/parties are just around the corner and these cookies fit the bill.
Cranberry White Chocolate Fudge CookiesI know these cookies aren’t much in terms of looks. But I’m telling you, every single time I’ve made these cookies (for home or for other people to bring to potlucks) they always get a hit review. Super fudgy with a crisp edge and the sweetness is toned down by the tart dried cranberries, which makes it a perfect holiday cookie. Oh, and you can make it in one bowl for easy clean up.
Cranberry White Chocolate Fudge CookiesCan’t believe Thanksgiving is in a few days! Uh… I still haven’t done my shopping yet (except for my two 12 pound turkeys). I’ll probably do the rest today. Wish me luck!

Cranberry White Chocolate Fudge Cookies

Makes about 24 large cookies

Ingredients:
8 oz. (two sticks) butter, room temperature
1 c. sugar
1 c. brown sugar
2 egg, room temperature
2 tsp. vanilla extract
⅓ c. Dutch-processed cocoa powder
⅓ c. natural unsweetened cocoa powder
2 c. all-purpose flour
1 tsp. baking soda
1 tsp. kosher salt
1 c. white chocolate chips (or chunks)
1 ½ c. dried cranberries

Instructions:

  1. In the bowl of a stand mixer fitted with the paddle attachment, beat butter, sugar and brown sugar until lighter in color and fluffy.
  2. Add eggs and vanilla on medium speed and mix until glossy.
  3. Add cocoa and mix until homogeneous.
  4. Change the speed to low and add the flour, baking soda, and salt. Mix until just combined.
  5. Fold in white chocolate and cranberries.
  6. Preheat oven to 350˚F and line two large cookie sheets with parchment paper.
  7. Dose 1 tablespoon of cookie dough onto parchment paper. Spacing each ball 2 inches from each other.
  8. Bake about 9 minutes, until the edges just set. (Rotating the baking sheet halfway if your oven heats unevenly.)
  9. Let cool and enjoy.

Strawberry Ombré Cake

Strawberry Ombré Cake The first day of spring came with snow in Jersey this week. I feel like I should be surprised, but I’m really not. The weather has been pretty off-kilter this year. Remember when it was 60 degrees during Christmas? This cake reminds me of springtime with its bold strawberries and fresh mint leaves. Decorated with tiny white fondant and frosting flowers and a few pink pearls, it is feminine and floral too.
Strawberry Mint Cake The secret to amazing strawberry frosting is to use fresh strawberries and cook it down until it becomes thickened. It is similar to making jam, except you are boiling down just strawberries, a squeeze of lemon and a splash of water. Add this mixture to your standard frosting, and you’ll have the freshest, strawberry-est tasting frosting ever.
Strawberry Ombré Cake When I make a strawberry layer cake, I tend to add a layer of fresh strawberries to up the fruit flavor. You just need to remember to slice your strawberries thinly to keep the cake layers intact. If you don’t, it might compromise the structural integrity of the cake and the layers might slide off of one another.

Strawberry Ombré Cake
Makes one 6-inch cake

You will need:

1 batch of vanilla buttermilk cake (recipe below)
1 batch of strawberry frosting (recipe below)
½ pint fresh strawberries, divided (7 small strawberries left whole, the rest sliced thinly)
1 batch swiss meringue buttercream (recipe below)
pink gel food coloring
fresh mint leaves
pink edible pearls
white mini fondant flowers

Instructions:

  1. Frost the top of one layer of vanilla cake with strawberry frosting.
  2. Put one layer of sliced strawberries on top of the strawberry frosting.
  3. Repeat with the remaining layers of vanilla cake.
  4. Use the remaining strawberry frosting to crumb coat the entire cake.
  5. Let cake set in freezer for 5-10 minutes. Until the crumb coat is set.
  6. Reserve three tablespoons of swiss meringue buttercream in a bow.
  7. Evenly divide the rest of swiss meringue buttercream into 4 bowls.
  8. Leave one batch white and color the other 3 batches in different shades of pink.
  9. Fill an icing bag fitted with a very large round tip with the white swiss meringue buttercream.
  10. Remove the cake from the freezer.
  11. Ice the cake from the top with the white swiss meringue buttercream, moving slowly down.
  12. Once the white frosting runs out, add the light pink swiss meringue buttercream to the same bag and continue moving downwards.
  13. Once the light pink frosting runs out, add the darker pink swiss meringue buttercream to the same bag and continue frost down the cake until you get to the bottom of the cake. (The cake will look bulky and messy. This is normal.)
  14. Using a flat spatula, start going around the cake and smoothing out the sides.
  15. As you move around the cake and start removing frosting, an ombré pattern will appear.
  16. Once the cake is relatively smooth, take a small offset spatula and using a light pressure, start moving the offset spatula in a circular pattern around the cake to create soft ridges.
  17. Top the cake with the whole strawberries with the leaves removed. Do not cut the strawberries. They will release their juices if they are cut.
  18. Fill a piping bag fitted with a small closed star tip with the reserved 3 tablespoons of buttercream frosting.
  19. Fill any gaps between the strawberries with the frosting.
  20. Take the mint leaves and arrange it around the strawberries as desired.
  21. Make tiny buttercream flowers with the closed star tip by squeezing the bag and releasing it in one spot. Place one pear at the center of these flowers.
  22. Fill the rest of the gaps with tiny white fondant flowers.

Vanilla Buttermilk Cake

Ingredients:

2 c. cake flour
1⅓ c. sugar
¾ tbsp. baking powder
¼ tsp. salt
¾ c. buttermilk, divided
6 oz. unsalted butter, room temperature
3 eggs, room temperature
1 ½ egg yolks
1 ½ tsp. vanilla extract

Instructions:

  1. Preheat the oven to 350˚F and line four 6-inch cake pans with parchment paper.
  2. In a bowl of a standing mixer with the paddle attachment, add flour, sugar, baking powder, and salt. Mix until combined.
  3. On low speed, add ½ c. buttermilk and butter and mix until combined.
  4. In a separate bowl, whisk eggs, egg yolks, ¼ c. buttermilk, and vanilla extract until homogeneous.
  5. On low speed, slowly add the egg mixture to the flour mixture.
  6. Increase speed to medium, and mix until combined.
  7. Evenly divide cake batter into the four cake pans.
  8. Bake about 20-25 minutes until cake is done or until a toothpick inserted into the center comes out clean.
  9. Let cool in pan for 10 minutes, and then move onto a cooling rack until completely cool.

Strawberry Frosting (for the filling)

Ingredients:
1 c. whole milk
¼ c. flour
¼ tsp. salt
8 oz. (2 sticks) unsalted butter, room temperature
1 c. sugar
strawberry puree (recipe below)

Instructions:

  1. In a saucier pan, put milk, salt and flour and whisk until combined on medium heat.
  2. Continuously whisk mixture until thickened to a pudding like consistency.
  3. Once thickened, strain through a mesh strainer into a bowl with a spatula to remove lumps.
  4. Place a piece of plastic wrap on top of the flour mixture and put into the fridge until fully cool.
  5. In a mixer bowl fitted with the whisk attachment, mix the sugar and butter on high speed until fluffy and pale about, 5-10 minutes.
  6. Add the chilled flour mixture and continue to whip on high speed until the sugar is completely dissolved and the mixture is no longer gritty, about 5-10 minutes.
  7. Add ¾ of the strawberry puree and mix until combined. Taste and see if it needs the rest.
  8. If it needs more strawberry flavor, add in the rest of the strawberry puree and mix until combined.

Strawberry Puree

Ingredients:
¾ pint of strawberries, hulled and cut in halves
2-3 tsp. lemon juice, freshly squeezed
1 tbsp. water

Instructions:

  1. In a small pot, cook strawberries, lemon juice and water on medium heat.
  2. Use a potato smasher to smash the strawberries while cooking to get an even consistency.
  3. Cook strawberries for 5-10 minutes until thickened.
  4. Once thickened, put in a bowl to cool and refrigerate.

Swiss Meringue Buttercream (for the outside)

Ingredients:

1 c. sugar
4 large egg whites
3 sticks unsalted butter
1 tsp. vanilla extract

Instructions:

  1. Simmer an inch of water in a medium pot.
  2. In the bowl of a standing mixer, whisk egg whites and sugar together.
  3. Place the bowl over the pot of simmering water and whisk the egg white and sugar mixture continuously until the mixture becomes lighter and no longer grainy.
  4. Remove the bowl from the pot and transfer the bowl into the mixer fitted with a whisk attachment.
  5. Mix on high until mixture becomes white and fluffy, and cool (check for this by seeing if the outside of the bowl is cool to the touch).
  6. Add in vanilla extract and butter one stick at a time until a silky smooth frosting forms.


Lucky Charms Cake

lucky charms cakeI’m pretty sure everyone is already saying this, but how is it already March? I’m definitely not complaining since I absolutely adore warm weather and I’m dying to be able to wear dresses without tights. As spring quickly approaches, the next holiday around the corner would be St. Patrick’s Day. Even closer is National Cereal Day, which is on March 7th. So I figured that I might as well tie up both and make this cake.
DSC_0584I’ve been thinking of something similar to this when I bought a bag full of “Lucky Charms” marshmallows. I say it in quotes because while it tastes very similar to the marshmallows in the cereal, the shapes of these marshmallows are less detailed and smaller. (I’m thinking it’s a copyright issue.) Either way, I wasn’t about to pick out each marshmallow from a box of Lucky Charms cereal, so I used this to decorate the outside of the cake. What is really funny is, that over time, the marshmallows will rehydrate from the frosting giving it a similar flavor and texture to a dehydrated marshmallow that was sitting in a pool of milk. They become darker in color and squishy and so this cake is best eaten the day it is baked.
DSC_0504The inside of the cake is frosted with cereal milk frosting, (like the one I posted in my cereal macaron post) but instead of Frosted Flakes, I used Lucky Charms cereal. The cereal milk turns a pale green and I think it’s perfect for the theme. The cake itself is funfetti since I was going along with the rainbow color scheme.
DSC_0526My absolute favorite part of the cake is the Lucky Charms bark I made from the marshmallows, different colors of candy melts and chock full of every kind of decorative sprinkle. You start off with a melted slab of white candy melt and swirl different colors of melted candy melts using a toothpick and then swipe along the top with an offset spatula. It blends beautifully and makes a watercolored candy bark. Then you pretty much go ham with however you want to top it. I think it’s important to restrain yourself when you do this so that you can still see the colors of the bark.
DSC_0578I had some confetti macaron shells leftover from a baking order, so I stuck some marshmallow pieces on top of it and decorated the cake, but really, I don’t think it’s worth baking a whole batch of macarons for this. If you have it, great and if it not, it still looks beautiful without it. I should warn you that this is a very sweet cake. I suppose it shouldn’t come as a surprise given the funfetti inside and the marshmallows and candy outside. But it’s so stunning, I think it’s worth the sugar overload.

Lucky Charms Cake

Funfetti Buttermilk Cake (recipe below)
Lucky Charms Cereal Milk Frosting (recipe below)
Vanilla Swiss Meringue Buttercream (recipe below)
Lucky Charms Marshmallows
Lucky Charms Bark (recipe below)
Funfetti Macarons (optional, recipe in this post)

Instructions:

  1. Evenly fill and stack each layer of funfetti cake with cereal milk frosting.
  2. Crumb coat the cake with a thin layer of the remaining cereal milk frosting
  3. Place cake in freezer for 5 minutes until the frosting on the outside sets firmly.
  4. Once crumb coat is set, frost the entire cake with swiss meringue buttercream.
  5. Take a handful of marshmallows and slowly cup the outside of the cake, patting it to ensure full coverage.
  6. Let the outside set in freezer for 5 minutes.
  7. Take cake out and top the cake with shards of Lucky Charms bark and macarons if desired.

Funfetti Buttermilk Cake

Ingredients:

2 c. cake flour
1⅓ c. sugar
¾ tbsp. baking powder
¼ tsp. salt
¾ c. buttermilk, divided
6 oz. unsalted butter, room temperature
3 eggs, room temperature
1 ½ egg yolks
1 ½ tsp. vanilla extract
¾ c. rainbow sprinkles

Instructions:

  1. Preheat the oven to 350˚F and line four 6-inch cake pans with parchment paper.
  2. In a bowl of a standing mixer with the paddle attachment, add flour, sugar, baking powder, and salt. Mix until combined.
  3. On low speed, add ½ c. buttermilk and butter and mix until combined.
  4. In a separate bowl, whisk eggs, egg yolks, ¼ c. buttermilk, and vanilla extract until homogeneous.
  5. On low speed, slowly add the egg mixture to the flour mixture.
  6. Increase speed to medium, and mix until combined.
  7. Fold in sprinkles into the batter.
  8. Evenly divide cake batter into the four cake pans.
  9. Bake about 20-25 minutes until cake is done or until a toothpick inserted into the center comes out clean.
  10. Let cool in pan for 10 minutes, and then move onto a cooling rack until completely cool.

Lucky Charms Cereal Milk Frosting (for the filling)

Ingredients:

1½ c. cereal milk (recipe below)
1/4 c. flour
½ tsp. kosher salt
8 oz. (2 sticks) unsalted butter, room temperature
¾ c. sugar
½ tsp. vanilla extract

Instructions:

  1. In a small pot over medium heat, whisk milk, salt and flour until combined.
  2. Continuously whisk mixture until thickened to a pudding like consistency.
  3. Once thickened, strain through a mesh strainer into a bowl with a spatula to remove lumps.
  4. Place a piece of plastic wrap on top of the flour mixture (to prevent skin from forming) and put bowl into the fridge until fully cool.
  5. In a mixer bowl fitted with the whisk attachment, mix the sugar and butter on high speed until fluffy and pale about, 5-10 minutes.
  6. Add the chilled flour mixture and continue to whip on high speed until the sugar is completely dissolved and the mixture is no longer gritty, about 5-10 minutes.
  7. Add the vanilla extract and mix until combined.

Cereal Milk

Ingredients:

3 ½ c. Lucky Charms cereal
4 c. whole milk, cold

Instructions:

  1. In a large bowl, mix cereal and milk and steep for 30 minutes, until cereal is soggy.
  2. Strain mixture through a fine mesh strainer. (Do not force mixture through mesh strainer. The resulting milk will be starchy and thicker than what you started with.)

Vanilla Meringue Buttercream (for the outside)

Ingredients:

1 c. sugar
4 large egg whites
3 sticks unsalted butter
1 tsp. vanilla extract

Instructions:

  1. Simmer an inch of water in a medium pot.
  2. In the bowl of a standing mixer, whisk egg whites and sugar together.
  3. Place the bowl over the pot of simmering water and whisk the egg white and sugar mixture continuously until the mixture becomes lighter and no longer grainy.
  4. Remove the bowl from the pot and transfer the bowl into the mixer fitted with a whisk attachment.
  5. Mix on high until mixture becomes white and fluffy, and cool (check for this by seeing if the outside of the bowl is cool to the touch).
  6. Add in vanilla extract and butter one stick at a time until a silky smooth frosting forms.

Lucky Charms Bark

Ingredients:

white candy melts
yellow candy melts
orange candy melts
sky blue candy melts
pink candy melts
purple candy melts
Lucky Charms cereal marshmallows
any type of sprinkles you would like to use

Instructions:

*Note: You want to move fast before the candy melts set. Try to have all of the sprinkles, marshmallows, and candy melts out and on hand before you start this recipe.

  1. Line a sheet pan with wax paper.
  2. Melt white candy melts in a bowl and spread thinly in a rectangular shape onto the wax paper.
  3. On a separate plate, melt about 3-4 disks of each color of the candy melt separately,
  4. Using a toothpick, make swirls of different colors all over the slab of white candy melt.
  5. Using an offset spatula, smooth the top of the bark in one fluid horizontal stroke.
  6. Place the marshmallows and sprinkles before the candy bark sets.
  7. Before the candy bark sets completely, (when it is similar to very soft chocolate) take a sharp knife and score shards of candy bark by making triangular shapes into the candy melt.
  8. When the candy bark sets, break along the lines you made with your knife.

Weekday Update

pink swirl cakeIt’s been a quiet few weeks on the busy spatula. Mostly, I’ve been busy filling cake orders and baking here and there. Not enough photos to write an actual blog about, but just enough for a glimpse of what’s been going on. (If you follow me on Instagram, you probably saw some of these already.)

Pink and Gold Swirl Cake – It’s such a whimsical cake, I couldn’t help taking close up photos of this one. Swirled with pastel pink and white frosting then filled to the brim with pearls, gold stars, and dragees. It was four layers of chocolate cake filled with toffee coffee frosting.

DSC_0487DSC_0428DSC_0475DSC_0477

Baymax Macarons – I wanted to post these for Valentine’s Day, but I never had the time. Place a few red heart sprinkles on each macaron and draw in two circles and connect with a line with a black edible color marker. I filled the inside with some leftover strawberry frosting. So simple and very cute.

baymax macarons baymax macarons

Pink Ombre Ranunculus Cake – The inside of this cake was layered with layers of pink ombre cake. Filled with fresh strawberry frosting and topped with fresh ranunclus, it was so pretty. I originally wanted peonies, but the florist didn’t have any that were in bloom. Did you know that you had to order peonies in advance? I never knew.

pink ombre flower cakeranunculus flowers on cake

Red Velvet Rose Pavlova

Red Velvet Rose PavlovaAs much as I love flowers, I’ve learned over the years that I have a black thumb. No matter how hard I try or how “low-maintenance” the plant is, I manage to kill it. I’ve even killed a cactus. Don’t ask me how I did it. But one day it started to shrivel up and before I knew it, it was dead.  These days, I run away from plants like the plague. The cute DIY terrariums that everyone talks about? Nope. Growing my own herbs? No way. So instead of growing my own plants, I prefer already cut plants because (not to sound morbid) they’re already dying. It gives me a little less stress.
Red Velvet Rose Pavlova 2In the food world, I think Valentine’s Day can be renamed as Red Velvet Everything Day. Is it just me or when February rolls around, everything is red velvet flavored? They come in forms of cake, brownies, whoopie pies, cupcakes and cookies. It is not their fault. There aren’t that many red cakes out there and that deep red hue is kind of perfect for the season.
Red Velvet Rose PavlovaRed Velvet Rose Pavlova Instead of doing the usual red velvet cake, I decided to make a red velvet pavlova. I dyed the layers of pavolva red (or as red as I could get them) and flavored them with a hint of cocoa. Then I made a cream cheese whipped cream (because how would you have anything red velvet without cream cheese) and flavored it with some rose water for a floral note. I finally decorated it with some tiny rose meringues and actual tiny roses. If you are using fresh flowers, make sure they’re pesticide-free and if you want to eat them, make sure they’re edible.
Red Velvet Rose Pavlova
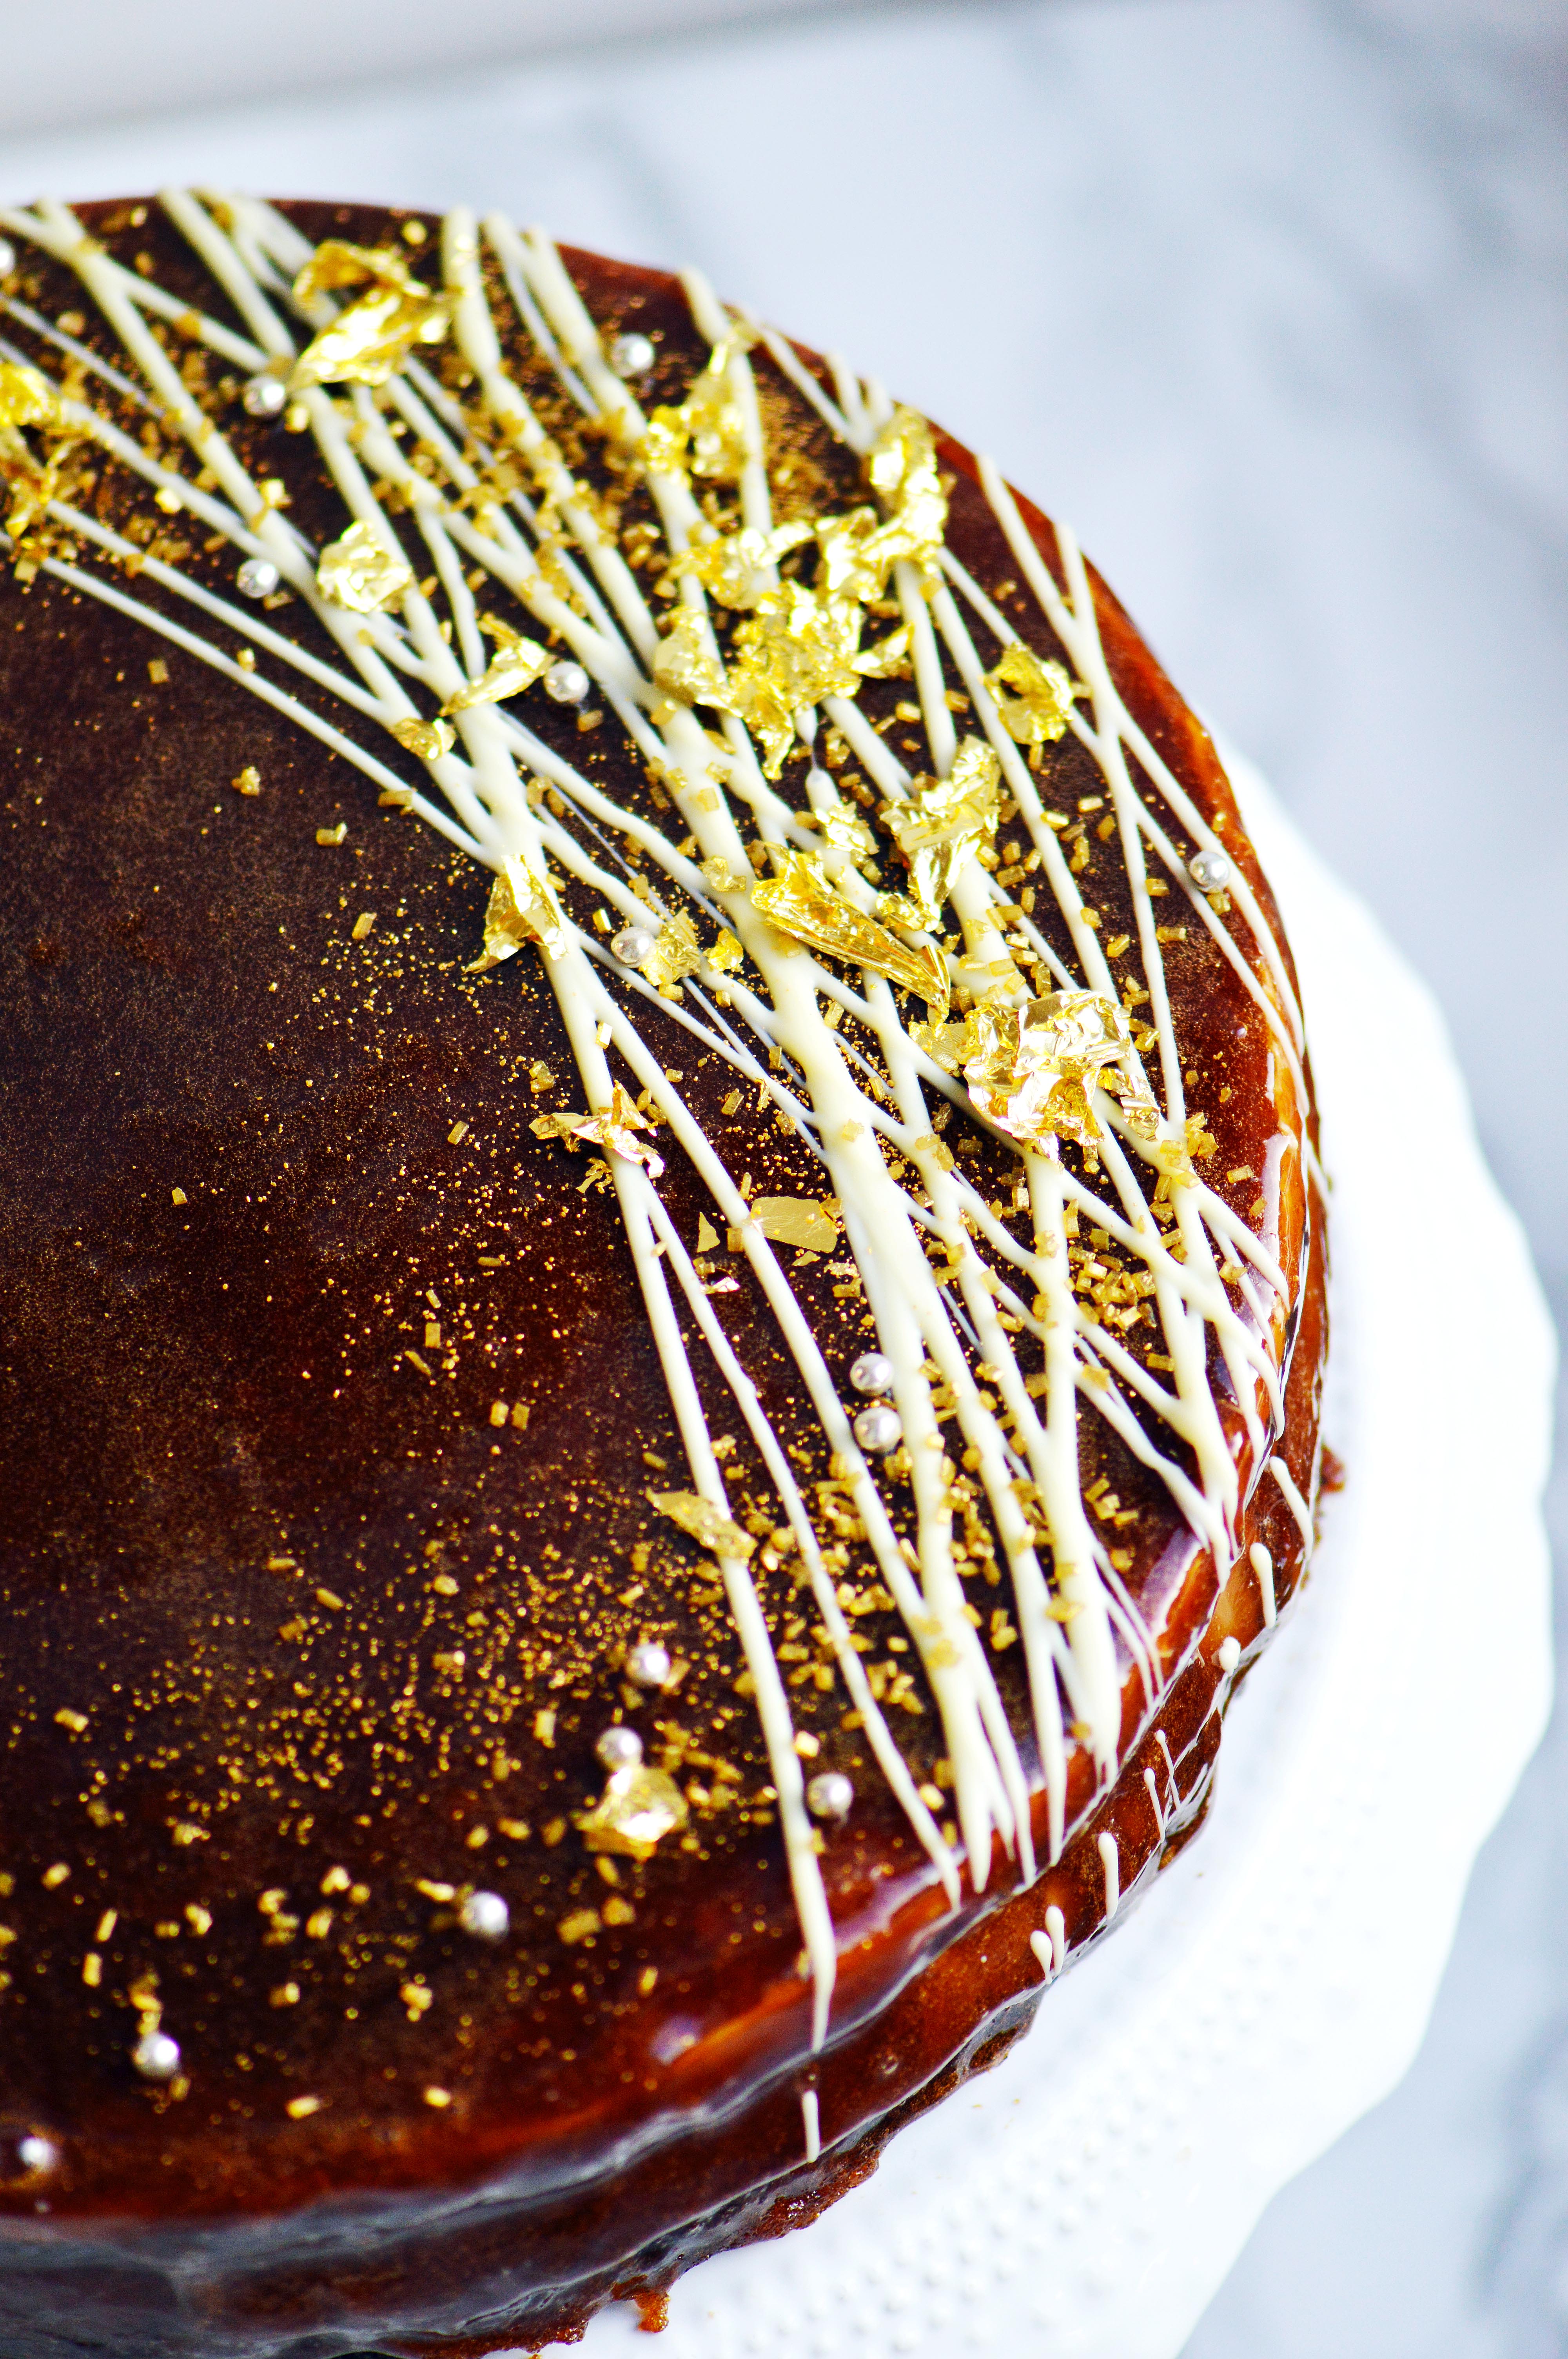
This may be the most romantic cake I’ve made. (Followed closely by this one.)

Red Velvet Rose Pavlova
Makes one 4-layered mini cake

Ingredients
300 g. superfine sugar
150 g. egg whites, room temperature
1 pinch cream of tartar
2 tbsp. cocoa powder
red gel food color
1 batch of cream cheese rose whipped cream (recipe below)
mini red roses, organic pesticide-free (for decoration)

Instructions:

  1. Preheat oven to 400˚F and line a rimmed baking sheet with parchment paper.
  2. Spread sugar in an even layer over parchment.
  3. In the bowl of a standing mixer fitted with the whisk attachment, add the egg whites and the cream of tartar.
  4. Place sugar into the oven and bake until the edges of the sugar begins to melt but not brown, about 5 minutes.
  5. Once the sugar begins to melt, turn the mixer onto high.
  6. Remove baking sheet from the oven and the eggs whites should be foamy.
  7. Turn the mixer to medium high and slowly pour the hot sugar from the parchment paper into egg whites.
  8. Once all the sugar is added, turn the mixer onto high and mix until stiff, shiny peaks form.
  9. Reserve ¼ c. of white meringue batter in a different bowl.
  10. Add cocoa powder and red gel food color to the rest of the batter and mix until desired color is reached.
  11. Reserve ¼ c. of red meringue batter in a separate bowl.
  12. Reduce oven to lowest setting 140˚F.
  13. Line two baking sheets with parchment paper.
  14. On one baking sheet, spoon 4 five-inch circles of the red meringue.
  15. Fit a medium closed star piping tip into a piping bag and add ¼ c. each of reserved white and red meringue batter.
  16. On the second baking sheet, form small roses by making small circles with the piping tip.
  17. Bake the baking sheet with the five-inch circles for 1- 2 hours until they are crisp and hollow.
  18. Bake the baking sheet with the mini roses for 30 minutes to 1 hour until they are crisp and hollow.
  19. Turn off oven and let it dry out for about 30 minutes to an hour.
  20. When meringues are completely cool and dry, alternate a layer of the meringue with the layer of the whipped cream.
  21. Decorate the top with the mini meringue roses and mini roses.

Cream Cheese Rose Whipped Cream

Ingredients:

1 ½ c. heavy whipping cream, cold
4 oz. cream cheese, room temperature
½ c. powdered sugar
½ – 1 tsp. rose water (be careful with the rose water, too much of it will make the frosting taste like soap)

Instructions:

  1. In a bowl of a standing mixer fitted with the whisk attachment, whip the heavy cream until stiff peaks form.
  2. Set aside the whipped cream mixture into a different bowl.
  3. In the same bowl, add the cream cheese and powdered sugar and mix until light, fluffy and fully incorporated.
  4. Fold the whipped cream into the cream cheese mixture.
  5. Add ½ tsp. rose water and taste. If you feel like it needs more, add ¼ tsp. at a time until desired flavor is reached.

Tiramisu Cinnamon Rolls

Tiramisu Cinnamon RollsIf I bottled the scent that came out of the oven while this baked, I would be a millionaire. It smells as if your house was smack dab in the middle of a Starbucks and a Cinnabon store. Er.. kind of like a mall. (I suppose living in the mall would be a nightmare for some people.) Everyone knows the best part about going to the mall is passing by a Cinnabon or a Weltzel’s Pretzels store. I’m always battling my inner fat kid every time I walk by.
Cinnamon RollsFilled with a cinnamon-coffee sugar, topped with a whipped mascarpone frosting and dusted with a generous dose of cocoa powder, it highlights the best parts of both worlds. I would suggest taking the buns out of the pan about 5-10 minutes after it comes out of the oven. The coffee cinnamon sugar creates a caramel when it bakes, and if you let it cool completely in the pan, it will become a type of glue which makes it nearly impossible to get clean cuts out of the pan. Also, don’t be like me and roll the dough out too thinly, I originally wanted just 8 cinnamon rolls, but I had to slice the dough more because it was too tall for the pan. Boo.

Tiramisu Cinnamon RollsCinnamon rolls are definitely not an on-the-whim kind of treat. But if you do decide to make it, I can imagine it being part of an awesome Christmas morning breakfast.
DSC_0579

Tiramisu Cinnamon Rolls

Ingredients:

For the Cinnamon Rolls:
1 ½ teaspoon active dry yeast
½ c. water, warm (110-120°F)
¼ cup granulated sugar, divided
2 tbsp buttermilk
1 large egg
3 tbsp unsalted butter, melted
3 c. all-purpose flour
1 tsp. kosher salt

For the Filling:
¼ c. unsalted butter, softened
¾ c. light brown sugar, packed
1 tbsp. ground cinnamon
2 tsp. cornstarch
1 ½ tbsp. coffee emulsion
For the Frosting:
8 oz. mascarpone cheese, room temp
2 tbsp. butter, room temp
⅓ c. powdered sugar
2 tbsp. heavy cream
cocoa powder, for dusting on top

Instructions:

  1. In a microwave safe cup, warm ½ c. water until 110°F-120°F or lukewarm. Stir in 1 tablespoon of granulated sugar until dissolved. Stir in dry yeast and let stand until foamy (about 5 minutes).
  2. While the yeast is proofing, mix flour, buttermilk, 3 tbsp. sugar, egg, salt, and the melted butter into a bowl of a stand mixer.
  3. Add the water mixture into the flour mixture and stir until a loose dough forms.
  4. Let stand for 8 minutes to hydrate flour.
  5. With the dough hook attachment, knead the dough on speed 2 for about 8 minutes until dough is pliable and stretchy.
  6. Move dough to an oiled bowl and cover the bowl and let the dough rise until double its size, about 1 to 2 hours.
  7. In a separate bowl, combine sugar, cinnamon, corn starch, butter, and coffee emulsion until combined. Set aside.
  8. On a lightly floured surface, roll out the dough to a 9” x 12” rectangle. Spread the cinnamon sugar mixture evenly, except 1” along the bottom of the dough.
  9. Roll the dough tightly, using the uncovered border to seal the roll.
  10. Cut the roll into 8 even rolls.
  11. Grease a 9×13 inch pan, and evenly space out the rolls. Cover with plastic wrap and let rise for 1 – 1 ½ hours until rolls have doubled in size.
  12. Preheat the oven to 350˚F.
  13. Bake for about 20 minutes until rolls are golden brown.
  14. Let cool for about 5-10 minutes before turning out the rolls onto parchment paper or a nonstick surface.
  15. While the rolls cool. Make the mascarpone frosting.
  16. Using a handheld mixer, whip butter and powdered sugar in a medium bowl.
  17. Add mascarpone cheese and heavy cream and mix until light and fluffy. Do not overwhip.
  18. Spread frosting over cooled rolls and dust the top generously with cocoa powder using a fine meshed sieve.

Cinnamon roll recipe adapted from The Slow Roasted Italian.