This Lent season I gave up online shopping. I used to think that online shopping was for people who were too lazy to go to the mall and try on clothing, but as I’ve gotten older I’ve seen the light. With a click of a button, you can see what is available to you in your size instead of rifling through all the different sizes in the stores. What I really like is that the clothes come looking pristine and new (even though I’m pretty sure someone else has tried it on before me). You know what I mean though right? You go through piles of clothing in a store trying to find that perfect dress on sale and when you find it, it has a lipstick or deodorant mark on it and sometimes, a strange stain that may or may not come out in the wash. Don’t get me wrong, I still love the mall and I believe that retail therapy is sometimes best done in stores. It’s just that now I’m in love with two forms of shopping.
 What I’ve learned is that online shopping is really hard to avoid. It follows you through email, social media, and even through paper catalogs. I’ve become so used to the thrill of finding a “good” deal that many times I perused through websites just to see what was available without the intention of buying anything. And then when I found something really great, it was very hard for me to not purchase it. Like an alcoholic that goes into a liquor store just to see what is available, I was just torturing myself for no reason.
 Why even go through it if it was so difficult? Because it gave me time to reflect on my lifestyle, and on my faith. At the times where I caught myself window shopping (online), I would close the window and spend some time in prayer and meditation. I’ve come to appreciate the things I already have in my life and realize the abundance of needs that are already met despite the lack of the perfect lace up suede flats. I am so thankful and am writing this with an overwhelmingly grateful heart.

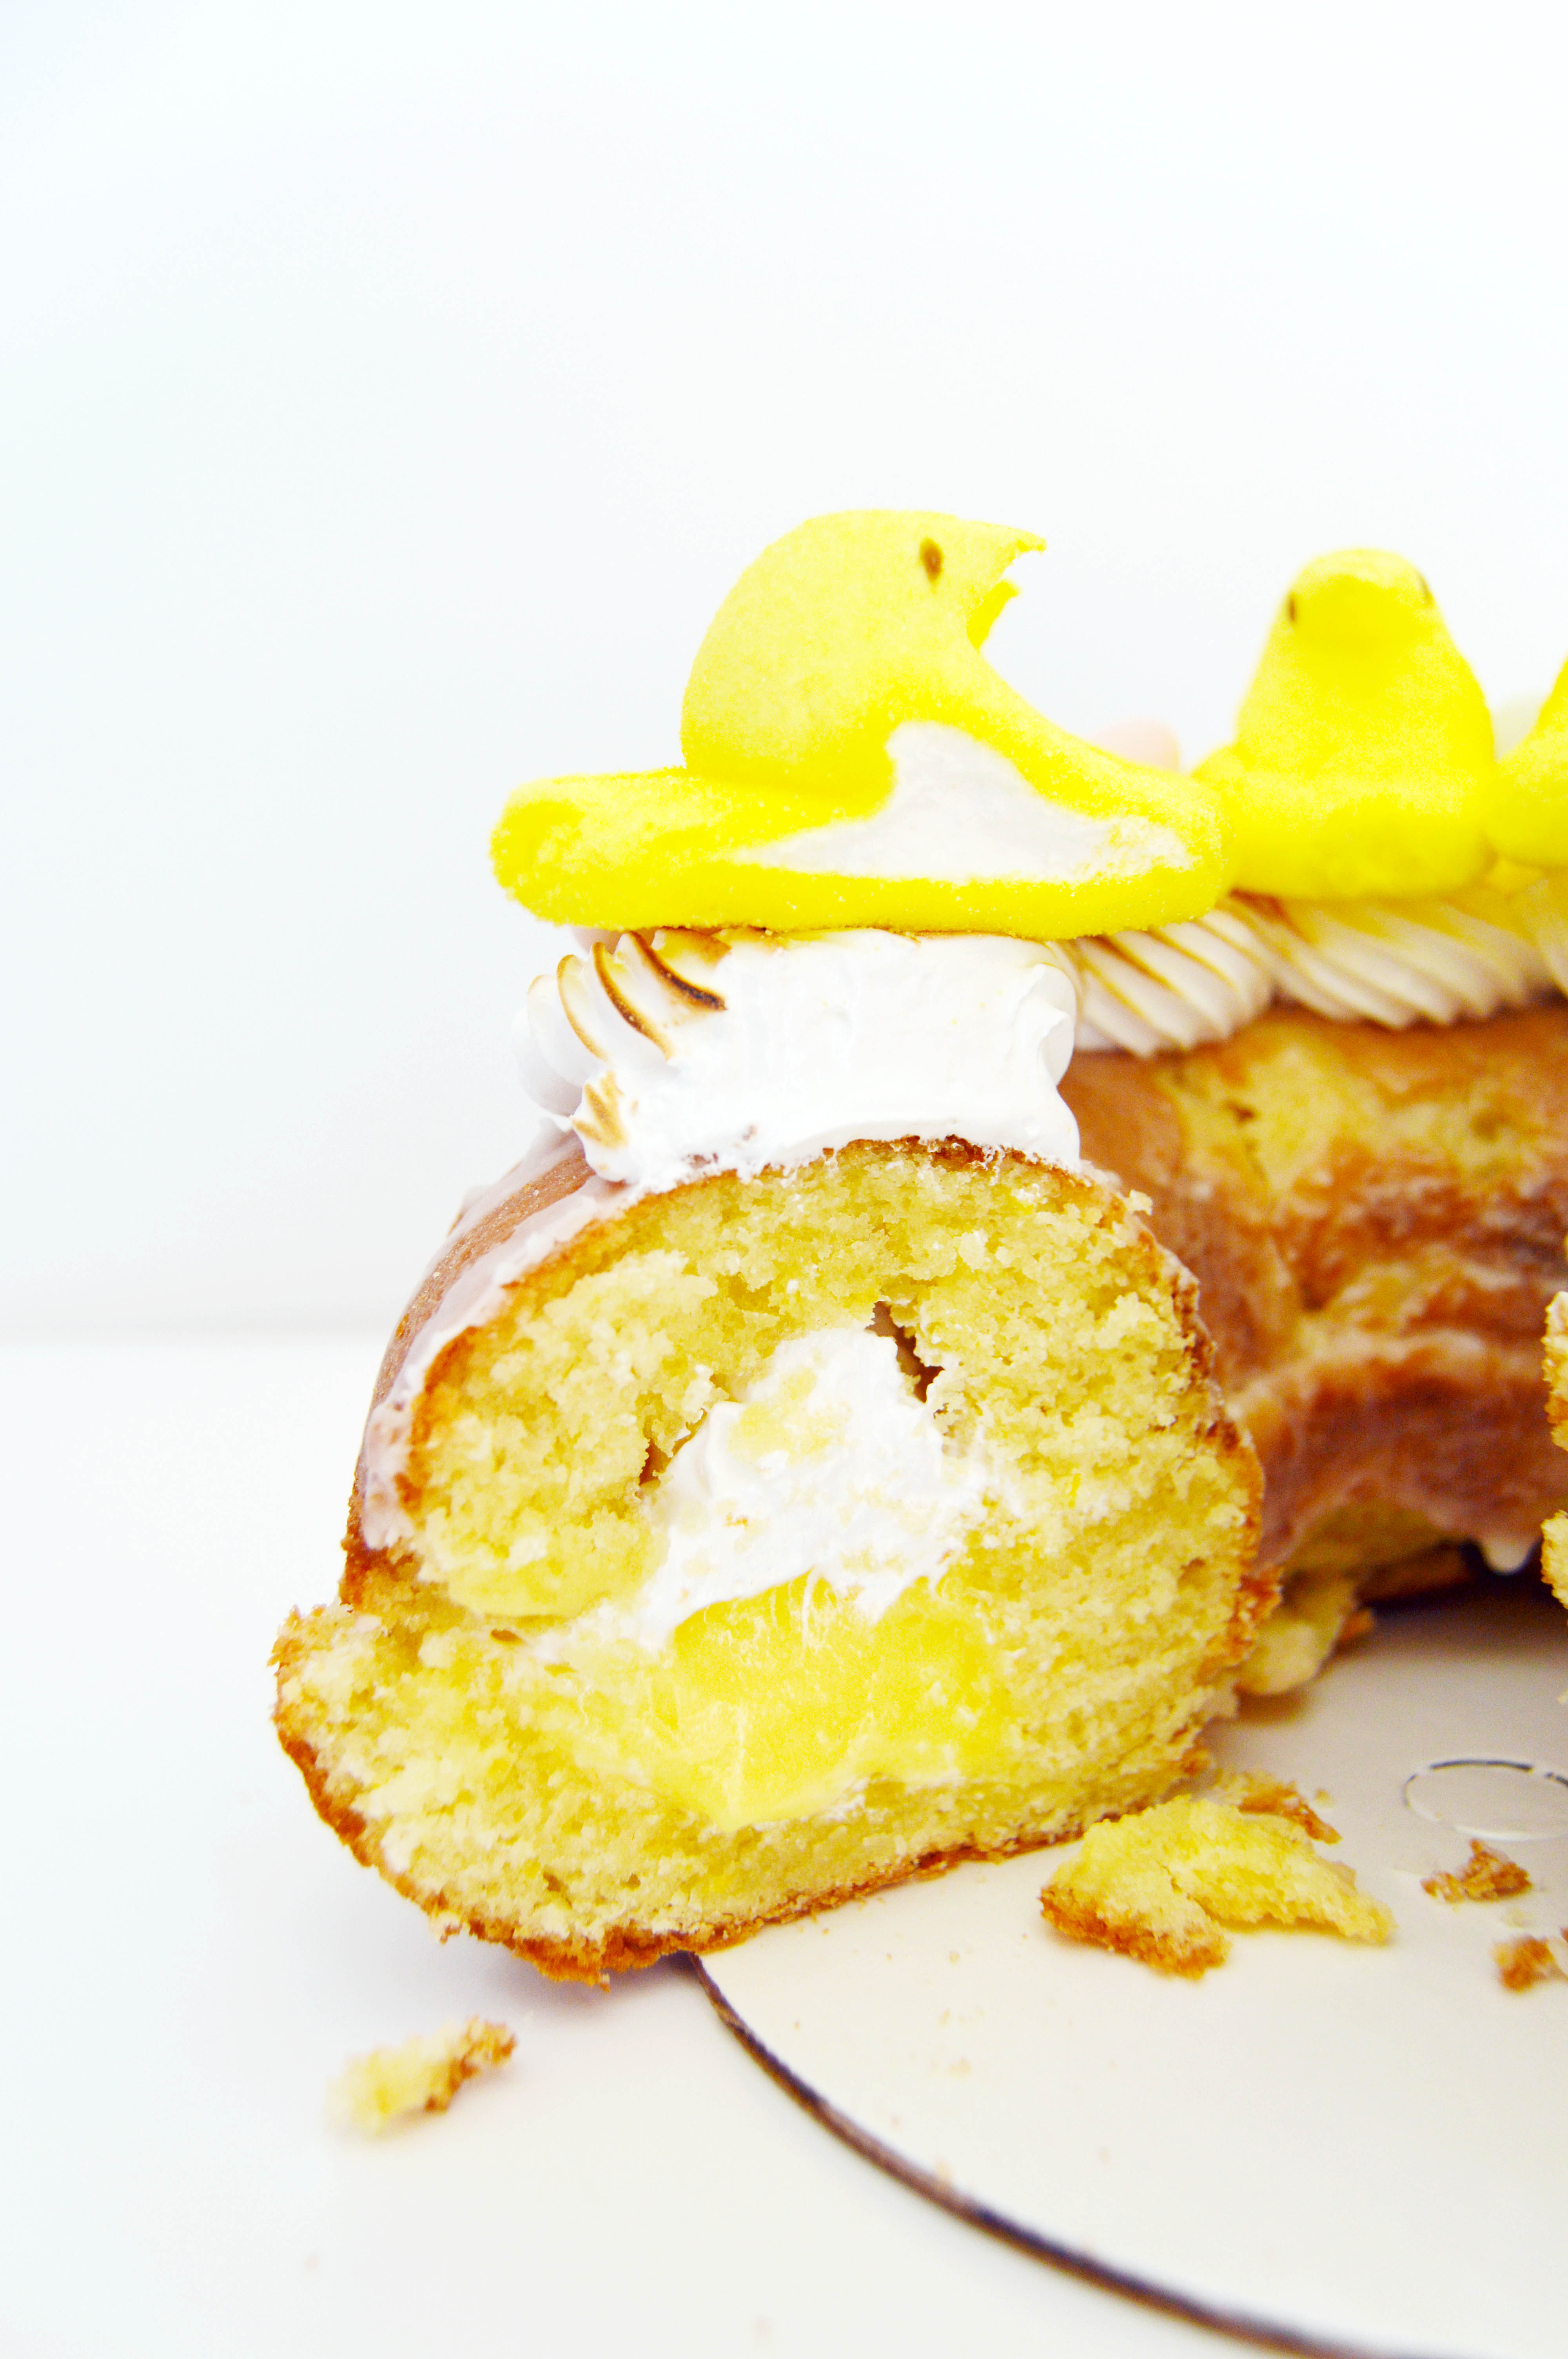
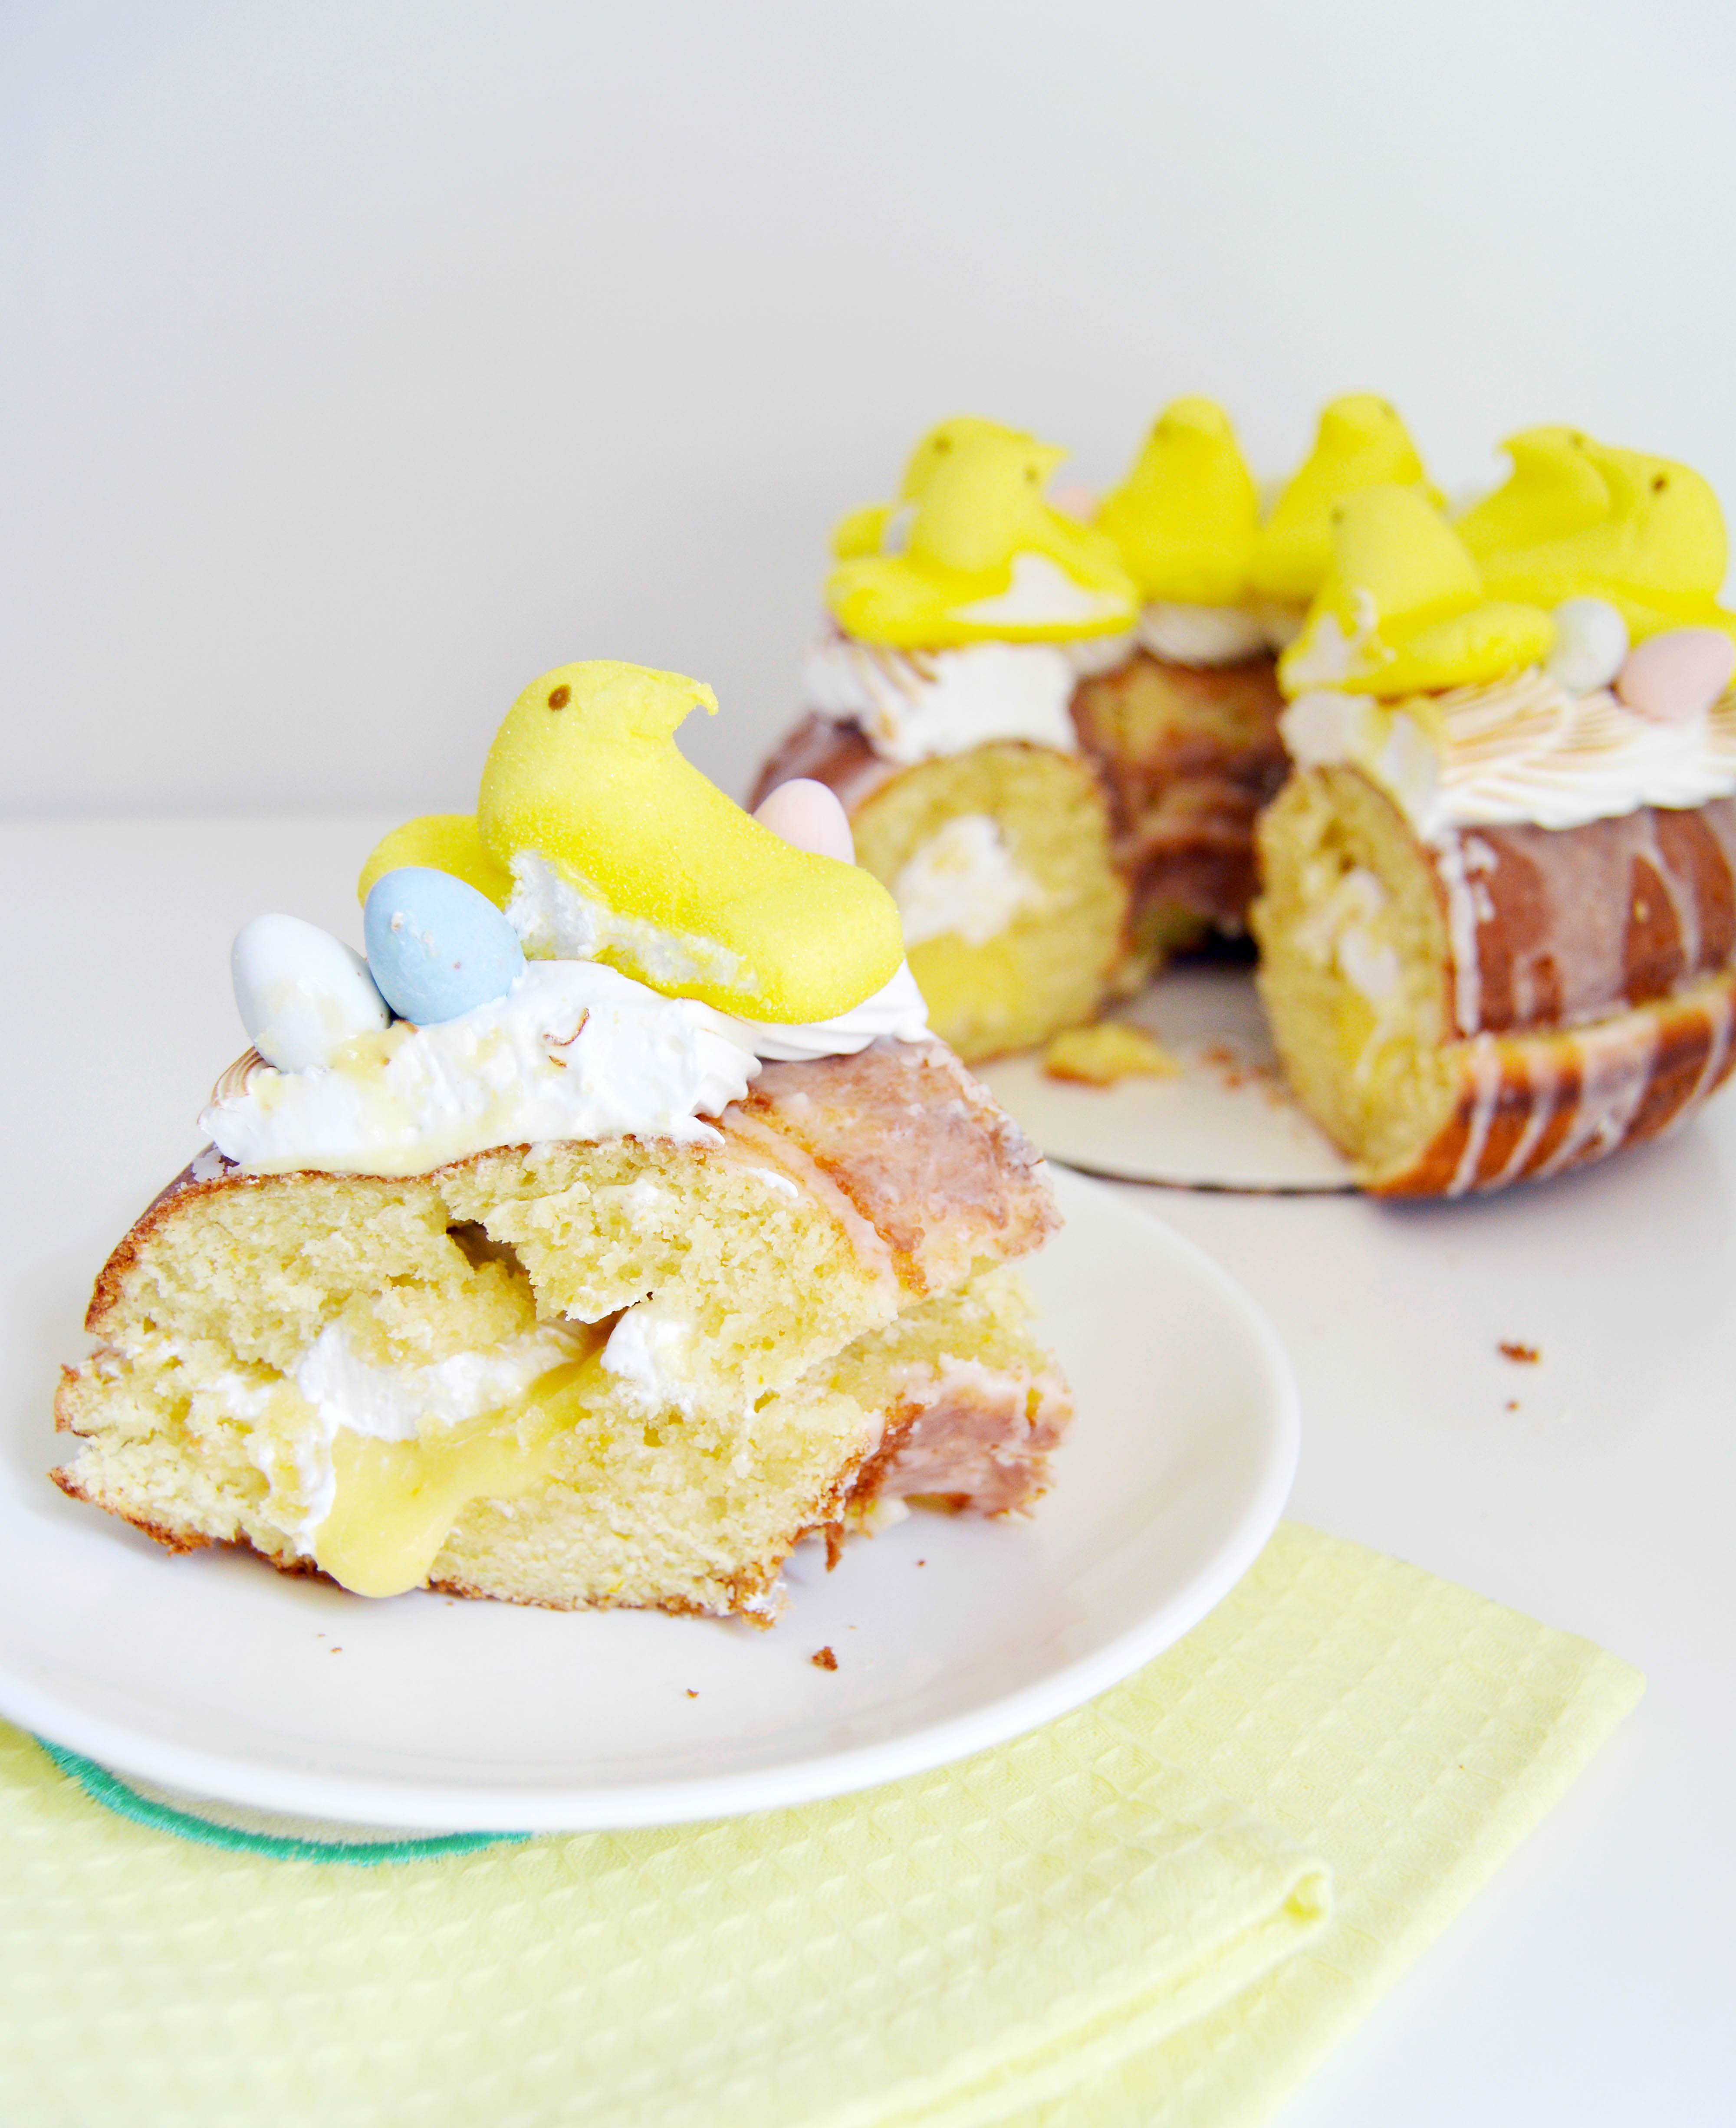
 When Easter rolls around, seasonal bunny, egg and chick themed candy appear and I think Peeps is the most iconic Easter candy of them all. I know they come in different shapes and colors, (they even have peeps flavored milk these days) but I think the OG is the yellow chick peep. Super bright in color with a squishy marshmallow interior, it makes me feel like it should be lemon flavored. This is where I got my inspiration from. As for the doughnut shape, well anything doughnut is superior to plain cake. No?

 I happened to have a giant doughnut cake pan set from Williams Sonoma, which they don’t sell anymore but this cake can be made with two 8” cake pans if desired. Or, you can carve a hole in the middle and make yourself a makeshift doughnut cake too.
 Meyer lemons are popping up everywhere this season, so this cake is filled with all things lemon. It’s a lemon cake, filled with lemon curd and topped with a lemon glaze. As for the marshmallow component, it’s filled with my favorite marshmallow frosting and also topped with a toasted marshmallow frosting that when you put the chicks in, the browned top kind of looks like a nest. I decorated mine with a few Cadbury min eggs (the best chocolate egg candy IMHO) to give that nest feel a little more oomph. Seasonal in flavor and themed, it’s the perfect baking project for this weekend. 🙂
 Here are other Easter themed blog posts from the past:
Easy Peanut Butter Eggs
Easter Bunny Surprise Cake
White Chocolate Tiramisu Eggs
Bunny Cake Pops
Giant Peeps Doughnut Cake (Meyer Lemon Marshmallow Doughnut Cake)
You will need:
1 batch of meyer lemon cake (recipe below)
1 batch meyer lemon curd (recipe below)
1 batch meyer lemon glaze (recipe below)
1 batch marshmallow frosting (recipe below)
Cadbury mini eggs
yellow marshmallow chick Peeps
Instructions:
- Carve a small ditch around each half of the doughnut cake, making a tunnel for the filling.
- On the bottom half of the doughnut, fill the cavity with the lemon curd.
- On the top half of the doughnut, fill the cavity with marshmallow frosting.
- Sandwich the bottom and half together and set the cake on top of a wire cooling rack and pour the lemon glaze over the top, letting it dribble down the sides.
- Fill a piping bag with a large open star frosting tip (the one with a lot of teeth, not the one with 5 teeth) with the rest of the frosting.
- Make a swirl pattern all over the top of the cake.
- Use a kitchen torch to toast the tops of the marshmallow frosting.
- Place a marshmallow Peep all around the cake.
- Decorate the empty spaces with the mini eggs.
Meyer Lemon Doughnut Cake
Ingredients:
8 oz (2 sticks) unsalted butter
1 ¾ c. granulated sugar
4 extra-large eggs, at room temperature
¼ c. grated meyer lemon zest (3-4 meyer lemons)
3 c. all-purpose flour
½ tsp. baking powder
½ tsp. baking soda
1 tsp. kosher salt
¼ c. meyer lemon juice, freshly squeezed
¾ c. buttermilk, at room temperature
1 tsp. pure vanilla extract
Instructions:
- Grease and flour the two doughnut pans. Preheat the oven to 350˚F. (The cake pan I used is discontinued but this product is similar.)
- In a medium bowl, mix flour, baking powder, baking soda, and kosher salt. Set aside.
- In another bowl, mix lemon juice, buttermilk and vanilla extract. Set aside.
- In the bowl of a standing mixer fitted with the paddle attachment, cream sugar and butter together until light and fluffy.
- Add eggs one at a time until blended and then the zest.
- Add the flour and buttermilk mixture alternatively to the batter, beginning and ending with the flour.
- Divide the batter evenly between the two pans, smoothing the tops.
- Bake for 30-40 minutes, until a toothpick inserted into the cake comes out clean.
- Let cool in pan for 10 minutes, then remove from pan onto a wire cooling rack and cool completely.
Meyer Lemon Curd
Ingredients:
2 tsp. meyer lemon zest
½ c. meyer lemon juice, freshly squeezed
½ c. sugar
2 large eggs
pinch of salt
4 oz. (1 stick) unsalted butter, cut into 8 pieces
Instructions:
- Simmer about an inch of water in a small pot.
- In a medium metal mixing bowl, whisk together the zest, juice, sugar, eggs and salt.
- Add the butter to the mixing bowl and set the bowl over the pot of simmering water and whisk mixture continuously until mixture thickens and reaches 160˚F, about 5 minutes.
- Strain the curd through a fine meshed sieve and refrigerate to thicken completely.
Meyer Lemon Glaze
Ingredients:
2 c. confectioners’ sugar
¼ c. meyer lemon juice, freshly squeezed
Instructions:
- Whisk together sugar and meyer lemon juice until smooth.
Marshmallow Frosting
Ingredients:
3 large egg whites
¾ c. sugar
¼ tsp. cream of tartar
1 tsp. vanilla extract
Instructions:
- Simmer about an inch of water in a small pot.
- In the bowl of a standing mixer, whisk together egg whites, sugar, and cream of tartar.
- Place the bowl over the pot of simmering water and whisk constantly until sugar is dissolved, 3-4 minutes.
- Transfer the bowl to the standing mixer fitted with a whisk attachment and whisk on high speed until white glossy, stiff peaks form.
- Add the vanilla extract and mix until combined.
Meyer lemon cake and glaze recipe adapted from Ina Garten.
Meyer lemon curd adapted from Epicurious.
Marshmallow frosting adapted from Martha Stewart.

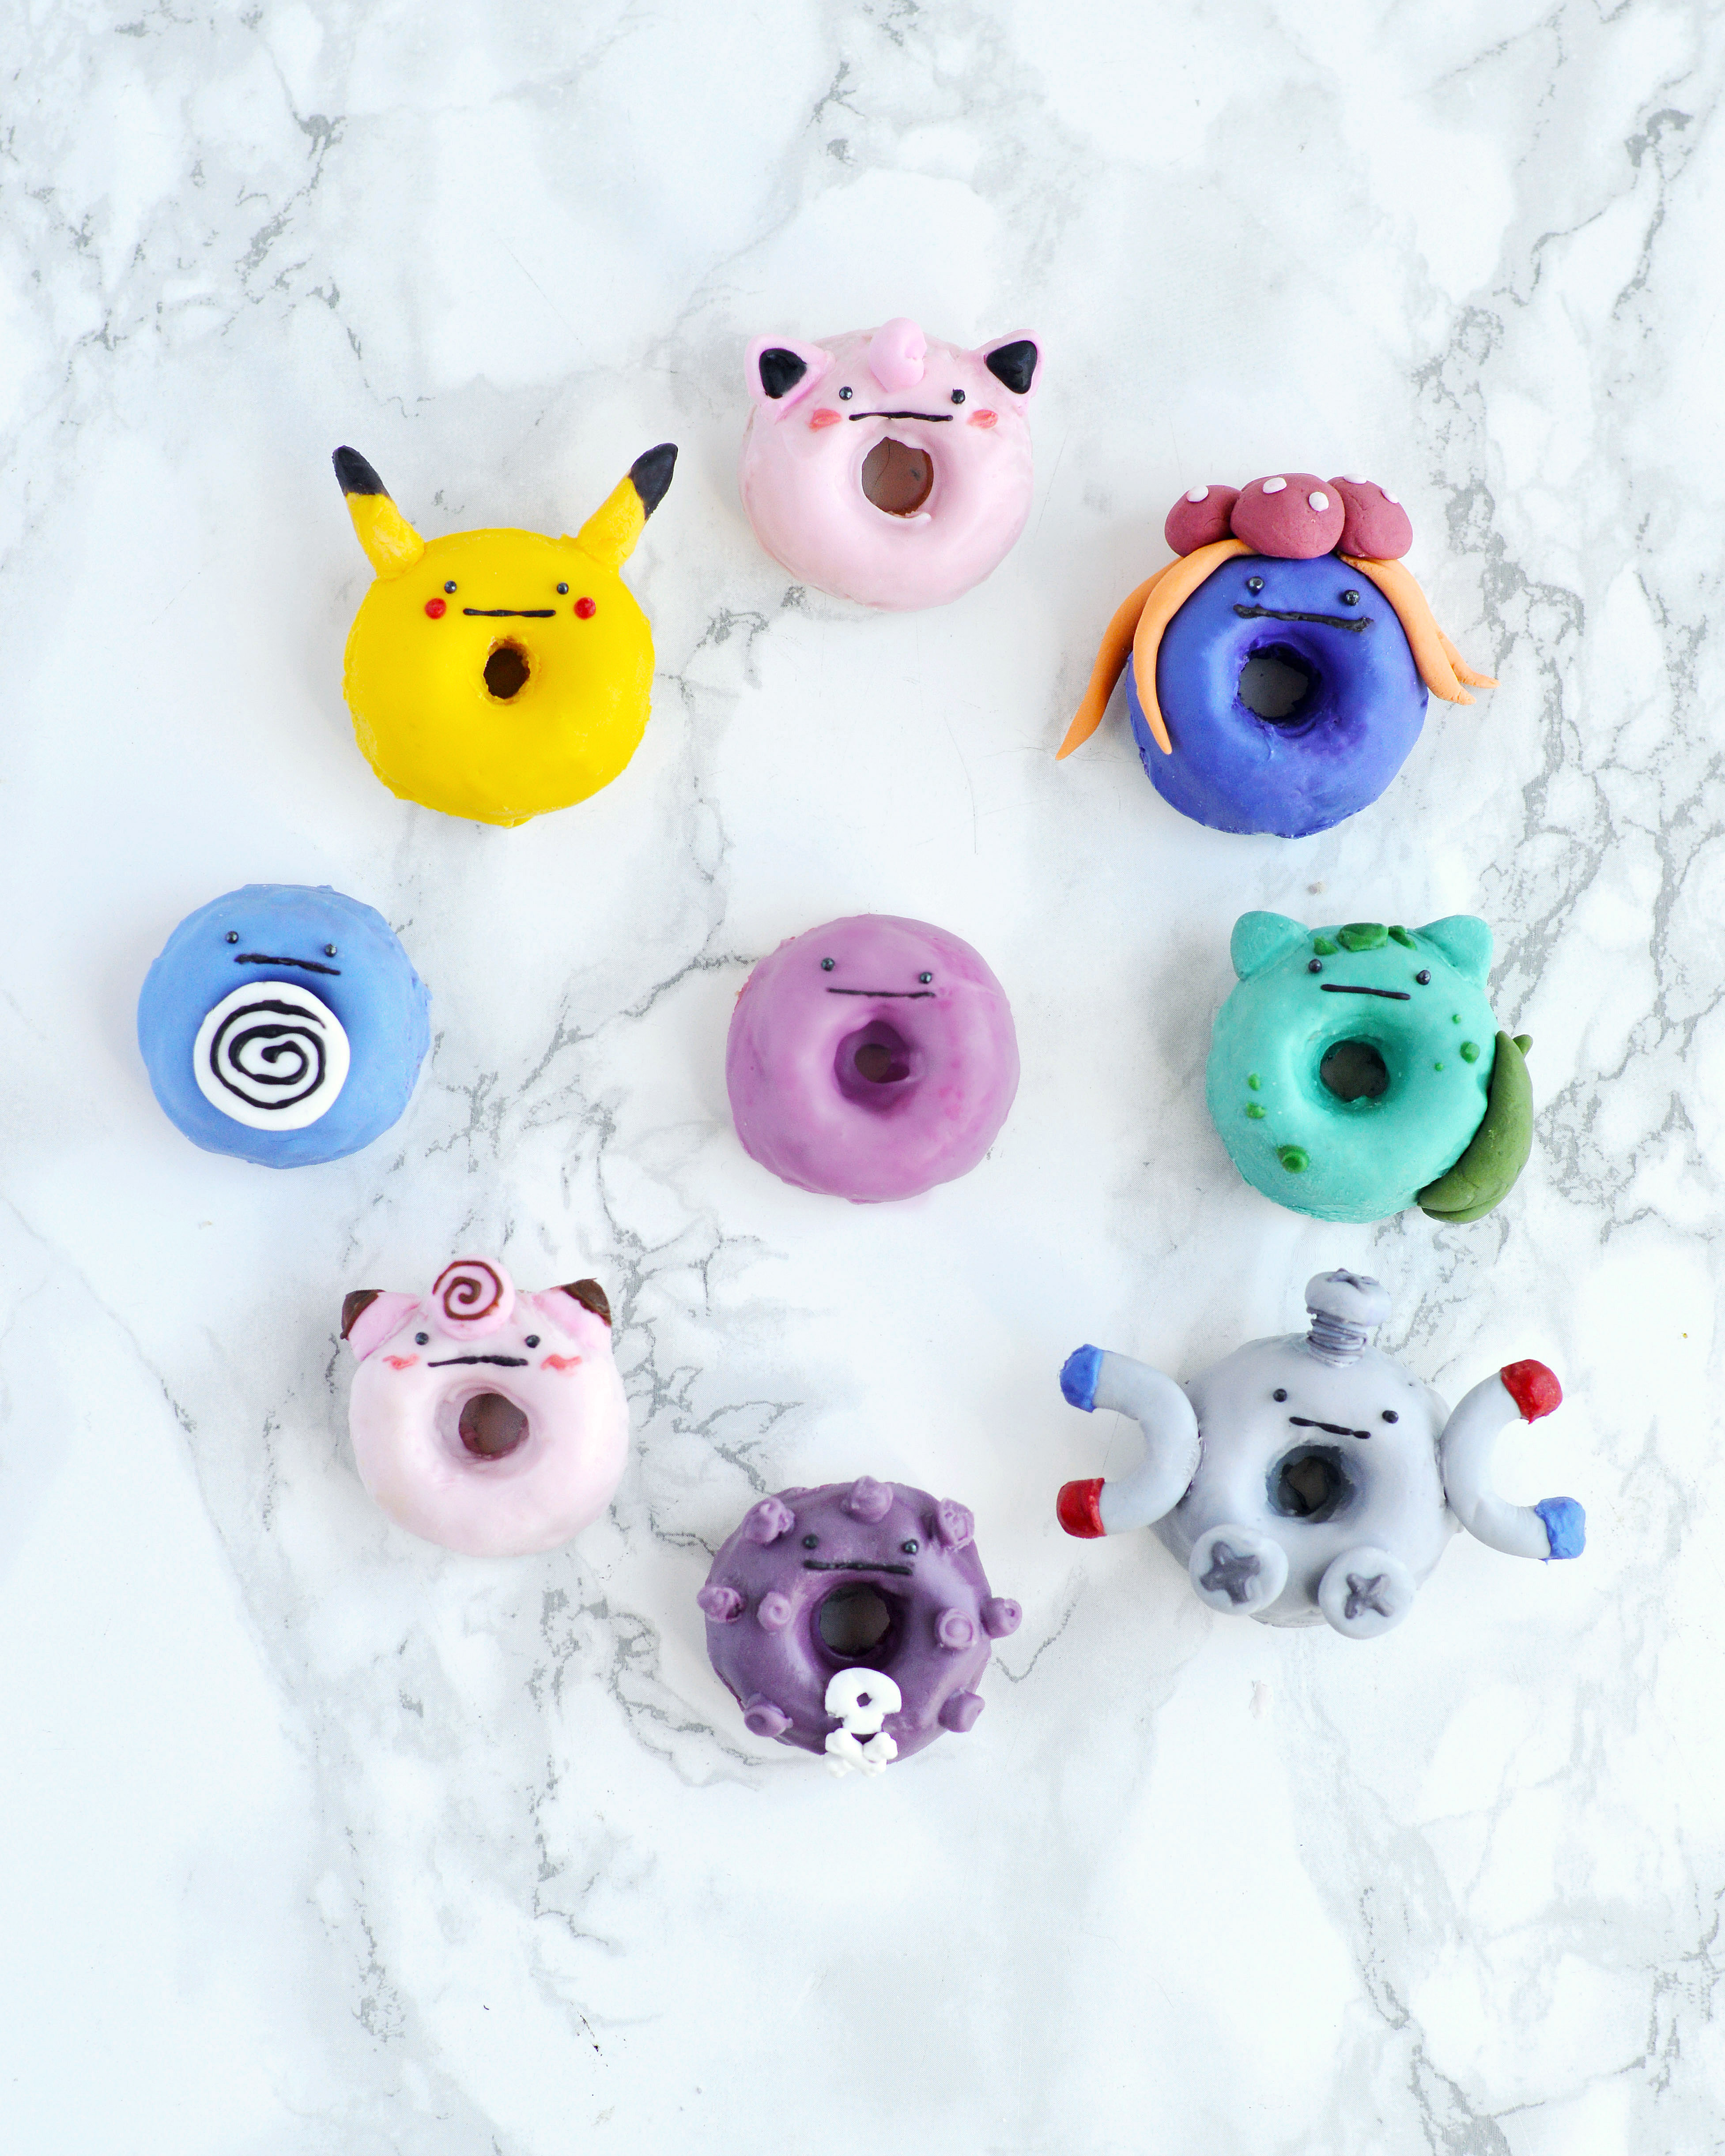 I remember holding a Gameboy Color in my hands for the first time. My brother had bought it with months of saving up for it and I couldn’t believe the handheld color display. Along with the Gameboy he purchased Pokémon Red, which was just starting to get its hype. I loved that game and spent hours leveling up Pokémon and discovering glitches like the MissingNo.. This glitch let you duplicate rare candies infinitely which you then used to up your team to level 99. Honestly, leveling up your team so high is useless because you can beat the whole game with much less, but bragging rights seem to never go out of fashion. And while Pokémon Red has a special place in my heart, Pokemon Silver has to be the best one out there. (Don’t @ me, please.)
 I’ve made Star Wars doughnuts in the past, so I thought it’d be fun to do a Pokémon version. Only this time I decided to make them into Ditto versions. If you didn’t know, Ditto is a Pokémon that copies the abilities and appearances of other Pokémon except for their face. I guess this was a way of keeping the same simple face while making fun appendages. But honestly, I think they’re very cute in their own right. Just look at all the plushies that are made of them!
 If you follow me on Instagram, you can see the process of making some of these. Click below to be taken to the page: